Clean, Clean, Clean
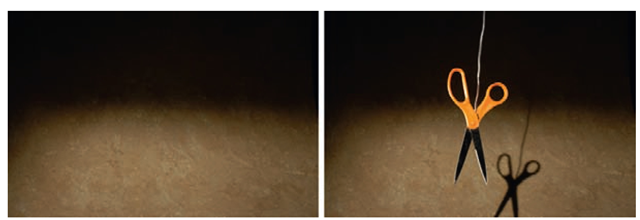
To composite images together requires several steps beyond match lighting and eyeline considerations. You may choose to use visible rigs that need to be cleaned out or removed for final viewing. You may have some unwanted dirt or shadows that somehow crept into your shot. The solution absolutely essential for this kind of cleaning is called the clean plate. The clean plate is a shot (often two or three) of the background set or image without the figure or moving object in the foreground of the frame. This clean plate needs to maintain the same lighting and background elements that you use during the animation. It is often shot just before the animation of your figure or object begins. For safety, it is smart to shoot a second clean plate just after you finish the animation (after removing the foreground image or figure).
Fig 10.7 a shot of a clean plate next to the same composition with a foreground element.
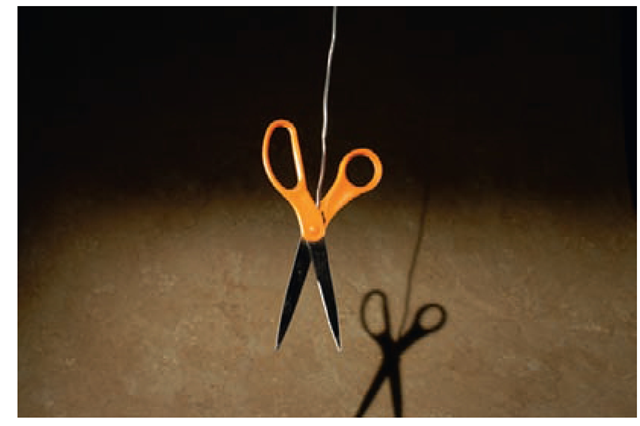
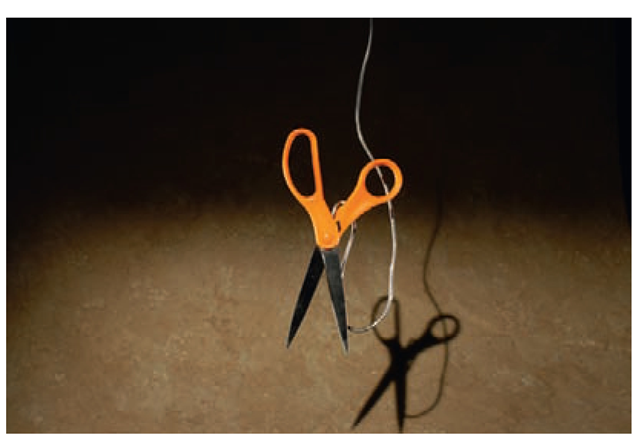
Your support rig should have a minimum of junctions with the animated object or person. Ideally, you only want one intersection of the support rig and the animated object. This makes the cleanup go much faster. If your object is near a wall or someplace where the animated object casts a shadow, then you want to make sure that, during the shooting, the rig does not cross the shadow area of the animated object. The shadow is very difficult to replace, because the clean plate does not have the same shadow in it.
FIG 10.8 The ideal rig support placement.
FIG 10.9 Too many junctions with the rig and object, with the rig covering the object shadow.
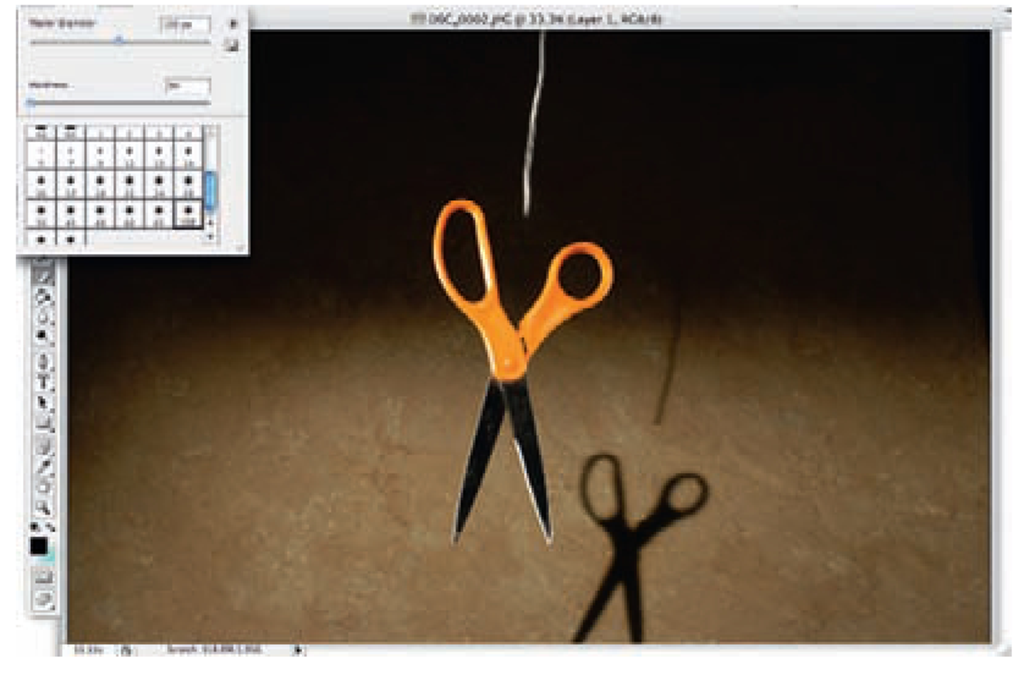
Several different programs and techniques can be used to clean rig supports, but to get the principle across, I use Photoshop as the demonstration tool. Programs like After Effects are ideal for this kind of work, because they utilize the power of layering from Photoshop, but they do it more efficiently in a timeline. If you captured your animated scene on a flash card or in a program like Dragon, then you have all of your shots in a folder sequentially numbered. Dragon exports these images to a Quicktime movie, but you have to import the images from a flash card to a program like Final Cut or Quicktime Pro, using the image sequence option for exporting to a movie. Before you make your final movie from the scene, you have to remove those cumbersome rigs. This has to be done frame by frame. In Photoshop, you can use some shortcuts, like "batch" processing frames. In the new extended version of Photoshop, you can import Quicktimes and image sequences. A timeline in this Photoshop allows you to work on individual frames in a sequence. Ultimately, this is a slow, meticulous process and requires careful scrutiny on a frame-by-frame basis. No matter what approach you take, the goal is to place the clean plate on every animation frame that has a rig or cleanup issue as a background layer. It can be helpful to use a rig support that has a different color than your model so the delineation of the two elements is easier to distinguish. Carefully erase the rig and rig shadows of the animation frame on the top layer, revealing the clean plate behind it. These should match in placement, color, and light. I often use a small, slightly feathered eraser at the interface point of the rig and animated object being supported. It is possible to use a larger feathered eraser for the rest of the rig, because the rest of the rig is less critical in its placement.
FIG 10.10 The eraser tool wiping out a rig.
Once all your frames have been cleaned, which should include any camera dirt or burned out pixels from the image sensor, you want to re-export those new frames to a Quicktime movie. Often you do not see some of the more subtle imperfections in a shot until you see it in "running time." You may have to go back and address those problems for the particular frames that need additional work.
The Chroma Key
Chroma keying is becoming more prevalent in stop motion, because it allows an animator to work with individual components or objects separately in any shot. This often saves space and massive set building. There are many uses for chroma keying, so I asked Jeff Sias, who, along with his partner Bryan Papciak, run a small studio in Boston called Handcranked Productions, to create a chroma key exercise that explains the process.
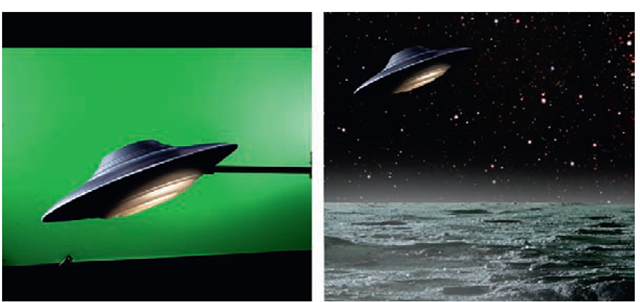
Chroma keying is a compositing term, meaning that anything of a particular color in frame will be eliminated through the process of "keying out" that color. If shooting with a green screen, then anything green in frame will be removed and become transparent. This allows you to composite your subject onto a new background. For this exercise, let us imagine that your subject is an animated flying saucer and you would like to composite it into a real-life live-action night scene.
The first thing to do when planning a chroma keying shot is to determine what color you will be using as a keyable background. The typical keying colors are pure, saturated, and evenly lit green and blue, because those are the colors least present in human skin tones. It is important to pick a screen color that is not part of your subject, so that your key will be nice and clean. For example, if the flying saucer is silver and has a blue stripe around it, you want to use a green screen background so that you don’t lose the blue stripe in the keying process.
The next step is to plan the movement and animation of your subject. Remember that, once you key out the background color, your subject can be moved around the frame freely, scaled and rotated however you like. You can animate the saucer hovering and spinning in center frame, but plan to animate and scale its larger movement as part of the compositing process within After Effects.
Using a two-layer multiplane downshooter, set up the lower plane as the green screen with the saucer animating on the top glass plane. For the green screen background, use a solid tone supersaturated green card or cloth. Focus the camera lens on the saucer; you can let the background go out of focus, which will actually help the green screen key better. Think carefully about the lighting of the flying saucer and the scene it will be compositing into. In this case, the flying saucer might be lit as if with soft blue moonlight.
Once animated, you must bring the frames into your editing program as an image sequence or Quicktime movie. With After Effects, you can import either a Quicktime movie or a folder of sequentially named images. Either way, you end up with your animated saucer as a single clip, ready to key and composite. You want to import your background footage of the night sky at this point, too.
Once you set up a working sequence in After Effects, add your background footage as the bottom layer in your timeline and your saucer footage on top of that. Select the top saucer layer and go to the menu item Effects ^ Keying ^ Color Key. Once the Color Key effect is applied to your saucer layer, you must pick the color it will key. Click on the little eye dropper tool in the Filter window and use it to pick the green color on the saucer layer. Pick a point fairly close to the saucer’s edge as this gives you the cleanest key. If you have a nice, evenly lit green screen, you should immediately see most of the green around the saucer disappear, revealing the background night sky layer below. Play with the Color Tolerance parameter until all the green is gone. If you cannot remove all the green, you can always create a simple "garbage matte" to remove the rest. The point is to get the edge of your saucer as clean as possible.
To make the composite of the saucer perfect, there are still a few more steps. First, play with the Edge Thin and Edge Feather parameters.
These affect the edges of your saucer matte and clean up any jaggy lines. It is important to soften the edges of the saucer slightly so it marries into the background better. You may also want to apply a "De-spill" effect, which helps remove any green tinge or green reflections on your saucer.
Once you have a nice matte, you will likely want to apply a color correction filter to your saucer layer. In this case, you want to darken the saucer, give it more contrast, and add a dark blue or purple cast to it. This helps it feel integrated into the dark night sky. Key framing these color correction effects as the saucer "flies" through the scene further enhances the illusion.
Let us do a simple animation of the saucer flying into frame, hovering for a few seconds, and then flying off. Use your animation skills to think about how the saucer would move into frame. All you have to do is set a few key frames so the saucer starts small, zooms into the frame, hovers for a few seconds, and zooms off into the distance. All this can be achieved with only a few position and scaling key frames. Because you animated a slight hovering motion on the downshooter, you retain a nice stop-motion feel to the shot.
FIG 10.11 An example of the flying saucer on the green screen and matted onto a background
As a last note, you may want to click the motion blur button of the saucer layer. This adds a blur to the frames where your saucer is moving fast, which adds a touch of realism and really helps your saucer feel like it is integrated into the background.
As you get more comfortable with the chroma-keying and compositing processes, you can try other keying filters and color effects. Keying and compositing are a whole specialty in and of itself, with many techniques and filters to try. But, understanding the basic concept and keeping your green screen evenly lit gets you great and believable results very quickly.
