Preproduction
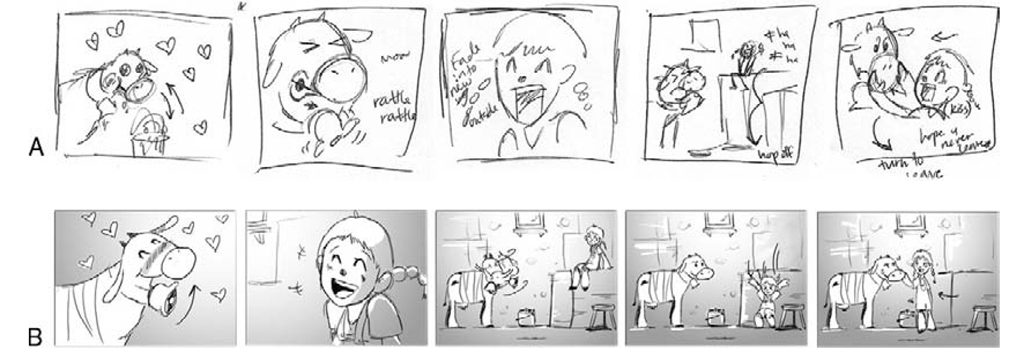
Your concept and script need to be translated into visual language for you to know how to prepare for a shoot. This is the storyboard. Storyboarding can be a career unto itself, and some highly talented people work in this arena. The critical job of the storyboard is to force you to think through your idea carefully, map out a plan of production, and help communicate with the people involved in the production. The storyboard does not have to be beautiful. It needs to be practical and communicate your idea visually. If you are creating a film for a potential client, especially one that may not have your visual imagination, then a well-rendered and clear storyboard becomes essential. If you are making a film for yourself or a few friends, who may help you in production, then a "thumbnail" or simple stick-figure rendering of your idea suffices.
FIG 2.7 Images of "thumbnail" boards. a is a thumbnail and B is a finished storyboard.
The use of reference material in this phase is a must. What does a gila monster look like? What is the scale relationship between the Empire State Building and an igloo? What color is Mars? If you have no idea then jump on the web and get some photographs and images to become informed. You can then distort this information, but you need to know the truth before you go off on a tangent. Even if you create something that has never been seen before, you still may need some reference for texture, details, or color. Reference material is where it all starts visually. If you do not draw very well and cannot get someone to help, then you might consider creating a photographic storyboard with a digital still camera. This approach requires that you go out and find images you can photograph with your digital single-lens reflex (dslr) still camera, or images in magazines, on the web, or from other visual resources. By using some simple cutting and pasting in a program like Photoshop, you can create your own storyboard that clearly communicates the narrative or ideas you need to show to tell your story. This is especially appropriate for the production of a pixilated film. Between reference material and photographs, you can create a storyboard that reminds you of how you planned the production, and it can communicate your intentions to your small crew.
FIG 2.8 Images of a photographic storyboard. a is a simple cut and paste photographic storyboard.
B is a finished photographic storyboard with background.
Drawing is a great skill, one that I would encourage, but if the skill is not available, then there are other ways to lay out a storyboard and move your production ahead. Storyboarding for time-lapse and certain pixilated films may be close to impossible to draw out because it relies so much on the eye of the cinematographer and director when on location. Simply writing down shot ideas in sequence and what you want to accomplish with each shot can be very helpful. You then have to be open to what happens in the field. In time-lapse animation, it is absolutely critical to observe the event that you want to photograph. You need to know how long an event takes to unfold, what the subjects do, how the lighting might change, and how the general environment, like weather, might change before you shoot the final shot.
You need to scout a location first. If you cannot scout a location or event before you shoot a time-lapse film, then you need to get information about the weather, accessibility of the location, and what sort of traffic crosses through your focused area. This research and environmental anticipation can be done on the web or by talking to people who have been in the area you want to shoot. This is all preproduction, the planning and preparation necessary to execute before you enter the actual production stage. It saves you a lot of time, effort, and helps give clarity to your idea. It forces you to think through the process and solve problems before they arise (which will happen in the field or on the downshooter during the actual shooting). Preproduction does not eliminate all the potential problems but it resolves the majority of them and focuses your vision. Alternative stop-motion techniques are not an exception from all other types of animation when it comes to preproduction.
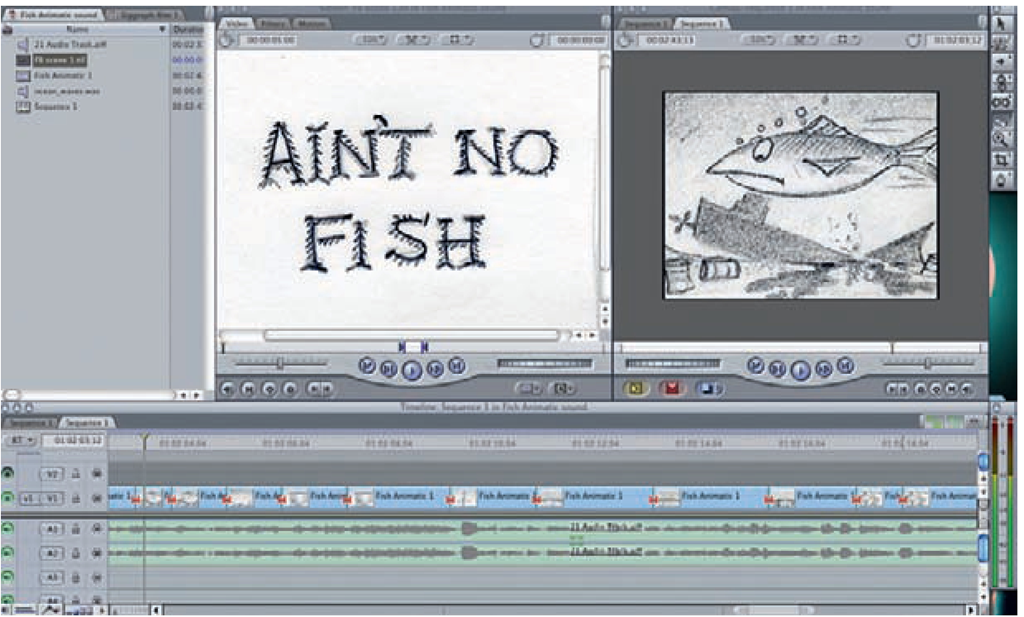
Many directors and animators like to take the preproduction process one step further. They make a moving storyboard, or what is known as an animatic. An animatic puts all the storyboard panels into a timeline and makes a movie of the artwork. It should be timed out to match the final timing of your film. You can make adjustments to the animatic, and it helps determine the final cut of your animated film. Often animation can be pre-edited through this process. The advantage of this is that you do not overshoot the animation footage, which is a very time-consuming, expensive, and potentially exhausting experience. It forces you to look at the overall flow of your film, check for consistencies, and have an idea of the dynamics of your shots all together. It is critical to look at the big picture. Once you capture the final footage, then the corresponding artwork shot for the animatic can be replaced by the final footage. The sound and dialog play an important role in this process.
FIG 2.9 Animatic on a timeline in Final Cut Pro,
One step I practice and encourage all alternative stop-motion animators to consider is shooting some test footage before the actual production begins. If you are pixilating someone, then try the action yourself in front of the camera and get a sense of the pace, action, and timing. Try your actor out in a test and give the person a chance to practice this arduous technique, so you can see how he or she acts and how you want the ultimate action to look. This is the time to have a bit more confidence with your shots because you cannot make mistakes in a test. Allow yourself the spontaneity that can often birth new and exciting ideas to apply to your film. If you have no one to help you test a pixilated idea, then set your camera to run on a time-lapse interval and test a particular movement on your own. If you plan to shoot a time-lapse event, then take your time-lapse camera and shoot a test of the event and see if you need to consider an adjustment to your exposure or interval between exposures. Cutouts or sand on glass have their own properties, and a trial run will inform your initial animation shots and improve your technique right out of the gate. There is often a tendency to jump right into production shooting, with no time allowed for testing.
I cannot tell you how many times I have heard animators complain about their initial shots, because they were learning everything on the first shots and made adjustments in later shots. The desire to reshoot first shots is strong but often schedules do not allow this. Testing can resolve this issue. There really is no reason not to test and experiment before you commit to your final film.
Testing requires equipment, and this is one more issue that needs to be addressed before final production begins. Pixilation and time-lapse animation utilize equipment that is familiar to live-action filmmakers. Cameras, computers, tripods, lights, and grip equipment, like flags, C-stands stands, sandbags, and gaffer’s tape, can all be used with these alternative stop-motion techniques. The downshooter requires an animation stand and this crosses over into the more traditional animation realm. All alternative stop-motion techniques have a camera as the primary piece of equipment. After all, we are stopping the camera frame by frame and manipulating the images in front of the camera, whether on a tripod or a downshooter, very much like the first "trick films."
Equipment and Setting Up
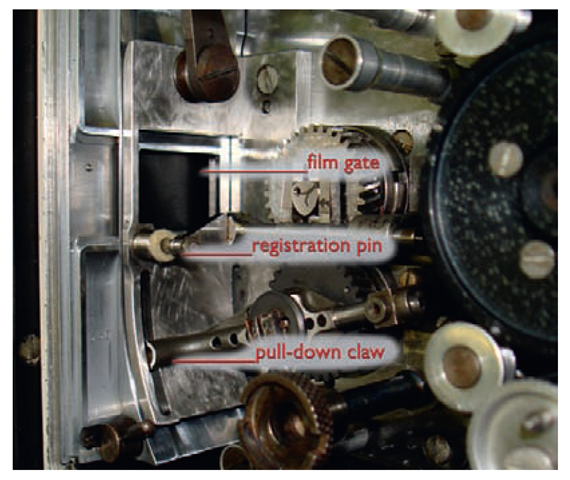
For decades, the movie film camera was the primary capture system. Kodak, Bell & Howell, and Mitchell cameras were steady and reliable animation cameras. Other cameras were used, but the key element that made a good stop-motion film camera was known as pin registration. Basically, this means that the camera has the ability to place the individual frame to be exposed in the exact same position in front of the film gate as the previous frame through placement pins. This eliminates the weave and bobbing up and down that can occur when films are projected.
FIG 2.10 Image of a Mitchell camera with pins.
These days, like many things, digital technology has put the animation film camera to rest. The two main digital cameras used are the digital video camera and the dslr camera. There are advantages to each camera, and this is explored in subsequent topics. Remember that we need the ability to shoot one frame at a time. Digital still cameras are ideal for this approach because they were designed to take single still pictures. Most digital video cameras can be controlled to shoot single frames through the animation software that you need to use. All images that come through a digital camera are digitally registered in size and placement, so there is a steady image when single frames are strung together to make a movie. Having a camera that has "manual" controls is critical for a steady image. Canon and Nikon are two leading brands in the digital SLR arena and Sony and Panasonic are two popular brands in the digital video approach. Many more brands work well and satisfy the requirements needed for alternative stop motion techniques.
FIG 2.11 Image of a Panasonic digital video camera and a Canon digital still camera.
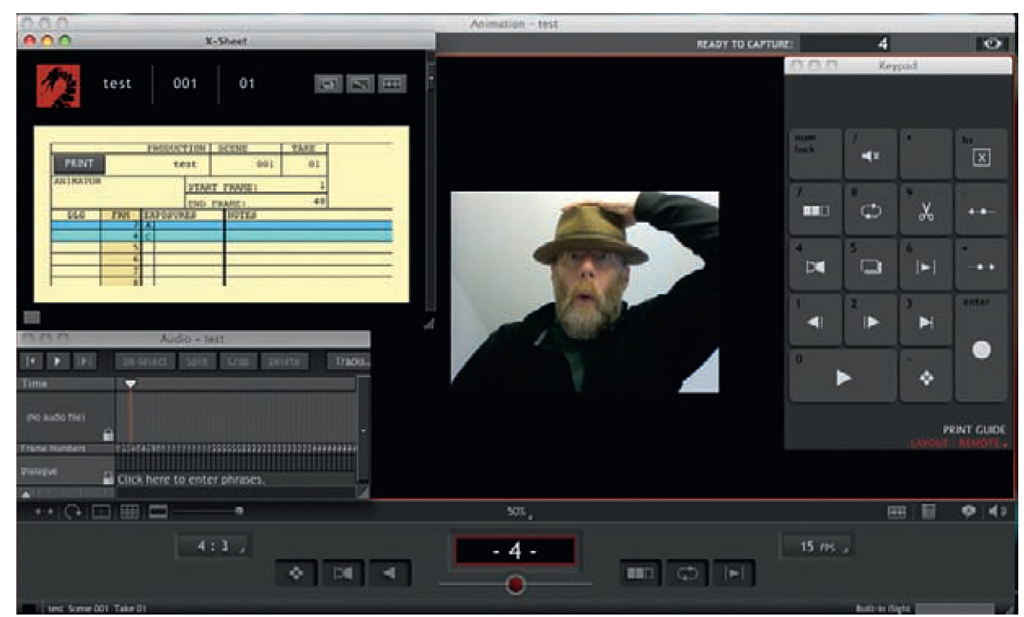
The computer software that makes animation possible and easier to execute is known as capture software. Several different brands are listed on our associated website and mentioned through this topic. Dragon Stop Motion and Stop Motion Pro are ubiquitous across the globe. Several features are common to all good capture software. They need to show you a "live" frame coming directly in from your camera. The ability to compare the previously captured frame and the live frame allows you to monitor the amount of movement your subject has registered. It is important to be able to step through all your frames one frame at a time so you can see the sequence of movement, and the software needs to have an instant playback at various frame rates so you can see your final animation. The better capture software programs have many more features that allow you to refine your animation and animation technique. They also work on Apple and PC platforms.
Several inexpensive and free capture software programs, like iStopMotion, Framethief, and Anasazi, are available for novice animators, but these programs can have support, technical, and capability limitations and may frustrate the more advanced stop-motion animator. They are great starter programs but are not quite up to the depth of the previously mentioned programs.
FIG 2.12 Image from the "screen grab" of the Dragon Stop Motion interface.
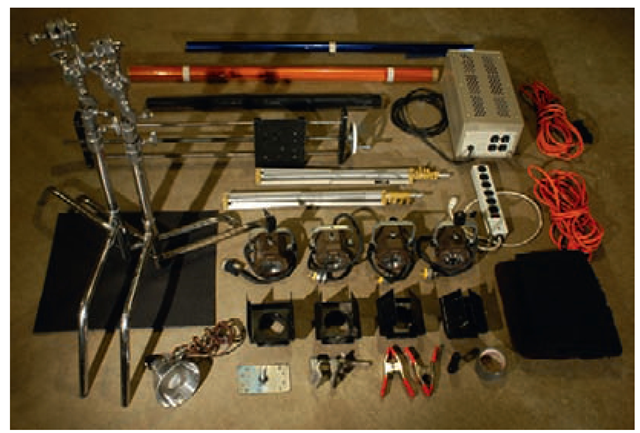
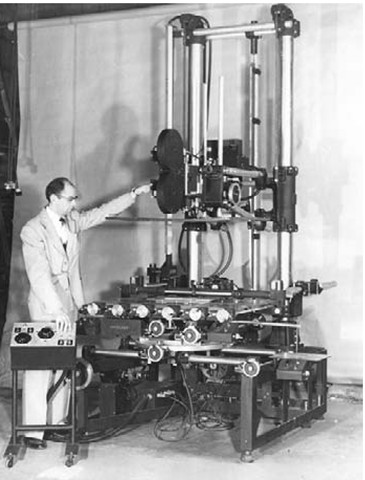
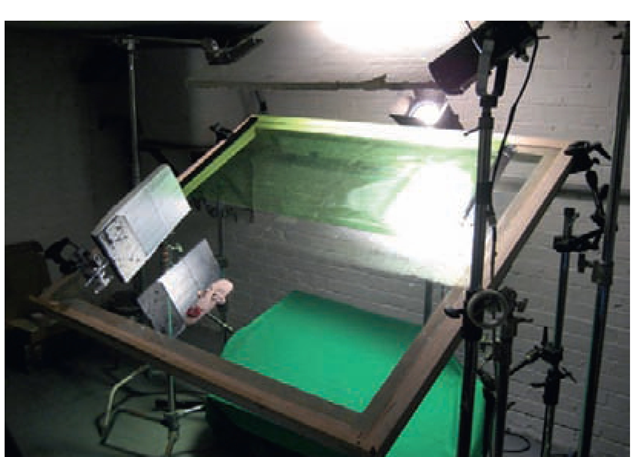
Similar to live-action photography and live-action movie making, all stop motion requires a "grip" package. This may include tripods, lights, flags, electric chords, voltage regulators for lights, sandbags, gaffer’s tape, and potentially motion control for moving the camera. We will explore these elements in more detail but it is important to know what is required by your particular script or idea. Naturally, for downshooting, an animation stand is required, but the stand comes in various forms. This can range from a classic Oxberry animation stand right down to a camera on a tripod pointed down at 45° angle toward a tabletop. The Oxberry animation stand is like the Rolls Royce of downshooters. It offers weight, stability, and very accurate, dependable registration systems, like machined peg bars used to perfectly match one cel or drawing to the next. Often Oxberry stands, which are designed for both 16 mm and 35 mm film cameras, are computer controlled with stepping motors that drive the various components of the stand, like the shooting table, the lighting, and the mounted camera. Most downshooting producers custom build their own stand for a fraction of the cost of an Oxberry, and it suits their needs quite well.
FIG 2.13 Image of grip equipment (lights, flags, voltage regulator, c-stands).
FIG 2.14 Image of Oxberry animation stand.
FIG 2.15 A custom downshooter,
During this preplanning/preproduction process, you need to think through all of your shots and determine the most efficient and effective way to shoot your production. Examine your budget, space to shoot (if it requires a controlled studio environment), and the amount of time you have to shoot.
Let us move into one of the most popular forms of alternative stop motion. Pixilation can be direct and simple when practiced by novice filmmakers or it can be very sophisticated. Of all the various types of stop motion, pixilation can be a bit more spontaneous in production because it is very hard to control humans frame by frame. If you are out in the field, it is hard to control natural light and any peripheral activity. With the proper planning, observation, and application of this technique, the results can be very satisfying and fresh.
