Technique
Save Time By
Setting up new users on your computer quickly and correctly
Choosing security settings that are right for you
Understanding the crucial difference between accounts
Avoiding the bogus information you see in print about the Guest account
If you’re connected to a Big Corporate Network (BCN), skip this technique entirely. The network administrator controls all the user capabilities on a Big Corporate Network. The only way you can change anything about users on a BCN is by convincing or cajoling the network administrator into changing things. Bribery may work. Calling him the “Network Admini” is not recommended.
On the other hand, if your computer sits by itself in a corner, or if you have a peer-to-peer workgroup network, setting up accounts for each person who uses the computer can be a worthwhile, timesaving endeavor. It won’t do much to keep prying eyes from viewing your files, unless you go to great lengths to hide things, but having one account for each user can go a long way toward keeping people from accidentally bumping into each other.
This technique tells you what you need to know about user accounts. It also gives you the straight story about many topics that have been garbled in the press and online: Much of what you may have read about Guest accounts and the Administrator account is accurate for Windows 2000, but completely wrong for Windows XP. This technique sets the record straight.
Grasping User Accounts
If you bought a new computer with Windows XP installed, it probably has two accounts: the Administrator account and the Guest account. You may or may not be able to see either or both. When you first turned on your computer, it may have prompted you to create a new account.
If you installed Windows XP, you set up one or more accounts for the people who will be using the computer. Thus, a minimum of three users are generally available: the Administrator account, the Guest account, and whatever account you set up — probably one with your name on it.
Microsoft has jimmied things a bit, so you may never see the Administrator account or the Guest account. That’s probably a good thing. You need both accounts, whether you realize it or not — yes, even if you tell Windows to disable the Guest account because you think it reduces security exposures (it won’t, as you see later in this technique).
You have only two good reasons for adding more accounts to your computer:
Security Convenience
Most people add new accounts to their PCs because they think that doing so keeps other users out of their files. That’s bogus. Unless you understand the details, adding a user account to keep people out of your files is a waste of time. Boosting security on a plain-Jane Windows XP computer entails much more than setting up a password-protected user account or adding a password to your own account. See “Increasing security with passwords,” later in this technique.
On the other hand, having separate accounts for each person who uses a computer can be enormously convenient. It’s also a good way to keep neophytes from accidentally clobbering other users. Many a time-consuming tragedy has been averted this way. In some situations, you can keep other people out of your files by adding new accounts, but the process is difficult and entails some risk (see Technique 48).
Recognizing account types
Windows XP set up on a Big Corporate Network (a client-server domain network) inherits all the account security restrictions imposed by the server. Nothing in this technique applies to PCs running on a BCN. To do anything, you have to contact your network administrator.
In all other circumstances, Windows XP has two built-in types of users:
Computer Administrator: This account has full access to everything on the computer.
Limited user account: People with this type of account can change their own settings, read and write files in their own My Documents folder, and look at files in shared folders. That’s it.
Although changing the capabilities of these two types of accounts in some circumstances is possible, at least in Windows XP Professional, you’re better off not trying. (You can also add new types of accounts in Win XP Pro.) Making mistakes with difficult, time-consuming repercussions is easy. Stay away from the Windows XP Professional Local Users and Groups console unless you know what you’re doing, and you have an overwhelming reason to change how these types of accounts work.
Chances are pretty good your computer has three accounts:
One with your name: This is a Computer Administrator account (not to be confused with the Administrator account), with full control over the machine. My original account is called .
Administrator: That’s the name of the account. In most cases, you can’t see the account called Administrator. That’s why it’s so confusing. The Administrator account is, as you might imagine, a Computer Administrator account. With apologies to Joseph Heller, Administrator is kind of like having an Army Major called Major Major.
If you have Windows XP Professional Edition, you gave Administrator a password when you installed Windows — even if you don’t remember that password. If you have Windows XP Home Edition, the Administrator account’s password is blank.
All this folderol about an account called Administrator probably sounds like a tempest in a teapot, but Administrator can perform some actions that other accounts can’t. Many of those actions have to do with resuscitating a
nearly dead Windows installation. Under normal circumstances you have no need to use Administrator — indeed, Windows goes to great lengths to hide it from you. But in some dire circumstances (see, for example, Technique 63), you can only use the Administrator account to get your system out of trouble.
Guest: That’s also the name of an account. The Guest account is generally invisible unless you specifically make it visible. Guest is a vital account, an account that Windows uses to make many different features work. The Guest account is a limited account, with one additional restriction: You can’t put a password on the Guest account.
Computer Administrator accounts are frequently called Administrator accounts, and accounts with Administrator privileges are called Admin accounts, or simply Administrators. Only one account on your PC is actually called Administrator. You can have many accounts that are Computer Administrator accounts.
Of the three initial accounts — the one with your name on it, the Administrator account, and the Guest account — you can usually see only one: yours. The other two are lurking around, though, and as you will see, they are crucial.
By the way, all Computer Administrator accounts are created equal. Just because your account was the first Computer Administrator account doesn’t give you any special privileges. (The administrator account — that is, the account called “Administrator” — has extra privileges, but they only come into play when you’re digging deep inside your computer.) All limited user accounts are equal, too.
Working with account types
Computer Administrator user accounts (including the hidden one called Administrator) can perform the following functions:
Add or remove other accounts (except Administrator, Guest, and your own account)
Change passwords and require or remove passwords for any account (except Administrator and Guest)
Change Windows XP read/write/access permissions for any drive, folder, or file
Create, open, modify, or delete files anywhere on the PC, except in Encrypting File System protected folders (refer to Technique 8)
Change Registry settings for all users
An administrator can see the contents of any file on the system unless the file’s been encrypted by using, say, the Encrypting File System (refer to Technique 8), an application’s password-protection mechanism, or Windows’ Information Rights Management technology. All three of those file-locking methods operate independently of Windows XP.
Because Administrator accounts can create files in important places, such as C:\ Program Files, and administrators can modify the Registry, you usually need an Administrator account to install a program. You also usually need an Administrator account to install new hardware.
By contrast, people with limited user accounts can perform only the following functions:
Change their own password or require/remove passwords on their own account
Create, open, modify, or delete files in shared areas, including (usually) the Shared Documents folder
Create, open, modify, or delete files in My Documents
The powers granted to a limited account usually restrict limited user accounts to running programs but not installing them.
The limited account called Guest can do all those limited account things except require a password for the account.
Increasing security with passwords
Many Windows XP users with stand-alone machines or small (peer-to-peer workgroup) networks think that they can keep other people out of their files by putting a password on their account, and then creat ing new accounts and requiring passwords on those accounts.
It’s a crock.
Windows XP’s accounts were built for convenience, not security.
If you want to keep data on one machine from being viewed by users on a different machine, Windows XP, straight out of the box, gives you all the tools you need for coarse, quick, and generally quite usable control. See Technique 48 for details on Simple File Sharing.
If you want to keep multiple users on one machine from seeing or clobbering each other’s files, the situ ation becomes much more complex. You can’t simply put passwords on some accounts, or make some accounts limited user accounts. You have to change a bunch of settings — and give up a lot of flexibility. In particular, you have to set up one account that will be in control, and relegate all the other people using the computer to limited user account status. Among other things, that means only one account is capable of installing new programs or hardware. Keeping your data away from the prying eyes of other people who use your computer is a difficult, time-consuming task.
Here’s what you have to do:
7. Use Windows XP Professional Edition.
The steps here only apply to Windows XP Professional.
Windows XP Home Edition doesn’t have the functionality to completely ensure that multiple users can’t access each other’s files.
2. Allow one user to be in control.
That one user gets an Administrator account. All other users must have more restricted accounts — typically, that means all the other users must have limited user accounts. If you have more than one Administrator account on a PC, all except one must be deleted. Then you can create new limited user accounts to replace the deleted ones. See the next section for details on setting up new accounts.
Anyone with an Administrator account can change the password of any other user. Unless you spend a substantial amount of time juggling permissions, one user gets an Administrator account, and everybody else becomes a limited user. And that means that only one person can install programs on the PC, add new hardware, and so on.
3. Password-protect the account of anyone who wishes to protect his or her files from other users of the computer.
Refer to Technique 9 for details.
4. Require any user with a password to create a password reset disk.
See Technique 65 for more information.
5. Put the protected file or folder on a hard drive that uses NTFS.
I discuss NTFS in Technique 67.
Old-fashioned FAT32 drives can’t be protected.
To see what kind of drive you have, choose Start My Computer, right-click the drive, and choose Properties. You see the dialog box shown in Figure 47-1.
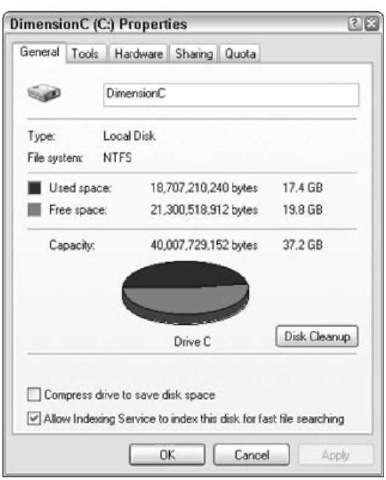
• Figure 47-1: You can protect only NTFS drives.
6, Switch off the Windows XP Simple File System.
Simple File System is the default file protection mechanism inside XP. Instead, you want to bring back the old Windows 2000 file sharing system, which I explain how to do in Technique 48.
7 Explicitly protect the files or folders that you want to keep from prying eyes.
See Technique 48 for details.
Those are the steps necessary to make sure that other people using your computer can’t see or delete your files. The process is time-consuming and abounds with hidden gotchas. The vast majority of people who believe their PC is set up to protect data from prying eyes or accidental deletion are sadly mistaken. Keeping other people out of your data entails much, much more than requiring passwords or checking an obscure box.
The bottom line: Setting up bulletproof protection from prying eyes and clobbered files takes a lot of time and effort.
Administrator accounts and viruses
Unless you do something to change the situation, every new account created on a Windows XP PC is a full-blown Computer Administrator account. Some people think that you shouldn’t use Administrator accounts for everyday work — that most users only need a limited user account.
Many Windows XP experts suggest that you create two accounts for each user:
An Administrator account that you can use to install hardware and software and make major changes (such as adding a new account)
A plain, limited account for everyday work
The rationale is straightforward: If you’re using an Administrator account and you accidentally run into a virus (or a Trojan horse, worm, or the next big, scary security threat), that bad program automatically inherits your authority. So if you’re using an Administrator account, the bad program can wipe out your hard drive or do just about anything it likes.
In actuality, though, the level of protection afforded by running as a limited user isn’t all that great. Malicious programs that can crack Outlook’s address topic, for example, can certainly attack the address books of all accounts on the computer, whether they’re Administrator accounts or limited user accounts. And any program that deletes My Documents can get all the My Documents folders on the machine, guaranteed. Anyway, your antivirus software should be looking for malicious programs and protecting your entire machine. That’s simply not the job of an Administrator account.
Of course, if you’re using a limited account and you bump into a virus, Trojan horse, worm, or some other form of sniveling scumware, the program can’t do as much damage. Because malware inherits your authority (and limited user accounts don’t have much authority), you may be slightly better off. Slightly. After all, you still have a virus infecting your machine.
Using simple, common-sense protection
If you need intricate file security — where large numbers of individuals or groups of individuals are allowed access to specific folders — you need more than Windows XP. You really need a Big Corporate Network, with servers running Active Directory.
If your file security needs are relatively modest — say, you want to protect your My Documents folder so that only you can see what’s inside, and you don’t want to allow anyone to delete the files — you can follow the steps in the preceding section and lock down your folder. In order to get that to work, though, everyone else who uses your PC must have a limited user account. They won’t be able to install any programs or new hardware.
Windows XP’s accounts were built for convenience, not security.
Most individuals, families, and small offices don’t need fancy security settings. In most cases, you can keep things simple but secure. I’ve boiled down a lot of experience into a handful of recommendations:
Password-protect files that you don’t want others to see. Use the password protection available in the application that created the file (such as Word, Outlook, or Excel). Most applications allow you to set a password that’s required to open a file, and a second password that’s necessary to change the file. This doesn’t prevent a malicious or misguided person from deleting the file — you always need good backups — but as long as the Recycle Bin isn’t emptied frequently, simple password protection works pretty darn well.
If a user can’t be trusted to use an antivirus program religiously or has a bad habit of downloading and installing scummy programs from the Internet, give that user a limited account.
Better, make Windows show the Guest account on the welcome screen (Start Control Panel User Accounts Guest Turn On the Guest Account) and let your neophytes use Guest.
Give everybody else a standard (Computer Administrator) account. But be merciless in your insistence that they use antivirus software.
Put files in Shared Documents only if you’re willing to see them deleted.
Creating a New Account
If you have a Computer Administrator account (unless someone has changed it, chances are good your account is a Computer Administrator account), creating a new account couldn’t be simpler:
1 Choose Start Control Panel User Accounts.
Windows shows you the User Accounts dialog box, shown in Figure 47-2.
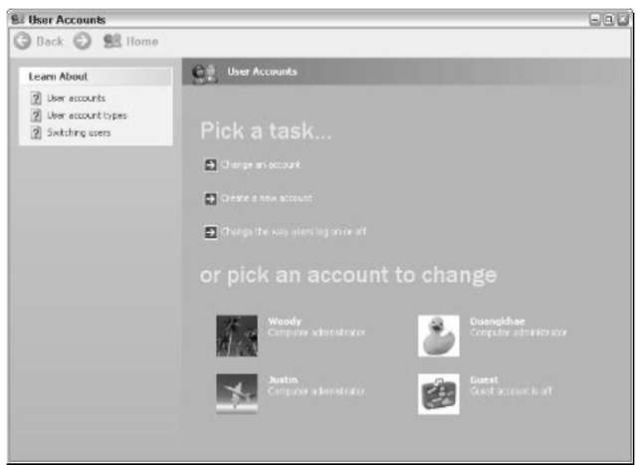
• Figure 47-2: User Accounts central.
2. Click the Create a New Account line.
You see the Create a New Account dialog box, shown in Figure 47-3.
To make your life simpler, use a short, simple name, with no spaces or punctuation marks.
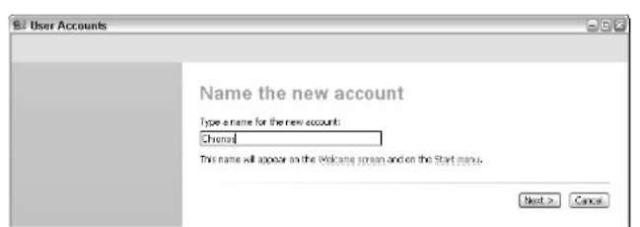
• Figure 47-3: The name you enter here becomes the name of a folder in the Documents and Settings folder.
3, Type a name and click Next.
Windows asks you to pick an account type (as shown in Figure 47-4).
If you can trust a person to run antivirus software reliably — and not download any scummy programs from the Internet — she probably is a good candidate for a Computer Administrator account. Besides, if you give her an Administrator account, she can install her own programs, and she won’t have to come running to you every time she needs to do something that’s “restricted.”
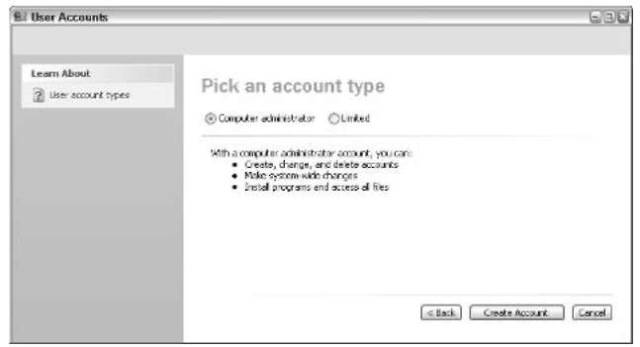
• Figure 47-4: People who don’t use antivirus software all the time should probably be assigned a limited user account.
4, Choose between an Administrator account and a limited account and then click Create Account.
The new account becomes available immediately.
Modifying an Account
If you have a limited account, you can change your own name, password, and picture. Computer Administrator accounts, on the other hand, can change every detail of every account. A person with an Administrator account can add new accounts or delete existing accounts — along with all the data associated with an existing account. Administrator accounts can do just about anything.
Yes, you read that right. Say your PC has two Administrator accounts, called and . can go into account, change password, then log in as, and do anything that can do. doesn’t need to know current password in order to change it. Conversely, can modify password, log in and do anything can do. Even worse, can delete account, and all his data — permanently — even if account has a password, and doesn’t know what the password is. See why I say that Windows XP accounts are made for convenience, not security?
If you have an Administrator account and you choose Start Control Panel User Accounts and then pick an account (see Figure 47-5), you have the following choices:
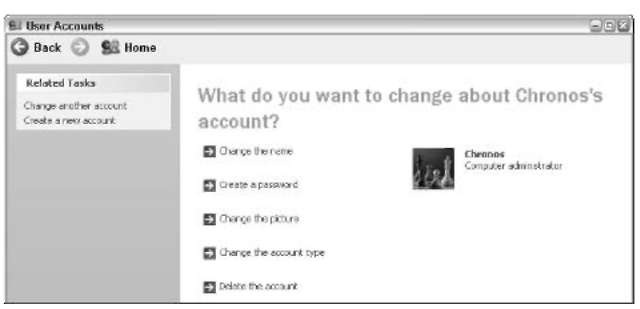
• Figure 47-5: Making changes to Chronos’s account.
Change the name: When you set up the account, the name you choose is permanently, indelibly used as the name of the Documents and Settings folder for the user. After the account is set up, changing the name changes only what appears on the welcome screen, at the top of the Start menu, and in this User Accounts dialog box.
The first time you enter a user’s name — when you set up the new account — choose something short and sweet, so when you go spelunking through the Documents and Settings folder, you don’t have to wade through lots of junk. (You’ll probably end up typing the folder name many times, too.) After the account is set up, though, you have no need to be so conservative. Turn the name into anything you like.
Create or change a password: You can force this account to use a password. If you’re twiddling with another user’s account, setting a password for the user (or changing an existing one) can effectively keep the user off the machine. And you don’t even need to know the user’s current password in order to make the change. Ouch.
Change the picture: Change the picture that appears on the welcome screen and at the top of the Start menu
.
In the User Accounts dialog box (refer to Figure 47-5), click Change the Picture. Windows responds with the Pick a New Picture dialog box, as shown in Figure 47-6. Click the picture you want, click Change Picture, and then exit the User Accounts dialog box.
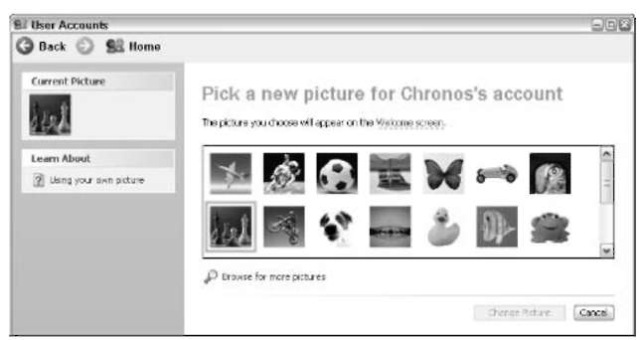
• Figure 47-6: Pick a pic.
If you want to stick with Windows’ politically correct selection, go ahead and pick a picture from the list. But if you want to have some fun, click Browse For More Pictures. Windows lets you choose a picture from just about anywhere (as shown in Figure 47-7). In fact, Windows squishes any picture down to size for you. Square pictures work best because Windows can squish them down without putting in any white space.
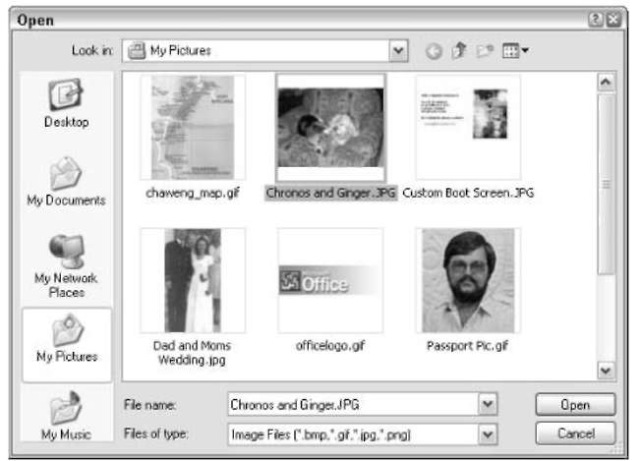
• Figure 47-7: Pick a picture, and Windows makes a 48-X-48 pixel thumbnail.
Change the account type: Switch from Computer Administrator to limited and back again.
Delete the account: Delete another user’s account. Yes. That’s right. Just like that. You aren’t given this option if you’re working on your own account. The user who’s logged on cannot delete his or her own account.
When you delete an account, Windows gives you the option of saving some of the files associated with the account (as shown in Figure 47-8). Save the files! After Windows deletes the files, they’re gone for good. They’re not in the Recycle Bin. They are really gone.

• Figure 47-8: Deleting a user removes all of that user’s folders. Careful!
Normally, all users except the two hidden users — the account called Administrator and the account called Guest — show up on the Windows welcome screen. In some cases, you may want to remove an account from the welcome screen, thus making it a little bit harder for someone to “accidentally” log on pretending to be you. The easiest way to remove an account from the welcome screen is with Tweak UI:
7. Download and install Tweak UI.
I talk about Tweak UI in Technique 5.
2. Choose Start All Programs PowerToys for Windows XP Tweak UI for Windows XP.
3, On the left, double-click Logon.
Tweak UI shows you a list of all the names on the welcome screen (as shown in Figure 47-9).
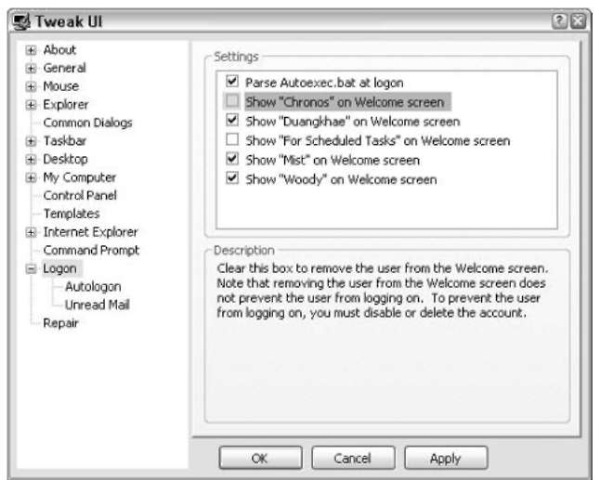
• Figure 47-9: Each name on the welcome screen appears here.
4, Uncheck the boxes next to the items that you want removed from the welcome screen.
Tweak UI also can set up one ID to log on automatically, bypassing the welcome screen. To do so, double-click Auto logon on the left and click the Log on Automatically At System Startup box (as shown in Figure 47-10).
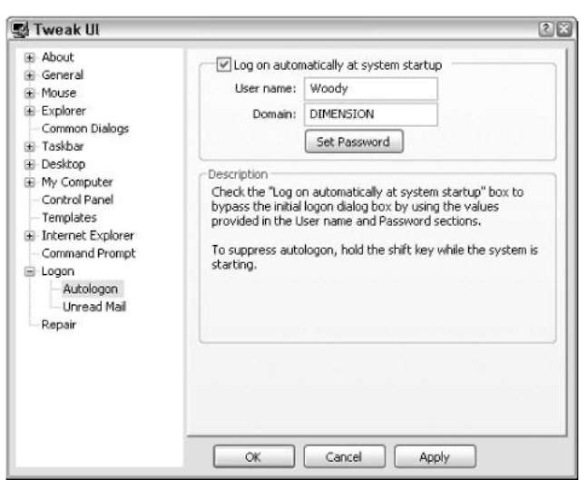
• Figure 47-10: Tweak UI can set Windows so it automatically starts one user.
5. Click OK. Check the results by choosing Start Log Off Switch Users (or use the Fast User Switch icon from Technique 6).
Using the Hidden Administrator Account
The moment you add just one user account to your system, the Administrator account (which is to say, the account called Administrator) effectively vanishes: It doesn’t show up on the welcome screen; there’s no Administrator account in the User Accounts dialog box (refer to Figure 47-11); Tweak UI won’t show it (refer to Figure 47-9); there isn’t even an Administrator folder hanging off of the Documents and Settings folder.
Under normal circumstances, you don’t want to mess with Administrator: It exists primarily so you can get into Windows in Safe Mode, to run the System Recovery Console (see Technique 63), and to make changes deep inside Windows when an emergency arises. There are occasions when you need to log on
with Administrator. For example, if you have only one Computer Administrator account on your PC, that account is password-protected. If you forget the password, your only choice is to log on as Administrator and change the password.
It is possible to log on to the Administrator account if you’re using Windows XP Professional. And, of course, if you know the tricks.
You can’t access the main Administrator account unless you’re using Windows XP Professional. Windows XP Home Edition automatically sets up the Administrator account with a blank password — in effect, no password. But in order to log on as Administrator you must have a password. (Catch-22. Joseph Heller would be proud.) Microsoft intentionally built XP Home Edition this way to keep the unwashed masses from jimmying around their Administrator accounts. If you use XP Home Edition and you absolutely must give your Administrator account a password, choose Start Run, type control userpasswords2, press Enter, and click the Reset Password button (shown in Figure 47-11).
To log on with the account called Administrator, if you’re using Windows XP Professional, follow these steps:
1 Make sure that every user on the PC is logged off.
This is a critical step.
If Fast User Switching is enabled, as shown in ) Technique 8, everybody has to be logged off the machine before you can log on as Administrator.
2, At the welcome screen, hold down Ctrl+Alt, and then press the Delete key twice.
That brings up a Windows 2000-style logon dialog box.
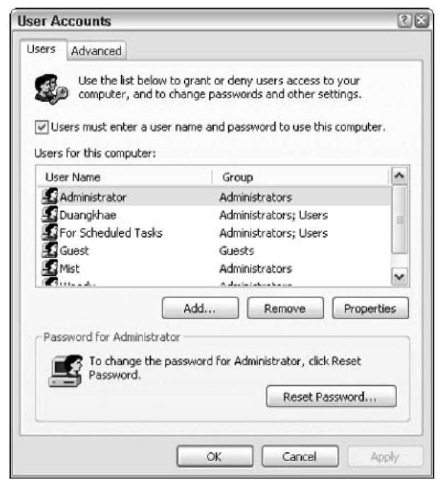
• Figure 47-11: The only way to give an XP Home Administrator account a password.
3, Type Administrator as your user name, enter your password, and click OK.
Windows logs you on as Administrator.
If you log on as Administrator and use Fast User Switching to switch to a different user, you can’t log on as Administrator again unless you reboot your machine. It’s a bug in Windows XP Professional.
If you’re using Windows XP Home, there’s only one way to log on with the account called Administrator: You must log on in Safe Mode. For details, see Technique 63.
Hobbling the Guest Account
I know, I know. You really want to turn off the account called Guest because you know it doesn’t have a
password and you’re worried that some hacker or bad program is going to get into it.
Relax.
In the old days, a guest account on a networked PC served as a convenient way to let people onto a PC or network temporarily. The guest didn’t need to know a password to log on, but the guest couldn’t perform as many computing functions, either. That’s where the term “guest” came from.
In XP, Windows makes it easy to “turn on” or “turn off” the Guest account. Here’s how:
1 Choose Start Control Panel User Accounts.
The Guest account is the last account listed. If Guest appears as one of the accounts on the Windows welcome screen, you see an on-screen message that says Guest account is on (see Figure 47-12). If no Guest account is on the welcome screen, Windows says Guest account is off.
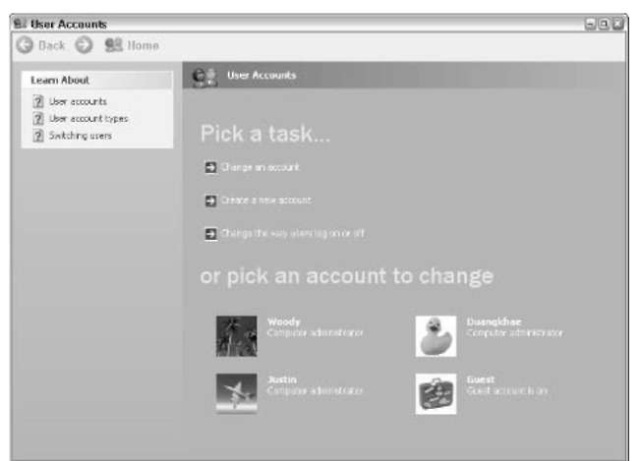
• Figure 47-12: The Guest account is on — which means that it’s visible on the welcome screen.
2. Click the Guest account.
You see the User Accounts dialog box, as shown in Figure 47-13.

• Figure 47-13: Not many choices for Guest.
3. If you don’t want Guest to be visible on the welcome screen, click Turn Off the Guest Account. If you want Guest to be visible, click Turn On the Guest Account.
4. Close the User Accounts dialog box.
You might assume that this procedure turns the account called Guest on or off. It doesn’t. Windows XP is fooling you. In Windows XP, Guest plays a pivotal role. Among other things, Windows uses Guest to communicate between computers, run print jobs, and perform a plethora of other behind-the-scenes functions. Windows can’t let you turn off the Guest account. If you did, all sorts of things would go bump in the night.
You may find detailed instructions on the Web that show you how to really turn off Guest. It’s difficult, but it can be done. Resist the temptation. Leave Guest going.
Guest gets a bad rap
I’m astounded by how much drivel regarding the Guest account has appeared in print, so let me dispel some falsehoods and misconceptions. If you’re feeling nervous about the Guest account, the following points should help calm your fears:
Nobody and nothing can surreptitiously log on to your computer via the Guest account. The Guest account hasn’t become a convenient entry point for hackers, as one publication put it. If you decide to put the Guest account on your welcome screen, it’s like any other limited account. If you don’t put it on the welcome screen, nobody can steal it.
Guest is the means by which other users connect to your computer. Say there’s a password-protected Administrator account on my machine called If someone logs on to my machine from the network with name and password, that person is not given Administrator account capabilities — even though is an Administrator account. Anyone who logs on from the network is only given the capabilities of the lowly Guest account.
The Guest account is absolutely vital. In addition to providing the means for other people to log on to your computer, Guest operates behind the scenes in Internet Connection Sharing and with file and printer sharing. It’s okay to hide the account on the welcome screen, using Windows XP’s settings. But don’t follow the advice you occasionally see on the Web, dig deep into Windows, and delete the account. You need it.
