Technique
Save Time By
Finding out what name your computer is registered to
Updating Windows’ Registered Owner and Registered Company
So you just finished reading Technique 68 and you want to try a Registry change that won’t get you tied up in knots. Have I got a tweak for you.
When you first installed Windows, or when you fired up your PC as soon as you got it out of the box, the installer asked you for your name and your organization’s name. Did you get it right? Has it changed since then?
Yeah, me, too.
This short technique takes you through the simple steps to change the Registry so Windows thinks it belongs to the person and organization you choose. Whether you feed Windows the real thing — well, that’s up to you.
Seeing Who Owns Your PC
Every Windows XP PC has a registered owner and a registered organization. Confusingly, these settings have nothing to do with whether you, uh, registered Windows or not. (I talk about registering your copy of Windows — actually, I warn you not to do it — in Technique 2.)
Your computer’s registered owner and registered organization come from information that you typed into the Windows installer. Chances are good that was so long ago you’ve forgotten that you ever did it.
The easiest way to see Windows’ official registered owner and organization is to
1, Click Start.
2, Right-click My Computer.
3, Choose Properties.
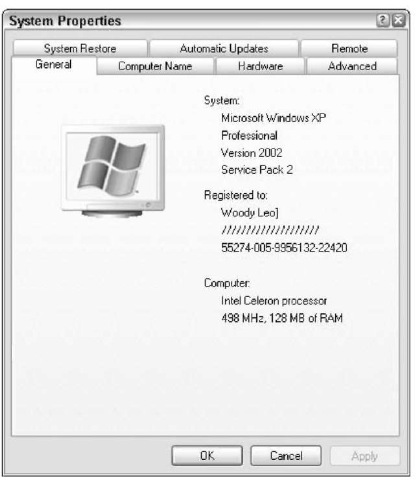
Windows shows you the System Properties dialog box in Figure 69-1. You can read the owner and organization underneath the Registered To line.

• Figure 69-1: My completely screwed-up registered owner and organization settings.
If your registered owner and organization are | wrong, don’t feel too bad. I’d guess that half of all the PCs in the world are working just fine with incorrect owners and organizations.
The biggest problem with an incorrect owner and organization? Other programs frequently pick up the names when they get installed, so you either have to over-type the name and organization when you install new programs — or you simply live with being identified. Hey, I’ve been called worse.
Changing the Owner and Organization
It just so happens that changing the registered owner and organization takes just a minute or two, providing you’re willing to dive into the Windows Registry.
The first rule of editing the Registry: Don’t do | it unless you have to. Tweak Ul (which I talk about in Technique 5) handles a wide range of changes, and almost always eliminates the need to dig into the Registry. Surprisingly, though, Tweak Ul doesn’t let you change the registered owner or organization. Thus, a quick dip in the Registry is warranted.
To change the registered owner and organization
7. Choose Start Run, type regedit and press Enter.
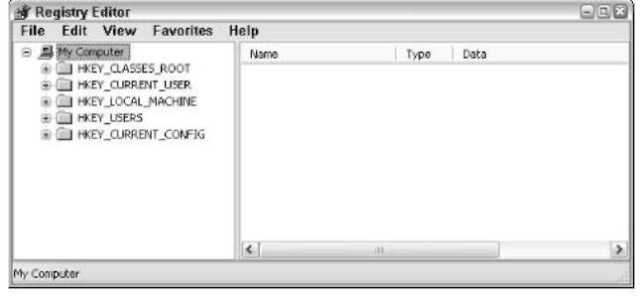
The Windows Registry Editor appears (shown in Figure 69-2).

• Figure 69-2: The Registry Editor in all its glory.
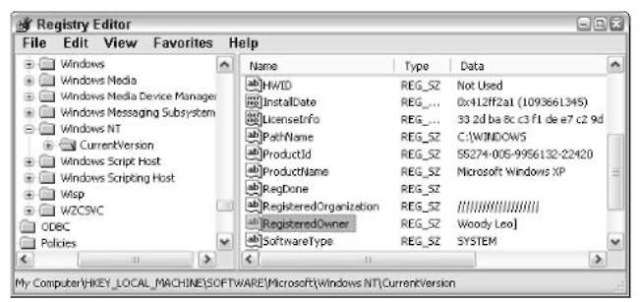
2. On the left side, under My Computer, doubleclick and navigate all the way down to HKEY_LOCAL_MACHINE\SOFTWARE\ Microsoft\Windows NTACurrentVersion (see Figure 69-3).
Yes, I know that you aren’t running Windows NT. Some Registry settings are in really weird places.

• Figure 69-3: The Registry key that contains the registered owner and organization.
3, On the left, make sure you click
Current Version. Then on the right, scroll down to Registered Owner and double-click it.
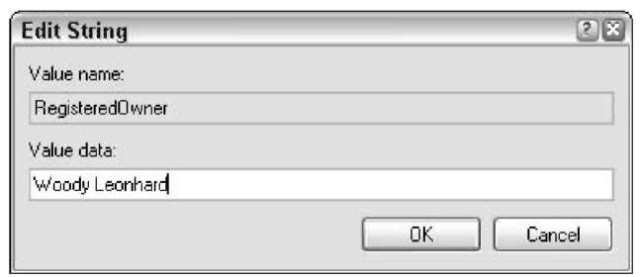
An Edit String dialog box appears (see Figure 69M).

• Figure 69-4: The registered owner appears here.
4 In the Value Data box, type the name you want to use for the registered owner. Then click OK.
The Registry gets updated with the value you
typed.
5, On the right, double-click Registered Organization.
Again, you see an Edit String dialog box.
6, In the Value Data box, type the name you want to appear for the registered organization. Then
click OK.
Yes, you can claim that this copy of Windows XP is registered to Microsoft Corp. Or the Central
Intelligence Agency. Or SMERSH.
7 Choose File Exit to leave the Registry Editor.
8, Check to make sure your changes are correct by clicking Start, right-clicking My Computer, and choosing Properties.
Your new, improved System Properties box appears (see Figure 69-5).

• Figure 69-5: Now that’s more like it.
