Technique
Save Time By
Scanning your system for old programs that might cause problems
Making your old programs work — quickly
Installing old programs when the installer doesn’t work
If you have a trusted, old, dog-eared copy of Norton Anti-Virus for Windows 98, throw it away. And that classic disc with Steve Gibson’s Scan Rite for Windows 95? Give it the heave-ho, too.
Old system utilities don’t work with Windows XP. In fact, they can be downright dangerous. If you could get them to work — and you probably can’t — there’s a very good chance they’ll scramble your hard drive.
Ah, but Commander Keen? Now there’s a trooper. Old games, like old accounting programs, never die. They just keep eating into your productivity.
This technique shows you how to make your old programs work with Windows XP.
Scanning for Program Compatibility
Most application programs that worked in Windows 98, 98 Second Edition, Me, NT, or 2000 can work with Windows XP. Windows XP has an amazingly high tolerance for the odd behavior of games, word processors, databases, all sorts of communication programs, accounting programs, weird printing utilities, timers, and the myriad of diverse programs that helped make the computer industry what it is today.
On the other hand, most utilities — disk scanners, defragmenters, backup programs, antivirus products, firewalls, tune up packs, and the like — that aren’t already compatible with Windows XP have to be built from the ground up to become Windows XP-compliant. If you try to run them, even in Windows XP’s special compatibility mode, you have a chance of breaking something.
Every commercial program available on store shelves today works with Windows XP. Most programs that you download from the Internet also work with Windows XP, although some older programs (primarily games and commercial products that aren’t being sold anymore) may have problems.
A compatibility mode is just a collection of smoke and mirrors that makes programs believe they’re running under an older version of Windows (or even DOS). Running in compatibility mode doesn’t necessarily protect your PC. Mostly, it deceives the programs.
Windows XP has a wizard that gathers the names of programs on your computer and lets you test out various compatibility mode settings with each. To run the compatibility wizard, follow these steps:
1 Choose Start All Programs Accessories Program Compatibility Wizard.
The Program Compatibility Wizard appears, as shown in Figure 71-1.
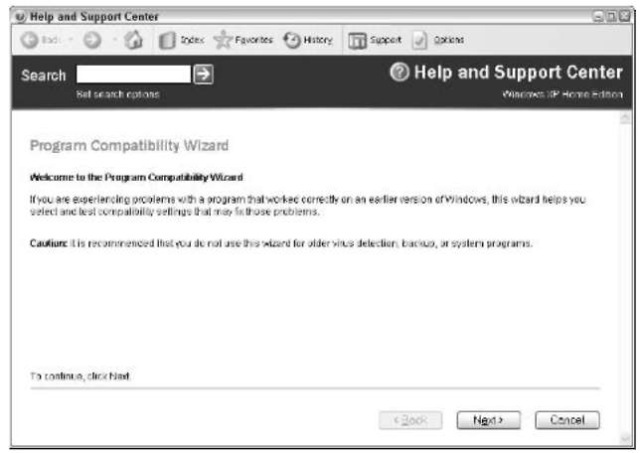
• Figure 71-1: Windows XP’s Compatibility Wizard.
2. Click Next.
The wizard wants to know whether it should scan your computer and create a list of programs, or if you have a specific CD or program that you want to use.
3. If you have trouble with one specific program, select the I Want to Locate the Program Manually option. Otherwise, select the I Want to Choose from a List of Programs option.
Click Next.
The wizard assembles a list of programs (see Figure 71-2).
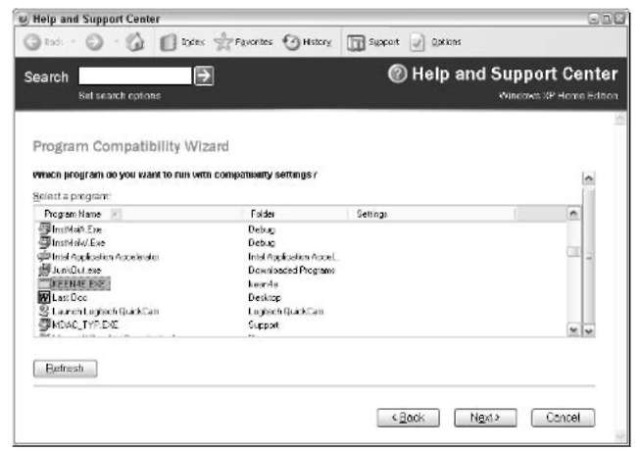
• Figure 71-2: The wizard’s list doesn’t seem to conform to any particular rules.
The wizard doesn’t find all the programs on your PC. I couldn’t get it to scan my D: drive, and it missed several obvious candidates for compatibility mode on my C: drive. If you have a problem with a specific program, choose it — don’t rely on the wizard to be very wizardly.
4. Choose a program for compatibility mode testing.
In Figure 71-2, I chose Commander Keen 4. (Ever wonder what Id Software made before Quake and Doom?)
5. Click Next.
The wizard wants to know which version of Windows it should trick the program into “seeing,” as shown in Figure 71-3.
6. Choose the version of Windows that you want to test, and then click Next.
The wizard allows you to trick the application into thinking that it only has a very limited number of colors available on-screen, as shown in Figure 71-4.
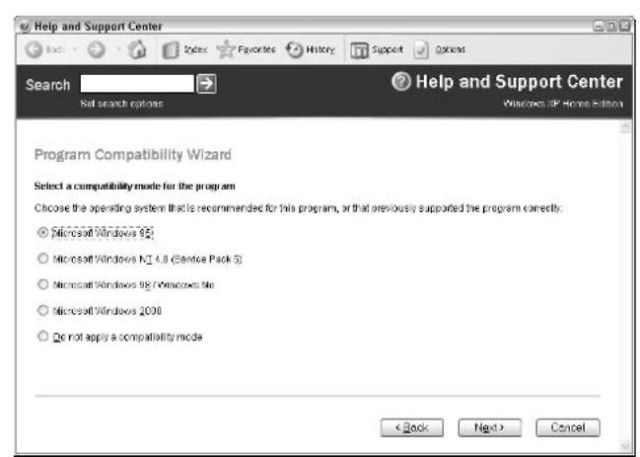
• Figure 71-3: Pick a Windows compatibility version.
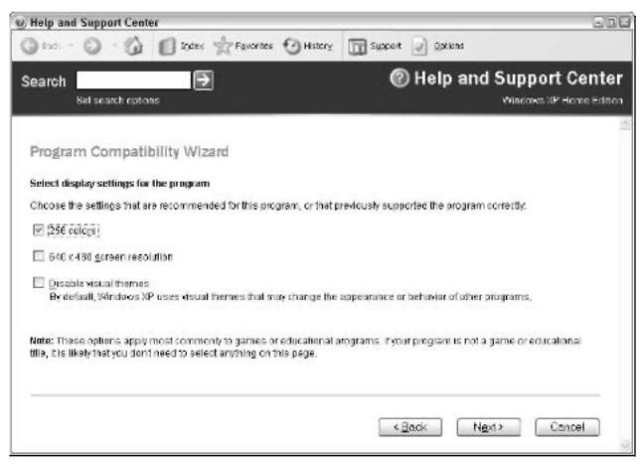
• Figure 71-4: Sometimes color depth is a crucial
compatibility factor — older programs get confused when they can use too many colors.
7 If you think color might be a problem, choose a limit to the number of colors in the compatibility mode, and click Next.
The wizard displays the settings you chose.
8. Click Next.
Windows launches the program in compatibility mode. It’s up to you to see whether the program works right.
When you exit the program, you go back to the wizard, as shown in Figure 71-5.
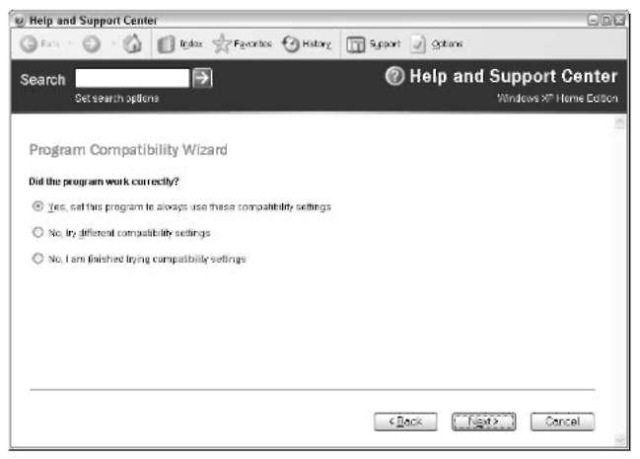
• Figure 71-5: The wizard wants to know whether it should store the compatibility settings.
9. If the program worked correctly, click Next. If not, select one of the No options.
The wizard asks whether you want to send the settings that you just put together to Microsoft.
f0. Click the No button, and then click Next.
You see a typical wizard Finish screen.
Click Finish.
Although the wizard doesn’t tell you, in fact it has made changes to the compatibility settings for this particular program (see Figure 71-6). See the next section for details.
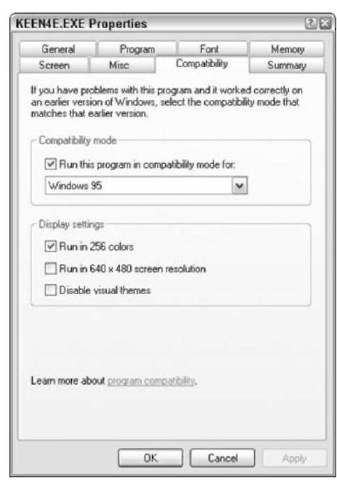
• Figure 71-6: Compatibility settings generated by the wizard for Commander Keen 4.
Setting Compatibility Modes
Although you can use the Program Compatibility Wizard to set up compatibility modes, in many cases going in and making the changes manually is just simpler. In fact, the wizard won’t even handle several settings.
Here’s how to go it alone:
7. Choose Start My Computer and navigate to the program that you want to run in compatibility mode.
2. Right-click the program and choose Properties Compatibility.
In Figure 71-7, you see the compatibility settings for the original Commander Keen 1 (vintage 1990).
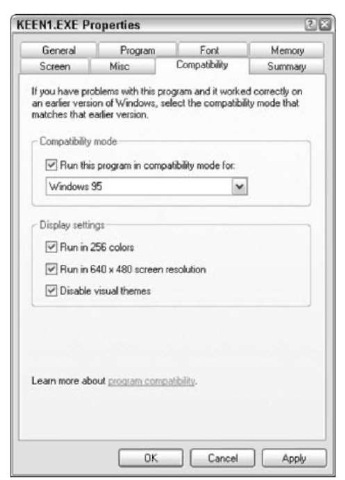
• Figure 71-7: Commander Keen’s compatibility.
3. Change compatibility settings to match the kinds of hardware and software that were available when the program was released.
In Figure 71-7, I used the most retro settings available: Windows 95 (the oldest operating system offered), VGA mode (256 colors at 640 x 480), and disabling the fancy Windows XP visual themes.
4, Click the Memory tab. If the program requires old-fashioned EMS, XMS, XMS/HMA, or DPMI memory, or if it needs to run in protected main memory, make the appropriate adjustments to your settings.
Many people overlook the fact that you have to set up special memory settings independently of the other compatibility settings. (See Figure 71-8.) In fact, even the Program Compatibility Wizard ignores this crucial information. If your program requires any of these complex, obsolete ways of addressing memory, the program’s documentation lists that fact.
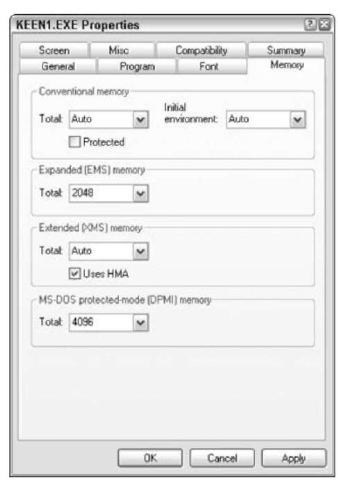
• Figure 71-8: Ancient (and confusing!) memory settings go here.
5, Click OK and run the program.
6, If the program still won’t run, go back to Step 1 and try tweaking the settings.
7 If you experience memory violations, and you can’t get the settings in Step 4 to work right, go on to the Internet and use Google (www.google. com) to search for the name of the program, plus one of the types of memory.
For example, search for Commander Keen XMS. If the program requires an oddball memory setting, you’ll probably find it on the Web.
If your old program is on a CD, your settings aren’t saved. You have to go in and adjust the settings using these steps every time you run the program. Copy the program to a convenient place on your hard drive. When you do that, the settings are stored and take effect every time you run the program.
Installing the Retro Way
I’ve seen reports from people on the Internet who are having trouble installing older programs. In many cases, the problem is that the installer needs to run in Program Compatibility Mode.
Some of the old installers make changes to Windows that fly under Windows XP’s radar. If you run the installer under Windows XP, the installer thinks it’s running under DOS, so it makes changes to autoexec.bat and config.sys — which Windows XP doesn’t even look at. On the other hand, if the installer thinks it’s running under Windows NT 4, it may make changes that actually work in Windows XP.
If you have an old program that just doesn’t work under Windows XP, try running the installer in compatibility mode. Here’s how:
7. Choose Start My Computer and navigate to the installer.
Old installers were invariably called install.exe or setup.exe. Come to think of it, new installers are invariably called . . . oh, never mind.
2, Right-click install.exe or setup.exe and choose Properties Compatibility.
3, If you’ve never run the installer in program compatibility mode before, choose Windows NT 4.0 (Service Pack 5) from the drop-down list in the Compatibility Mode area.
4, Click OK and run the installer.
If that doesn’t work — either the installer doesn’t run, or the program itself doesn’t work right — go back and, in Step 3, try running in Windows 95 compatibility mode.
Good luck! Commander Keen awaits.
