Technique
Save Time By
Using Simple File Sharing effectively
Choosing the right level of protection for your drives and folders
Solving common sharing problems quickly
Most people set up a small office or home network to share an Internet connection, a few files or folders, and a printer or some other piece(s) of hardware.
Although sharing an Internet connection and some hardware is a very straightforward goal — you can either print from all the computers on your network, or something’s wrong — file and drive sharing rapidly turns these basic concepts from black-and-white to shades of gray (not to mention fuchsia and indigo).
You can spend a lot of time sweating the intricacies of file sharing; in fact, companies with Big Corporate Networks (BCNs) have entire teams that handle nothing but the inherent turf wars — er, access permission settings — that exist in complex information-sharing environments.
If you have a real need for complex sharing rules, you should look into a meatier program, such as Windows 2003 Server’s Active Directory, to supplement Windows XP.
On the other hand, if your needs are simple, Windows XP can handle them — quickly, easily, and effectively, if you understand the nuances. That’s what this technique is all about: the nuances of sharing folders and drives across a network, or sharing folders among multiple users on a single PC.
Keeping File Sharing Simple
If you use Windows XP Professional on a Big Corporate Network (that is, a client/server network — what Microsoft calls a domain), you automatically receive an entire suite of tools for managing who can get at what files or folders or drives on your machine — the permissions you grant to let people get at data on your PC. You can choose which individual users or groups of users can see this or change that; you can assign passwords to unlock folders, files, or drives; you can even allow specific users onto your PC or block them entirely, based on the time of the day or the phase of the moon. Okay, I’m exaggerating. A little bit.
You could spend half your working day juggling permissions and sweating endless rivulets of small stuff. If you have a domain, your network administrator gets to deal with most of the arcana. Thank heaven for network admins.
Windows XP Home Edition machines and Windows XP Professional Edition machines that aren’t connected to a BCN are automatically set up with Simple File Sharing. SFS is a four-sizes-fits-all approach that most people can live with, but some people can’t.
In general, SFS is a great fit. In particular, however, SFS won’t work for you if you require one or more of the following:
The capability for users to have the same access permissions regardless of the computer: If you
want to log on to any computer on the network and access your files the same way you could if you were working at your usual machine, SFS won’t work for you.
The capability to password-protect folders: You can almost always password-protect individual files by using the application that made the file. You can also password-protect compressed files by using a file compression product, such as WinZip (www.winzip.com). But having passwords apply to a whole folder is an entirely different can of worms, and SFS doesn’t have a can opener.
The capability to grant specific users (or groups of users) on the network unusual capabilities: If you want to give most users the ability to open all the files in a folder but only give a handful the ability to change them (see Figure 48-1), SFS isn’t the tool for you. Windows 2000 lets you fine-tune permissions such as these in great detail. Windows XP Professional even lets you throw out SFS and bring back the (not-so-) good ol’ Windows 2000 method of granting permissions. But SFS can’t give you this level of control.
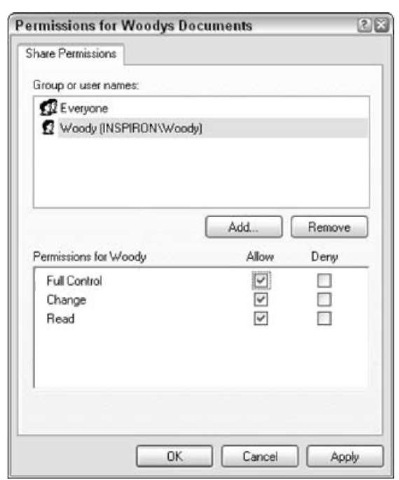
• Figure 48-1: Windows XP Professional with the old
Windows 2000 file sharing enables you to make complicated decisions about who gets access to which folders and files.
If you need any of those capabilities, there may be hope for you; but you have to meet the following criteria:
You must be running Windows XP Professional either on a lone machine or as part of a peer-to-peer workgroup network.
Your machine must use the NTFS file system.
If you’re not using Windows XP Professional or your hard drive doesn’t use the NTFS file system, you’re out of luck.
If your machine uses the older FAT32 file system, you can make all these changes — but none of the security settings work. Windows XP doesn’t bother mentioning that you have to have NTFS to make any of the old Windows 2000 security settings work.
Although disabling Simple File Sharing on a Windows XP Home computer is theoretically possible, I don’t recommend it. The process hasn’t been tested well enough — and the last thing you need is to bump into a time-consuming problem running unapproved software. If you need the old-fashioned Windows 2000 security settings, it’s best to pay the Redmond Piper and upgrade to Windows XP Professional.
If you’re using Windows XP Professional Edition, here’s how to disable Simple File Sharing and get at the old Windows 2000 security settings:
1 Choose Start My Computer.
Windows Explorer appears.
2. Choose Tools Folder Options View.
You see the Folder Options dialog box shown in Figure 48-2.
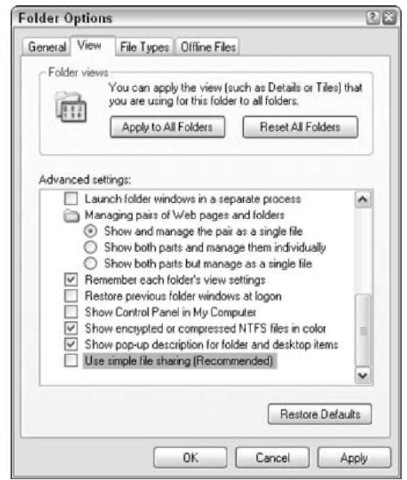
• Figure 48-2: The Simple File Sharing setting is buried at the bottom of a truly obscure dialog box.
3. Uncheck the Use Simple File Sharing (Recommended) check box.
4, Click OK.
You can set old-fashioned Windows 2000 access permissions (as shown in Figure 48-3) by right-clicking any folder, choosing Sharing and Security, and then choosing items from the Sharing tab and the Security tab. (For more information, see Windows 2000 Professional Bible by Michael Desmond, Michael Meadhra, Blair Rampling, and Robert Correll, published by Publishing, Inc.)
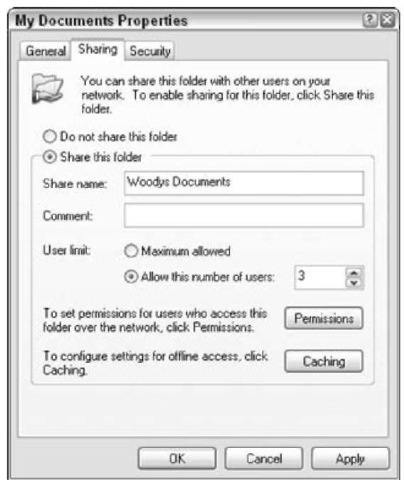
• Figure 48-3: The Windows 2000 security dialog box,brought to life in Windows XP Professional.
Using the Four Levels of Protection
Windows 2000 has an enormously rich — and complicated — repertoire of file-sharing settings. For example, you can tell Windows 2000 to allow a predefined group of users to read files in a certain folder, but only allow specific individuals to change files in that folder. You can set passwords for a drive or folder. The number of choices is daunting — and maintaining security settings in such fine detail can be enormously time-consuming.
In fact, unless you specifically need one of the three security features mentioned in the preceding section, you will probably find Simple File Sharing more than adequate — and one whole heck of a lot faster, easier, and simpler to use than the old Windows 2000 security settings.
Simple File Sharing allows you to set four different levels of sharing (or protection) for every folder or drive:
Private: Only you can get at it. Any user can mark his or her My Documents folder as Private, and keep all other users out of it.
You must be using the NTFS file system (not FAT32) on the drive containing the My Documents folder in order to make the My Documents folder Private.
Administrators Here Only: You can tell Windows XP to protect a drive or folder by keeping out any limited user account, and anyone trying to get at the folder from another computer on the network (assuming you have a network). Files in folders marked Administrators Here Only can be read, changed, or deleted by any administrator on that particular PC. All other kinds of accounts are kept out. This is the default setting for all the
drives and folders on a PC, except the Shared Documents folder. (Limited user accounts are given full read/write permission for their own My Documents folders, as you expect.)
Unless you specifically change settings, all new accounts on a PC are Administrator accounts (see Technique 47). So if you mark a drive or folder Administrators Here Only, chances are good that people who use your computer can see or clobber anything in that folder. However, if your computer is on a network, other users on the network won’t even know that the folder or drive exists — it’s hidden from them.
Read Only on the Network: Administrators on this computer can read, change, or delete anything in the folder. Users on other computers can open files in the folder but can’t change or delete them, and limited users (including the Guest account) can only read documents without making any changes or deletions, regardless of the computer they use to access the files.
Wide Open: Anybody, anywhere (even people using the Guest account) can read, change or delete anything in the folder or drive. This is the default setting for the Shared Documents folder.
If somebody on another computer deletes a file on your computer, it does not go to the Recycle Bin. You’ll have a devil of a time getting it back (see Technique 21). Use the Wide Open option with caution.
Table 48-1 gives you a quick summary of the four levels.
Table 48-1: Simple File Sharing Levels
| Level | You Can | Administrators Can | Limited Users Can | Users on Other Computers Can |
| Private | Read/Write | Do nothing | Do nothing | Do nothing |
| Administrators Here Only | Read/Write | Read/Write | Do nothing | Do nothing |
| Read Only on the Network | Read/Write | Read/Write | Read | Read |
| Wide Open | Read/Write | Read/Write | Read/Write | Read/Write |
Microsoft’s documentation and dialog boxes hint at a fifth SFS level — a setting called Shared on This Computer, which supposedly allows administrators to read, change, or delete anything in the folder. This setting allegedly grants read-only access to limited users (including Guest) and blocks any access from other computers on the network. Microsoft gives detailed instructions for setting up a folder with this kind of SFS setting, both in a Windows XP dialog box and in Microsoft’s Knowledge Base (support.microsoft.com/ ?kbid=304040). Unfortunately, if you follow those instructions, you end up with a folder that is Wide Open.
Files and folders inside a folder inherit the sharing/ protection features of the folder that contains them. For example, if you make a folder called Some Folder read-only, then Some Folder\Another Folder (a sub-folder of Some Folder) is also read-only unless you explicitly change it.
Making a folder Private
Making My Documents Private requires the NTFS file system. Windows XP encrypts the My Documents folder using the Encrypting File System (see Technique 8). That’s how other users are locked out and can’t get in.
Using SFS, you can only make your own My Documents folder Private. That’s true for all users, all the time, even on a PC that’s not connected to a network, and it doesn’t matter how many accounts are on the PC. You can’t do it to any other folder; nobody else with an Administrator account can do it to you. After you make your My Documents folder Private, you can’t make any subfolders “un”private. It’s an all-or-nothing deal.
If you make My Documents Private, you’d better put a password on your account. Otherwise, anybody who walks up to the machine can get into the folder.
The minute you put a password on your account, you need to make a password reset disk so that you can retrieve this private data if you ever forget your password. See Technique 65.
To make My Documents Private, follow these steps:
1 Choose Start My Documents.
Explorer takes you into the My Documents folder
2. On the Standard toolbar, click the up arrow.
Explorer takes you up one level so you can see the My Documents folder.
3. Right-click the My Documents folder and choose Properties.
You see the My Documents Properties dialog box
4. Click the Sharing tab.
Windows shows you the Sharing settings shown in Figure 48-4.
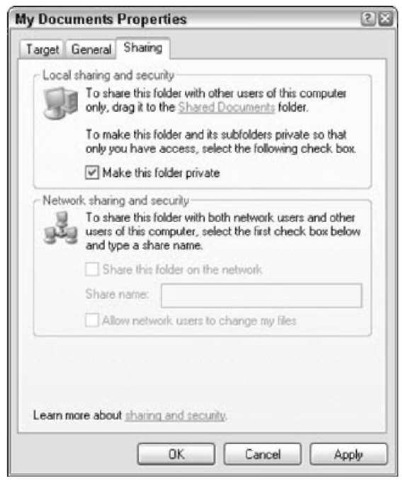
• Figure 48-4: The check box to make My Documents Private.
5, Check the Make This Folder Private box and click OK.
Windows encrypts all the data in My Documents. That can take a long time. When it’s done, Windows returns to the My Documents Properties dialog box.
6, Click OK to clear the My Documents Properties dialog box.
If you have an Administrator account and you add a password to it by using the Control Panel’s User Accounts dialog box (see Technique 47), you’re asked if you want to make your My Documents folder Private. It’s the same setting as the Make This Folder Private setting in Figure 48-4.
Making a folder Administrators Here Only
This is the default setting for My Documents folders — other administrators can read, write, or delete files inside the folder, but limited users (including Guest) can only see inside their own My Documents folders.
If you want to make sure a folder is Administrators Here Only, follow these steps:
7. In Windows Explorer, navigate to the folder you want to mark as Administrators Here Only. (You might do that by choosing Start My Computer or Start My Documents, or any of a dozen other ways.)
Explorer takes you into the My Documents folder.
2, Right-click the folder and choose Properties; then click the Sharing tab.
Sometimes you can right-click a folder and pick Sharing and Security. You end up in the same place, the Sharing tab of the Properties dialog box, as shown in Figure 48-5.
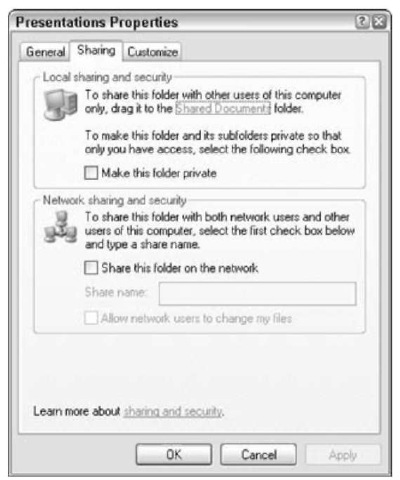
• Figure 48-5: Clear the boxes to make a folder Administrators Here Only.
3, Uncheck the Make This Folder Private and Share This Folder on the Network check boxes.
4, Click OK.
Making a folder or drive Read Only on the Network
Many Windows XP owners feel more comfortable allowing people on the network to look at their shared files but not change or delete them. If that describes your situation, this setting’s for you.
Windows XP discourages you from sharing entire drives. (Among other things, you have to explicitly confirm, in a separate step, that you want to share a drive on the network.) There’s a good reason for Windows’ caution. If you share the drive that contains Windows (typically your C: drive), other people on the network can get in and see — or possibly even delete — key system files, including files that store passwords and other important settings.
Files in Read Only on the Network folders can be read, changed, or deleted by administrators who are using the PC that contains the folder. Everybody else — limited users on the same PC or even administrators on other PCs — can only open the files.
To make a folder behave this way, follow these steps:
1 Use Explorer to navigate to the folder.
2. Right-click the folder and choose Properties; then click the Sharing tab.
Windows shows you the Sharing tab of the folder’s Properties dialog box. See Figure 48-6.
3. Check the Share This Folder on the Network box.
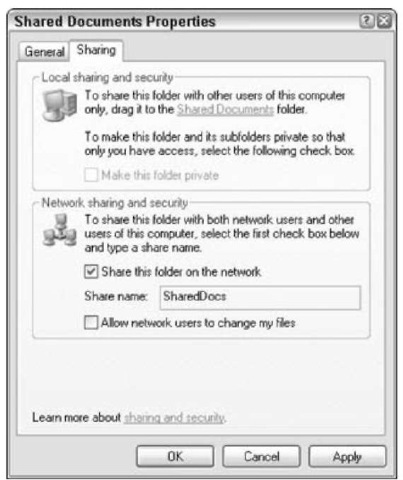
• Figure 48-6: Check to share the folder.
4. In the Share Name text box, type a name that other people on the network will recognize as a name for a shared folder.
5. Click OK.
Making a folder or drive Wide Open
Heaven help me, Wide Open is the setting I use for the Shared Documents folder on all my machines. The way I figure it, anybody I’m willing to give network access to has the right to delete any file in my shared folders. All I have to do is be careful what I share and what I keep private.
No, this isn’t a very secure setting. Yes, it’s very convenient and fast.
To expose a folder to this level of travesty, follow these steps:
1 Use Explorer to navigate to the folder.
2. Right-click the folder and choose Properties; then click the Sharing tab.
The Sharing tab of the Properties dialog box appears. (See Figure 48-7.)
3. Check the Share This Folder on the Network check box.
4. In the Share Name text box, give your folder a name that other people will recognize as a name for a shared folder.
5. Check the Allow Network Users to Change My Files check box.
6. Click OK.
In general, it’s a bad idea to make the root of your C: drive — or whichever drive holds your Windows files — Wide Open. (A root of a drive is just the drive letter itself.) If you do share C: (the root of your C: drive), anybody with an IQ above room temperature (Celsius) can go into your C:\Windows folder and do all sorts of damage.
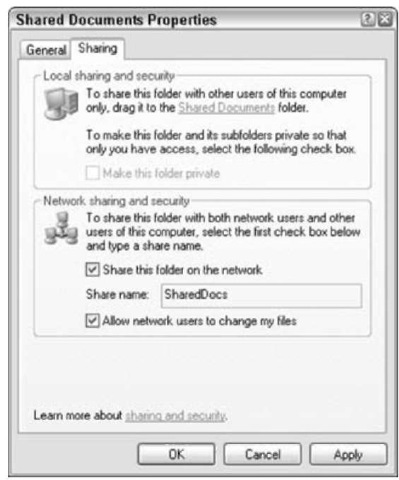
• Figure 48-7: This shared folder is Wide Open.
If you try to share the root of any drive, Windows responds with a warning message, as shown in Figure 48-8.
On the other hand, it’s a very good idea to make your CD drive(s) Wide Open. If the CD drive on your machine ever goes on the fritz, you can slap a CD into any other computer on your network and use the other CD drive almost as easily as the one attached to your computer.
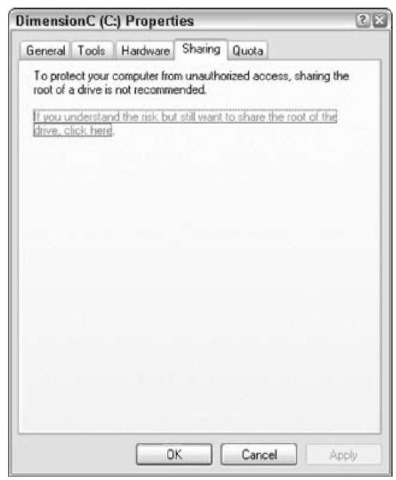
• Figure 48-8: Perfectly good advice for the C: drive. Dreadful advice for a CD drive.
In general, use your own discretion when sharing the root of any drive. Don’t let Windows nag you or scare you into submission. There’s nothing inherently wrong with sharing an entire drive. Just understand that everything on the drive is available according to the settings you pick, and be sure that you trust the other people who have access to your network.
