Technique
Save Time By
Using the Windows Network Setup Wizard the right way
Getting your network secure in no time
The most important part of installing a wireless network comes after the network is up. You have to protect it against random intrusions, in spite of all the weird techy terminology. If you don’t, your next door neighbor will be able to get onto your network, any time.
My first encounter with wireless networking really drove home the point. A friend of mine came over to the house and helped me put together a wireless network — a Linksys WRT54G wireless broadband router tied into an ADSL line. We had it up and running in no time flat, thanks largely to the Windows XP Network Setup Wizard (which I talk about in Technique 45). My friend started downloading a big file, using his portable and its built-in wireless chip.
One thing led to another, my friend got a phone call, and had to leave. As he was walking near the beach, a hundred meters or so away from the house, he sat down, pulled out his portable and opened it. With absolutely no effort on his part, Windows XP connected to my wireless home network, found its way to the Internet, and continued downloading the file.
Scary, eh?
If you have a wireless network, and you haven’t taken the necessary steps to secure it, anybody can get onto your network with essentially no effort. He can use your Internet connection and — most alarmingly — go snooping all over your network, just as if he were sitting in your office, plugged into your router.
Securing your wireless network
is vitally important.
Running the Wireless Network Setup Wizard
Windows XP Service Pack 2 has a lot of nifty new features, and one of the best is the wizard that helps you plug up your wireless network. You need a USB flash drive, or a USB flash card reader, and a free USB port on every computer attached to the wireless network.
If your wireless broadband router, wireless access point, or other wireless base station has a USB port, and it supports Windows Smart Network Key (another meaningless marketing term), you’re in luck: The wizard can configure your entire network in a matter of minutes. If your router doesn’t support WSNK, not to worry — entering the requisite codes by hand is pretty easy.
Here’s how to get your wireless network secure:
7. Choose Start All Programs Accessories Communications Wireless Network Setup Wizard.
The wizard shows its splash screen. Ignore the bafflegab. I don’t think the text on the screen’s accurate, but even if it is, it certainly isn’t relevant.
2. Click Next.
The wizard asks you to type in a name for your network (see Figure 46-1).
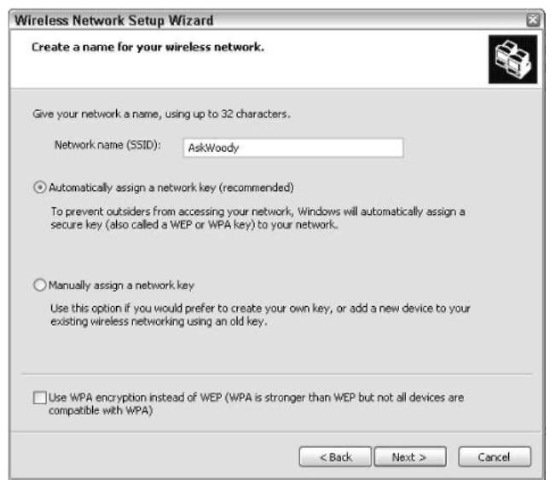
• Figure 46-1: All the security configuration settings are right here, in one easy location.
3. Type a name for the network.
The name of the network is used for the wireless router’s SSID (Service Set Identifier — yet another meaningless acronym), which the wireless box typically broadcasts to make it easy to connect. The SSID is the name that appears when you try to connect to a wireless network. Each wireless router has a default SSID: tsunami, wireless, and linksys are all common default SSIDs.
4. Unless you already have a network key that you absolutely must use, select the Automatically Assign a Network Key radio button.
5. If your wireless base station and all the wireless cards on your network support WPA (if you have 802.11g, they may or may not; with 802.11b, it’s unlikely), check the Use WPA Encryption box.
There is a performance hit for using either WEP or WPA encryption. Your network will run slower — but your neighbor won’t be able to look at your files. Fair trade, eh?
6. Click Next.
Behind the scenes, the wizard generates all the information it needs to set up a secure wireless network.
The wizard asks if it can use a “key drive” (USB flash drive) to set up the network (see Figure 46-2).
7 If you have a key drive (USB flash drive) handy, and a free USB port is on every computer on your network, and all of the computers on your network are running Windows XP Service Pack 2 or later, and your wireless router has a USB port and it understands WSNK (check the manual), select the Use a USB Flash Drive radio button. If not, select the Set Up a Network Manually radio button. Then click Next.
If you click the first button, the wizard takes you through the steps to transfer the settings to all the other computers on the network, as well as the wireless base station. Basically, you schlep the key drive to all the PCs, and they set themselves up.
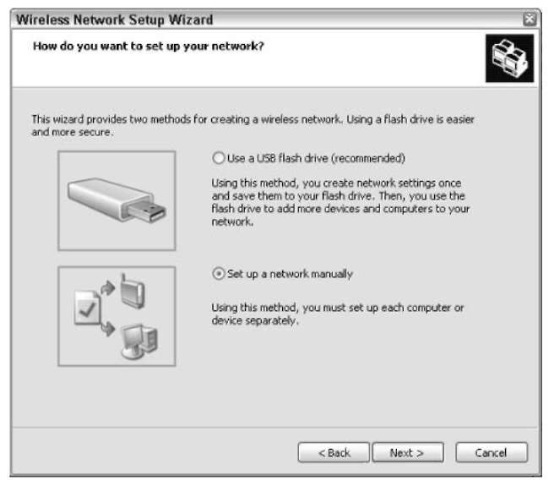
• Figure 46-2: Unfortunately, you can only use a key drive if your wireless router has a USB port, and it understands WSNK.
If your hardware isn’t quite up to the Dick Tracy stage yet, the wizard shows you its final instructions, as shown in Figure 46-3.
8. Click Print Network Settings.
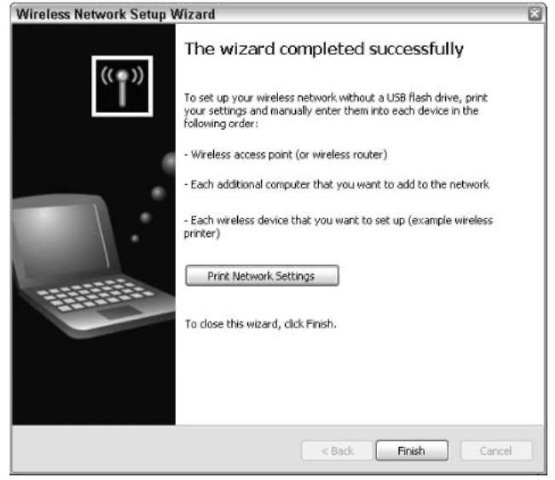
• Figure 46-3: Print the details and enter them manually.
The wizard doesn’t actually print them. Instead, it opens Notepad and sticks the relevant settings in a new text file (see Figure 46^1).
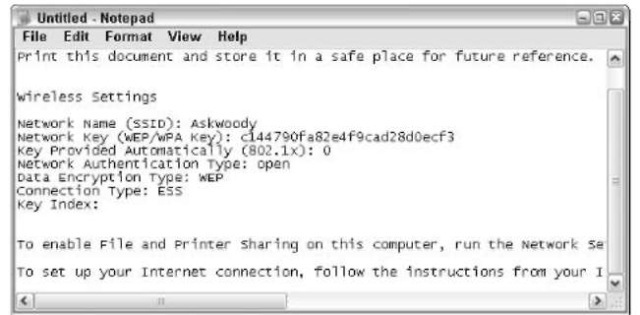
• Figure 46-4: The settings that have to be entered into each wireless device.
9. Print the text file and follow the instructions to transfer the settings to each of your wireless devices manually.
It isn’t as bad as it looks. See the next section.
Making Manual Changes
So you’re stuck with entering wireless network security information by hand. Be of good cheer. The Wireless Network Setup Wizard (see the preceding section) does all the heavy lifting. If you’re running Windows XP Service Pack 2 or later, it’s pretty easy:
7. Enter the new settings in your wireless router or access point.
Unfortunately, every one is different. You may have to dig into the router’s manual. Usually, once you get inside the router, making the changes is easy (see Figure 46-5). The key you need to enter is the one that was generated by the Wireless Network Setup Wizard (refer to Figure 46-4).
2. Make sure you update/apply/save the changes to the wireless router before leaving.
Many routers require you to save the changes manually, so they’ll be around if the electricity goes out.
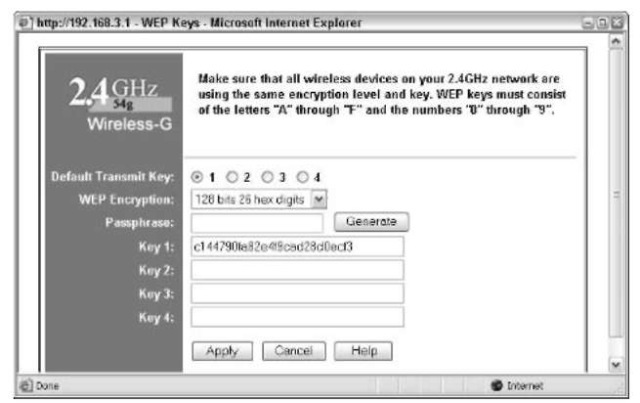
• Figure 46-5: The Linksys WRT54G’s WEP encryption key goes in a specific box. Other routers are similar.
3, Choose Start All Programs Accessories Communications Wireless Network Setup Wizard.
You see that really confusing splash screen again.
4% Click Next.
The wizard asks for a network name (see Figure 46-6).
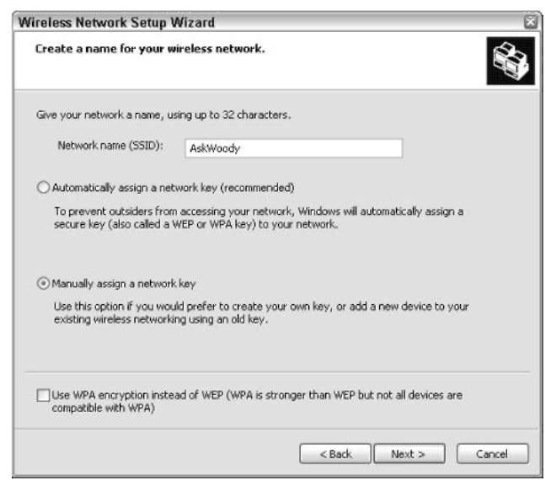
• Figure 46-6: Tell the wizard that you need to manually assign a network key.
5, Type the network name precisely the same way that it appears in the printout from the preceding section. Select the Manually Assign a Network Key radio button and click Next.
The wizard asks you to type the key (see Figure 46-7).
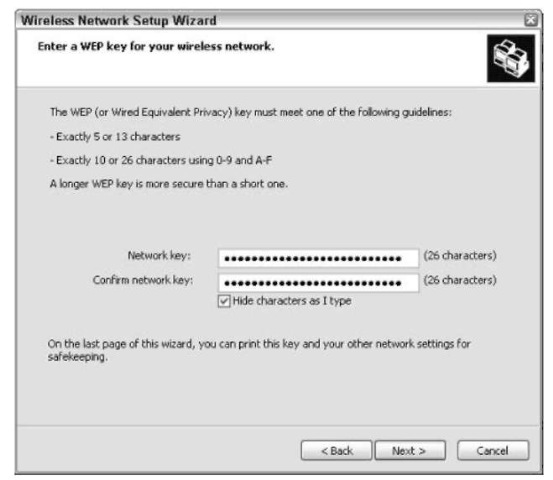
• Figure 46-7: Enter that abysmally long (but ultra secure!) key.
6. Click Next.
You end up at Step 7 in the preceding section, from which point you can print your settings or just close down the wizard.
7 Repeat Steps 3 through 7 on each computer in your wireless network.
The end result: a very secure wireless network that works like a-ringin’ a bell!
If you need help configuring a computer that isn’t running Windows XP Service Pack 2 or later — or if you’re interested in learning what all those obfuscating three letter acronyms really mean — check out Wireless Home Networking by Danny Briere, Walter Bruce, and Pat Hurley.
