Technique
Save Time By
Setting up a password reset disk now — before you need it
Using a password reset disk quickly and correctly
Figuring out what to do if you lost your password and don’t have a reset disk
There’s a downside to creating good, strong passwords. What if you forget yours?
If your PC is connected to a Big Corporate Network (in Microsoft speak, a domain), you can use the password reset disk I discuss in this technique to get on to your PC — but you can’t log on to the network. Should you require files, printers, or anything else on the network, you have to rouse the network administrator and get her to change your password. Then you have to log on to the network and change your password once again. It’s a pain in the posterior, but there’s no alternative. That’s how BCNs work.
If you have a peer-to-peer network (a workgroup in Microsoft speak), or a stand-alone PC, the situation isn’t nearly as dire — providing that you’re prepared. This technique’s password reset disk can have you going in seconds. A few minutes spent creating a password reset disk can save you hours of hassle and pain.
Technique 9 shows you how to make passwords that withstand concerted, knowledgeable attempts to break them.
This technique shows you how to break them. Or at least, how to set things up ahead of time so you can break them. It’s easy, if you know how.
Creating a Password Reset Disk
The minute you turn on password protection for an account, you should create a password reset disk for that account. Why? Because any administrator who can get on your PC can switch your password — and you can do nothing about it!
As I describe in Technique 47, unless you’re attached to a Big Corporate Network, or you’ve taken specific steps to rein them in, every user on your Windows XP system has Administrator privileges. That means anybody can change your password, anytime — even accidentally.
Unless you’re using a Big Corporate Network, a password reset disk is a defensive maneuver. It guards you against the slings and arrows of others who use your PC.
The password reset disk has two severe limitations:
Windows XP forces you to use specific kinds of removable drives when you create the password reset disk and when you use it. In my experience, you can use a floppy disk, a USB-connected flash drive, or other type of drive connected via a USB port (including a Smart Card reader), and even (believe it or not) a camera attached to your PC.
I have had no luck at all using CD-R or CD-RW drives, or other kinds of removable media. Once upon a time, every PC had a floppy drive, and Microsoft assumed that your password reset disk would naturally be a floppy diskette. Times change. Microsoft hasn’t kept up. If your PC doesn’t have a floppy drive, and you don’t own a USB floppy or flash drive, consider plugging in your camera. Most of the time it works. Really.
If you are on a Novell Netware network, you can create a password reset disk — but you can’t use it. Netware doesn’t have a feature that allows you to use the password reset disk, even if you only want to get onto your own PC.
Follow these steps to make a password reset disk:
1 Choose Start Control Panel User Accounts.
2. Click your account.
The User Accounts applet asks what you want to change (see Figure 65-1).
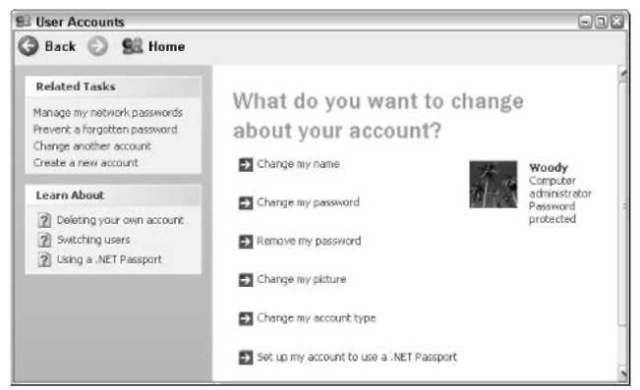
• Figure 65-1: Start the Password Reset Disk Wizard here.
3. In the Related Tasks section, double-click Prevent a Forgotten Password.
The Forgotten Password Wizard starts, as shown in Figure 65-2.
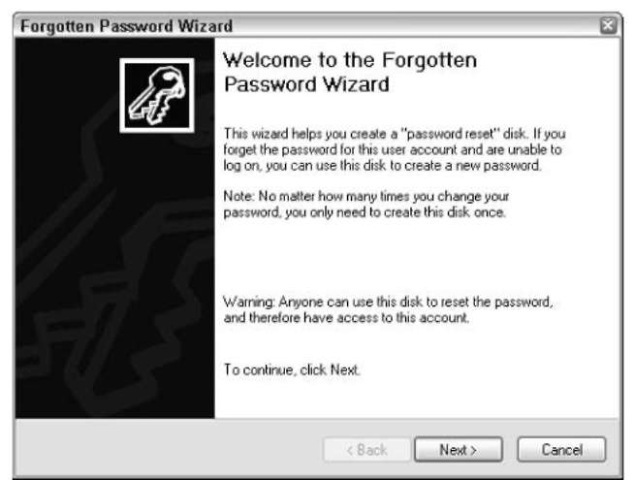
• Figure 65-2: The Forgotten Password Wizard steps you through creating a password reset disk.
4, Click Next.
The wizard asks for a drive, as shown in Figure 65-3. In fact, you can create a password reset disk on various kinds of removable drives, including flash drives or Flash Memory cards, but the most common is a simple floppy.
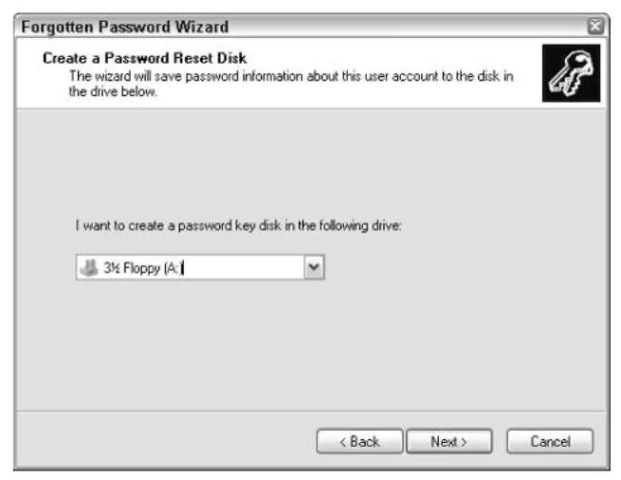
• Figure 65-3: A “password key disk” is a password reset disk.
5, Choose the drive you want to use for the password reset disk, and then click Next.
The wizard asks for the current password, as shown in Figure 65-4.

• Figure 65-4: You must supply the password in order to create the disk.
6 Type the password for the account, and then click Next.
The wizard puts a small file called userkey.psw on the disk, and then displays the final screen.
7, Click the Finish button.
Although Microsoft likes to make it sound like there’s something magical about the password reset disk, in fact there isn’t. The userkey.psw file holds the information that unlocks the account. You can copy userkey.psw onto any disk at all and use it to log in to this particular PC with this particular account. On the other hand, if you use the wizard a second time to create a second password reset disk (in fact, a second userkey.psw), the original password reset disk (userkey.psw) doesn’t work anymore.
No matter how many times you change your password, the last password reset disk (actually, the last version of userkey.psw) created for that account still works. There’s no reason to update the disk when you change your password.
8, Store the disk — specifically, the file
userkey.psw — in a safe place. Anyone who gets the file can log on to your PC without knowing your password.
Using Your Password Reset Disk
So the sad day has come — you can’t remember your password. That’s okay. Happens to everybody — except the folks who write their passwords with permanent markers on the front of their screens. But those people have other problems.
You know you’ve reached that sad state of affairs when the welcome screen greets you with the dour message shown in Figure 65-5.
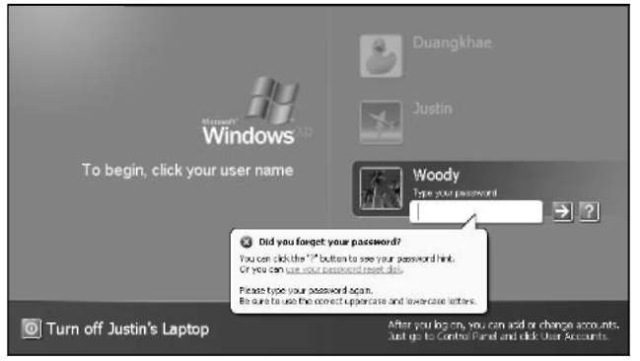
• Figure 65-5: You did remember to make a password reset disk, didn’t you?
If you have your password reset disk handy, here’s how to use it:
7. Click the Use Your Password Reset Disk link on the welcome screen.
The Password Reset Wizard appears.
2. Click Next.
The wizard wants to know where to find your password reset disk.
3. Choose the removable drive that contains userkey.psw (probably your floppy drive, with the password reset disk in it, but you have other alternatives). Click Next.
The wizard asks you to provide a new password (see Figure 65-6).
4. Give the wizard a new password and hint for this account. Click Next.
The wizard reaches into Windows XP and changes the password for this particular user. It doesn’t matter what the old password was, this new password now takes effect.
5. Click the Finish button, and then log on with the new password you specified.
It’s quite remarkable, but the password isn’t stored on the password reset disk (nor is it in
userkey.psw).
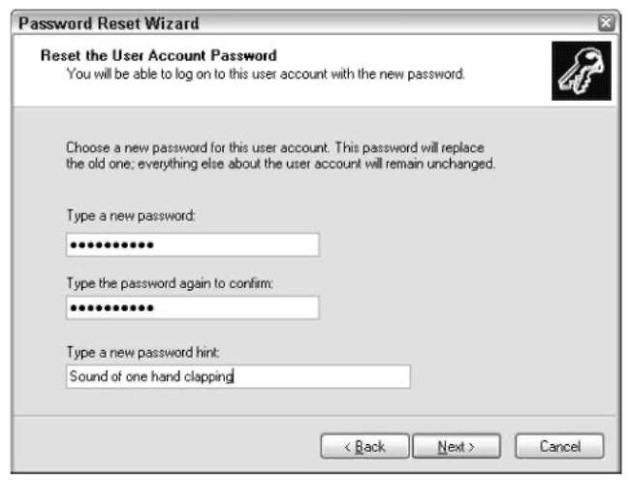
• Figure 65-6: Type a new password for this account.
Getting Around Your Own Password
So what do you do if you forget your password, you don’t have a network administrator to bail you out, and you didn’t create a password reset disk?
In short, you have to go in with a different account and change your password.
If you forget your password, don’t have a pass-| word reset disk, and you’re using the NTFS file system and its Encrypted File System (described in Technique 8), don’t attempt anything listed here — if you succeed in changing the password, you clobber all those encrypted files. (Encrypted File System corresponds to the Make This Folder Private option I discuss in Technique 48.) If you bought your computer with Windows XP installed, chances are good it has NTFS. If you made the My Documents folder inaccessible to other people, you’re using EFS, and you should not undertake any of these steps.
Some companies claim to have software that opens up those encrypted files — www.sunbelt-software.com is among them — but it’s far from a sure thing. Spend some time on the Internet and keep trying.
If your folders are not marked as Private (see Technique 48), try the following steps to get your account back in order.
Log on with a different Administrator account and change your password. This step really is as simple as it sounds. If you don’t believe me, I describe the process in Technique 47. When you change your account’s password, you lose any other passwords that Internet Explorer has stored for you, as well as some other stored passwords — so you may have to provide your password again the next time you check out of Amazon.com, and you have to come up with your dial-up Internet account password, if you have one. But that’s usually a small price to pay.
If there is no other Administrator account, you have to log on to the account named Administrator and change your account’s password.
Windows XP goes to great lengths to hide it, but there’s probably an account called Administrator enabled on your system. You typed a password for that account when you installed Windows XP Pro, even if you have no recollection of doing so.
If Windows has a password for the account called Administrator and you can’t remember it or don’t know it, you are in for some interesting times. The best alternative I’ve seen is to reinstall Windows XP from the original Windows XP Installation CD: Reinstalling gives you an opportunity to provide a new Administrator password without completely wiping out Windows. For instructions on performing a reinstallation, see www.microsoft. com/windowsxp/using/helpandsupport/ learnmore/tips/doug92.mspx.
Here’s how to log on to the Administrator account if you’re running Windows XP Pro:
1 If you use the welcome screen, first disable Fast User Switching.
Choose Start Control Panel User Accounts Change the Way Users Log On or Off, and uncheck the Fast User Switching check box.
Log off (Start Log Off Log Off).
The Windows welcome screen appears.
2. Hold down Ctrl and Alt, and press Del twice.
The old-fashioned Windows 2000 logon screen appears.
3. In the User Name text box, type Administrator. In the Password text box, type the password and click OK.
From that point, it’s easy to go into User Accounts (Start Control Panel User Accounts) and change your own account’s password.
If there is no other Administrator account with Windows XP Home Edition, you have a blank password for the account called Administrator. You need to change it to a real password. Follow these steps to do so:
The only way to change the real password is in Safe Mode. I describe Safe Mode in Technique 63.
7. Follow the instructions in Technique 63 to go into Safe Mode. When you see the welcome screen, click Administrator.
2. Choose Start Control Panel User Accounts.
You see a modified User Accounts dialog box, as shown in Figure 65-7.
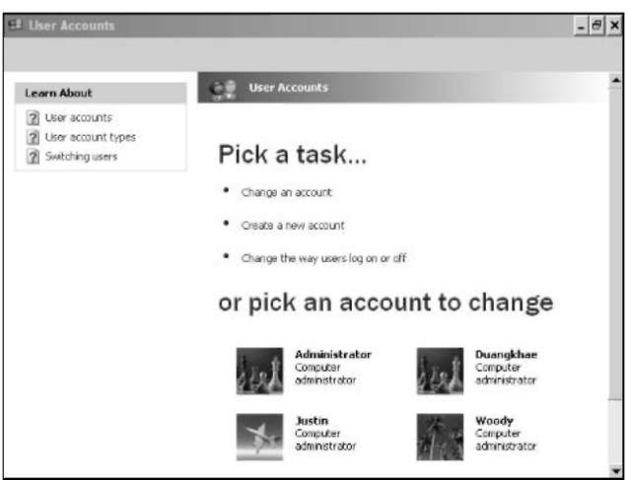
• Figure 65-7: The User Accounts window in Safe Mode.
3, Click Administrator, and then click Create a Password to give the account a real password.
4. Get out of Safe Mode by choosing Start Log Off Computer Restart.
5, If you use the welcome screen, first disable Fast User Switching
Choose Start Control Panel User Accounts Change the Way Users Log On or Off, and uncheck the Fast User Switching check box.
Log off (Start Log Off Log Off).
The Windows welcome screen appears.
6. Hold down Ctrl and Alt, and press Del twice.
The old-fashioned Windows 2000 logon screen appears.
7 In the User Name text box, type Administrator. In the Password text box, type the password and click OK.
From that point, it’s easy to go into User Accounts (Start Control Panel User Accounts) and change your own account’s password.
Good luck.
