Technique
Save Time By
Making a System Restore Point before you install something new
Rolling back immediately with System Restore
Using the Last Known Good Configuration option in a Windows boot
Ever get the feeling that Windows was about to head down the tubes, in a hurry? Before you get to that point, you should make a Restore Point. That way, after your system has gone to Hades in a hand-basket, you can use System Restore to bring it back to its original upright position.
Or something like that.
Finding out how to create System Restore Points takes only a few minutes. If you create a Restore Point before you install an unknown piece of software — oh, I won’t mention KaZaA by name — then you have everything you need to quickly, easily, wipe all vestiges of KaZaA from your system. If you don’t make a System Restore Point, oh man, are you in for a wild ride.
This technique can save you all sorts of time.
You may have read that Windows XP Home Edition doesn’t support System Restore. ‘Tain’t so. Windows System Restore works fine with XP Home. XP Professional users get Automatic System Restore, but unless you’re connected to a Big Corporate Network, you probably don’t want to go to the hassle of wrangling with ASR. Normal ol’ Windows System Restore more than suffices.
This technique shows you how to use System Restore.
Understanding System Restore’s Limitations
Let me just make one thing clear, right off the bat. Windows XP’s System Restore is not a backup program. It doesn’t back up your spreadsheets, keep track of your e-mail, or create automatic copies of all those Word documents you have lying around.
Rather, System Restore takes snapshots of Windows XP that include copies of key system files, all the Registry, various settings for each user — basically everything that’s necessary to roll back Windows to a previous point in time except for your data. And it doesn’t back up your programs, either. Just Windows.
You have to make your own backups, thank you very much. Technique 60 shows you how.
Windows automatically creates snapshots — called Restore Points — on these occasions:
When you install an application (if the installer is a recent one and behaves properly by notifying Windows).
When you install a Windows update, patch, or service pack.
When you install an unsigned driver. (For more about unsigned drivers — programs that make hardware work, which haven’t been approved by Microsoft — see Technique 58.)
When you manually create a Restore Point.
Just before you restore an old Restore Point (so you can, in effect, undo the undo if need be).
Every 24 hours if you keep your computer on all the time, or when you turn your computer on and it’s been more than 24 hours since the last Restore Point. Windows XP waits until there hasn’t been any activity on the machine for a while before creating a Restore Point.
When you restore a Restore Point, only Windows gets restored. That can lead to some mighty confounding behavior.
Say you install a program that you think might be unstable. You create a Restore Point before you install it. The program bombs and takes your system along with it, so you roll back to
the Restore Point. Windows won’t know that the program was ever installed — but the program’s files are still on your hard drive. If you accidentally try to open one of these files before you have reinstalled the program, there’s no telling what might happen. A good guess: Windows chokes on the file, forcing you to reboot.
Creating a Restore Point
Say you have a copy of Uncle Billy Joe Bob’s Blaster Beta, and you’re about to install it. You know Billy Joe Bob doesn’t have a real installer package — one that properly notifies Windows that it’s about to install a program and give Windows a chance to create a Restore Point automatically. It’s time for you to ponder your immediate future.
Maybe the Blaster Beta won’t do anything bad to your system. Maybe it will. Maybe it has a good installer. Maybe it doesn’t.
When in doubt, run a Restore Point before you install new software or hardware. It’s a quick, easy ounce of prevention.
To manually create a Restore Point, follow these steps:
7. Choose Start All Programs Accessories System Tools System Restore.
The System Restore Wizard appears, as shown in Figure 64-1.
2. Click the Create a Restore Point option, and then click Next.
The wizard wants a name for the Restore Point, shown in Figure 64-2, so you can figure out when it was made.
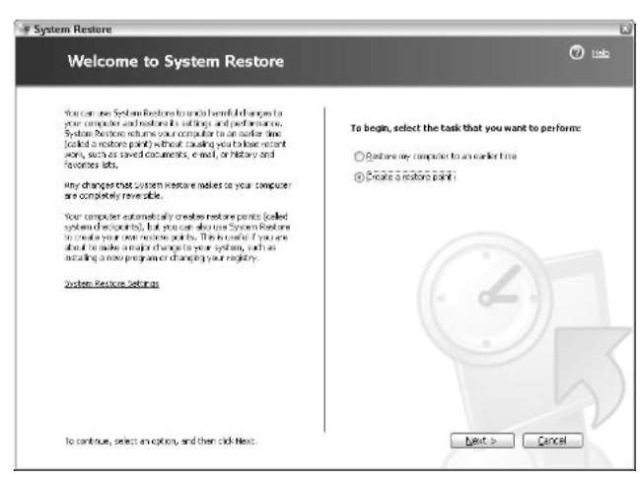
• Figure 64-1: The System Restore Wizard also creates Restore Points.
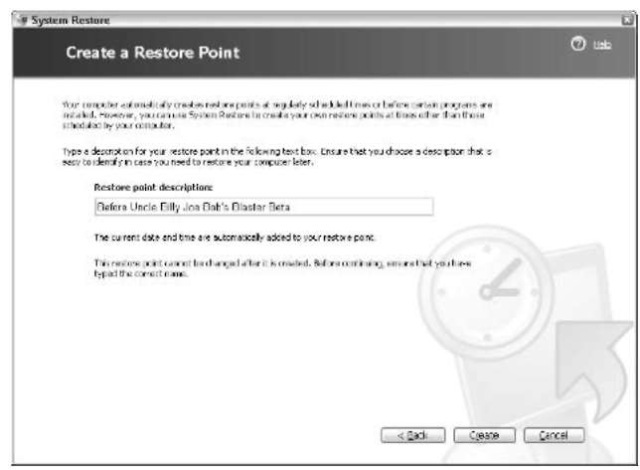
• Figure 64-2: Use a name that you can identify with.
3, Give the Restore Point a name that you will understand a day or a week from today, and then click the Create button.
“System Restore Point May 2″ doesn’t cut it as a good Restore Point name. Why? Because Windows automatically saves the date and time with the Restore Point. Instead use a name such as Before Uncle Billy Joe Bob’s Blaster Beta.
The wizard takes a while to gather all the pertinent data, but when it’s done, you see the report in Figure 64-3.
4. Click the Close button.
Windows XP saves your Restore Points for 90 days, or until the wizard runs out of space. It’s hard to imagine why you would want a Restore Point that’s, say, 73 days old, but if you need it, Windows has it.
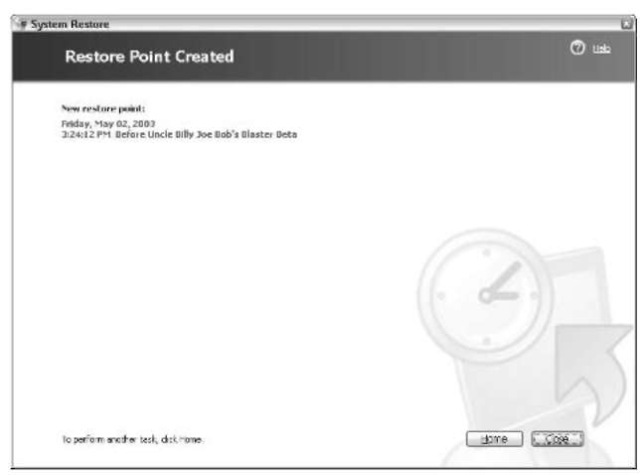
• Figure 64-3: Your official confirmation that the wizard completed its task.
Restoring to a Restore Point — Quickly
So something has gone terribly wrong with your system, and you want to get Windows back to the way it was a day ago (or, if you installed Uncle Bill Joe Bob’s Blaster Beta, maybe just a few seconds ago).
The exact method you use for restoring Windows depends on how badly Windows is hurting.
If Windows isn’t running and won’t start
If you can’t get Windows to start, don’t fret. You can restore Windows to the last Restore Point by following these steps:
1 Reboot your computer.
Every PC goes through its self-test a little differently, but typically you see a counter as the PC tests its memory, and then you see notices about keyboard and mouse drivers, and then you see a notice about your hard drives. (Assuming these don’t flash by so fast you see only a blur.)
2, Immediately after you see the message that your hard drive is alive, press F8 and hold it down.
Windows XP shows you the Advanced Boot Options screen, as shown in Figure 64^1.
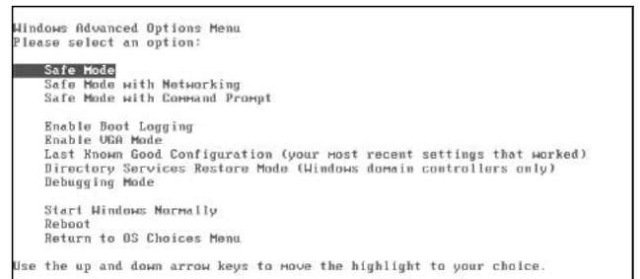
• Figure 64-4: The fast way to restore Windows to the most recent Restore Point.
3, Use the down arrow to highlight Last Known Good Configuration (Your Most Recent Settings That Worked).
4, Press Enter.
The Last Known Good Configuration choice simply runs Windows System Restore using the last Restore Point, and then boots normally.
Windows automatically makes a Restore Point when you restore — so if you run through these steps twice in a row (without setting a new Restore Point), the second time you use Last Known Good Configuration, you get your original (presumably bad!) Restore Point.
If Windows runs
As long as you can coax Windows into running — even if it’s in Safe Mode (see Technique 63) — you can restore to any Restore Point created in the past 90 days.
If you’re rolling back Windows specifically because of a flaky program, start by uninstalling the program. Follow these steps:
1 Choose Start Control Panel Add or Remove Programs, select the program, and click the Remove button.
If the program has a halfway decent uninstaller (not all of them do), this simple step gets rid of most of the program files and other gross pieces of the program.
2, If you’re rolling back Windows because of a bad driver, see Technique 58.
Usually, there’s no need to roll back all of Windows because of a bad driver. On the other hand, sometimes you want to make really, really sure you get rid of all the pieces, so if you follow Technique 58 and it doesn’t solve all your problems, come back here to Step 3.
3, Choose Start All Programs Accessories System Tools System Restore.
The System Restore Wizard appears.
4, Click the Restore My Computer to an Earlier Time option, and then click Next.
The wizard lets you scroll through a calendar full of Restore Points.
5, Choose the Restore Point that will cause the least disruption but still get the job done, and then click Next.
The System Restore Wizard tells you to save and shut down everything.
6 Close any open programs, and then click Next.
The wizard performs the restore, and then immediately shuts down Windows and restarts. When Windows comes back, it tells you that it has been restored.
7 If you want to undo the restore, choose Start All Programs Accessories System Tools System Restore.
The wizard adds an option to undo, as shown in Figure 64-5.
8% To undo, click the Undo My Last Restoration option, click Next, and follow the wizard.
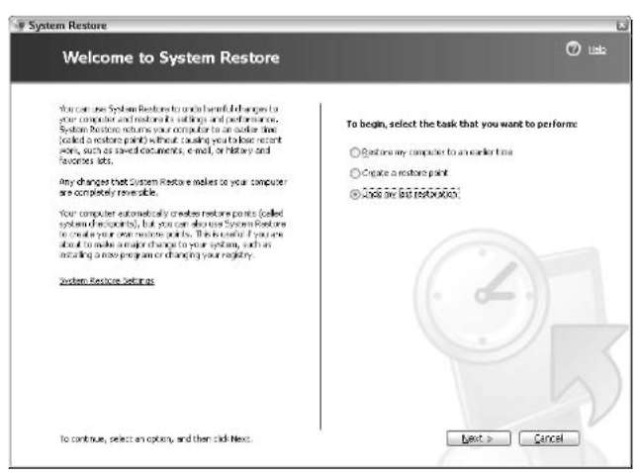
• Figure 64-5: Undoing a restore is very easy.
