Camera Controls
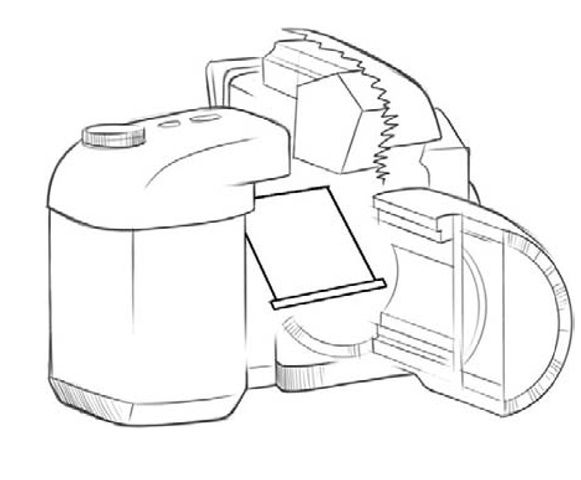
When I first started using digital still cameras, about 10 years ago, I knew very little about the way they worked. I certainly understood film camera technology and soon discovered that digital still camera technology was based on film technology. Even though no film was involved, the principles are the same. There is a sensor chip instead of film but the 45° mirror that sends the image to the viewfinder and shuts out the light from the film/chip plane when it is not being exposed was the same. This is why it is called a single-lens reflex camera. Some newer technologies are eliminating the mirror all together. I ordered about seven different cameras, tested them, and returned all but one for my shoot. What I learned was that all the cameras operate in the same basic way, so once you learn how one works, the rest are easy to figure out.
One of the newer technologies is the 4/3 camera, which eliminates the mirror in the camera housing and allows for a constant monitoring of the image without having to set up the live-view feature. The 4/3 refers to the size of the image sensor inside the camera.
FIG 5.9 A diagram of the 45° mirror on the single-lens reflex camera.
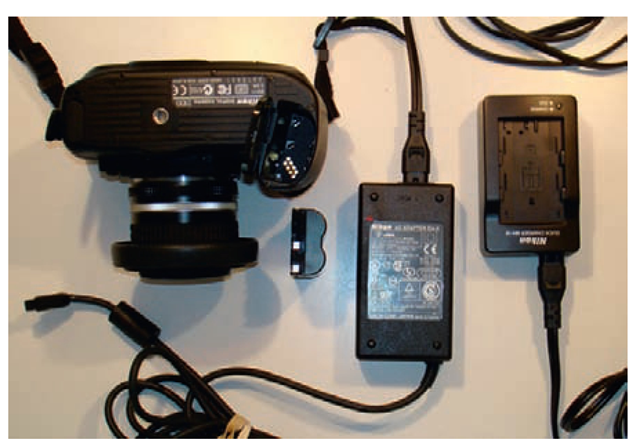
All dslr cameras come with battery and power adapter options. Usually, when you buy a camera the power adapter does not come with the camera. You get a battery and battery charger. You might have to buy the power adapter separately. I feel that this is a worthwhile investment. Many of these frame-by-frame techniques require shooting in locations that are not near power sources, so the batteries are critical to operating the camera. The risk is, of course, that the camera will run out of power before a shot is complete. Yes, you can change the battery in mid-shot if you have a spare charged battery on hand and if you can get to the battery without disturbing the camera.
The issue is that you may risk bumping the locked-down camera in midshot, compromising your image stability. You might potentially get a color shift in the digital camera once you change the battery (although this can be corrected in postproduction, because these shifts are usually minimal). Many cameras have their batteries located on the bottom of the camera body, and if you have mounted your camera on a tripod or a solid flat surface, then you have to move the camera to change the battery. Ultimately, using a power adapter from the beginning of each shot eliminates this problem and allows you to shoot for longer periods of time uninterrupted.
FIG 5.10 A shot of the open camera bottom, battery, power adapter, and charger.
The settings for manual controls are easy to find. A dial for the iris and shutter changes is located on an area near the read-out panel, usually located on the top of the camera. There may be a switch along the side of the lens to put it in manual focus mode. You have to spend a little time with the camera to understand how it works, but that time is well worth it.
A "menu" button on the back allows you to program your camera. Many features are offered in this area, including viewing options, white balance, formatting (erasing all of your images on the camera), and image and file sizes. The image size of your picture is an important choice. New cameras usually have three sizes of jpeg files and what is known as raw. The raw image is all the information that the image sensor can give you with no compression and it gives you the most capabilities for image manipulation in postproduction. The raw file size varies from camera to camera. This is the best-quality image and is much bigger in size than you would need for high-definition playback (which is 1920 pixels wide and 1080 pixels high). Shooting jpeg files (high or medium quality) provides plenty of image to work with later on. It is great having nice-looking images and you can enlarge both the jpeg and the raw images and create more detailed postproduction work on them because of the added data information.
The great advantage to raw images is that they carry a lot more metadata on each image, so if you happen to have the wrong color balance setting during a shoot you can still correct it in postproduction color correction. This is much more difficult with jpeg compression. There is one drawback to using these kinds of larger picture files.
That drawback has to do with the time it takes for larger files to be processed in the camera. It can take from 1 to 15 seconds to allow each frame to be processed and placed on the flash card or computer control system, depending on how old your camera and flash card are. Now 15 seconds does not seem long, but when you are animating a person holding unusual and demanding positions, that 15 seconds times several hundred shots can make all the difference in the successful completion of a shot. If you are shooting objects that can remain stable and unmoving between shots, then the digital still camera processing issue is not a problem, except it may slightly throw off the rhythm of the animator. Humans are not immobile objects. The larger the file format, the longer it takes to process each frame. At this point, you want to consider what kind of camera to use when animating humans or anything that requires a faster shooting pace. The newer compact flash cards, like the Lexar 300X series, have greatly improved this lag time and are often a little more expensive but worth the price. This technology is improving every day, and most of the brand new dslr cameras can capture one frame per second continuously. Digital video cameras capture frames much faster and allow for a faster shooting pace than digital still cameras, because the frames are small in size. High-definition frames take longer than standard-definition frames, but that is rapidly changing. Standard definition frames can look great if you have a good camera. They can be projected well with a good system, but you cannot enlarge those frames very much and any postproduction work will not be as accurate as working with a file with more data and definition. The high-definition files will eventually put all standard-definition images to rest.
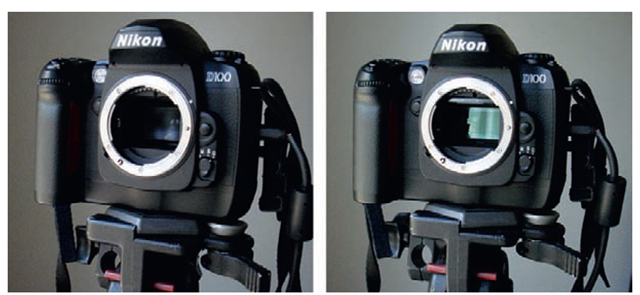
A final note regarding dslr cameras has to do with the basic maintenance of these sensitive pieces of equipment. Dirt, lint, and all sorts of fine particles can get into your camera and sit on the low-pass filter in front of your image sensor. Sometimes static electricity makes this happen. Changing lenses is the main way that dust can get onto the filter and sensor. Try to keep lens changes to a minimum and change only in a clean, interior room. If you need to change lenses on location or outside, try to do it inside a car or out of the wind to avoid windblown particles entering the camera. You can clean the filter, but it is very delicate work. Some of the newer pro-sumer grade cameras have ultrasonic auto-sensor-cleaning as an option. But, often, the dirt has to be swabbed out by hand. Most dslr cameras have a sensor-cleaning mode, which requires you to lift and hold the mirror open revealing the low-pass filter in front of the sensor. This can be carefully cleaned with a proper swab, like the Sensor Wand, and proper cleaning fluid, which you can get at a photography store. Also, you can blow antistatic pressured air on the filter to remove dirt. You might seriously consider having a reputable camera store clean your image sensor. Cleaning it yourself can result in a scratch on the low-pass filter, which is costly to replace.
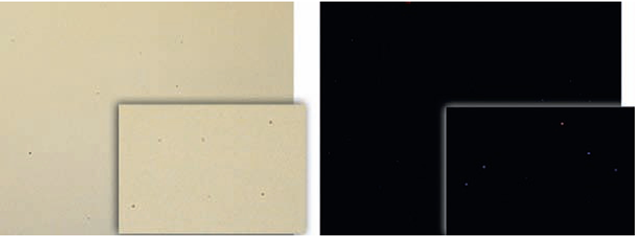
These cameras were made for single-frame shooting and not really for movie making or multihour use of multiframe exposures. Sensors can overheat when they are in live view for long periods of time. So the cameras get what I call pixel burnout (also referred to as hot pixels or stuck pixels). This is usually apparent when shooting into a darker compositional field or during long exposures. When you throw the individual picture files onto a large screen you can see bright little spots that are the burned pixels. Blue seems to be the first color that appears in these pixels. Eventually, you have to have your image sensor replaced, but in the meantime, there are postproduction solutions like pixel sampling. This basically identifies the burned out bright pixel and replaces it with the color of the pixel next to it.
Burned pixels and dust on the sensor or low-pass filter are especially noticeable on moving shots. They are also much more difficult to clean up on a moving camera shot over locked-down shots. It is better to address the issue (of potentially replacing the sensor) than trying to fix each problem in postproduction. You should include sensor cleaning as a standard part of your camera maintenance plan.
FIG 5.11 A shot of an open camera with the mirror and mirror lifted to expose the low-pass filter.
FIG 5.12 An example of dirt on the low-pass filter and examples of pixel burnout.
Lighting for Animation
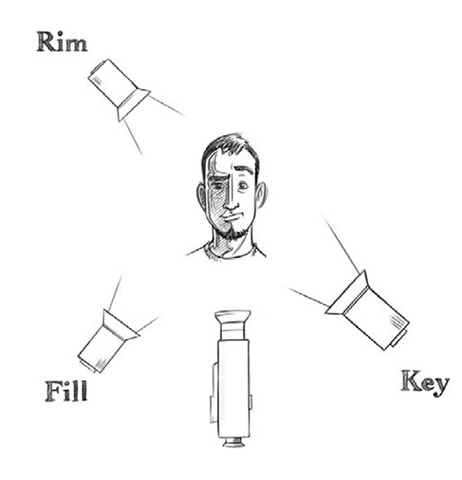
Lighting is a real strength in photographic animation. One of the worst mistakes to make in any stop-motion technique is to light an image with flat, overall lighting. Lighting should give form, dimension, atmosphere, drama, and life to any object or person. Selective lighting can make the composition in stop motion feel larger, adding mystery and drama. Side or underlighting can add tension and weight. This is a huge area to explore and experiment in, but it is important to understand the basics first. The simple formula for basic lighting is to use key, rim, and fill lighting to get the best result. This is known as three-point lighting.
FIG 5.13 A diagram of the key, rim, and fill three-point lighting setup.
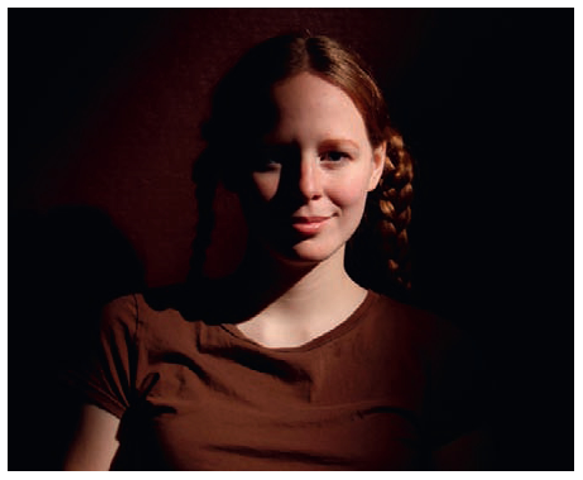
Simplicity can also be very effective. Single-source studio lighting has a very dramatic look and you use only one light.
FIG 5.14 An example of single-source lighting with no bounce card.
There are all sorts of lighting combinations, but trying to maintain one main shadow with a key light is the best place to start. When you light a person or object, start with the key and see what it lights, then start building with rims or fill, turning each light on and off to see if you really need it and what its effect is on the person or object. The use of reflector boards and foam core can be very effective as fill light and can be illuminated from the spill of a key light. These lighting techniques have been simulated in painting for centuries. Sfumato is the technique of blending colors with similar mid-tones and creating gentle gradients of color and light, and chiaroscuro is the much more dramatic use of single-source lighting that creates high-contrast lights and darks. Leonardo da Vinci was a master of the former and Rembrandt mastered the latter.
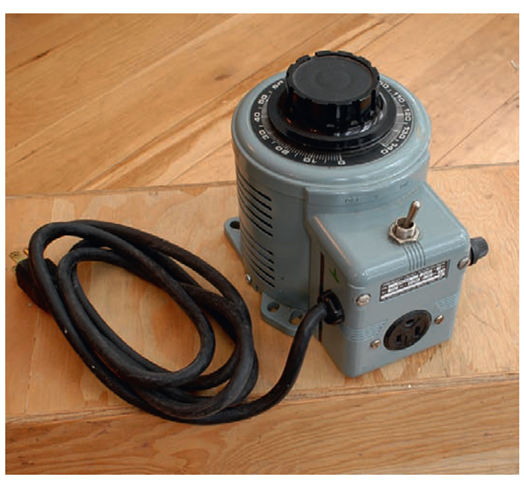
Moving or animating the lights in a shot is another element to consider when preparing your preproduction. We have moved light sources with the light painting technique discussed earlier. You can also move lights on stands frame by frame with guides for smoother effects. Use your software capture program to gauge the light movement. Professionals often use computer operated motion control to move lights around a set. It is virtually impossible to achieve the same lighting effect in postproduction. Rheostats or dimmers are another way to fade lights in and out of shots. If you are turning lights on and off constantly, then consider using rheostats to help extend the life of the bulbs. Switching bulbs on and off can be very hard on the filaments in the bulb, and they burn out a lot faster.
FIG 5.15 Shot of a professional rheostat.
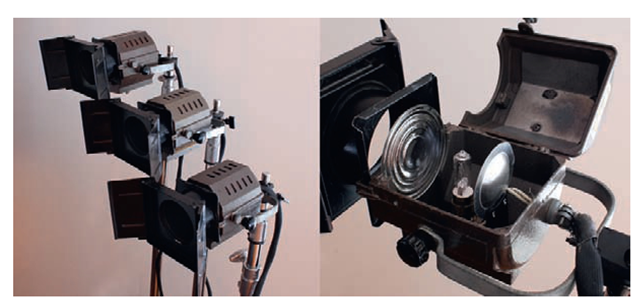
What size lights should you use? Generally, the same rules that apply for live-action lighting apply to stop motion but on a smaller scale. Instead of using a 650 watt bulb for a key light, you might consider a 150 watt bulb. Most stop motion is on a smaller scale, so overlighting can be a problem. The only real exception might be shooting done in a studio with pixilation of people or additional lighting needed for "out in the field" Since the subject matter is larger, you need to cover more ground. It is logical. Lamps that have Fresnel lenses for focusing and softening the light are very helpful. There are many brands, and it is not necessary to pay high prices for these lamps. You can find lamp housing with barndoors, which are used for stage lighting, and the cost is less than the traditional movie lighting brands. LEDs (light-emitting-diodes) are another wonderful, if slightly expensive, alternative to miniature lighting of objects. They are bright, often colored, cool in temperature, and highly efficient. The color temperature of lights used to be an issue when shooting film, because the film labs would develop the film based on daylight temperatures. If your lights were warmer than 3200 foot candles (the lighting measurement standard for daylight), then the film would come out yellow and red. Now, when you shoot a dslr camera with any light, you can see what the final image is immediately and adjust any number of controls, like white balance (in manual mode), to correct for the color imbalance. There is also the postproduction color correction option (especially if you have raw files).
FIG 5.16 Several small 150 watt lamps with Fresnel lenses and barndoors.
Finally, I want to mention indoor and outdoor lighting and the effects of shadows. Indoor shooting has much more control because you are the one setting the lights. Outside, the big key light in the sky, otherwise known as the sun, is in control. If your shadows are too dark on an inside shoot, then you need to add fill light for a bit of definition on the subject. The shadows are stable or move only when your animated subject moves, but outside the story is different. Since the earth is constantly moving, the relationship to the sun changes and shadows move in an even fashion. We can see this quite clearly in an extended piece of time-lapse photography outdoors. Exterior fill lights have to move or shooting times have to be very short. So, if you are shooting pixilation outdoors, then you want to think about the rate of shooting you need to maintain to have even shadow movement. Erratic shadow movement can be very distracting, unless it is part of the overall effect.
Compositional Beginnings and Ends
Like time-lapse filming, any of these stop-motion techniques can use camera movement to enhance a shot. We explored motion control, geared heads, and even moving the camera itself by hand with a guide. The important point to keep in mind is the beginning and end positions of your camera and the continuously changing composition. It is absolutely critical to practice a run-through of the movement before you commit to shooting frames. In more traditional puppet stop-motion film, animators perform what is known as a pop-through. This is a run-through of the move that records camera and subject movement every 5 to 10 frames. Any issues that arise are revealed with the changing lights, shadows, focus, and other difficulties that you will encounter. Once you have addressed these problems, you can adjust for them and the choreography of your shot flows smoothly. Know where you are going, so the camera and subject matter can stay in sync with the camera. This is the equivalent of the cue mark for live-action actors.
One wonderful resource to consider is Joseph Mascelli’s The Five C’s of Cinematography: Motion Picture Filming Techniques. Camera angles, continuity, cutting, close-ups, and composition are all important elements to any film production, including frame-by-frame animation. Many consider this text a classic for filmmakers. The next area that we investigate is the actual subject to be animated. What or who will be put in front of the camera and manipulated in a slow and arduous process? Are there any ways to make this work easier or does the term no pain, no gain apply? This is what we explore next.
