Before you can start using an iPhone for email,you have to configure the email accounts you want to access with it.The iPhone supports a number of standard email services including MobileMe, Exchange (by far the most widely used email system in business), Gmail,Yahoo! Mail, and AOL. You can also configure any email account that uses POP (Post Office Protocol—and no, I’m not making that up) or IMAP (Internet Message Access Protocol); this is good because almost all email accounts provided through ISPs (Internet service providers) use one of these two formats.
There are many ways to configure email accounts on an iPhone, including the following:
• Using MobileMe You can configure a MobileMe account on an iPhone with just a few simple steps.When you set up a MobileMe account on an iPhone, you also configure email access. See Chapter 4,”Configuring and Synchronizing Information on an iPhone,” to learn how to set up a MobileMe account on an iPhone.
• Syncing email accounts on computers You can configure email accounts on an iPhone by syncing it with your email accounts on both Windows PCs and Macs.This process is similar to moving other information onto an iPhone and is also covered in detail in Chapter 4.
• Configuring Gmail,Yahoo! Mail, or AOL email accounts manually
An iPhone is designed to work with these email accounts and has specific account configuration tools for them. In the next section, you learn how easy it is to set up one of these accounts on your iPhone.
• Configuring an Exchange email account manually Microsoft’s Exchange email system is the most widely used email in business. Fortunately (or unfortunately, depending on your point of view), you can configure an iPhone to work with your Exchange email account, so you have access to work-related email. (Hey, an iPhone can’t be all fun and games!)
• Configuring other email accounts manually If you have an account that isn’t configured on a computer and isn’t one of those listed in the previous bullets, you can add it to an iPhone manually with just a bit more work.
After you have created email accounts on an iPhone, you can do some advanced configuration to tweak the way they work.
step-by-step
Configuring Gmail, Yahoo! Mail, or AOL Email Accounts on an iPhone Manually
An iPhone is designed to work easily with email accounts from these providers. Although the details vary slightly between these types of accounts,the following steps (which happen to show a Gmail account being configured) show you how to configure any of these accounts.
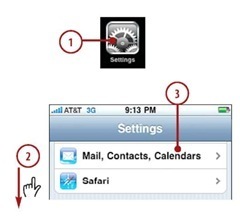
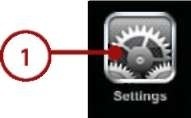
1. On the Home screen,tap Settings.
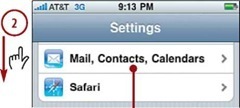
2. Scroll down the screen.
3. Tap Mail, Contacts, Calendars.
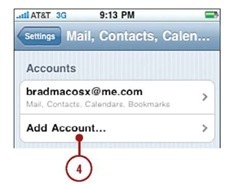
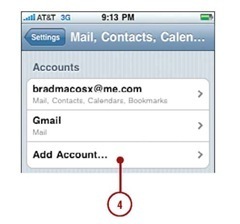
4. Tap Add Account.
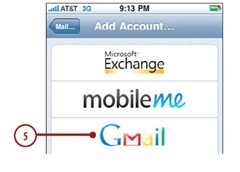
5. Tap the kind of account you want to configure.The rest of the steps are for a Gmail account,but configuring Yahoo! Mail or AOL accounts is similar.
Gmail POPs Is for Me
If you don’t have a Gmail account, you can sign up for a free one at mail.google.com.When you set up the account, make sure that you select the POP option. If you already have an account, log in to your Google account, choose Gmail settings, click the Forwarding and POP tab, choose the Enable POP for all mail option,and save your changes. If your Gmail account is not POP-enabled, it won’t work on an iPhone.
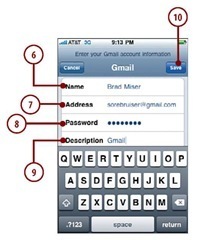
6. Enter your name.
7. Enter your Gmail email address.
8. Enter your Gmail account password.
9. Change the default description, which is your email address,if you want to.This description appears on various lists of accounts.
10. Tap Save. Your account information is verified.When that process is complete,you see the Mail, Contacts,Calendars screen,which shows the account you configured on the Accounts list.The account is ready to use.
11. If you want to perform advanced configuration of the account,refer to “Performing Advanced Configuration of Email Accounts on an iPhone,” later in this chapter.
Bonus Task
Please go to this topic’s website at www.informit.com/title/ 9780789742315 and click the Downloads tab to find two additional tasks titled,”Managing Email Accounts,”and “Deleting Email Accounts.”
![tmp3946_thumb_thumb[1] tmp3946_thumb_thumb[1]](http://lh3.ggpht.com/_X6JnoL0U4BY/S0rzeHZENCI/AAAAAAAAAwU/4qNeq8LQswU/tmp3946_thumb_thumb1_thumb.jpg?imgmax=800)
Configuring Exchange Email Accounts on an iPhone Manually
Microsoft Exchange is the most widely used system for corporate email.The iPhone’s email application is compatible with Exchange, which is good news indeed.
There are two ways to connect an iPhone to an Exchange account (which can include email, calendar, and contacts). One is to go through an Outlook Web Access (OWA) service; this service enables you to access your Exchange account over the web.The good news about this is you don’t need any support from your organization’s IT department to configure an iPhone to access your Exchange account.The other option is for your organization’s Exchange system to be configured to support iPhone email access directly; this does require support from the IT department. Some additional configuration work (and slight expense) is needed by the IT department to enable this.
If you already know you can access your Exchange account through OWA, you’re ready to configure your Exchange account on an iPhone, and you can move ahead with these steps. If you aren’t sure, check with your IT department to see if OWA is supported. If it is, use these steps to configure it on an iPhone. If OWA isn’t supported, find out if the Exchange system has been configured to support iPhones and iPod touches. If it has, get the configuration information you need from your IT department and use that to configure the Exchange account on your iPhone.You do this similar to other types of accounts, mostly by providing the information related to your account in the appropriate locations.
![]()
The following steps show you how to configure an Exchange account via OWA.
1. On the Home screen,tap Settings.
2. Scroll down the screen.
3. Tap Mail, Contacts, Calendars.

4. Tap Add Account.
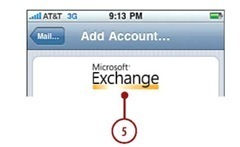
5. Tap Microsoft Exchange.
6. Enter your email address.
7. Enter your domain.
8. Enter your username.
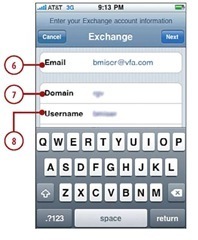
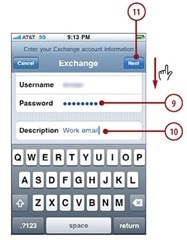
9. Scroll down the screen and enter your password.
10. Enter a description of the account. (The default is your email address.)
11. Tap Next.The account information is verified,and you see the Exchange screen with your information and some additional fields. (If the security certificate or other information can’t be veri-fied,just tap Accept anyway.)
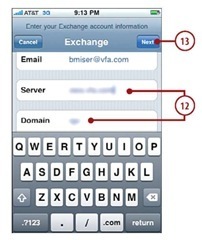
12. Enter the server address.If you are using OWA, this might be something like owa.yourcompany.com. You don’t enter the https:// before the address you use to move to the server via a web browser or the /exchange after that address. If you’re not using OWA, enter the address provided by your IT department.
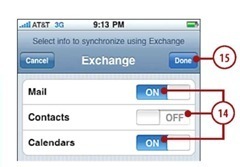
13. Tap Next.The account information is verified, and you see the controls that enable you to determine which information is synced on an iPhone.
14. Tap ON for any of the information you don’t want to be moved onto an iPhone; its status becomes OFF to show you it won’t be moved onto the iPhone. If ON is shown, that information is moved onto the iPhone.
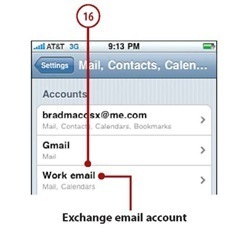
15. Tap Done.The sync is configured, and you move back to the Mail, Contacts,Calendars screen where you see your Exchange account. Under the account description, you see the information that is being synced with the account, such as Mail or Calendars.
16. Tap your Exchange account.
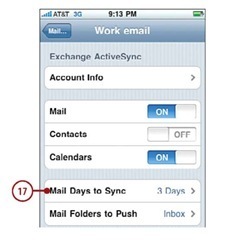
17. Tap Mail Days to Sync.
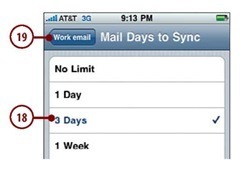
18. Tap the amount of time over which Exchange information should be synced. For example,to have one week of Exchange information on an iPhone,tap 1 Week.
19. Tap the Return button,which is labeled with your email account’s description.
Problems Sending Mail?
You might have trouble sending email from some kinds of email accounts provided by an ISP when you are using a network that isn’t provided by that ISP. For example, many email accounts provided by an ISP (such as a cable company) require that any mail being sent come from the IP address associated with that account, which means you can only send mail when you are accessing the Internet from a network with an IP address that the ISP’s network recognizes (such as your home network).This won’t be the case when you are out and about with an iPhone using a Wi-Fi network, so you can’t send email from these accounts on an iPhone.You can still receive email for these accounts, but you can’t send it.
There are several possible solutions.The easiest one is to select an account from which you can send email when you are outside of your network. (How to do this is explained later in this chapter.) In some cases, you can configure email to be sent by using a specific port. (You usually have to search the ISP’s help information to find out what this is.) To do this, you need to use the Advanced configuration settings for the email account with which you are having trouble sending email; this is explained in the following section.The third option is to configure a different email account on an SMTP server (Simple Mail Transfer Protocol)—the server that sends email—that you can send email from for the account that you can’t send mail from; use the information in the “Performing Advanced Configuration of Email Accounts on an iPhone” task to do this. Finally, you can enable the SMTP server that your iPhone provider includes if it does provide one; this is also covered in the next section.
![]()

Performing Advanced Configuration of Email Accounts on an iPhone
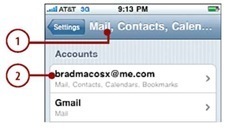
Different kinds of email accounts have different sets of advanced configuration options,but you access those options in a similar way for all accounts. The following steps show details for a MobileMe account. To do advanced configuration of other accounts, you use similar steps, but the details for the specific accounts you are configuring will differ.
1. Move to the Mail, Contacts, Calendars screen.
2. Tap the email account you want to configure.
3. Tap Account Info.
4. Tap Advanced.
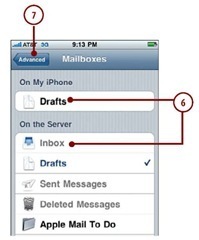
5. Tap Drafts Mailbox.
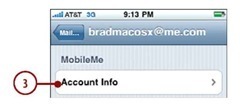
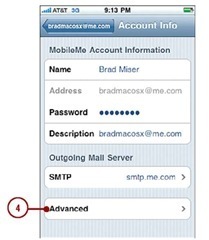
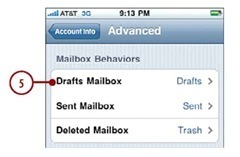
6. To have drafts of your emails stored on the iPhone,tap Drafts in the On My iPhone section,or to have them stored on the server, tap Inbox or one of the other folders in the On the Server section. The advantage of storing drafts on the server is you can work on them from any location that can access your MobileMe account, such as a computer. If you save them on an iPhone, you can only work on them using the iPhone.
7. Tap Advanced.
8. Using the information in steps 6 and 7, set the location where your sent email is stored and where deleted messages are stored.The options are the same as for draft messages.
9. Tap Remove.
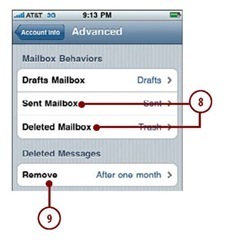
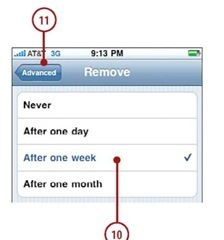
10. Choose when you want deleted email to be removed from the server. The longer the timeframe, the longer storage space on the server is used for deleted messages, but the longer you will be able to recover those messages. In most cases, the amount of space you have on the email server associated with the email account is limited, so it’s better not to store messages you have deleted there for a long period of time.
11. Tap Advanced.
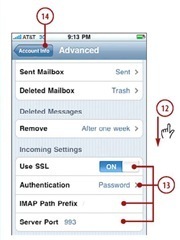
12. Scroll down so you see the Incoming Settings section.
13. If you should ever need to change any of the settings that enable you to retrieve email for the account,use the fields in the Incoming Settings section to do so. It is unlikely you will need to change these settings,assuming you synced the account with a computer or were careful when you first configured it.If you ever do change the settings,you need to make sure they match the incoming mail server information provided for the email account by
the ISP.
14. Tap Account Info.
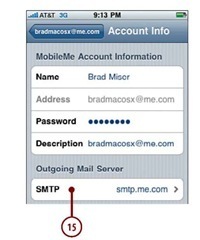
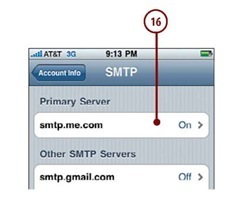
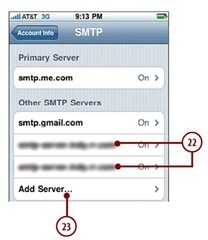
15. Tap SMTP.You move to the SMTP screen for the account. Here, you see all the SMTP servers for the various email accounts configured on your iPhone. At the top of the screen is the primary server, which is the one that iPhone always tries first when you send email from the account you are working with. The Other SMTP Servers list shows other servers that are configured. If a server’s status is On, the iPhone will attempt to send email via that server if the primary fails. It’s useful if you have at least two SMTP servers On for each email account.
16. If you need to enable or disable the primary server,tap it.
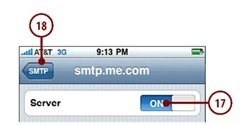
17. To turn the server off for the account,tap ON;the status becomes OFF,and that server will not be used to send email from the account.
18. Tap SMTP.
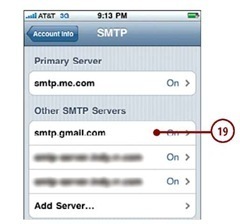
19. To configure another SMTP server for the account,tap it on the Other SMTP Servers list.
20. To disable the server for the account,tap ON so the status becomes OFF.That server won’t be used when sending email through the primary account fails. To enable the server,tap OFF,so the status becomes ON.When sending messages through the primary server fails,the enabled server will be tried.
21. Tap SMTP.
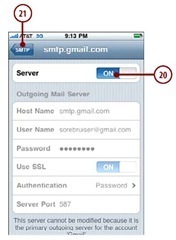
22. Enable or disable other STMP servers.
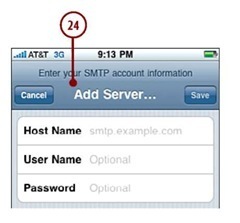
23. To add a new SMTP server,tap Add Server.
24. Configure the server with the Add Server screen.
Changing SMTP Server Settings
If the fields for an SMTP server are disabled, it means the server is the primary for at least one of your email accounts,and so you can’t change it from the current one.To make changes to that server, move to the Advanced screen for the email account for which it is the primary SMTP server and use its tools to make the changes to the server settings.
