Apple’s MobileMe service provides you with a number of features including online disk space, an email account, an online photo gallery, and more. When it comes to your iPhone, MobileMe offers one primary benefit, and it is a really good one. With MobileMe, you can keep your contacts, calendar, web favorites, and MobileMe email in sync between computers and your iPhone wirelessly. Instead of having to connect your iPhone to a computer to move information over the USB cable, information (such as your email) is moved directly from the Internet onto iPhone via its cellular data or Wi-Fi Internet connection. Not only is this easier, but also your information remains much more current on all your devices.
MobileMe isn’t free. Currently, an individual MobileMe account is $99 per year, and the cost of a family account is about $149 per year. However, you can sign up for a free trial account that is available for 60 days. At the end of that period, you can choose to cancel the account if you don’t find it valuable.
There are three general steps required to use MobileMe with an iPhone. One is to obtain a MobileMe account.The second is to configure MobileMe on your computers; this task is slightly different on Windows PCs or Macs, so you’ll find a section for each kind of computer.The third step is to configure iPhone to access the information provided by MobileMe; these tasks are described in the relevant chapters but are primarily discussed in Chapter 4, “Configuring and Synchronizing Information on an iPhone.”
>>>step-by-step
Obtaining a MobileMe Account
To begin your free trial MobileMe account,follow these steps.
1. Use a web browser to move to www.apple.com/mobileme/.
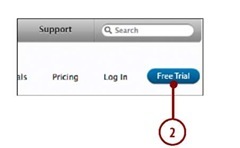
2. Click Free Trial.
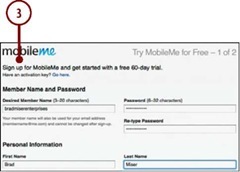
3. Follow the onscreen instructions to obtain your MobileMe account. This involves creating your member name and password and providing contact information and a credit card (which isn’t charged until the end of your free trial period). At the end of the process, you’ll have a MobileMe member name and password.You use this information to access MobileMe services on all your devices.
Your Member Name Is Important
Be careful about what you choose as your member name;in addition to using this to log in to MobileMe, it becomes part of your email address.You can’t change your member name after you’ve created your account.
Configuring MobileMe on a Windows PC
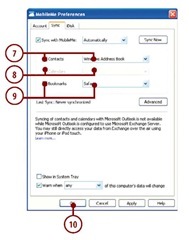
Use the MobileMe control panel to configure MobileMe syncing on a Windows PC.
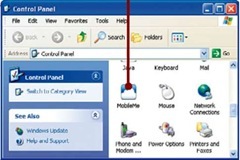
1. Open the MobileMe Preferences control panel. (If you don’t have this control panel,you aren’t using the current version of iTunes. Go back to the “Updating iTunes” section and update iTunes.)
CD
2. Enter your MobileMe member name and password.
3. Click Sign In.Your computer connects to your MobileMe account. In the Account Status section,you see information about your account,such as the amount of disk space you have,when the account expires,and so on.

Exchange Handled Separately
If you have an Exchange account, you don’t use MobileMe to sync your calendar or contact information. Instead you configure the Exchange account on iPhone and choose which information to sync with it. (This is explained in Chapter 7,”Emailing.”)
4. Click the Sync tab.
5. Check the Sync with MobileMe check box.
6. On the top drop-down menu, choose how frequently the sync happens.Choose from Hourly, Automatically,and Manually. If you select Manually,you must click the Sync Now button to sync iTunes to your iPhone.
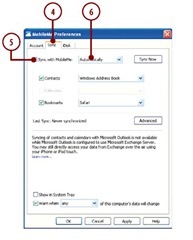
7. If you want your MobileMe contact information to be included in the sync,check the Contacts check box and choose where you want the contact information stored, such as in the Windows Address topic.
8. To include MobileMe calendar information in the sync,check the Calendar check box and choose the location of the calendars to be synced from the drop-down list.
9. To have your topicmarks moved into the MobileMe cloud,check the topicmarks check box and choose the web browser where the topicmarks you want to sync are maintained (Internet Explorer or Safari).
10. Click OK. If you selected any option but Manually in step 6, the information you selected is copied from the computer to the MobileMe cloud where you can access it on iPhone,and the process is repeated according to the schedule you set. If you selected Manually,click the Sync Now button to move the information.
11. Skip to the section titled “Managing MobileMe Syncs.”
Configuring MobileMe on a Mac
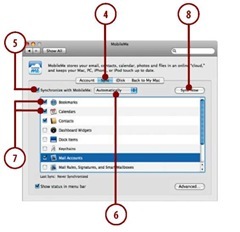
Use the MobileMe pane of the System Preferences application to configure MobileMe syncing on a Mac.
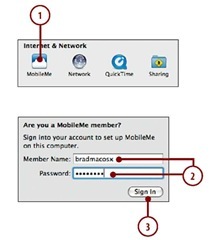
1. Open the System Preferences application and click the MobileMe icon.
2. Enter your member name and password.
3. Click Sign In. Your account information is configured, and the MobileMe pane updates to show that you have configured MobileMe.
4. Click the Sync tab.
5. Check the Synchronize with MobileMe check box.
6. On the pop-up menu, select how you want synchronizations to occur.You can choose Manually to sync manually; choose a time, such as Every Hour, to sync at those times; or choose Automatically to have syncs performed whenever included data changes.
7. Check the check box next to each item you want to include in the syncs.
8. Click Sync Now. The information you selected is copied onto the MobileMe cloud where you can access it from iPhone. Future syncs happen according to the schedule you set, or if you selected Manually, you have to click the Sync Now button whenever you want to sync your information.
Managing MobileMe Syncs
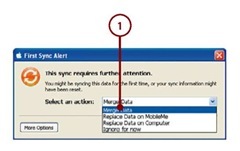
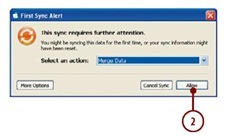
As information changes on your iPhone or on a computer, that information is synced via the MobileMe cloud.When this happens, the differences between data on each device must be managed.You decide what happens the first time you sync,and you manage the process each time thereafter. Choose Merge Data if you want the data on MobileMe to be merged with the information on your computer. Choose Replace Data on Computer to replace the information on your computer with information stored on the MobileMe cloud. Choose Replace Data on MobileMe to have the information on your computer replace the data on the MobileMe cloud. Choose Ignore for Now if you don’t want any action taken.
>>>step-by-step
Syncing for the First Time
The first time you sync information via MobileMe (or if you reset your sync options),you decide how you want information to be moved.You are prompted via the MobileMe Sync Alert dialog.
1. At the prompt,choose how you want information to be moved.
2. Click Allow. The sync proceeds.
Managing Sync Alerts
During syncs, you are prompted when the amount of data changes beyond the limits you set on the MobileMe Preferences control panel or the MobileMe pane of the System Preferences application. For example, you might choose to be notified when more than 5% of the computer’s data will change.When this happens, you see a dialog that enables you to make selections about how data is moved.You can use the controls in this dialog to review the changes and accept or prevent them as you see fit. When you’ve decided, you click the appropriate Sync button to allow the sync to proceed. If these prompts get too annoying, move back to the MobileMe preferences and increase the percentage of data change that triggers a notification or disable the notifications entirely.
This Isn’t a topic on MobileMe Either
If you get a MobileMe account, make sure you explore all it has to offer, including the great web applications for email, contacts, and calendars.You might find that its iDisk online disk space is worth the cost of an account on its own.
