In This Chapter
Getting to know the Clock application
Modifying your clock
Setting alarms
Setting Bedside mode
Using the BlackBerry stopwatch
Setting the BlackBerry timer
Making your life easier with Password Keeper
In this chapter, we introduce you to the Clock application, which not only tells you the time, but also allows you to set alarms and a timer. In addition, you can use the application as a stopwatch. And in keeping with one of the key themes of this topic — making your life easier — the Clock app has a feature called Bedside mode that turns your Curve into a quiet bedside companion.
To add to the theme of making your life a little easier, we make sure that you get the scoop on keeping your passwords in a single location safely by using the Password Keeper application.
Accessing Clock
Clock can be found right on the Home screen, as you can see on the left side of Figure 6-1. Just look for the icon of an alarm clock. Once you find the Clock icon, simply select it, and you should see a screen similar to the one on the right side of Figure 6-1.
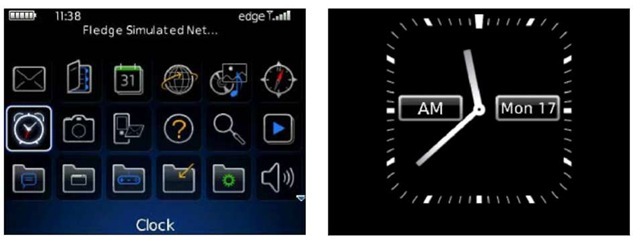
Figure 6-1: Launch Clock (left) and view your clock (right).
If you’ve changed themes, different icons might be displayed (refer to Chapter 3 for more on themes). Just remember that the Clock application is always located on the Home screen.
Customizing Your Clock
If the default analog clock doesn’t fit your taste, you can change it. Customizing your clock is easy and doesn’t take much time.
You customize the clock in the Options screen. Follow these steps:
1. Select Clock from the Home screen. The Clock application opens.
2. Press the menu key and then select Options.
The Clock Options screen appears, as shown on the left side of Figure 6-2, ready and willing to be customized.
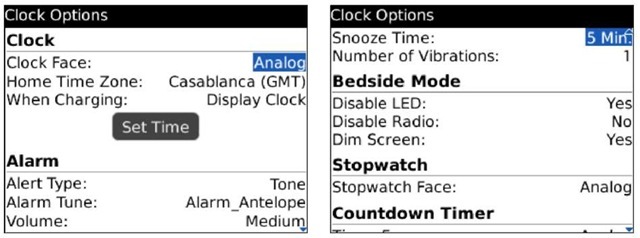
Figure 6-2:
Customize your clock here.
3. Move to each field and choose the option you want.
Each of these fields is described shortly.
4. Press the escape key and then select Save from the prompt.
The Clock Options screen is divided into five sections, as follows:
Clock section: This is where you choose the type of clock, time zone, and time.
• Clock Face: Allows you to set the type of clock. The options are Analog (the default; refer to the right side of Figure 6-1), Digital, Flip Clock, and LCD Digital. Digital looks like the clock shown on left side of Figure 6-3, and Flip Clock is shown on the right side of Figure 6-3.
• Home Time Zone: Select your time zone from the list.
• When Charging: Allows you to control the behavior of the clock when you connect your Curve to the charger. Possible choices are Do Nothing, Display Clock (the default), and Enter Bedside Mode.
• Set Time: Click this button, and you see a Date/Time screen that displays the current time in edit mode, allowing you to change the time. You can also change the time zone, as well decide whether to synchronize your BlackBerry time to the network carriers’ time.
Alarm section: Navigate here if you want to customize the behavior of the alarm:
• Alert Type: Choose the type of notification. The options are Tone (the default), Vibrate, and Tone + Vibrate.
• Alarm Tune: Choose from a list of ring tones you want to play. This setting applies only if you have Tone or Tone + Vibrate selected for the Alert Type. The default tone is Alarm_Antelope.
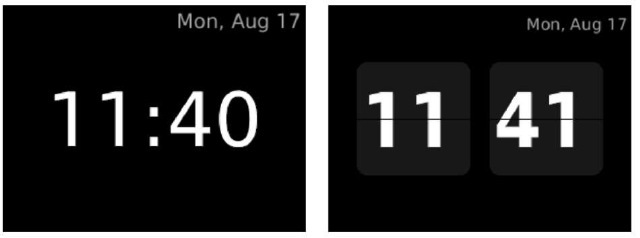
Figure 6-3:
Digital (left) and Flip (right) clocks.
• Volume: You can set the volume of the tone to Low, Medium (the default), High, or Escalating. Escalating means that the tone starts from Low and gradually goes to High.
• Snooze Time: Just like with your ordinary alarm clock, you have the option to hit the snooze. You can choose 30, 15, 10, or 5 (the default) minutes, 1 minute, or None.
• Number of Vibrations: The default is 1, which is a quick vibration of your Curve as your alarm. Choices are to repeat the vibration either 2 or 3 times.
Bedside Mode section: This section allows you to set the behavior of your Curve when it is in Bedside mode:
• Disable LED: Allows you to disable LED notifications during Bedside mode. Choices are Yes (the default) and No.
• Disable Radio: Allows you to disable the radio during Bedside mode. Choices are Yes and No (the default).
Disabling the radio means that all communication-related applications — such as e-mail, SMS, BlackBerry Messenger, instant messaging clients, and Phone — cannot receive incoming signals.
• Dim Screen: Choose the Yes (the default) or No option to control the dimming of the screen when in Bedside mode.
Stopwatch section: A section to change the face of the stopwatch:
• Stopwatch Face: Choose between an Analog (the default) and a Digital stopwatch.
Countdown Timer section: Navigate here if you want to customize the behavior of the timer:
• Timer Face: Your choices are Analog (the default) and Digital.
• Timer Tune: Choose from a list of ring tones you want to play when the timer reaches the time you set.
• Volume: You can either select Mute or set the volume of the tone to Low, Medium (the default), High, or Escalating. Escalating means that the tone starts Low and gradually goes to High.
• Vibrate: Choose Yes if you want the Curve to vibrate when the timer reaches the time set; otherwise, choose No (the default).
Setting a Wake-Up Alarm
The Clock application is also your bedside alarm clock. You can set it to wake you up once or on a regular basis.
Here’s how you tell your wake-up buddy to do the work for you:
1. Select Clock from the Home screen.
The Clock appears.
2. Press the menu key and then select Set Alarm.
A time field appears on the bottom of the screen, as shown in Figure 6-4. The time defaults to the previous set alarm time or, if you haven’t used the alarm before, the current time. If the default time isn’t your intended alarm time, proceed to Step 3 to change the time.
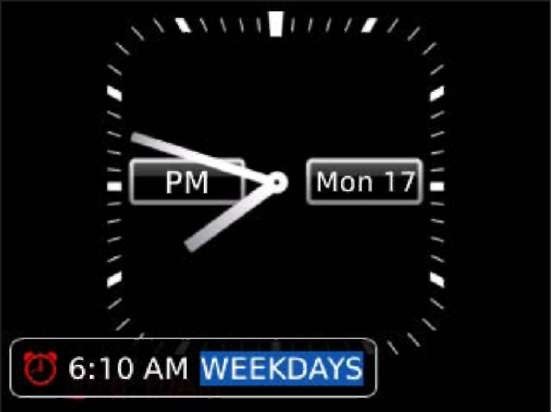
Figure 6-4:
Set your alarm time here.
3. Scroll sideways to select the specific portion of the time that you want to change, and enter the values.
Any highlighted portion of the time is editable. You can change the hours; minutes; AM/PM; and whether the alarm is ON, OFF, or only WEEKDAYS. Setting a value doesn’t create an entry in Calendar or Tasks. You can either enter the value or scroll up or down to choose among possible values.
4. Press the trackball or trackpad to accept all your changes.
Setting and Exiting Bedside Mode
You can use a setting in the Clock application called Bedside mode to minimize disturbances by your Curve. With Bedside mode, you can dim the screen, disable the LED, and even turn off the radio, all of which pretty much make your Curve behave like a brick. Bear in mind that when you turn off the radio, you won’t get incoming phone calls or any type of messaging. If you want a refresher on how to set these options, see “Customizing Your Clock,” previously in this chapter.
To set your BlackBerry Curve in Bedside mode:
1. Select Clock from the Home screen.
2. Press the menu key and then select Enter Bedside Mode (see Figure 6-5,
left).
That’s it. Your Curve should now behave like a good bedside companion.
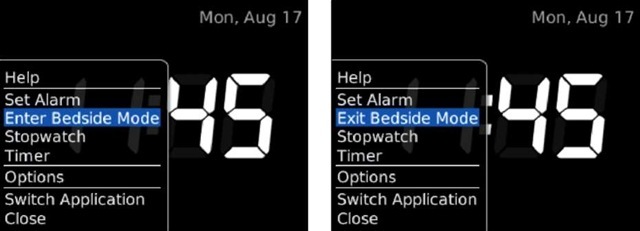
Figure 6-5:
Enter and exit Bedside mode here.
Buy a charging pod from shop.blackberry.com or shop.crackberry. com. Then you can put your Curve on a bedside table in an upright position while the charging pod is adding juice to your device. Make sure that the Clock setting (not just the Curve) is in Bedside mode when charging. (To do so, select Clock from the Home screen. Press the menu key and then select Options. Under the Clock section, change When Charging to Enter Bedside Mode.)
To exit from Bedside mode:
1. Select Clock from the Home screen.
2. Press the menu key and then select Exit Bedside Mode, as shown on the right side of Figure 6-5.
Using Stopwatch
In case you ever need a stopwatch, you need look no further than your BlackBerry Curve. Here’s how to run the stopwatch:
1. Select Clock from the Home screen.
2. Press the menu key and then select Stopwatch.
You see a screen similar to Figure 6-6. There are two buttons on this screen:
• Stopwatch button: Select this button to start and stop the stopwatch.
• Lap button: The image on this button looks like a circular arrow. This button is useful when someone is doing multiple laps in a swimming pool or on a track field and you want to record how long each lap takes. Select this to record the completion of a single lap; the lap and the lap time will be listed on the screen. Lap is labeled as Lap 1 for the first lap, Lap 2 for the second lap, and so on.
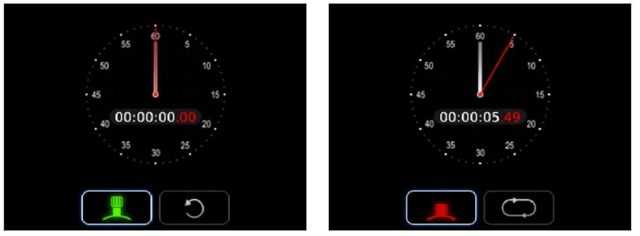
Figure 6-6:
Start (left) and stop (right) your stopwatch.
3. To start the stopwatch, select the Stopwatch button.
4. To stop the stopwatch, select the Stopwatch button again.
Using Timer
Have you overcooked something? Not if you have a good timer to warn you:
1. Select Clock from the Home screen.
2. Press the menu key and then select Timer.
A screen similar to the left side of Figure 6-7 appears. The left button with the stopwatch image is the start and pause button. You can use the right one with the circular arrow image to stop and reset the timer. The default time for your timer is based on what you set earlier. If you haven’t set a time, proceed to the next step.
3. Press the menu key and then select Set Timer.
A screen similar to the right side of Figure 6-7 appears.
4. Enter the time.
You can enter the time based on hours, minutes, and seconds by using the numeric keys. Enter the time from left to right. For example, if you want to set the timer for 5 minutes and 20 seconds, just press 5, 2, and 0 in succession.
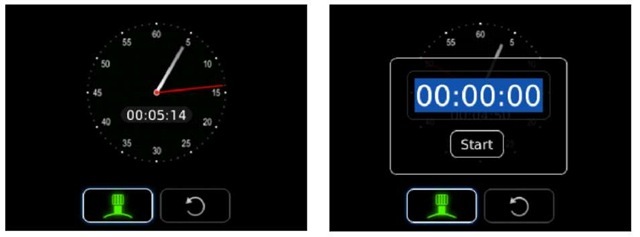
Figure 6-7:
Start and set the time of the timer.
5. Select Start.
Your timer starts ticking. Once it reaches the time, it will notify you.
You can customize the type of timer notification to a tone, a vibration, or both. To do so, select Clock from the Home screen. Press the menu key and then select Options. Under the Countdown Timer section, make your selections.
Using Password Keeper
Suppose that you’re in front of an Internet browser, trying to access an online account. For the life of you, you just can’t remember the account password. It’s your third login attempt, and if you fail this time, your account will be locked. Then you have to call the customer hotline and wait hours before you can speak to a representative. Argghh! We’ve all done it. Luckily, BlackBerry Curve gives you an application to avoid this headache.
Password Keeper is the simple yet practical BlackBerry Curve application that makes your life that much easier. Password Keeper is filed in Applications (as shown in Figure 6-8).
Setting a password for Password Keeper
The first time you access Password Keeper, you’re prompted to enter a password. Be sure to remember the password you choose, because this is the password to all your passwords. Forgetting this password is like forgetting the combination of your safe. There is no way to retrieve a forgotten Password Keeper password. You are prompted to enter this master password every time you access the application.
Trust us — one password is much easier to remember than many passwords.

Figure 6-8:
Password Keeper in the Applications folder.
Creating credentials
Okay, so you’re ready to fire up your handy-dandy Password Keeper application. Now, what kinds of things does it expect you to do for it to work its magic? Obviously, you’ll need to collect the pertinent info for all your various password-protected accounts so that you can store them in the protected environs of Password Keeper. So when creating a new password entry, be sure you have the following information (see Figure 6-9):
Title: This one’s straightforward. Just come up with a name to describe the password-protected account — My Favorite Shopping Site, for example.
Username: This is where you enter the username for the account.
Password: Enter the password for the account here.
Website: Put the Web-site address (its URL) here.
Notes: Not exactly crucial, but the Notes field does give you a bit of room to add a comment or two.
The only required field is Title, but a title alone usually isn’t of much use to you. We suggest that you fill in as much other information here as possible, but at the same time, be discreet about those locations where you use your user-name and password — so don’t put anything in the Website field or use My eBay Account as a title. That way, in the unlikely case that someone gains access to your password to Password Keeper, the intruder will have a hard time figuring out where exactly to use your credentials.
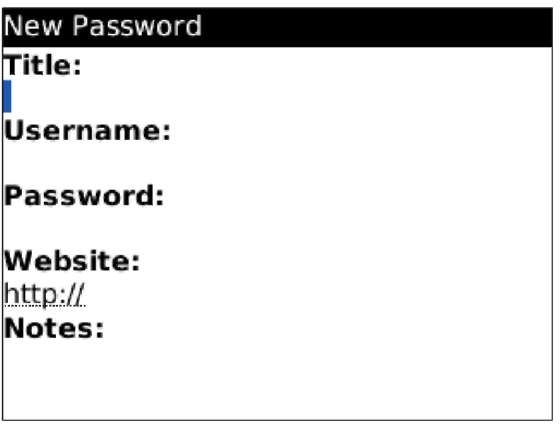
Figure 6-9:
Set your password here.
Generating random passwords
If you’re the kind of person who uses one password for everything but knows deep in your heart that this is just plain wrong, wrong, wrong, random password generation is for you. When creating a new password for yet another online account (or when changing your password for an online account you already have), fire up Password Keeper, press the trackball or trackpad, and then select Random Password from the menu that appears, as shown in Figure 6-10. Voila! A new password is automatically generated for you.
Using random password generation makes sense in conjunction with Password Keeper because you don’t have to remember the randomly generated password that Password Keeper came up with for any of your online accounts — that’s Password Keeper’s job.
Using your password
The whole point of Password Keeper is to let your BlackBerry Curve’s electronic brain do your password remembering for you. So imagine this scenario: You can no longer live without owning a personal copy of the A Chipmunk Christmas CD, so you surf on over to your favorite online music store and attempt to log in. You draw a blank on your password, but instead of seething, you take out your Curve, open Password Keeper, and do a find.
Type the first letters of your account title in the Find field to search for the title of your password. After you find (and highlight) the title, you press the trackball or trackpad, and the screen for your account appears, conveniently listing the password. All you have to do now is enter the password in the login screen for the online music store, and Alvin, Simon, and Theodore will soon be wending their way to your address, ready to sing “Chipmunk Jingle
Bells.”
Yes, you can copy and paste your password from Password Keeper to another application — BlackBerry Browser, for instance. Just highlight the password name, press the trackball or trackpad, and select Copy to Clipboard from the menu that appears. Then navigate to where you want to enter the password, press the trackball or trackpad, and select Paste from the menu. Keep in mind that for the copy-and-paste function to work for passwords from Password Keeper, you need to enable the Allow Clipboard Copy option in Password Keeper options (see the upcoming Table 6-1). You can copy and paste only one password at a time.
After you paste your password in another application, clear the Clipboard by pressing the trackball or trackpad and choosing Clear Clipboard. The Clipboard keeps your last copied password until you clear it.
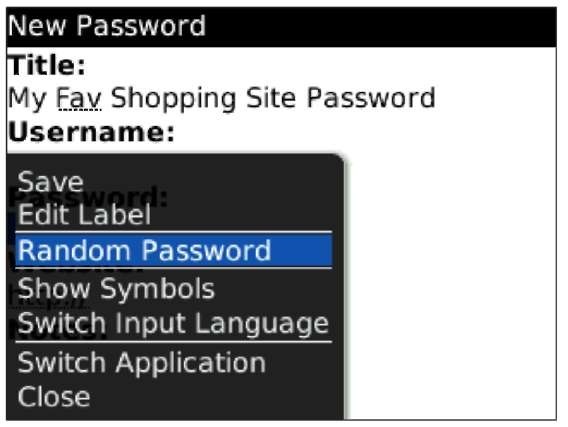
Figure 6-10:
Generate a random password.
Password Keeper options
Password Keeper’s Options menu, accessible by pressing the menu key while in Password Keeper, allows you to control how Password Keeper behaves. For example, you can set what characters can make up a randomly generated password. Table 6-1 describes all the options in Password Keeper.
Changing your password to Password Keeper
If you want to change your master password to Password Keeper — the password for opening Password Keeper itself — follow these steps:
1. Select Password Keeper.
The initial login screen for the Password Keeper application appears.
2. Enter your old password to access Password Keeper.
3. In Password Keeper, press the menu key and then select Change Password.
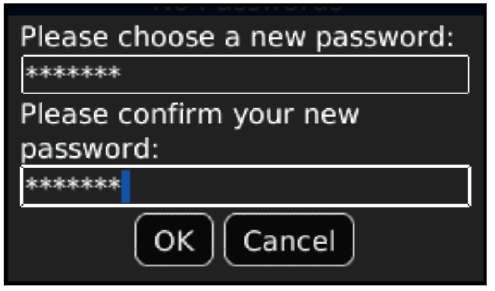
Doing so calls up the Password Keeper screen that allows you to enter your new password, as shown in Figure 6-11.
4. Enter a new password, confirm it by entering it again, and then use your trackball or trackpad to click OK.
| Table 6-1 | Password Keeper Options |
| Option Name | Description |
| Random Password Length | Select a number between 4 and 16 for the length |
| of your randomly generated password. | |
| Random Includes Alpha | If True, a randomly generated password |
| includes alphabetic characters. | |
| Random Includes Numbers | If True, a randomly generated password |
| includes numbers. | |
| Random Includes Symbols | If True, a randomly generated password |
| includes symbols. | |
| Confirm Delete | If True, all deletions are prompted with a confir- |
| mation screen. | |
| Password Attempts | Select 1 to 20 attempts to successfully enter the |
| password to Password Keeper. | |
| Allow Clipboard Copy | If True, you can copy and paste passwords from |
| Password Keeper. | |
| Show Password | If True, the password is displayed; otherwise, |
| asterisks take the place of the password | |
| characters. |
