In This Chapter
Seeing your schedule from different time frames
Making your Calendar your own
Scheduling a meeting
Viewing an appointment
Sending and receiving meeting requests
To some folks, the key to being organized and productive is mastering time management and using their time wisely (and we aren’t just talking about reading this topic while you’re commuting to work). Many have discovered that there is no better way to organize their time than to use a calendar — a daily planner tool. Some prefer digital to paper, so they use a planner software program on their PC, whether installed on their hard drive or accessed through an Internet portal (such as Yahoo!). The smartest of the bunch, of course, use their BlackBerry handheld because it has the whole planner thing covered in handy form with its Calendar application.
In this chapter, we show you how to keep your life (personal and work) in order by managing your appointments with your BlackBerry Calendar. What’s great about managing your time on a BlackBerry instead of on your PC is that your BlackBerry is always with you to remind you. Just remember that you won’t have any more excuses for forgetting that important quarterly meeting or Bertha’s birthday bash.
Accessing BlackBerry Calendar
BlackBerry Calendar is one of the BlackBerry core applications, like Contacts or Phone (read more about the others in Chapter 2), so it’s easy to get to. From the Home screen, press the menu key and then select Calendar. Voila! You have Calendar.
Choosing Your Calendar View
The first time you open Calendar, you’ll likely see Day view, the default setting, as shown in Figure 5-1. However, you can change the Calendar view to a different one that works better for your needs:
Day view: Gives you a summary of your appointments for the day. By default, it lists all your appointments from 9 a.m. to 5 p.m.
Week view: Shows you a seven-day summary of your appointments. In this view, you can see how busy you are in a particular week.
Month view: Shows you every day of the month. You can’t tell how many appointments are in a day, but you can see on which days you have appointments.
Agenda view: A bit different from the other views. It isn’t a time-based view like the others; it basically lists your upcoming appointments. In the list, you can see details of the appointments, such as where and when.
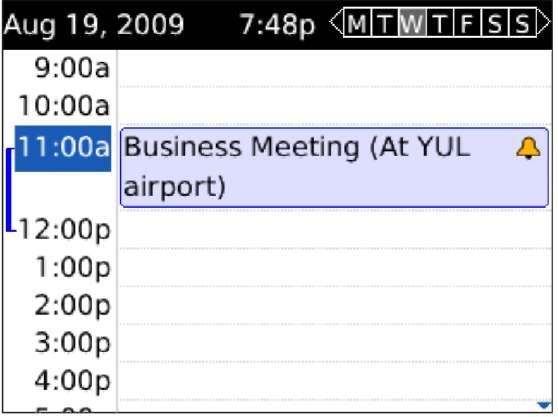
Figure 5-1:
Day view in Calendar.
Different views (such as Week view, shown in Figure 5-2) offer you a different focus on your schedule. Select the view you want based on your scheduling needs and preferences. If your life is a little more complicated, you can switch between views for a full grasp of your schedule.
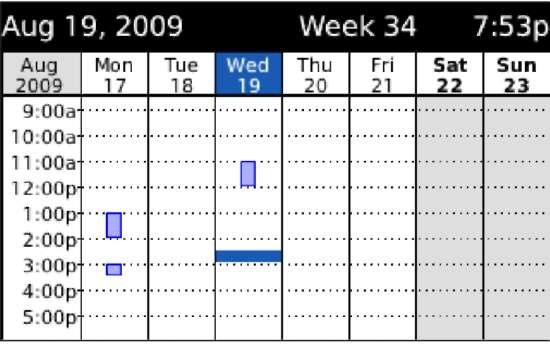
Figure 5-2:
Change your Calendar view to fit your life.
To switch between different Calendar views, simply follow these steps:
1. From the Home screen, press the menu key and then select Calendar.
Doing so calls up the Calendar application in its default view — Day view.
2. Press the menu key and then select the view of your choice from the menu that appears (shown in Figure 5-3).
As we mention earlier, depending on your current calendar view, you can switch among Day, Week, Month, and Agenda views.
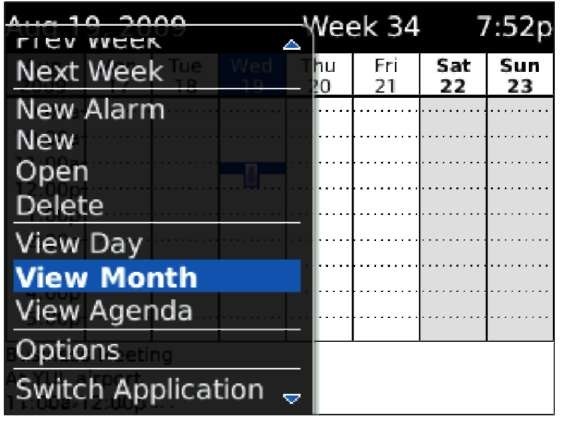
Figure 5-3:
Choose your Calendar view here.
Moving between Time Frames
Depending on what view of Calendar you’re in, you can easily move to the preceding or next day, week, month, or year. For example, if you’re in Month view, you can move forward to the next month. Likewise, you can also move back to the preceding month. In fact, if you like to look at things in the long term, you can jump ahead (or back) a year at a time. (See Figure 5-4.)
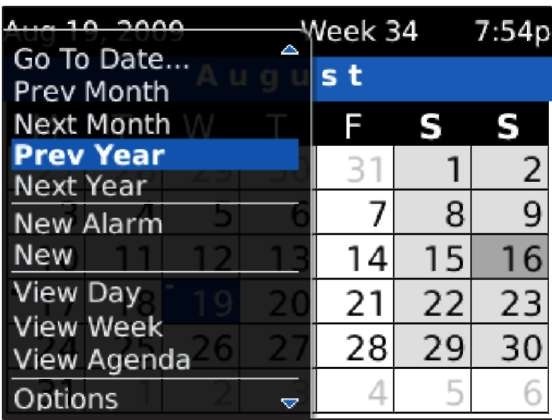
Figure 5-4:
Move among months or years in Month view.
You have similar flexibility when it comes to the other Calendar views. See Table 5-1 for a summary of what’s available.
| Table 5-1 | Moving between Views |
| Calendar View | Move Between |
| Day | Days and weeks |
| Week | Weeks |
| Month | Months and years |
| Agenda | Days |
You can always go to today’s date regardless of what Calendar view you’re in. Just press the menu key and then select Today from the menu that appears.
Furthermore, you can jump to any date you choose by pressing the menu key and then selecting Go to Date. Doing so calls up a handy little dialog box that lets you choose the date you want. To change the date, select the desired day, month, and year, as shown in Figure 5-5.
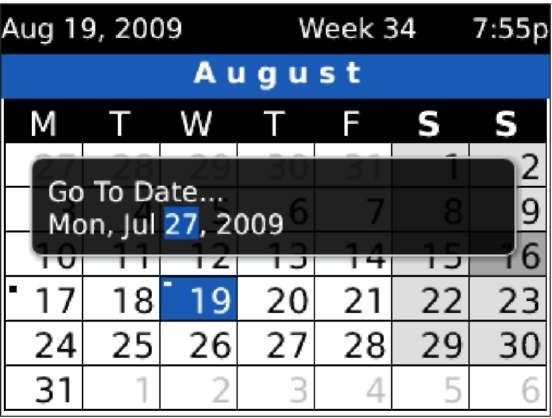
Figure 5-5:
Go to any date you want.
Customizing Your Calendar
To change the initial (default) view in your Calendar — from Day view to Month view, for example — Calendar Options is the answer. To get to Calendar Options, open Calendar, press the menu key, and select Options from the menu that appears. You see choices similar to the ones shown in
Table 5-2.
| Table 5-2 | Calendar Options |
| Option | Description |
| Formatting | |
| First Day of Week | The day that first appears in your Week view. |
| Start of Day | The time of day that defines your start of day in Day |
| view. The default is 9 a.m. If you change this to 8 a.m., | |
| for example, your Day view starts at | |
| 8 a.m. instead of 9 a.m. | |
| End of Day | The time of the day that defines the end of day in Day |
| view. The default is 5 p.m. If you change this to 6 p.m., for | |
| example, your Day view ends at 6 p.m. instead of 5 p.m. | |
| Views | |
| Initial View | Specifies the Calendar view that you first see when |
| opening Calendar. | |
| Show Free Time in | If Yes, this field allows an appointment-free day’s date to |
| Agenda View | appear in Agenda view. If No, Agenda view doesn’t show |
| the date of days on which you don’t have an appointment. | |
| Table 5-2 (continued) | |
| Option | Description |
| Show End Time in | If Yes, this field shows the end time of each appointment |
| Agenda View | in Agenda view. If No, Agenda view shows only the start |
| time of each appointment. | |
| Actions | |
| Snooze | The snooze time when a reminder appears. The default |
| is 5 minutes. | |
| Default Reminder | How far in advance your BlackBerry notifies you before |
| your appointment time. The default is 15 minutes. | |
| Enable Quick Entry | Available only in Day view. Allows you to make a new |
| appointment by typing characters. This way, you don’t | |
| need to press the trackball or trackpad and select New. | |
| Note: If you enable this, Day view shortcuts described in | |
| this topic’s online Cheat Sheet don’t apply. | |
| Keep Appointments | This is the number of days your BlackBerry Curve will |
| save your calendar item. We recommend that you keep | |
| it on Never. | |
| Show Tasks | A scheduled task will be shown on your calendar just |
| like a Calendar event. (A scheduled task is a task with a | |
| due date.) | |
| Show Alarms | You can see alarms in your calendar if you set this |
| option to Yes. | |
All Things Appointments: Adding, Opening, and Deleting
After you master navigating the different Calendar views (and that should take you all of about two minutes) and you have Calendar customized to your heart’s content (another three minutes, tops), it’s time (pun intended) to set up, review, and delete appointments. We also show you how to set up a meeting with clients or colleagues.
Creating an appointment
Setting up a new appointment is easy. You need only one piece of information: when your appointment occurs. Of course, you can easily add related information about the appointment, such as the meeting’s purpose, its location, and whatever additional notes are helpful.
Managing multiple calendars
Like your e-mail accounts, you may have multiple calendars. For example, say you have a calendar from your day job and a calendar from your personal life or softball club. Whatever the reason, your BlackBerry Curve has a great way for you to manage multiple calendars.
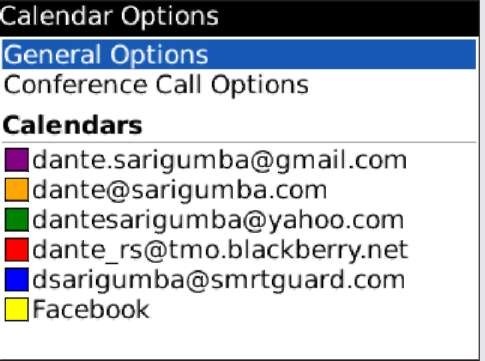
From Calendar Options, you see a screen similar to the following figure. The colored squares represent different calendars to give you a better view of which event belongs to which calendar. For example, you can assign red to your day job calendar and green to your softball club calendar. When two events conflict (share the same time slot), you can better prioritize with the color.
To change the color of each calendar, follow these steps:
1. Open Calendar.
2. Press the menu key and select Options Menu .
This opens a screen similar to the following figure.
3 . Select a calendar of your choice .
The calendar properties screen opens.
4. Highlight the colored square and then select the desired color. (You can choose among six colors. )
If you have more than one e-mail address “hooked” into your BlackBerry, you will see them here.
5. Press the menu key and tap the Save button .
In addition to setting a standard one-time, limited-duration meeting, you can set all-day appointments, recurring meetings, and reminders. Sweet!
Creating a one-time appointment
To add a new one-time appointment, follow these steps:
1. Open Calendar.
2. Press the menu key and then select New. The New Appointment screen appears.
3. Fill in the key appointment information.
Type all the information regarding your appointment in the appropriate spaces. You should at least enter the time and the subject of your appointment. See Figure 5-6.
4. Press the menu key and then select Save.
This saves your newly created appointment.
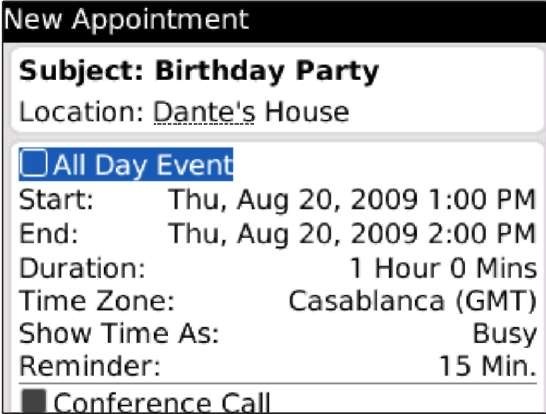
Figure 5-6:
Set an appointment here.
Your new appointment is now in Calendar and viewable from any Calendar view.
You can have more than one appointment in the same time slot. Your BlackBerry Calendar allows conflicts in your schedule because it lets you make the hard decision about which appointment to forgo.
Creating an all-day appointment
If your appointment is an all-day event — for example, if you’re in corporate training or have an all-day doctor’s appointment — select the All Day Event check box on the New Appointment screen, as shown in Figure 5-7. You can do so by scrolling to the check box and pressing the trackball or trackpad. When this check box is selected, you can’t specify the time of your appointment — just the start date and end date (simply because it doesn’t make sense to specify a time for an all-day event).
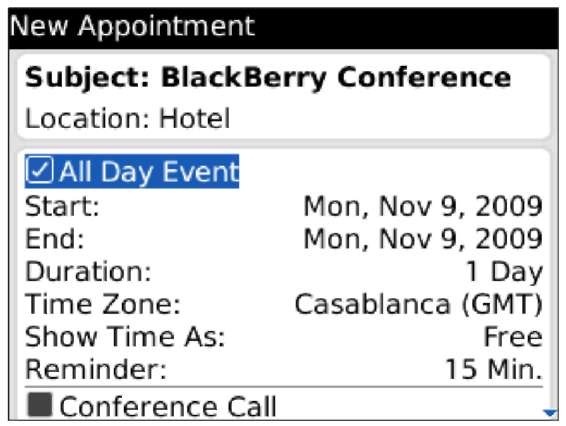
Figure 5-7:
Set an all-day event here.
Setting your appointment reminder time
Any appointment you enter in Calendar can be associated with a reminder alert — either a vibration or a beep, depending on how you set things up in your profile. (For more on profiles, see Chapter 3.) You can also choose to have no reminder for an appointment. From the New Appointment screen, simply scroll to the Reminder field and select a reminder time anywhere from None to 1 Week before your appointment time.
The native Profile application is simply another useful BlackBerry application that allows you to customize how your BlackBerry alerts you when an event occurs. Examples of events are an e-mail, a phone call, or a reminder for an appointment.
By default, whatever reminder alert you set goes off 15 minutes before the event. However, you don’t have to stick with the default. You can choose your own default reminder time. Here’s how:
1. Open Calendar.
2. Press the menu key and then select Options.
Doing so calls up the Calendar Options screen.
3. Select Default Reminder.
4. Choose a default reminder time anywhere from None to 1 Week before your appointment.
So from now on, any new appointment has a default reminder time of what you just set up. Assuming that you have a reminder time other than None, the next time you have an appointment coming up, you see a dialog box like the one shown in Figure 5-8, reminding you of the appointment.
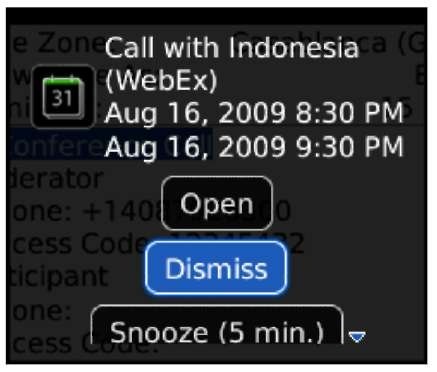
Figure 5-8:
You get a reminder dialog box if you want.
Creating a recurring appointment
You can set up recurring appointments based on daily, weekly, monthly, or yearly recurrences. Everyone has some appointment that repeats, such as birthdays or anniversaries (or taking out the trash every Thursday at 7:30 a.m. — ugh).
For all recurrence types, you can define an Every field. For example, say you have an appointment that recurs every nine days. Just set the Recurrence field to Daily and the Every field to 9, as shown in Figure 5-9.
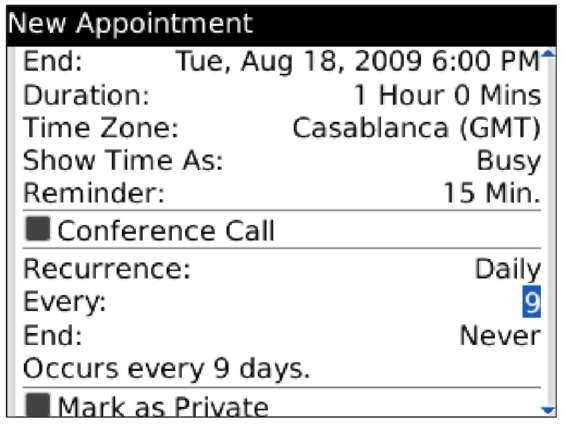
Figure 5-9:
An appointment recurring every nine days.
Depending on what you select in the Recurrence field, you have the option to fill in other fields. If you enter Weekly in the Recurrence field, for example, you have the option of filling in the Day of the Week field. (It basically allows you to select the day of the week on which your appointment recurs.)
If you enter Monthly or Yearly in the Recurrence field, the Relative Date check box is available. With this check box selected, you can ensure that your appointment recurs relative to today’s date. For example, if you choose
the following, your appointment occurs every two months on the third Sunday until July 31, 2012:
Start: Sunday, June 21, 2009 at 12 p.m. End: Sunday, June 21, 2009 at 1 p.m. Recurrence: Monthly Every: 2
Relative Date: Selected
End: Saturday, July 31, 2012
On the other hand, if all options in this example remain the same except that Relative Date isn’t selected, your appointment occurs every two months, on the 21st of the month, until July 31, 2012.
If all this “relative” talk has you dizzy, don’t worry: The majority of your appointments won’t be as complicated as this.
Opening an appointment
After you set an appointment, you can view it in a couple of ways:
If you set up reminders for your appointment and the little Reminder dialog box appears onscreen at the designated time before your appointment, you can view your appointment by clicking the box’s Open button. In the same dialog box, you can Snooze the reminder (refer to Figure 5-8).
In Calendar, go to the exact time of your appointment and view it there.
While looking at an appointment, you can make changes (a new appointment time and new appointment location) and then save them.
Appointments versus Meetings
Technically, any event in your Calendar counts as an appointment, whether it’s a reminder for your best friend’s birthday or a reminder of a doctor’s appointment for a checkup. However, when you invite people to an appointment or you get invited to one, regardless of whether it’s a face-to-face meeting or a phone conference, that appointment becomes a meeting.
Sending a meeting request
Sending a meeting request to others is similar to creating a Calendar appointment. Follow these steps:
1. Open Calendar.
2. Press the menu key and then select New.
3. Fill in the key appointment information (subject, location, and time).
4. Press the menu key and then select Invite Attendee.
You’re taken to Contacts to select your meeting attendee.
5. Select your contact via Contacts:
• If your contact is in Contacts: Highlight the contact you want and then press the trackball or trackpad.
• If you don’t yet have contacts or if the one you want isn’t in Contacts: Select the Use Once option to enter the appropriate e-mail address and then press the enter key to finish and return to Calendar.
After returning from Contacts, you see the attendees in your Calendar meeting notice.
6. Press the menu key and then select Save.
An e-mail is sent to your meeting attendees, inviting them to your meeting.
Responding to a meeting request
Whether for work or a casual social event, you’ve likely received a meeting request by e-mail, asking you to respond to the meeting by choosing one of three options: Accept, Tentative, or Decline. (If it’s from your boss for an all-staff meeting, and you just can’t afford to decline again because it’s so close to Christmas bonus time, that’s an Accept.)
You can accept any meeting request from your managers or colleagues on your BlackBerry just as you would on your desktop PC. In the PC world, you respond to an e-mail request for a meeting by clicking the appropriate button in your e-mail client (Microsoft Outlook, for the vast majority of you). In the BlackBerry world, a meeting request also comes in the form of an e-mail; after reading the e-mail, just choose Accept, Tentative, or Decline in the Messages application. Your response is sent back in an e-mail. We go into more detail about the Messages application in Chapter 9.
After you respond to the meeting request, the meeting is added to your Calendar automatically. If you have a change of heart later, you can change your response (yes, you can later decline that useless meeting after all) in Calendar, and the declined event disappears from your Calendar.
Setting your meeting dial-in number
You may have colleagues and friends all over the country or even on another continent. Group phone meetings may require a Dial-in number
Moderator code (if you are the moderator) Participation code
To set your phone conference dial-in details, follow these steps:
1. Open Calendar.
2. Press the menu key and then select Options menu item.
3. Select Conference Call Options.
A screen similar to Figure 5-10 appears.
4. Enter the appropriate numbers.
5. Press the menu key and select Save.
Your conference call number is saved.
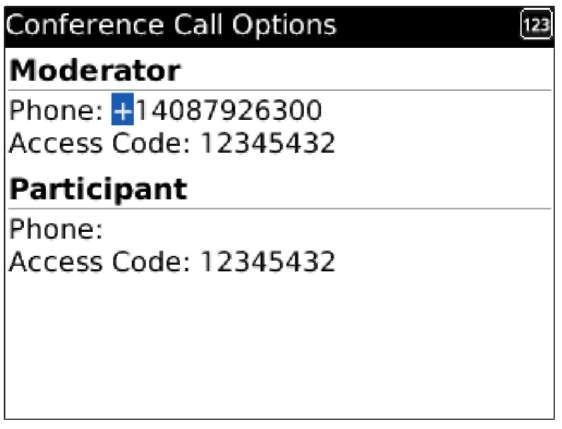
Figure 5-10:
Setting up conference call dial-in details.
The next time you create a new appointment, if you tap the Conference Call check box in the Appointment Screen, you see the conference number, as shown in Figure 5-11.
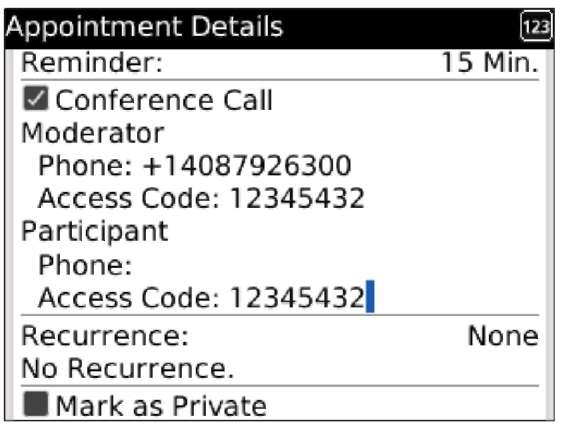
Figure 5-11:
Conference call information displayed in the Appointment screen.
