In This Chapter
Exploring BlackBerry Contacts
Adding, viewing, editing, and deleting contacts
Finding a contact
Organizing contacts
Sharing BlackBerry contacts
Transferring contacts from cellphones
Synchronizing Facebook contacts
Address books were around long before the BlackBerry was conceived.And BlackBerry Contacts serves the same function as any address book: a place where you record and organize information about people. However, Contacts also affords you a central place to reach your contacts in myriad ways: by landline phone; cellphone; e-mail; or the speedy messaging of PIN, SMS, MMS, or BlackBerry Messenger.
Most likely, in your busy lifestyle, you can benefit from using your BlackBerry Contacts if any of the following fits:
You travel.
You meet clients frequently.
You spend a lot of time on the phone.
You ask people for their phone number or e-mail address more than once.
You carry around a paper day planner.
Your wallet is full of important business cards, with phone numbers written on the backs, that you can never find.
If you’re one of those stubborn folks who insist they don’t need an address book — “I’m doing just fine without one, thank you very much!” — think of it this way: You’ve probably been using a virtual address book all the time, the one buried in your cellphone. That address book probably isn’t even a very good one! Read this chapter to see how to transfer all that good contact info from an old phone into your new BlackBerry-based Contacts.
Accessing Contacts
The Contacts icon looks like an old-fashioned address book. (Remember those?) You can see it highlighted in Figure 4-1. Opening Contacts couldn’t be simpler: Select the Contacts icon from the Home screen.
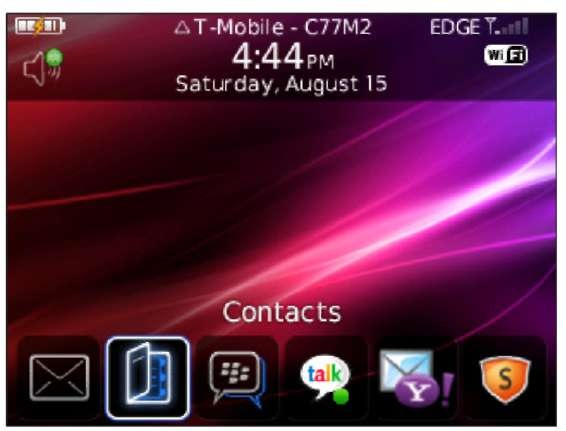
Figure 4-1:
The Contacts icon.
You can also access Contacts from Phone, Messages, BlackBerry Messenger, and Calendar. For example, say you’re in Calendar and you want to invite people to one of your meetings. Look no further — Contacts is in the menu, ready to lend a helping hand.
Another way to get to Contacts is by pressing A while on the Home screen. Go to Chapter 2 for more on Home-screen shortcuts.
Working with Contacts
Getting a new gizmo is always exciting because you just know that your newest toy is chock-full of features you’re dying to try out. We bet you feel that way about your BlackBerry Curve. The first thing you’ll want to do is try
to call or e-mail someone, right? But wait a sec. You don’t have any contact information yet, which means you have to type in someone’s e-mail address each time you send an e-mail — what a hassle.
It’s time to get with the plan. Most of us humans — social creatures that we are — maintain a list of contacts somewhere, such as in e-mail program, on an old cellphone, or on a piece of paper kept tucked away in a wallet. We’re pretty sure that you have some kind of list somewhere. The trick is getting that list into your BlackBerry Curve so that you can access your info more efficiently. The good news for you is that getting contact info into your BlackBerry Curve isn’t hard.
Often, the simplest way to get contact information into your BlackBerry Curve is to enter it manually. However, if you’ve invested a lot of time and energy in maintaining some type of Contacts application on your desktop computer, you may want to hot-sync that data into your Curve. For more on synchronizing data, check Chapter 16.
Creating a contact
Imagine that you just ran into Jane Doe, an old high school friend whom you haven’t seen in years. Jane is about to give you her number, but you don’t have a pen or pencil handy to write down her information. Are you then forced to chant her phone number to yourself until you can scare up a writing implement? Not if you have your handy BlackBerry Curve with you.
With BlackBerry in hand, follow these steps to create a new contact:
1. On the BlackBerry Home screen, select the Contacts application.
As we mention earlier, you also can access Contacts from different applications. For example, see Chapter 9 to find out how to access Contacts from Messages.
2. In Contacts, highlight Add Contact and then press the trackball or trackpad.
The New Contact screen appears, as shown in Figure 4-2.
3. Enter the contact information in the appropriate fields.
Use your BlackBerry Curve keyboard to enter this information. Scroll down to see additional fields.
When entering an e-mail address, press the Space key to insert an at symbol (@) or a period (.). BlackBerry is smart enough to figure out that you need an @ or a period.
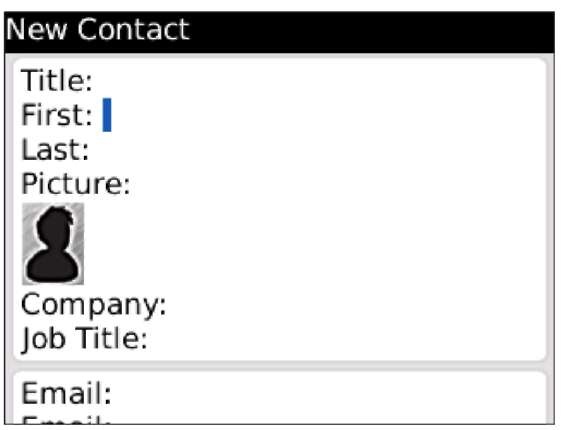
Figure 4-2:
Create a new contact here.
We don’t think you can overdo it when entering a person’s contact information. Enter as much info as you possibly can. Maybe the benefit won’t be obvious now, but when your memory fails you or your boss needs a critical piece of info that you happen to have, you’ll thank us for this advice.
4. (Optional) For those contacts who have more than one e-mail address — say, work and home — just create another new, blank Email field for the same contact.
a. Press the menu key.
b. Select Add Email Address.
You can have up to three e-mail addresses per contact.
5. Press the trackball or trackpad, and then select Save.
Your new contact is added to the list, as shown in Figure 4-3.
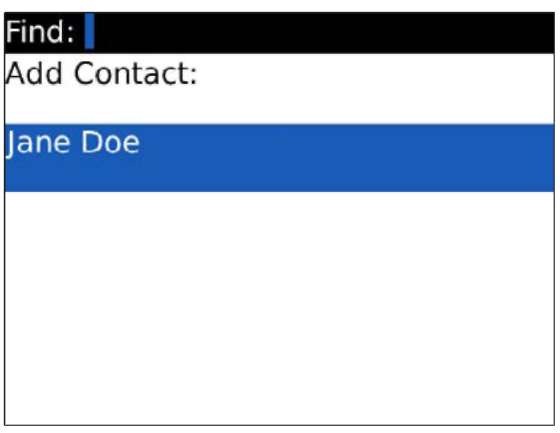
Figure 4-3:
The Contacts screen after adding a contact.
Here’s something slick to know when you’re entering phone information for a contact: BlackBerry Curve can also dial an extra number after the initial phone number. That extra number can be someone’s extension, or a participant code on a conference number, or simply your voice mail PIN. When you’re entering the contact’s phone number, type the primary phone number, press the Alt key and press X, and then add the extension number. Say you enter 11112345678X1111; when you tell your Curve to call that number, it will dial 11112345678 first. Then you’ll see a prompt asking you to continue or skip dialing the extension.
The menu is always available through the menu key, but just for convenience, we prefer to use the trackball or trackpad, which displays a shortened menu list based on where you are.
Adding notes
The Notes field on the New Contact screen (you may need to scroll down a bit to see it) is useful for adding a unique description about your contact. For example, use the field to hold info to jog or refresh your memory with tidbits such as Knows somebody at ABC Corporation or Can provide introduction to a Broadway agent. Or perhaps your note is something personal, such as Likes golf; has 2 children: boy, 7, & girl, 3; husband’s name is Ray. It’s up to you. Again, the more useful the information, the better it will serve you.
Customizing with your own fields
Perhaps you’d like to add contact information that doesn’t fit into any of the available fields. Although you can’t really create additional fields from scratch, you can commandeer one of the User fields for your own purposes.
The User fields are located at the bottom of the screen, so you have to scroll down to see them. Basically, you can use these fields any way you want (which is great), and you can even change the field’s name. (Face it, User field isn’t that helpful as a descriptive title.) For example, you can rename User fields to capture titles that follow a name (such as MD, PhD, and so on). Or how about profession, birthdate, hobbies, school, or nickname? You decide what information is important to you.
Changing the field name for this particular contact changes it for all your contacts. To rename a User field, follow these steps:
1. Scroll to the bottom of the screen to navigate to one of the User fields.
2. Press the menu key and then select Change Field Name.
The Change Field Name selection on the menu appears only if the cursor is in a User field.
3. Use the keyboard to enter the new User field name.
4. Press the trackball, trackpad, or enter key to save.
You’re all set.
Adding a picture for a contact
Like most phones, your BlackBerry Curve can display a picture of the caller. Here’s how to add a photo for a contact:
1. Have access to a digital picture of the person.
See Chapter 13 for more about taking photos with your BlackBerry Curve.
2. Get the photo to your BlackBerry Curve.
You can send it via e-mail, copy it to the microSD card, or copy it to the built-in memory of Curve. If you don’t know how to use the microSD, Chapter 16 is your gateway to media satisfaction.
3. From the Home screen, select the Contacts icon.
4. Highlight a contact.
5. Press the menu key and then select Add Picture (see Figure 4-4).
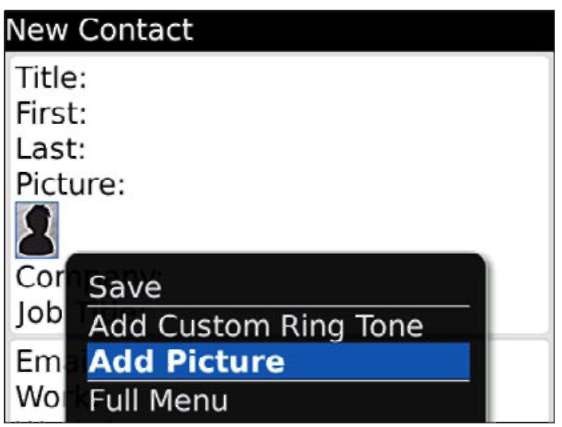
Figure 4-4:
Add a picture here.
6. Use the trackball or trackpad to navigate to the drive and folder that contains the picture.
You can use multiple locations for storing media files, such as pictures. Chapter 15 gives you the scoop.
7. Select the picture.
The picture you choose is displayed in full onscreen with a rectangle on it.
8. Slide the trackball or trackpad to position the rectangle on the face.
Contacts uses a tiny image, just enough to show the face of a person. The rectangle you see here indicates how the application crops the image.
9. Press the trackball or trackpad and then select Crop and Save.
You’re all set. Just save this contact to keep your changes. 10. Press the menu key and then select Save.
Assigning a tone
Oh, no, your ringing Curve has woken you. Ring tones help you decide whether to ignore the call or get up. We hope, you can easily switch to Sleep mode if you decide to ignore the call.
If you have OS 4.6 (perhaps BlackBerry Handheld Software v4.6), follow these steps to assign a ring tone to one of your contacts:
1. While editing a contact, press the trackball or trackpad and then select Add Custom Ring Tone from the menu (refer to Figure 4-4).
2. Press the trackball or trackpad.
A screen similar to Figure 4-4 gives you an option to customize the ring tone settings. From this screen, you can select a ring tone; set the volume; and control whether to make the LED blink, the phone vibrate, and the settings work while you’re on a call.
3. Select the ring tone you want.
4. Press the menu key and then select Save.
If you have OS 5.0 (possibly BlackBerry Handheld Software v5.0), follow these steps to assign a ring tone to one of your contacts:
1. While editing a contact, scroll to the Ring Tones/Alerts section.
Under the Ring Tones/Alerts section, you should see Phone and Messages. You can customize the ring tone when you receive a call and when you have a new message, such as an e-mail or an SMS.
2. Select Phone and customize the ring tone on the screen that follows.
You see and can change the following options:
• Ring Tone: You select a ring tone from a list of tones here.
• Volume: Allows you to control the volume. The default is set to use the Active Profile settings. Other values are 1 to 10; 10 is the loudest.
• Play Sound: Lets you control in what state to play the tone. Values are Active Profile, In Holster, Out of Holster, and Always; the default is set to Active Profile.
• LED: Allows you to use LED to indicate a call.
• Vibration: Allows you to enable vibration as a way of notification. Choices are Active Profile, Off, On, and Custom. The default is Active Profile. Choosing Custom allows you to control how long you want the vibration to last.
• Vibrate with Ring Tone: Allows you to choose between vibrating and playing the tone. Choices are Active Profile, On, and Off. The default value is Active Profile.
3. Press the escape key.
You’re back to the Edit Contact screen.
4. Select Messages.
You are presented with the Messages screen, allowing you to customize the ring tone when you receive a message. You can do all the customizations listed in Step 2 plus the following:
• Notify Me During Calls: Allows you to toggle notification while you are actively on a call. Your choices are Yes or No, and the default is No.
5. Press the escape key.
6. Press the menu key and then select Save.
Spend a little bit of time adding your own contact record(s). We recommend adding at least one record for your business contact info and one for your personal contact info. This saves you from having to type your own contact information every time you want to give it to someone. You can share your contact record by sending it as an attachment to an e-mail. (See the later section “Sharing a Contact.”)
Adding contacts from other BlackBerry applications
When you get an e-mail message or a call, that person’s contact information is in Messages or Phone. It’s just logical to add the information. You may have noticed that Phone lists only outgoing numbers. That’s half of what you need. You can access incoming phone calls in Messages:
1. On the BlackBerry Home screen, select Messages.
2. In Messages, press the menu key and then select View Folder.
3. Select Phone Call Logs.
A phone log entry stays only as long as you have free space on your BlackBerry Curve. When BlackBerry runs out of space (which could take years, depending on how you use it), it deletes read e-mails and phone logs, starting from the oldest.
You can view your device memory information by going to Options from the Home screen and selecting Memory. The next screen shows you two types of memory: application memory and media card. Pay close attention to application memory. This is where your applications are installed, including data from out-of-the-box applications such as Contacts, Messages, and Calendar. Your Curve has 128MB total application memory, and you should see how much is free from this screen.
Creating a contact from an existing e-mail address or phone number in Messages is easy:
1. On the BlackBerry Home screen, select Messages.
2. In Messages, select the e-mail address or the phone number.
3. Select Add to Contacts.
A New Contact screen appears, filled with that particular piece of information.
4. Enter the rest of the information you know.
5. Press the menu key and then select Save.
The best solution for capturing contact information from e-mail is an application called gwabbit. The app has the intelligence of detecting contact information and gives you a quick and easy way to add it to Contacts. You can purchase gwabbit for $9.99 a year and download the app from their Web site
at www.gwabbit.com.
Viewing a contact
Okay, you just entered your friend Jane’s name into your BlackBerry, but you have this nagging thought that you typed the wrong phone number. You want to quickly view Jane’s information. Here’s how you do it:
1. On the BlackBerry Home screen, select Contacts.
2. In Contacts, scroll to and highlight the contact name you want and then press the trackball or trackpad.
Pressing the trackball, trackpad, or enter key while a name is highlighted is the same as opening the menu and choosing View — just faster.
View mode displays only information that’s been filled in, as shown in Figure 4-5. It doesn’t bother showing blank fields.
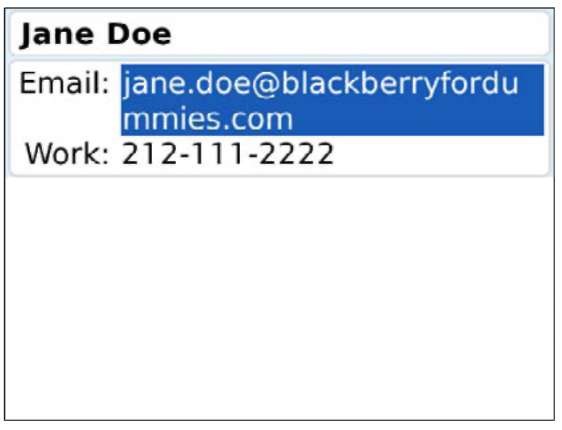
Figure 4-5:
View mode for a contact.
Editing a contact
Change is an inevitable part of life. Given that fact, your contact information is sure to change as well. To keep current the information you diligently put in Contacts, you have to do some updating now and then. To update a contact, follow these steps:
1. On the BlackBerry Home screen, select Contacts.
2. In Contacts, scroll to and highlight a contact name, press the menu key, and then select Edit.
The Edit Contact screen for that contact makes an appearance.
In Contacts (or any BlackBerry application, for that matter), displaying a menu involves a simple press of the menu key. You see the Edit option on the menu right below View.
3. Scroll through the various fields of the Edit Contact screen, editing the contact information as you see fit.
If you want to edit only a few words or letters in a field (instead of replacing all the text), slide the trackball or trackpad while pressing and holding the Alt key (located to the left of the Z key) to position your cursor precisely on the text you want to change. Then make your desired changes.
4. Press the menu key and then select Save.
The edit you made for this contact is saved.
When you’re editing information, and you want to replace the entry with a new one, it’s much faster to first clear the contents, especially if you have a lot of old data. When you are in an editable field (as opposed to a selectable field), just press the menu key and then select Clear Field. This feature is available in all text-entry fields and for most BlackBerry applications.
Deleting a contact
It’s time to get rid of somebody’s contact information in your Contacts. Maybe it’s a case of duplication or a bit of bad blood. Either way, BlackBerry Curve makes it easy to delete a contact.
1. On the BlackBerry Home screen, select Contacts.
2. In Contacts, scroll to and highlight a contact name you want to delete, press the menu key, and then select Delete.
A confirmation screen appears, as shown in Figure 4-6.

Figure 4-6:
The confirmation screen when you’re about to delete a contact.
3. Select Delete.
The contact you selected is deleted and disappears from your Contacts list.
Dealing with the confirmation screen can be a pain if you want to delete several contacts in a row. If you are 100 percent sure that you want to ditch a number of contacts, you can suspend the Confirmation feature by setting the Confirm Delete option to No on the Contacts Options screen. See the “Setting preferences” section, later in this chapter, for more on Contacts Options.
Copying Contacts from Desktop Applications
Most people use desktop applications to maintain their contacts — you know, Microsoft Outlook, IBM Lotus Notes, or Novell GroupWise. And a word to the wise: You don’t want to maintain two address books. That’s a recipe for disaster. Luckily for you, RIM (Research In Motion) makes it easy to get your various contacts — BlackBerry, desktop, laptop, whatever — in sync.
Your BlackBerry Curve comes with a collection of programs called BlackBerry Desktop Manager, one of which is Synchronize. You can use Synchronize to Sync between your device and the PC software for managing contacts such as Outlook.
Set up and configure the behavior of the program, including how the fields in the desktop version of Contacts map to the Contacts fields in your BlackBerry.
Chapter 16 shows how to use Synchronize.
Looking for Someone?
Somehow — usually through a combination of typing skills and the shuttling of data between various electronic devices — you’ve created a nice, long list of contacts in Contacts. Nice enough, we suppose, but useless unless you can find the phone number of Rufus T. Firefly at the drop of a hat.
That’s where the Find screen comes in. In fact, the first thing you see in Contacts when you open it is the Find screen, as shown in Figure 4-7.
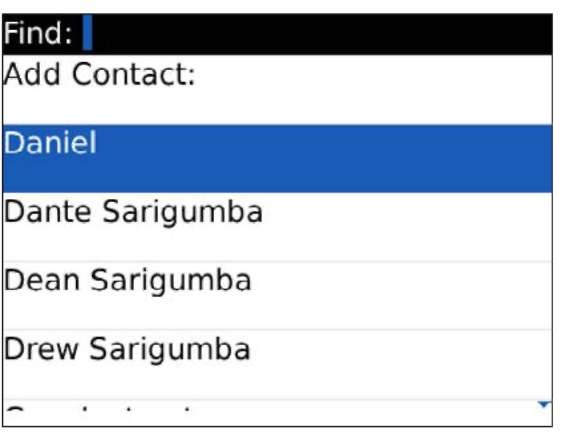
Figure 4-7:
Your search starts here.
You can conveniently search through your contacts by following these steps:
1. In the Find field, enter the starting letters of the name you want to search for.
Your search criterion is the name of the person. You could enter the last name or first name or both, although the list is usually sorted by first name and then last name. As you type the letters, the list shrinks based on the matches. Figure 4-8 illustrates how this works.
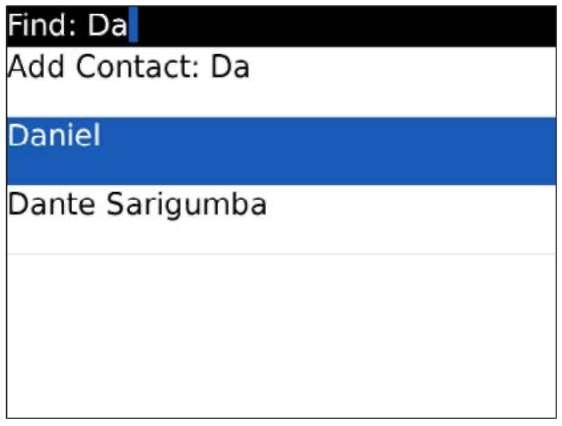
Figure 4-8:
Enter more letters to shorten the potential contacts list search.
2. Using the trackball or trackpad, scroll to and highlight the name from the list of matches.
If you have a long list in Contacts, and you want to scroll down a page at a time, just hold down the Alt key (it’s located to the left of the Z key) and scroll. You get where you need to go a lot faster.
3. Press the menu key and select from the possible actions listed on the menu that appears.
After you find the person you want, you can select among these options, as shown in Figure 4-9:
• Activity Log: Opens a screen listing e-mails, calls, and SMS messages you’ve made to the contact.
• View Work Map: Appears only if you have filled in the work address information. This allows you to map the location using Maps.
• Email: Starts a new e-mail message. See Chapter 8 for more information about e-mail.
• PIN: Starts a new PIN-to-PIN message, which is a messaging feature unique to BlackBerry. With PIN-to-PIN, you can send a quick message to someone with a BlackBerry. See Chapter 9 for more details about PIN-to-PIN messaging.
• Call: Uses Phone to dial the number.
• SMS: Starts a new SMS message. SMS stands for Short Messaging Service, which is used in cellphones. See Chapter 9 for more details about SMS.
• SIM Phone Book: This menu option enables you to view contacts saved on the SIM card. For more information on how to use this option, see the “Transferring Contacts” section, later in this chapter.
• MMS: Starts a new MMS message. MMS is short for Multimedia Messaging Service, an evolution from SMS that supports voice and video clips. See Chapter 9 for more details about MMS.
The MMS item appears in the menu only if you have filled in the contact’s Mobile field.
• Send as Attachment: Starts a new e-mail message with the contact as an attachment. See Chapter 8 for more information.
• Invite to Messenger Contact: This menu option, which is near the top of the menu list (so you don’t see it in Figure 4-9), allows you to add this contact to your contacts list in BlackBerry Messenger. (Note that this option appears only if you have BlackBerry Messenger installed.)
You can attach a contact, a security certificate or a file. Those three choices are in the menu displayed after pressing the menu key.
The Add Custom Ring Tone you see in Figure 4-9 was described previously, in the “Assigning a tone” section.
If you have a finger-fumble and press a letter key in error, press the escape key once to return to the original list (the one showing all your contacts), or press the trackball or trackpad once and then select View All.
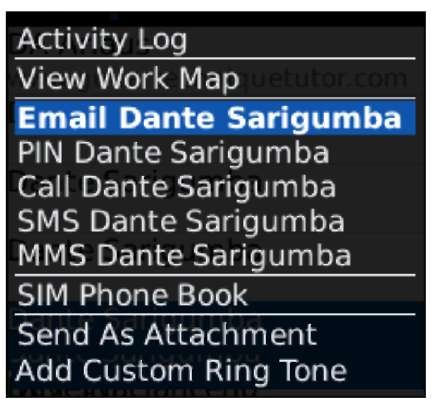
Figure 4-9:
Action options for the selected contact.
You aren’t hallucinating: Sometimes Email <contact name> or Call <contact name> appears on the menu, and sometimes it doesn’t. Contacts knows when to show those menu options. If a contact has a phone number, Call <contact name> and SMS <contact name> show up, and the same is true for e-mail and the personal identification number (PIN). In fact, this list of actions is a convenient way to find out whether you have particular information — a phone number or an e-mail address — for a particular contact.
In a corporate environment, your BlackBerry Enterprise server administrator may disable PIN-to-PIN messaging because it doesn’t go to the corporate e-mail servers and, therefore, can’t be monitored. If this is the case, the menu option PIN<contact name> won’t appear, even though you entered PIN information for your contacts. Note that you’ll still be able to receive a PIN-to-PIN message, but you won’t be able to send one.
Organizing Your Contacts
You’ve been diligent by adding your contacts to Contacts, and your list has been growing at a pretty good clip. It now has all the contact information for your business colleagues, clients, and (of course) family and friends. In fact, Contacts has grown so much that it holds hundreds of contacts, and it’s taking more time to find someone.
Imagine that you just saw an old acquaintance, and you want to greet the person by name. You know that if you saw the name, you’d recognize it. The trouble is that your list has 300-plus names, which would take you a long time to scroll through — so long, in fact, that this acquaintance would surely come right up to you in the meantime, forcing you to hide the fact that you can’t remember his name. (How embarrassing.) In this scenario, the tried-and-true Find feature wouldn’t be much help. What you need is a smaller pool of names to search.
This isn’t rocket science. You’ll want to do one of the following:
Organize your contacts into groups. Using groups (as every kindergarten teacher could tell you) is a way to arrange something (in your case, contacts) to make them more manageable. How you arrange your groups is up to you. You should base the principle on whatever makes sense to you and fits the group you set up. For example, you can place all your customer contacts in a Clients group and family members in a Family group.
Set up your contacts so that you can filter them. Use the Filter feature in combination with BlackBerry’s Categories. (Using Categories, you can label your contacts to make it easy to filter them.) The Filter feature can narrow the Contacts list to such an extent that you only have to scroll down and find your contact — no need to type search keywords, in other words.
Whether you use the Group or Filter feature is up to you. You find out how to use both methods in the next sections of this chapter.
Creating a group
A BlackBerry group in Contacts — as opposed to any other kind of group you can imagine — is just a simple filter or category. In other words, using a group just arranges your contacts into subsets without affecting the contact entries themselves. In Contacts, a group shows up in the contacts list just like any other contact. The only wrinkle here is that when you select the group, the contacts associated with that group — and only the contacts associated with that group — appear onscreen.
Need some help visualizing how this works? Go ahead and create a group, following these steps:
1. On the BlackBerry Home screen, select Contacts.
2. In Contacts, press the menu key and then select New Group.
A screen similar to that shown in Figure 4-10 appears. The top portion of the screen is where you type the group name, and the bottom portion is where you add your list of group members.
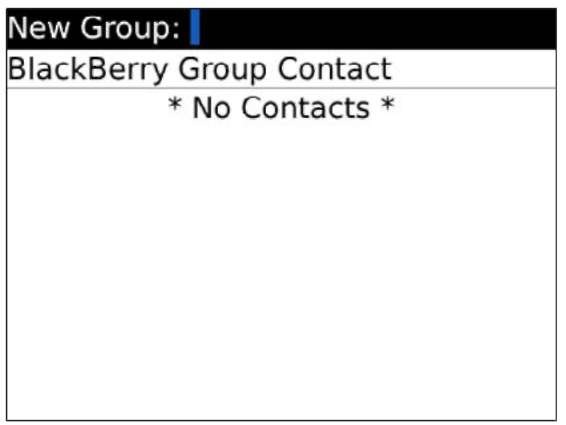
Figure 4-10:
An empty screen ready for creating a group.
3. Type the name of the group in the New Group field.
You can name it anything. For this example, let’s name it Poker Buddies.
4. Press the trackball or trackpad and then select Add Member.
The main Contacts list shows up in all its glory, ready to be pilfered.
5. Select the contact you want to add to your new group list, press the trackball or trackpad, and then select Continue from the menu that appears.
Everybody knows a Rob , so select him. Doing so places Rob in your Poker Buddies group list, as shown in Figure 4-11.
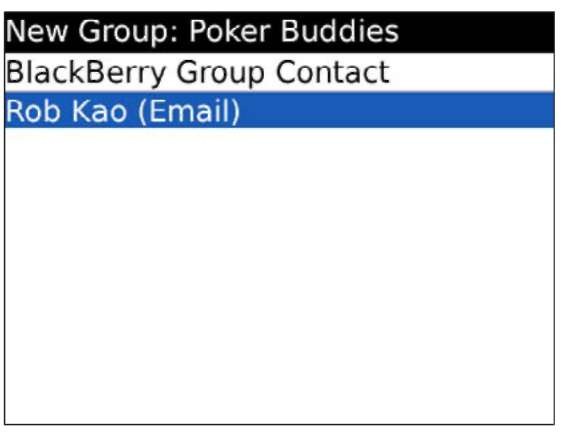
Figure 4-11:
Your new group has one member.
6. Repeat Steps 4 and 5 to add more contacts to your list.
After you’re satisfied, save your group in the next step.
7. Press the trackball or trackpad and then select Save Group from the menu that appears.
Your Poker Buddies group is duly saved, and you can now see Poker Buddies in your main Contacts list.
Using the Filter feature on your contacts
Are you a left-brainer or a right-brainer? Yankees fan or Red Sox fan? Innie or Outie? Dividing up the world into categories is something everyone does (no divisions there), so it should come as no surprise that BlackBerry divides your contacts into distinct categories as well.
By default, two categories are set for you on the BlackBerry Curve:
Business Personal
Why stop at two? BlackBerry makes it easy to create more categories. In this section, you first find out how to categorize a contact and then you see how to filter your Contacts list. Finally, you find out how to create categories.
Categorizing your contacts
Whether you’re creating a contact or editing one, you can categorize a particular contact as long as you’re in Edit mode.
If the trick is getting into Edit mode, it’s a pretty simple trick. Here’s how it’s done:
1. On the BlackBerry Home screen, select Contacts.
2. In Contacts, highlight the contact, press the menu key, and then select Edit.
Contacts is now in Edit mode for this particular contact, which is exactly where you want to be.
3. Press the menu key and then select Categories.
A Categories list appears, as shown in Figure 4-12. By default, you see only the Business and the Personal categories.
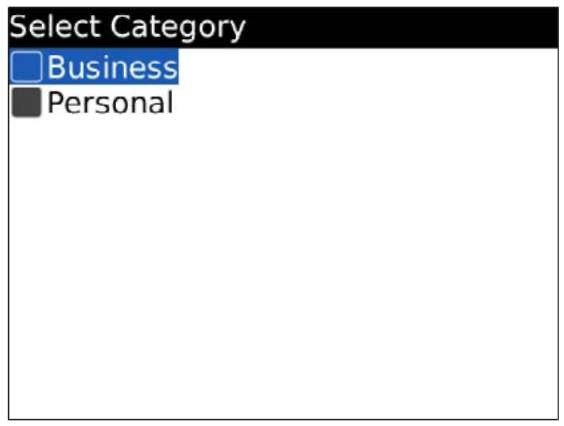
Figure 4-12:
Default categories.
4. Press the trackball, trackpad, or Space key to select the check box next to Personal.
5. Press the menu key and then select Save.
You are brought back to the Edit screen for this particular contact.
6. Press the trackball or trackpad and then select Save (again) from the menu that appears.
Filtering your contacts
You now have one — count ‘em, one — contact with Personal as its category, which means you can filter your Contacts list by using a category. Here’s how:
1. On the BlackBerry Home screen, select Contacts.
2. Press the menu key and then select Filter.
Your Categories list appears.
If you haven’t added any categories in the meantime, you see only the default Business and Personal categories.
3. Select the Personal check box.
Your Contacts list shrinks to just the contacts assigned to the Personal category, as shown in Figure 4-13.
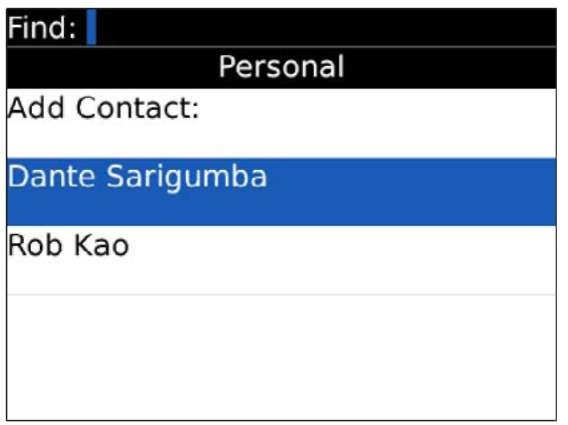
Figure 4-13:
The Contacts list after a filter is applied.
As you add contacts to a category, you can use Find. Enter the first few letters of the name to further narrow the contact search. If you need a refresher on how Find works, see the “Looking for Someone?” section, earlier in this chapter.
Adding a category
Whoever thought the default categories (Business and Personal) were enough for the complexities of the real world probably didn’t know many people. BlackBerry makes it easy to add categories, so you can divide your world as much as you like:
1. On the BlackBerry Home screen, select Contacts.
2. In Contacts, press the menu key and then select Filter.
You get a view of the default categories (refer to Figure 4-12).
3. Press the menu key (again) and then select New.
A pop-up screen asks you to name the new category.
4. Type the name of the category in the Name field and then press Enter.
The category is automatically saved. The Filter screen lists all the categories, including the one you just created. Just press the escape key to get back to the Contacts main screen.
Setting preferences
Vanilla, anyone? Some days you’ll wish that your Contacts list were sorted differently. For example, there’s the day when you need to find the guy who works for ABC Company but has a foreign name that you can hardly pronounce, let alone spell. What’s a body to do?
You’re in luck. Contacts Options navigates some out-of-the-ordinary situations. Figure 4-14 shows the Contacts Options screen. Despite its simplicity, it provides you with four important options that change Contacts behavior:
Sort By: Changes how the list is sorted. You can use First Name, Last Name, or Company. Use the Space key to toggle among the choices. Remember that guy from ABC Company? You can use the Sort By option to sort by company. By doing that, all contacts from ABC Company are listed next to one another, and with any luck, the guy’s name will jump out at you.
Separators: Changes the dividers in the Contacts list. It’s purely an aesthetic change, but check it out — you may like the stripes.
Allow Duplicate Names: Self-explanatory. If you turn this on, you can have multiple people who happen to share the same name in your Contacts. If you disable this option, you get a warning when you try to add a name that matches one already on your list. Maybe you’re just tired and are mistakenly trying to add the same person twice to your
list. Then again, sometimes people just have the same name. We recommend keeping the default value of Yes, allowing you to have contacts with the same names.
Confirm Delete: Displays a confirmation screen for all contact deletions.
Always keep this feature turned on for normal usage. Because there are many ways you could delete someone from your Contacts, this feature is a good way of minimizing accidents.
How do you change any of these options? The fields behave like any other on a BlackBerry application. Simply highlight the field and then press the trackball or trackpad to bring up a menu from which you can select the possible Options values. For example, Figure 4-15 shows the possible Sort By fields.
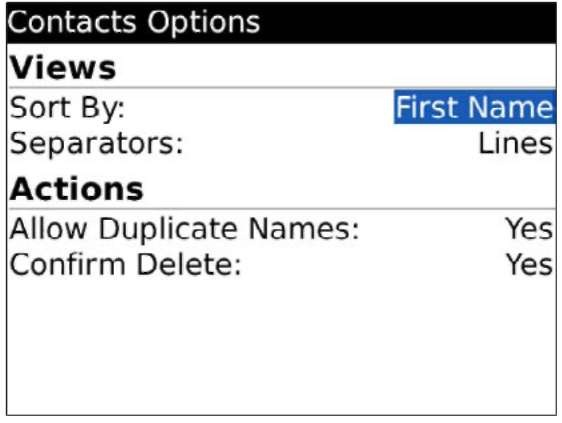
Figure 4-14:
Choose your sort type here.
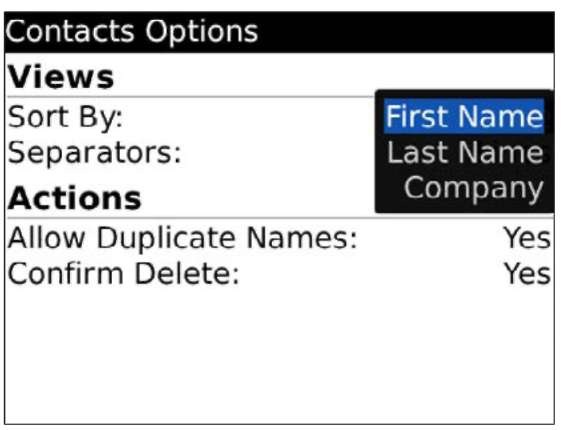
Figure 4-15:
The Sort By field options.
Sharing a Contact
Suppose you want to share your contact information with a friend who also has a BlackBerry. A vCard — virtual (business) card — is your answer and can make your life a lot easier. In BlackBerry land, a vCard is a contact in Contacts that you send to someone as an attachment to an e-mail.
At the receiving end, the BlackBerry Curve (being the smart device that it is) recognizes the attachment and informs the BlackBerry owner that he or she has the option of saving it, making it available for his or her viewing pleasure in Contacts.
Sending a vCard
Because a vCard is nothing more than a Contacts contact attached to an e-mail, sending a vCard is a piece of cake. (Of course, you do need to make sure that your recipient has a BlackBerry device to receive the information.)
Here’s how you go about sending a vCard:
1. On the BlackBerry Home screen, select the Messages application.
2. In Messages, press the menu key and then select Compose Email.
A screen where you can compose a new e-mail appears.
3. In the To field, start typing the name of the person to whom you want to send this vCard.
4. When you see the name in the drop-down list, highlight it and then press the trackball or trackpad.
You see an e-mail screen with the name you just selected as the To recipient.
5. Type the subject and message.
6. Press the menu key and then select Attach Contact.
Contacts opens.
7. Highlight the name of the person whose contact information you want to have attached and then press the trackball or trackpad.
The e-mail composition screen reappears, and an icon that looks like a book indicates that the e-mail now contains your attachment. Now all you have to do is send your e-mail.
8. Press the trackball or trackpad and then select Send from the menu that appears.
You just shared the specified contact information. (Don’t you feel right neighborly now?)
Receiving a vCard
If you get an e-mail with a contact attachment, here’s how you save it to your Contacts:
1. On the BlackBerry Home screen, select Messages.
2. Select the e-mail that contains the vCard.
The e-mail with the vCard attachment opens.
3. Scroll down to the attachment. When the cursor is hovering over the attachment, press the trackball or trackpad and then select View Attachment from the menu that appears.
The vCard makes an appearance onscreen. Now save the contact in Contacts.
4. Press the menu key and then select Add to Contacts.
The vCard is saved and is available in Contacts.
Transferring Contacts
Are you switching to BlackBerry Curve from an old AT&T or Cingular cellphone? You’ve probably accumulated contacts on that phone by painstakingly typing them. Good news! Maybe you don’t have to type them into BlackBerry Curve!
The trick is to use the old phone’s SIM card (see Figure 4-16) as an external storage device, such as a flash drive. The SIM card is an electronic chip that can store information, including your phone numbers and contacts.
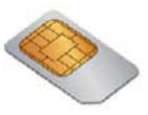
Figure 4-16:
Transfer contacts with a SIM card.
This should work on almost any GSM-compatible phone. The big U.S. GSM carriers are AT&T (including old Cingular phones) and T-Mobile; in Canada, Rogers. To find whether you have a GSM phone, look for the SIM card. Take the battery out of your cellphone; behind the battery, you should see a SIM card. If you don’t see a SIM card, you don’t have a GSM phone.
Copying contacts from a GSM phone
The process for copying contacts on a BlackBerry Curve is pretty straightforward, but the steps for retrieving them depend on your old phone.
For the purpose of showing you what’s what, we use a Nokia 6300 phone as an example. You will probably need the manual for your old phone because it’s likely that the exact steps aren’t the same.
To copy contacts from an old GSM cellphone to a BlackBerry Curve, follow these steps:
1. Take out the SIM card out of your BlackBerry Curve, and put it in the old cellphone.
Moving a SIM card is no big deal. The SIM card is usually behind the battery, so you have to remove the back cover of the device to get to it:
• On the Curve, there’s a lock at the bottom of the back of the device. Just press this with your thumb to unlock the cover. You can pull the cover out starting from where the lock is located. You should be able to gently pry the BlackBerry Curve battery out with your fingernail.
• Follow the instructions from the old cellphone’s manual to open it and remove the old SIM card, and then insert the BlackBerry Curve SIM card into the old cellphone. Put the battery back in the old cellphone, and switch it on.
2. Use the old cellphone’s menu to copy the old contacts list to the SIM card.
The contacts list may be called something like Contacts or Names. You’ll probably need the old cellphone’s manual to work through the process. The sidebar “Copying the contacts list” shows how it works on a Nokia 6300.
If your old cellphone phone doesn’t recognize your BlackBerry SIM card, perhaps the phone is locked. Phone providers can “lock” phones to their network, making the phones unusable in other networks. If this is the case, call your phone provider, and ask for instructions to unlock your phone.
3. Put the SIM card back into your BlackBerry.
Reinserting the SIM card and battery resets your BlackBerry. Don’t forget to put the old SIM card back into the old phone!
4. On the BlackBerry Home screen, select Contacts.
5. In Contacts, press the menu key and then select SIM Phone Book.
It might take some time to load the contacts from your SIM card; how long depends on how many contacts you’ve saved to the card. (You’ll see a progress bar on the screen.) After the contacts are loaded, they are listed on the screen, and you can start browsing or copying them to your Contacts list.
The SIM Phone Book menu item is located toward the bottom of the menu, as shown in Figure 4-17. You need to scroll down to see it.
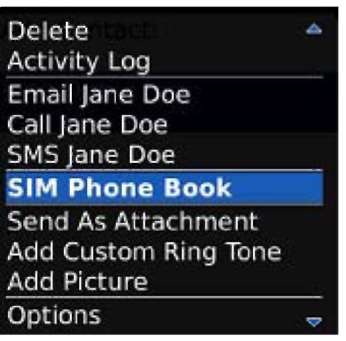
Figure 4-17:
The Contacts menu, showing the SIM Phone Book option.
6. Copy each contact you want on your new BlackBerry Curve.
To do so, highlight the contact, press the menu key and select Add to Contacts. Repeat this step for each contact you want to copy. (It’s still a lot better than actually typing each contact on your BlackBerry.)
Copying the contacts list
The steps for copying the contacts list depend on your old phone. You probably need the owner’s manual for your own phone, but here’s how it works on a Nokia 6300:
1. Select Names by pressing the top of the rightmost top button .
On this phone, Names is the equivalent of Contacts. The phone displays a list of contacts.
2. Select Options by pressing the leftmost top button.
The Names menu appears, as shown in the figure.
3. On the Names menu, select Mark All .
4. Select Options by pressing the leftmost top button.
The Names menu appears.
5. Select Copy Marked .
A menu displays two options: From Phone to SIM Card and From SIM Card to Phone.
6. Select From Phone to SIM Card .
7. Select All and then select Keep Original from the next menu .
A confirmation screen appears.
8. Select OK to confirm the copy .
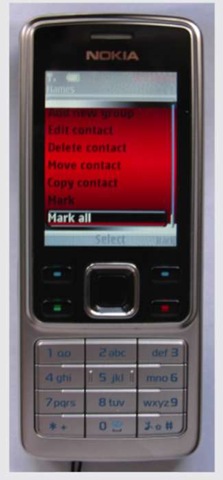
The Nokia 6300 phone starts copying the contents of the Phone Book to the SIM card. While it’s making the copy, the screen displays a bar that moves back and forth. If you have many contacts on your phone, this process can take some time, so be patient. When the contacts are loaded onto the SIM card, the screen displays the number of contacts that were copied.
When the contacts are copied, you can switch the SIM card back to the BlackBerry Curve.
SIM cards have a limited capacity. If one or two old contacts don’t fit on your SIM card, just type them into your BlackBerry Curve. But if you need to move many more contacts, you can clear and refill the SIM card as many times as needed to move all your old contacts:
1. On your Curve, launch Contacts.
2. Press the menu key and then select SIM Phone Book.
On this screen, you should see the already-copied contacts in your SIM card. Deleting the contact here deletes it only from the SIM card, not from the Contacts application. There’s no facility to delete all at once — only one at a time.
3. Press the Del key to delete a contact and then select Delete on the confirmation screen.
This is the best time to disable the confirmation screen and speed up the deletion. If you need a refresher on how to do it, check the “Setting Preferences” section, earlier in this chapter.
4. Swap the BlackBerry SIM card back into the old cellphone.
5. Use the old cellphone’s menu to copy individual contacts that didn’t fit when you copied “all” contacts.
Put the BlackBerry SIM card back in the BlackBerry Curve, and follow Steps 4-6 of the preceding instructions to copy the extra contacts from the SIM card to BlackBerry Contacts.
Copying a BlackBerry Curve contact
Someday, you may want to copy your carefully constructed BlackBerry Contacts list to another cellphone. It’s possible, with a little help from two BlackBerry experts.
This is one of the most difficult tricks unless someone shows you how. So here’s how to copy each contact you want to move:
1. View the contact information.
Follow the steps in the “Viewing a contact” section, earlier in this chapter.
2. On the view screen, scroll to a Phone Number field, press the menu key, and then select Copy to SIM Phone Book.
The Copy to SIM Phone Book feature (see Figure 4-18) shows up only when you position the cursor in a Phone Number field.
3. On the Phone Book entry screen, press the trackball or trackpad, and then select Save.
The screen immediately returns to the View contact screen. You can repeat these steps to copy more contacts from the BlackBerry Curve.
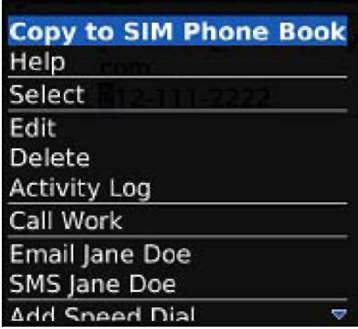
Figure 4-18:
Copy BlackBerry info to a cellphone.
When all the contacts you want are on the BlackBerry SIM card, insert the SIM card into the other phone, and follow its instructions to copy contacts from the SIM card.
If your other phone doesn’t recognize your BlackBerry SIM card, perhaps the phone is locked. Phone providers lock the phones to their network, making the phones unusable in other networks, all the time. If this is the case, call your phone provider, and ask for instructions on how to unlock your phone.
Searching for Someone Outside Your Contacts
Does your employer provide your BlackBerry Curve? Do you use Outlook or Lotus Notes on your desktop machine at work? If you answer yes to both questions, this is for you.
BlackBerry Contacts allows you to search for people in your organization, basically using any of the following software, which contains employee databases:
Microsoft Exchange (for Outlook) IBM Domino (for Lotus Notes) Novell GroupWise
Exchange, Domino, and GroupWise serve the same purposes:
Facilitate e-mail delivery in a corporate environment Enable access to a database of names:
• Global Address Lists (GALs) in Exchange
• Notes Address Books in Domino
• GroupWise Address Books in GroupWise
To search for someone in your organization through a database of names, simply follow these steps:
1. On the BlackBerry Home screen, select Contacts.
2. Press the menu key and then select Lookup.
Some corporations may not enable the Lookup feature. Please check with your IT department for more information.
3. Type the name you’re searching for and then press the trackball or trackpad.
You could enter the beginning characters of a person’s last or first name. You are searching your company’s database, not Contacts, so this step may take some time.
For big organizations, we recommend being more precise when searching. For example, searching for Dan yields more hits than searching for Daniel. The more precise your search criteria, the fewer hits you’ll get and the faster the search will be.
While the search is in progress, you see the word Lookup and the criteria you put in. For example, if you enter Daniel, the top row reads Lookup: Daniel . After the search is finished, BlackBerry displays the number of hits, or matches — for example, 2 0 matches: Daniel.
4. Select the number of matches.
The matches appear. A header at the top of this screen details the matches displayed in the current screen as well as the total hits. For example, if the header reads something like Lookup Daniel (20 of 13 0 matches), 130 people in your organization have the name Daniel, and BlackBerry is displaying the first 20. You have the option of fetching more by pressing the trackball or trackpad and then choosing Get More Results from the menu that appears.
You can add the listed name(s) to your Contacts by using the Add command (for the currently highlighted name) or the Add All command for all the names in the list. (As always, press the trackball or trackpad to call up the menu that contains these options.)
5. Select the person whose information you want to review.
The person’s contact information is displayed on a read-only screen (you can read but not change it). You may see the person’s title; e-mail address; work, mobile, and fax numbers; and snail-mail address at work. Any of that information gives you confirmation about the person you’re looking for. Of course, what shows up depends on the availability of this information in your company’s database.
Synchronizing Facebook Contacts
Do you network like a social butterfly? You must be using one of the popular social networking BlackBerry applications, such as MySpace or Facebook. You must have tons of friends from these networking sites and want to copy their contact information to your Curve. There are ways to achieve this, and individual networking sites will have their own unique way. But if you’re in Facebook, you’re lucky.
With the latest Facebook application (version 1.6 as of this writing), it’s much easier to get Facebook contacts to your Curve. The Facebook app also allows you to synchronize information between your Curve and your friend’s information in Facebook.
Adding a Facebook friend’s info to Contacts
Pulling down your friend’s information from Facebook is quite easy:
1. Select the Facebook icon from the Home screen.
The Facebook application is filed under the Downloads folder.
2. Press the menu key and then press F.
Your friends list shows up in the screen similar to the one on the left in Figure 4-19.
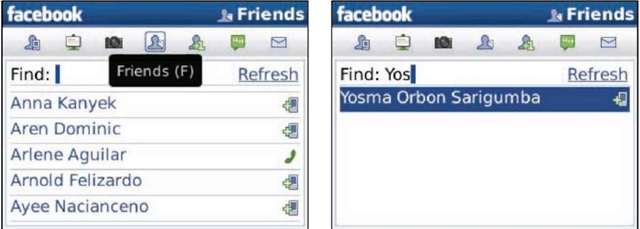
Figure 4-19:
Select Facebook friends to add to Contacts here.
3. In the Find field, start typing your friend’s name.
This narrows the list, as shown on the right in Figure 4-19.
4. Highlight the friend you want to add to Contacts, press the menu key, and select Connect to BlackBerry Contact.
A dialog box appears, as shown in Figure 4-20, allowing you to choose whether to connect this Facebook friend to an existing contact or add the friend as a new contact to your Curve. In this case, you want to add.
If the same person exists in your Curve and in Facebook, you can simply link the contact here. Also, see the next section to get an automatic update on your BlackBerry whenever your friend changes his or her profile in Facebook.
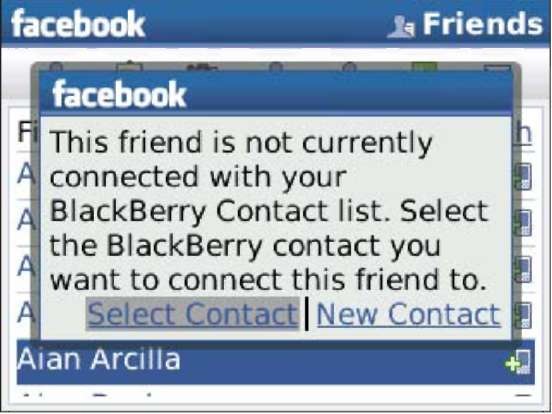
Figure 4-20:
Connect a Facebook friend to an existing contact or add a new contact here.
The term connect in the Facebook application means telling the app which contact is associated with a Facebook friend. After the app records this linkage, it knows which contact to update when information in Facebook changes.
5. Select New Contact.
A progress screen appears momentarily, telling you that it’s getting the contact information from Facebook. When it’s finished, a new contact is added to your Curve with the contact info shown on the screen.
6. Press the escape key.
The Facebook app displays a prompt, asking you whether to ask for a phone number. This is a default behavior even if the phone number is already in your BlackBerry.
7. Select either Yes or No in the prompt to request for phone number.
You’re back to the previous Facebook screen, and an Address Book icon has been added to the right of your friend’s name, indicating that this friend is now connected, or linked, to a BlackBerry contact, as shown in Figure 4-21.
Automatic syncing between Facebook profiles and Contacts
When running the Facebook application for the first time, you’re asked to enable synchronization. Here are Facebook and BlackBerry connections you can choose among:
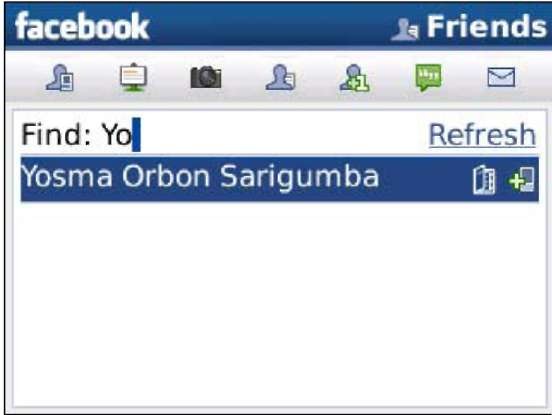
Figure 4-21:
The Address Book icon shows that your Facebook friend is connected to a BlackBerry contact.
BlackBerry Message application: When enabled, you’ll see new Facebook notifications in your Messages application.
BlackBerry Calendar application: When enabled, a calendar item is automatically created in your Curve whenever you have a new Facebook event.
BlackBerry Contacts application: When enabled, your Curve contacts are periodically updated with the latest Facebook information, including the profile pictures. For this to happen, your Curve contacts also will be sent to Facebook.
If you opted out of these options the first time you ran Facebook, you can still enable them from the Facebook Options screen. The following steps enable Contacts synchronization:
1. Select the Facebook icon from the Home screen.
The Facebook application is filed under the Downloads folder.
2. Press the menu key and then select Options.
The Options screen appears. A lot of information and text are on this screen, and you have to scroll down to see all the options. Feel free to check other options, but for synchronizing contacts, refer to the first two pages of the screen, which should look like the one shown in Figure 4-22.
3. Add a check mark to the BlackBerry Contacts application.
There’s explanatory text right below this check box. If you scroll down, you should see another check box, which allows you to synchronize Facebook profile photos with Contacts photos.
4. Add a check mark to the option titled Update Existing Photos in Your BlackBerry Contacts List with Facebook Friend Profile Photos (Figure 4-22, right).
5. Press the escape key, and select Yes on the Save Changes prompt.
Your Contacts will now be periodically updated with Facebook friends.
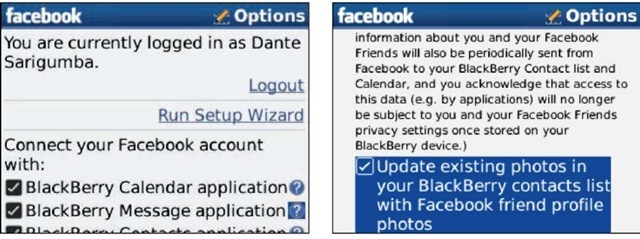
Figure 4-22:
Enable Facebook friends synchronization with Facebook Options.
