A Stand of Your Own
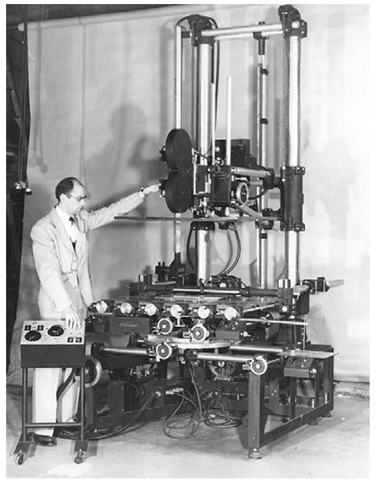
Several elements define the multiplane downshooter. The most distinguishing factor is that this type of shooting requires an animation stand. Immediately, you might think that this can be a very expensive proposition. You would be right if you decided to use a more traditional animation stand like an Oxberry stand. This is a fairly complex piece of machinery with the capability to make compound table moves underneath a camera that can crane up and down. The movement is usually controlled by a computer and requires stepping motors to move the various parts in small increments. This was the preferred method of shooting traditional cel or drawn animation.
FIG 7.1 A traditional Oxberry animation stand.
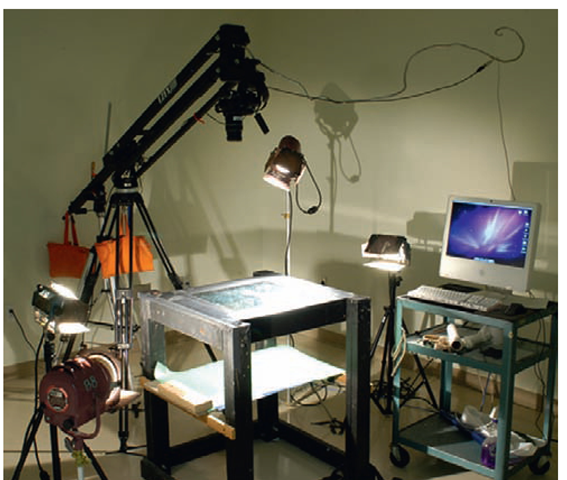
Most independent downshooting artists make custom stands, which can be as simple as a mounted piece of glass placed in front of a camera on a tripod. Many artists cannibalize old stands and cobble together parts, depending on their needs. It is not necessary to have a moving table or camera, especially these days with postproduction options. So, analyzing your needs and building something appropriate is a manageable proposition. When I shot the Penny Cartoon for Pee Wee’s Playhouse in the early 1990s, I put together a stand out of 2" x 4" boards of wood with a glass shooting surface and a mount for a camera. It worked beautifully and serviced my needs quite readily. The camera was locked in position, with the lens pointing downward onto a stationary glass surface. All the motion was created by animating the models and materials across the glass. Neither the camera nor the table needed to move.
The table that holds the objects, cutouts, or various materials to be animated can be a hard flat surface of wood or heavy solid plastic, but the great majority of shooting surfaces on downshooters are made of glass.
This allows for light to be transmitted from underneath, which can be used for mattes and other silhouetting techniques, like sand animation. The glass also allows for objects on the glass surface to be shot with no shadows falling directly below those objects. This is important for cutout animation and green-screen matting. We get into these approaches a little later in the topic. The glass itself can be any ordinary glass but there are a few advantages to choosing the right kind of glass. It is important to note that glass is preferable over Plexiglas, because the plastic is less stable under the heat of the lights and it scratches a lot easier. The best glass to use is called water white glass. It has no tinting in it, transmits 98% of the light, and usually has an antiglare, antireflective coating. This allows the backdrop to be photographed so that the true colors of the artwork show through. The glass can be an expensive choice and is not absolutely necessary because of the ease of postproduction color correction. All glass slightly changes the look of the background artwork. You just want to minimize that influence.
FIG 7.2 A custom-made animation stand with a piece of water white glass used for shooting the Penny Cartoon.
Lighting for the Downshooter
The downshooter presents very specific challenges when it comes to lighting. Shadows are the issue. When an object or cutout is placed on the glass shooting surface, it casts a shadow through the glass down on the lower plane, depending on the height of the light and the distance between the shooting planes. This is not a problem unless you are trying to shoot on green screen or do not want large and graphically confusing shadows being cast from one plane to the other.
Many parameters are involved in determining the distance between the shooting planes, including
FIG 7.3 Key light position relative to the shooting table and the shadows caused by objects on the top plane.
• How wide can the bottom plane be, based on the shooting range of a 35 mm or longer lens?
• How high above the shooting plane does the key light have to be for a good effect?
• Do you want to shoot horizontally or at a 15-45° angle by tilting the table?
• What kind of depth of field do you need to achieve?
• What is the size of the object you are animating and the distance it needs to move?
The 2" x 4" stand I built has about 16 inches between planes, and the camera is mounted about 2 feet directly above the first shooting plane.
As a result, my key light, no matter which side it is on, could rise from 1 to about 20 inches above that plane before objects on the top plane cast visible shadows onto objects on the lower plane. You should think of lighting three-dimensional objects on a stand in a similar fashion to lighting those objects in three-dimensional space. The key or primary light needs to define the object clearly, set a mood, and bring out the three-dimensional form of that object. Your key light can be placed anywhere 360° around the shooting table. It can be placed below the glass shooting up through the glass or anywhere from the glass shooting surface up to the point where the object shadow falls on the lower plane and can be visible to the camera. Ultimately, you must be aware of reflection from the light on the glass and the possibility of lens flare.
Fig 7.4 The range of the key light on an object on the top shooting plane that does not cause shadows on the lower shooting plane.
Key lights can create deep shadows, so it is often smart to give some definition to the shadow areas on three-dimensional objects with fill light. This goes back to the three-point lighting topic covered earlier. The range of the fill light is similar to the key light for the same reason: shadows. The fill usually is placed roughly on the opposite side of the key light, so it can complement the stronger key light. This fill light should be diffused and not wash out the shadows the key light creates. Both lights can utilize colored gels to add more atmosphere. Often times directors of photography think about light from nature. In this case, the key light would be warm (yellows and reds) like the sun and the fill light would be cool or in the blue range, which is normally found in the shadow areas and reflects the ambient blue light from the sky.
FIG 7.5 the range and placement of the fill light on a downshooter with dimensional objects.
Cutouts, which are usually flat graphic images, traditionally have a much more restricted range for lights. The lighting has more to do with allowing the artwork to be read clearly and with even lighting. Traditional drawn animation is shot on a stand with two key sources of light set at the sides of the stand at 45° angles to the shooting surface. The lights are set equally above the shooting surface for an even flat lighting effect. Bryan Papciak, a successful director of photography and director, describes his approach to lighting these surfaces:
"Focus each light into a hard ‘spotlight’ aimed across the table to the opposite side. The light on the left side of the table would be spot-focused to the right side of the artwork, and the light on the right side of the table would be spot-focused on the left side. Once the two spots are balanced, then defocus both lights to ‘floodlight.’ This will result in the most even coverage across the table."
Since cutouts are flat paper or similar material, they cast no shadows on themselves. On a traditional animation stand, the artwork is placed under a hinged piece of glass that rests on top of the artwork once it is placed on the table. This glass is called a platen. The glass platen is more difficult to contend with in cutout animation because it constantly moves or displaces the artwork if the artwork sits loosely on the shooting plane. Tacking down or sticking the cutout artwork to the shooting surface with wax, Blu-Tack, or tape helps eliminate this problem.
The last area in lighting we need to examine is the "underlit" or bottom light setup. This technique is used to gain a silhouette effect for the objects that sit on the top glass shooting plane. Usually, no light emanates from above in this approach, so the objects or cutouts block the lighting that comes from underneath the artwork, creating the silhouette. The light can shine from the lower plane in a couple of ways to achieve this effect. A light box that has florescent tubes and a diffused white milk glass surface can be mounted on the lower plane to radiate an even bright light. The other approach is reflective in nature. Similar to the even lighted top surface approach, two lights can be mounted on either side of the stand focused down at 45° on the lower plane. The light should hit a sheet of white or colored card and reflect up directly under the top glass shooting plane.
Fig 7.6 Two underlit setups for downshooters.
Carolyn Leaf, a master and pioneer in downshooting techniques, describes her own setup:
"I have given many sand workshops and the setup is a single framing camera over a piece of clear glass (plastic builds up static electricity, which can make the sand jump around) with white paper underneath, raised and underlit. I like to put two lights on either side of the glass pointing down onto white paper and bouncing back up to the glass surface. This gives even lighting and isn’t too hard on the eyes, which shouldn’t look directly into lights and can find tiring the contrast of light and dark when working with underlit sand."


