Modeling Exercise — Revolves and Curve History
1. Set your project to understanding_maya\Chapter03\modeling_curve_history_bottles.
2. Open the scene modeling_curve_history_bottles_begin.ma.
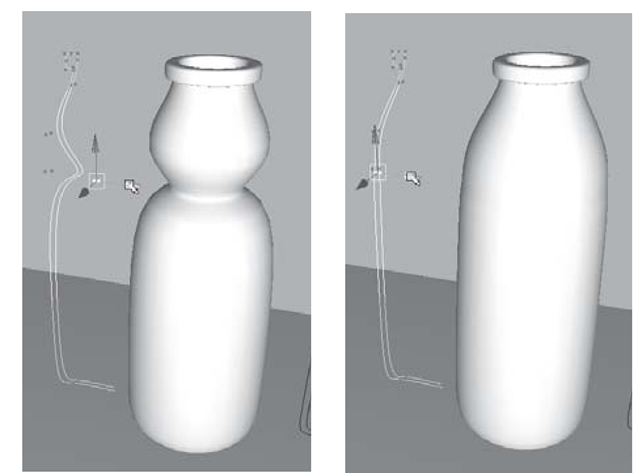
3. You’ll see a small set of shelves with some milk bottles on them. There is also a set of NURBS curves (see Figure 3.18).
4. The three bottles are each dependent on the curve to their left, since construction history was turned on when their curves were revolved. Any changes made to a curve will affect its related bottle surface.
5. Try selecting bottleCurve01. RMB-click on the curve, and choose Control Vertex from the component mask marking menu. Use the Move Tool to move some of the CVs. Notice how you are reshaping the bottle01 object by doing this.
6. A good way to create many objects with slight variations is to duplicate a single curve and then alter it before using the Revolve command.
Figure 3.18: Revolved surfaces
These variations help prevent your scenes from being overly perfect and uniform. We’ll now use the duplicated curves to make some more unique milk bottles.
7. Select bottleCurve05 and then click Surface > Revolve options. Reset the revolve settings and then click the Revolve button. This will make a new NURBS surface that has a construction history dependency on bottleCurve05.
8. Name the revolved surface bottle05 and then move it a few units to the right.
9. Now select bottleCurve05 again, and reshape its CVs in component mode. The bottle05 object will update as you move the curve’s CVs (see Figure 3.19). Often it’s easier to model interactively like this than to try to perfect the curve shape without a surface to reference.
Figure 3.19: Reshaping the bottles through construction history
10. When you are satisfied with the bottle’s new shape, repeat the revolve and modification process on the bottleCurve06.
11. Here is another interesting thing you can do with construction history: Animate the bottle shapes by altering the curves. Try selecting one curve, and then switch to component mode for CVs. Select some CVs, and then press the s key on your keyboard to keyframe their positions. Scrub to a new point on the timeline and move the CVs to reshape the curve. Keyframe the CV positions again. When you play the animation you’ll see that the bottle that is connected to that curve will also change shape.
Modeling Exercise — Revolve and Extrude
1. Set the project to understanding_maya\Chapter03\modeling_revolve_bucket.
2. Open the scene modeling_bucket_begin.ma.
3. You will see a single NURBS curve that has been created with its endpoints aligned to the Y-axis origin.
4. Select the bucketCurve. In the Modeling menu set, click Surfaces > Revolve options. In the options box, choose the defaults by clicking Edit > Reset Settings. Since the curve can be swept around its Y-axis to create a bucket surface, the Axis Preset should remain on the Y setting. Click the Revolve button.
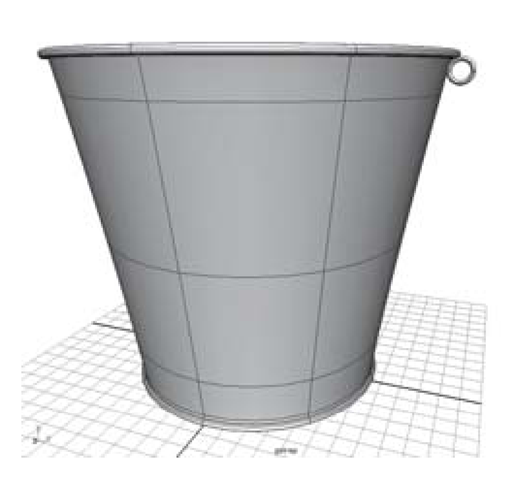
5. This creates a NURBS surface in the shape of a bucket (see Figure 3.20). Press 3 on your keyboard to display the full resolution of the object. Rename the object bucket.
6. Add two rings to the sides. The NURBS torus will work well for this. Click Create > NURBS Primitive > Torus options. Switch the Axis to Z, Radius to 0.5, and Minor Radius to 0.1. The small Minor Radius will make for a thinner, more ring-like shape compared to the default, doughnut-like proportions. Click the Create button.
7. Name the object leftRmg, and move it to the rim on the bucket’s left side, or Translate X = 9.7, Translate Y = 15.9.
8. To make the ring for the other side, select leftRmg and the click Edit > Duplicate options.
Figure 3.20: Bucket with rings
Reset the settings, and then change the Translate option to -19.4, 0, 0. (Since the original had been moved 9.7 units on the X-axis, and is a perfectly symmetrical object, a mirror of it can be created by setting the duplicated version to translate back to the origin -9.7 units plus an additional -9.7 to the right side of the bucket object, for a total of -19.4 units.) Click the Duplicate button.
9. Rename the new ring rightRing.
Last, we’ll make a handle. For this we’ll create another NURBS curve. This time, instead of revolving it, we’ll extrude a circle along it. The extrusion will essentially skin a surface along the path of the handle-shaped curve.
10. In Maya, you can begin creating a curve in one view panel and then switch to another panel to continue setting down points. You should take advantage of this feature whenever you are creating a curve that has a three-dimensional shape. Click Create > CV Curve Tool and start clicking one point in the front view panel right above the leftRmg object.
11. Switch to the side view panel, and click six more points to loop the handle curve through the leftRmg.
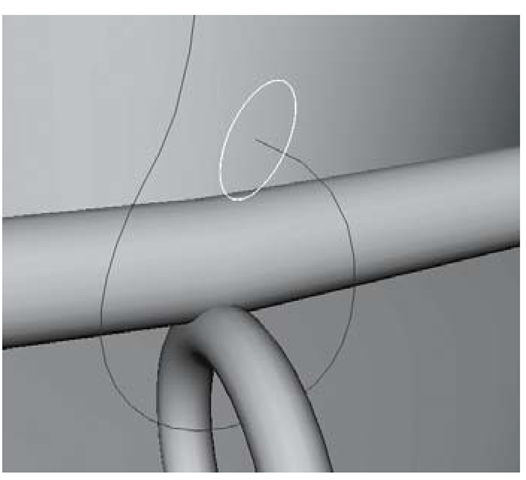
12. Switch back to the front view panel and continue creating the handle. When you near the top of the nghtRmg, switch to the side view panel and finish the curve as you began it. Press Enter on your keyboard to finish the curve (see Figure 3.21).
13. Name the curve handleCurve.
Figure 3.21: Handle curve
14. Next, create a circle to extrude along the handleCurve. Click Create > NURBS Primitives > Circle. Rename it profileCircle.
15. In order to extrude properly, the profileCircle must be snapped to the end of the handleCurve. Switch to the Move Tool. Now, press the Snap to curves icon in the Status Line. MMB-click-drag on the handleCurve.
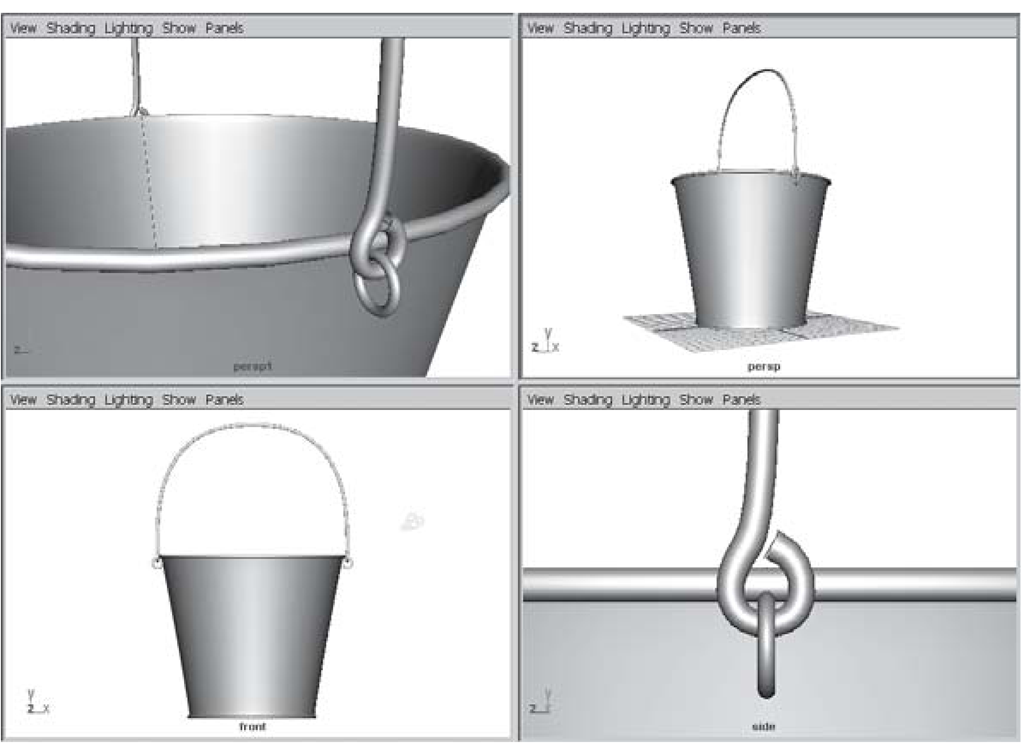
You’ll notice that theprofileCirde slides along the handleCurve. Continue MMB-click-drag-ging until you reach one end of the handleCurve. (see Figure 3.22)
16. Scale the profileCurve to 0.175 on all three axes. Rotate it about 60° on the X-axis to bring it in line with the handleCurve s direction.
17. With profileCircle selected, shift-select the handleCurve. Click Surfaces > Extrude options.
18. In the Extrude Options window, reset the settings, and then change the Result
Figure 3.22: Aligned to the profile curve
Figure 3.23: Extruded handle surface
Position setting to At Path. This makes the profile follow the path’s position. Click the Extrude button. This will create the surface as in Figure 3.23.
19. Name the new surface bucketHandle.
20. Save your scene as modeling_bucket_end.ma.
Lofting
Another way to generate a NURBS surface from curves is called lofting. Lofting is conceptually the same as building the ribs that are found inside a boat and then stretching a skin across those ribs to create a surface with a precise form. Here are some duplicated closed curves and the loft they generate.
Try building some objects with the loft command, such as a computer mouse or a boat. Notice how the order in which you pick the curves determines the flow of the object.


