There are many tools in Maya that can be used to automate or speed up otherwise tedious tasks. One such task is the creation of regular repeating movements in an fflUP animation. For example, to make a yo-yo go up and down on a string you would:
• Place a keyframe for the yo-yo’s Translate Y and Rotate Z channels at frame 1;
• Then go to frame 20, move the yo-yo down, rotate it; and place keyframes for these new values; and finally,
• Go to frame 40, move it up, reverse the rotation, and set keyframes.
Copying Keyframes
To throw the yo-yo again, it isn’t always necessary to repeat this procedure. Instead, you could copy the Rotate Z and Translate Y keyframes at frames 1, 20, and 40, and then paste duplicate sets of keyframes at any points along the timeline when the yo-yo is thrown. The Time Slider provides a convenient way to do this. With an object selected, the Time Slider displays a red tick mark for each keyframe. By <shift> + LMB-dragging across a range of keyframes, you can select multiple keyframes. By RMB-clicking on the highlighted frames, you can Copy the entire range of keyframes. Then you scrub to a new point on the timeline, RMB-click, and choose Paste > Paste, to make a second iteration of the keyframes. We’ll try it out in the next exercise.
Animation Exercise — Copying Keyframes
1. Set your project to understanding_maya\Chapter02\animation_copykeys_yoyo.
2. Open the scene animation_copykeys_yoyo_mid.ma.
3. Press the Play button. The yo-yo goes down and then up one time (see Figure 2.17).
4. Stop the playback and rewind.
Now, we’ll copy the existing keyframes on the yo-yo. The Time Slider is much like the Channel Box and other elements of the Maya interface, in that it displays information specific to the currently selected object. Notice how when nothing’s selected, the Channel Box is blank. Similarly, the Time Slider displays no red tick marks to indicate the presence of keyframes. This will change once you select an object that has been keyed.
a. Select the yoyo object.
b. In the Time Slider, hover the cursor over frame 1.
c. Press and hold the Shift key on your keyboard, while simultaneously click-dragging from frame 1 to frame 41. You will see the highlighted section of the timeline turn red (see Figure 2.18).
Figure 2.17: Yo-yo in action
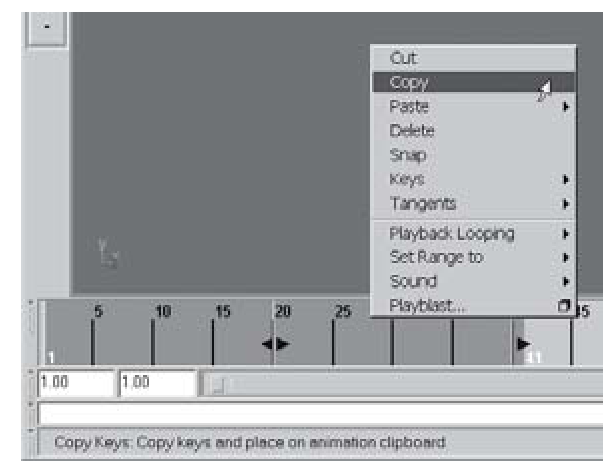
d. RMB-click anywhere inside the selected range of keyframes, and click on Copy in the context menu (see Figure 2.19). This copies all of the selected keyframes.
Figure 2.18: Selecting a range of keys
5. The Translate Y and Rotate Z keyframe values, interpolations, and relative spacing are now stored in a copy buffer. Just as in a word processing or email program, you can now paste that information into a new place. Scrub to frame 50 on the Time Slider. This will be the insertion point for your new set of keyframes. RMB-click on frame 50, and click on Paste > Paste in the context menu (see Figure 2.20). Notice that there are three new keyframe ticks on the timeline. (Since the Translate Y and Rotate Z channels were originally keyed together, Maya displays one tick mark at each frame. You will use the Graph Editor when you need to edit these channels separately.)
6. Rewind and then play your animation. The yo-yo now cycles twice in quick succession.
Figure 2.19: Copying keys
Figure 2.20: Pasting keys
7. Since the copied keyframes are still in the copy buffer, you can paste another iteration of the motion without re-copying. Go to frame 96 and paste the keyframes again.
8. Play back the animation. Let’s say that you’ve changed your mind and would like the last throw to occur much later. Instead of deleting, or undoing and then re-pasting, we’ll use another method. In much the same way as you highlighted a range of keyframes for copying, you can re-time an animation by sliding that range of keyframes on the Time Slider.
9. Shift-LMB-click the keyframes from frame 96 to frame 136. Notice that the red highlighted section has four arrows in it. Click-drag the middle set of arrows (they are positioned around frame 113) to the right. As you drag, pay attention to the white frame numbers at the head and tail of your selected range. When the head number reaches frame 130, stop sliding (see Figure 2.21).
10. Play your animation. The third throw has been time-shifted.
Figure 2.21: Sliding keys
11. What if you wanted to not only change when the third throw happened, but how quickly it happened? The relative spacing between the keyframes that comprise one throw is fine, but the absolute length of a throw needs to be changed. This is the role of the arrows at the ends of the red highlighted range. Click-drag the head arrow to the right, stopping at frame 146 (see Figure 2.22). Notice how the entire range has been scaled, meaning that the relative spacing is intact — the middle tick mark is still equidistant from the head and tail.
12. Now, when you play your animation you’ll see that the third throw is much quicker than the first two.
Figure 2.22: Scaling keys
13. Save your scene as animation_copykeys_yoyo_end.ma.
Pivot Points
Everything that rotates does so around a pivot point. You can’t get around this simple fact. Look at any object that rotates: the hands on a clock, a knob on a radio, the ball in a mouse, the wheels on a chair, your elbow, the earth, and so on. These things all have a single point around which they rotate. Roll a ball and the pivot point is at its center. Swing a stopwatch dangling from a chain and the pivot point is right at your fingertips.
In Maya, you must learn how to control pivot points in order to control your animation. The pivot point of an object is where you will see the Move, Rotate, and Scale Tool manipulators appear. Pivot points usually are located in the same place as hinges and axles (see Figure 2.23).
Try this simple exercise.
1. Create a polygon cube.
Figure 2.23: Pivot points
2. Scale the cube to be shaped like a door from the front view panel. ScaleX — 3.5; ScaleY = 6; ScaleZ — 0.3. Move the cube up 3 units on the TranslateY axis. Name the cube leftDoor.
3. With leftDoor still selected, click Edit > Duplicate options. Reset the tool settings, and then change the Translate settings to 4, 0, 0. This will make a duplicate of the leftDoor that is 4 units to the right. Click the Duplicate button.
4. Rename the new object rightDoor.
5. With rightDoor selected, choose the Move Tool. Notice that the manipulator is located at the center of the object. Now, press the Insert key on your keyboard. This puts the manipulator into edit mode, allowing you to move the pivot point itself.
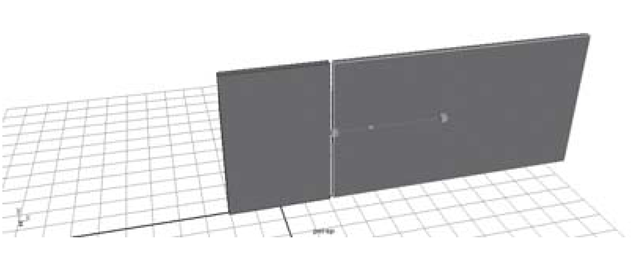
6. Click-drag the pivot point to the left edge of the rightDoor object, like a single hinge (see Figure 2.24). Now, press the Insert key again to return to translate mode.
7. Switch to the Rotate Tool. Pick and rotate the leftDoor object on its RotateY axis. Notice how it swings around its center.
8. Pick and rotate the rightDoor object on its RotateY axis. This one swings more like a normal door, thanks to the relocation of its pivot point (see Figure 2.25).
9. One last thing to point out: the pivot point affects scaling as well as rotation. Try scaling each of the doors on the ScaleX axis. The leftDoor scales from the center outward, while the rightDoor scales away from its hinge (see Figure 2.26).
Figure 2.24: Moving the pivot point
Figure 2.25: Rotating around the pivot point
You’ll need to pay special attention to pivot points when creating multi-part assemblies. A multi-part assembly could be a mechanical device such as a car, or a skeleton for animating a creature. Each part must have a carefully considered pivot point.
Figure 2.26: Scaling from the pivot point


