Windows Vista Wireless Network Setup
Windows Vista has incorporated wireless networking into the standard networking built right into the OS. You no longer have a separate application and Windows to work in to manage your wireless network connection — though you still have a lot of windows to navigate through.
In Windows Vista, everything takes place in the Network and Sharing Center. From this one location, you can work with any of your network connections and get any information about those connections — from your IP address and your available bandwidth to troubleshooting connections with problems.
To get to the Network and Sharing Center, follow these steps:
1. Click the Windows Start icon — the Start button of XP has been replaced with a round Windows icon button — in the lower-left corner of the screen. Select Network from the right column.
The Network dialog box appears.
2. Select Network and Sharing Center from the links bar — this is just below the menu at the top of the screen.
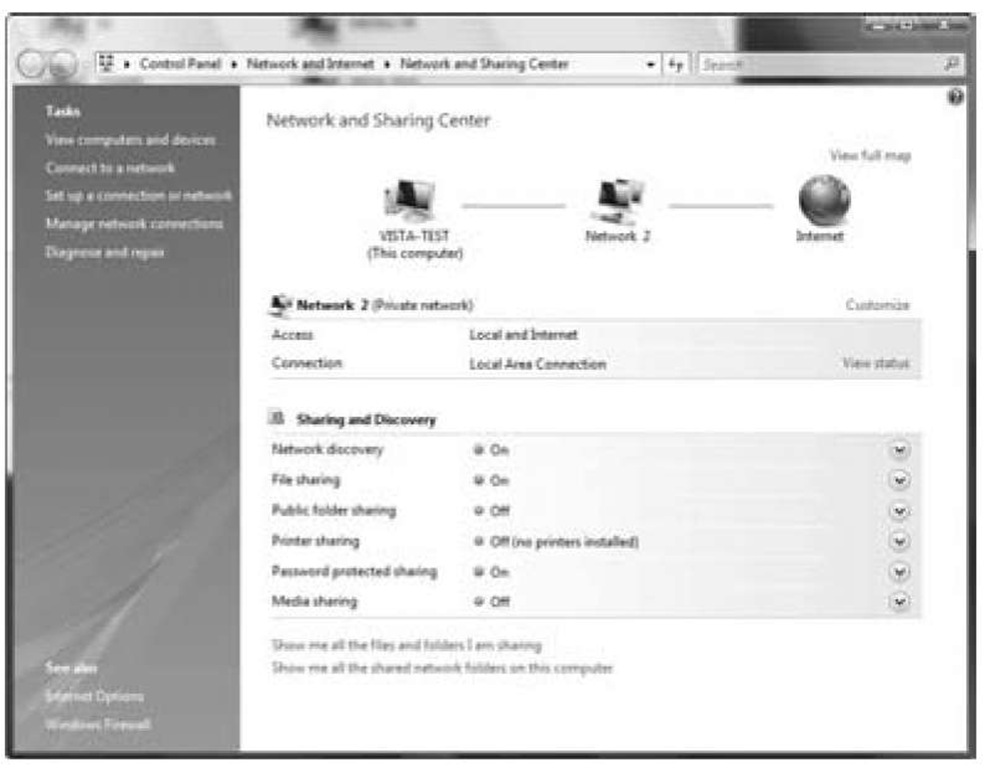
Once inside the Network and Sharing Center (see Figure 7-4), the default network you see is your wired network. To connect to your wireless network, you need to use the link on the left menu, Manage Your Wireless Networks link on the left menu. The list is blank by default because you have not set up a wireless connection at this point.
Figure 7-4:
The Windows Vista Network and Sharing Center.
3. Click the Add button to have Windows search for wireless networks in range of your AP.
At this point you should have the SSID and the WEP/WPA2 passphrase you set up in your AP handy — or your AP’s router PIN if your AP supports WPS. You have the option to have Windows search for any available wireless networks, manually set up a profile for your AP, or set up an ad hoc network. If you have turned off the broadcast of the SSID on your AP, you need to use the manual setup in Vista to add your AP to the list.
After the clicking the Add button, dialog boxes appear, asking you to fill in the appropriate information for any wireless network it can find. If you have to go through the manual process of setting up your AP, Vista’s manual add wizard will walk you through the process to get you connected.
4. Enter the WEP/WPA2 key.
The New Connection Wizard tests the connection before it finishes. If your AP supports WPS, the wizard asks for your AP PIN number.
5. Configure the connection.
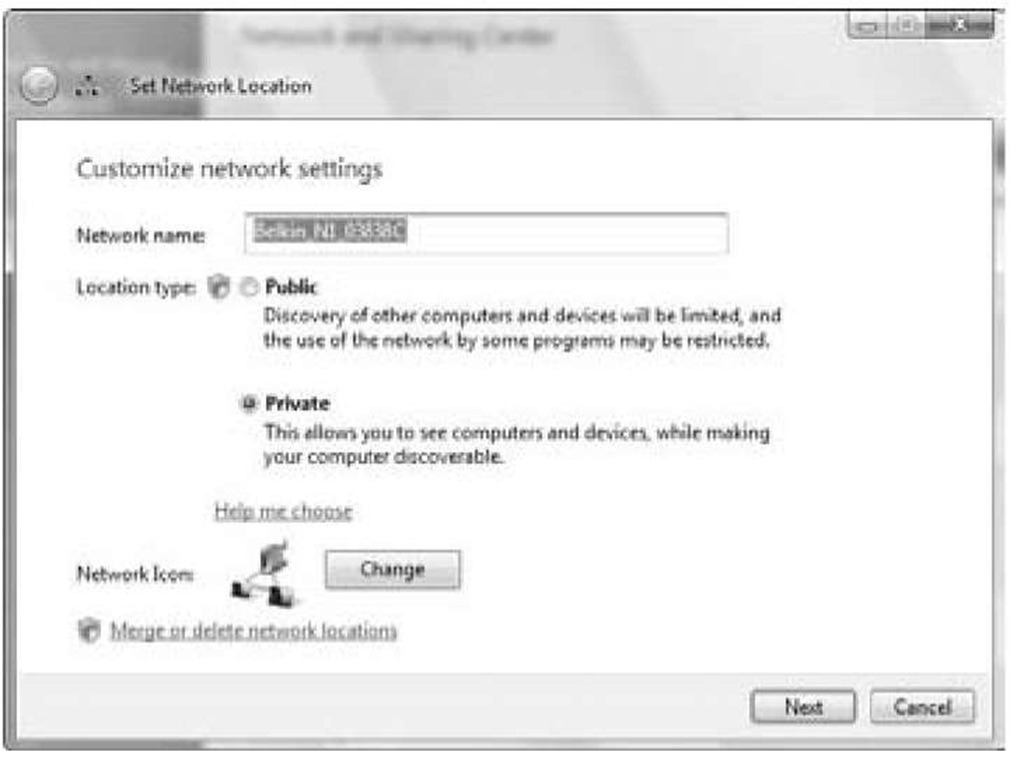
After your AP has been discovered, or set up, you are asked to configure the connection to the AP. In Vista, security has been tightened on all network connections, so you must choose whether this is a Public or Private network connection. If you want to share anything from your Vista machine, choose Private (see Figure 7-5). After you complete the selection, you return to the Manage Wireless Networks window, where you see your connection in the list.
Figure 7-5:
Setting the network location.
If you’re not sure you want to share anything from your Vista machine, you can gain a lot more security by choosing Public — you can always change it to Private later. When the connection is classified as Public, the Windows firewall is set with its strongest security, and many programs are restricted from using the connection — all programs to which you have not specifically granted access to an Internet connection are blocked from using this network connection. Vista security asks for permission to do everything, so any virus that’s trying to use the connection will trigger the security to pop up and alert you.
6. Close the Manage Wireless Networks window.
You return to the Network and Sharing Center.
7. Now that you have added your wireless network to your system, you can disconnect your Ethernet connection and try out your network.
You can discover and learn a lot more about your new wireless connection by using the tools in the Network and Sharing Center. In Figure 7-6, we have our Belkin AP set up as a Private network. From here we can use the View Status link to see all the details of our connection. Clicking the Details button will bring up all the information you might need about the speed, the amount of data that has been passed over the connection, the IP address, and pretty much everything else you may want to know about your connection. If you’re having problems with your connection, the View Status pop-up also has a Diagnose button that can help determine the cause of your connection problem.
Figure 7-6:
The Network and Sharing Center showing the new wireless network.
The Network and Sharing Center includes a helpful Signal Strength meter (which you can see from the View Status screen). We found in our tests that the Windows meter is not as fast to respond as some of the vendors’ software that comes with your wireless network card. But if your vendor does not give you a signal meter, this one works fine to find weak coverage areas in your house.
Tracking Your Network’s Performance
After you have your network adapters and APs installed and up and running, you may think that you have reached the end of the game — wireless network nirvana! And, in some ways you have, at least after you go through the steps in next topic and get your network and all its devices connected to the Internet. But part of the nature of wireless networks is the fact that they rely on the transmission of radio waves throughout your home. If you have ever tried to tune in a station on your radio or TV but had a hard time getting a signal (who hasn’t had this problem — besides kids who have grown up on cable TV and Internet radio, we suppose), you probably realize that radio waves can run into interference or just plain peter out at longer distances.
The transmitters used in Wi-Fi systems use very low power levels — at least compared with commercial radio and television transmitters — so the issues of interference and range that are inherent to any radio-based system are even more important for a wireless home network.
Luckily, client software — usually in the form of a link test program — comes with some wireless network adapters, and signal meters are built into Windows XP and Vista. These tools enable you to look at the performance of your network. With most systems (and client software), you can view this performance-monitoring equipment in two places:
In your system tray: Most wireless network adapters install a small signal-strength meter on the Windows system tray (usually found in the lower-right corner of your screen, although you may have moved it elsewhere on your screen). This signal-strength meter usually has a series of bars that light up in response to the strength of your wireless network’s radio signal. It’s different with each manufacturer, but most that we’ve seen light up the bars in green to indicate signal strength. The more bars that light up, the stronger your signal.
Within the client software itself: The client software you installed along with your network adapter usually has a more elaborate signal-strength system that graphically (or using a numerical readout) displays several measures of the quality of your radio signal. This is often called a link test function, although different manufacturers call it different things. (Look in your manual or in the online help system to find it in your network adapter’s client software.) The link test usually measures several things:
• Signal strength: Also called signal level in some systems, this is a measure of the signal’s strength in dBm. The higher this number, the better, and the more likely that you can get a full-speed connection from your access point to your PC.
• Noise level: This is a measure of the interference that’s affecting the wireless network in your home. Remember that electronics in your home (such as cordless phones and microwaves) can put out their own radio waves that interfere with the radio waves used by your home network. Noise level is also measured in dBm, but in this case, lower is better.
• Signal to Noise Ratio (SNR): This is the key determinant to the performance of your wireless network. This ratio is a comparison of the signal (the good radio waves) with the noise (the bad ones). SNR is measured in dB, and a higher number is better.
Many link test programs not only provide an instantaneous snapshot of your network performance but also give you a moving graph of your performance over time. This snapshot can be helpful in two ways. First, if you have a laptop PC, you can move it around the house to see how your network performance looks. Second, it can let you watch the performance while you turn various devices on and off. For example, if you suspect that a 2.4 GHz cordless phone is killing your wireless LAN, turn on your link test and keep an eye on it while you make a phone call.
When you grow more comfortable with your wireless LAN — and start using it more and more — you can leverage these tools to tweak your network. For example, you can have your spouse or a friend sit in the living room watching the link test results while you move the access point to different spots in the home office. Or you can use the link test with a laptop to find portions of your house that have weak signals and then use these results to decide where to install a second access point.


