Technique
Save Time By
Putting your clips together quickly and accurately
Using fades and other transitions wisely
Publishing your finished movie to a hard drive, CD, or on the Web
Windows Movie Maker 2, shown in Figure 39-1, is great despite its ability to cause system lockups.
Movie Maker 2′s bag of tricks runneth over, with more than 40 titles ready for you to stick in your movies, 60 transitions, and 30 other effects. In addition, the Auto Movie generator can make serviceable movies from a handful of clips with just a click.
Windows Movie Maker makes great demands on your hardware, particularly if you create long movies (er, “projects”), and/or if you try to edit a movie and stick it back on your digital camera. For big movies, you need big iron. Symptoms of iron deficiency include unexplained freezes and hangs, video getting out of synch with the audio, color splotches or black bands, and video-induced narcolepsy. (Okay, I made that last one up. That’s more a side effect of editing ten hours of raw vacation videos down to nine and a half hours of sheer boredom.) To handle big movies, you need to have a fast hard drive with lots of free space — and it helps if the drive has been defragmented recently. See Technique 5 for the skinny on defragmenting.
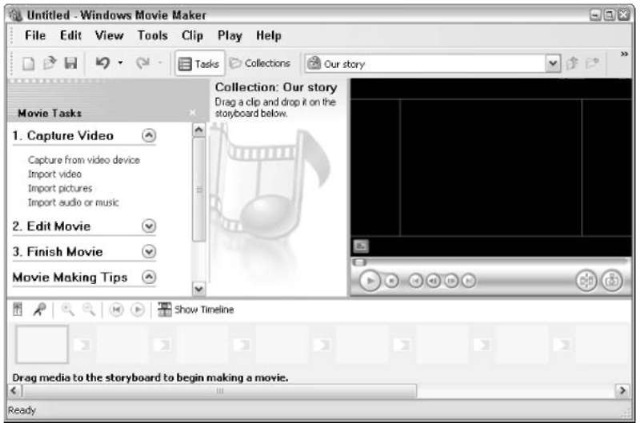
• Figure 39-1: Windows Movie Maker 2.1.
Understanding the Limitations of WMM
You can feed Windows Movie Maker video clips and still pictures in many, many different formats, but it won’t take MPEG-2 files, no way, no how. Thus, you can’t use Windows Media Center Edition 2004′s .dvr-ms files, and you can’t use files from the Sony MicroMV digital video cameras. Yes, you read that right: You can’t use files created by Media Center 2004 as input to Windows Movie Maker.
On the plus side, WMM 2.1 works directly and simply with your digital video (DV) camera, old-fashioned analog video camera, or even a retro VCR. If you have a DV camera, plan on connecting it directly to your computer’s USB 2 or FireWire (IEEE 1394) port. (If you don’t have a FireWire port, get a FireWire adapter card.) Analog devices, including older video cameras, VCRs, and “video out” connections on just about anything (including cable boxes, satellite boxes, TiVo, television tuners, video game machines, what-have-you) can be connected to an analog capture card, using either S-VHS or standard composite (yellow, red, white) plug-in connectors. WMM works with them all.
It also works great with a plain Webcam, as I explain in Technique 38.
After you’re done with your editorial effort, though, you have only a few choices for the final movie you produce:
You can turn the new movie into a WMV file.
WMV files can be viewed by Windows Media Player 9, 10, or later — but not with any earlier version of Windows Media Player. That means movies you create with WMM can’t be played on Windows 98 PCs (because WMP 9 doesn’t run on Windows 98). It also means you have to upgrade to WMP 10 on any other PCs before you can view movies created with Windows Movie Maker. WMV is a proprietary format, owned by Microsoft, lock, stock, and barrel.
You can burn the movie on a CD in Microsoft’s proprietary HighMAT format. You can only view that CD on a video machine capable of understanding HighMAT.
You can send the movie to digital videotape if you have a DV camera attached to the PC with a FireWire cable. (You also can produce a DV-AVI format file, which you can subsequently copy onto a DV camera.)
You can publish the new movie on the Web if you’re willing to pay one of Microsoft’s partners for the privilege. At the time I write this, Microsoft has only two providers available — Neptune Mediashare (moviemaker.neptune.com) and POPCast (moviemaker.popcast.com). It ain’t a growth industry.
Before you create a movie with Windows Movie Maker 2, it would behoove you to consider how and where you’re going to view the movie. If you had dreams of burning a DVD with your son’s birthday videos, and sending the DVD to your parents so they can watch it on their TV, you have to shell out extra bucks for a product like Sonic MyDVD (www.mydvd. com).
Importing and Combining Clips
Start to build a movie from a bunch of clips (see Technique 38 for a great way to make clips with your Webcam) and then follow these steps to put the clips together:
7. Choose Start All Programs Windows Movie Maker.
The main Movie Maker screen appears (refer to Figure 39-1).
2. Click Import Video.
You get the Import File dialog box, as shown in Figure 39-2.
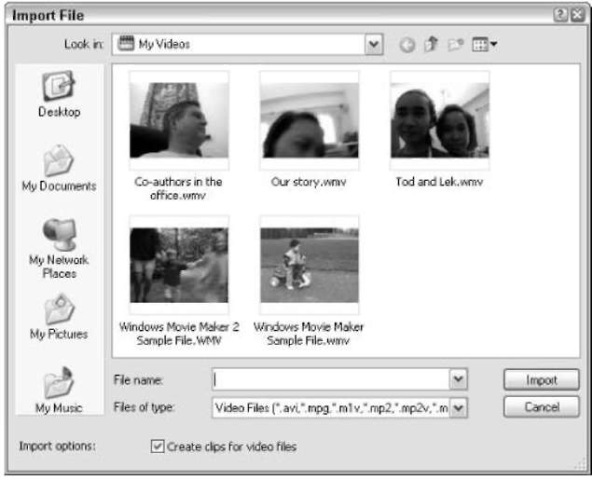
• Figure 39-2: Choose from available clips.
3, Choose one or more video files. (You can use Ctrl+click or Shift+click to pick more than one.) Click Import.
You can have WMM automatically break any file you choose into multiple clips and give each clip a unique number. If so instructed, WMM scans each video file and looks for logical breaks in the action. Each break point starts a new clip. The method for automatically breaking a file into clips isn’t perfect, but you can always stitch broken-up clips back together again. (In fact, if you do nothing, you’ll never notice a difference because the clips play back-to-back with no interruption.)
Although you may see only one clip in the middle of the screen (as shown in Figure 39-3), WMM really does open all the files you chose.
4, Click the clip that you want to appear at the beginning of the movie and drag it down to the first spot on the storyboard near the bottom of the screen.
You’re starting to assemble the movie by using a storyboard — a sequence of beginning still pictures in each clip that can help you organize the movie (as shown in Figure 39-4).
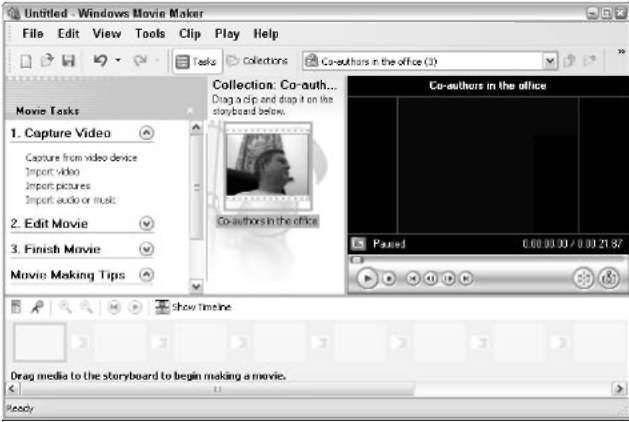
• Figure 39-3: WMM with one clip open.
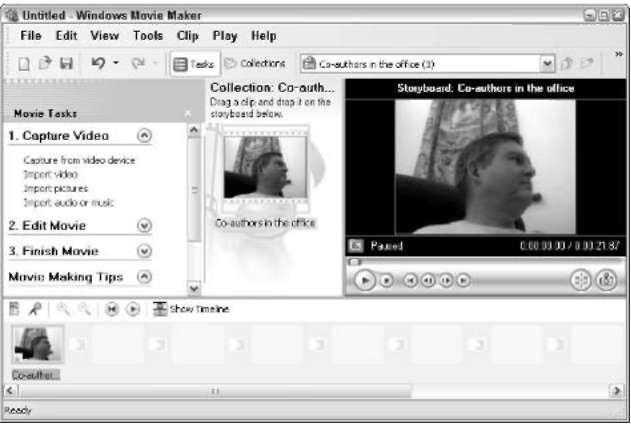
• Figure 39-4: The storyboard starts to take shape across the bottom of the screen.
5, To see all of the clips that you have open, click the Collections icon on the main toolbar.
Clicking the Collections icon turns the Task pane into the Collections pane. That’s where you can see the open clips.
6. Click and drag each clip into place. You can click a file in the Collections pane and drag clips to the storyboard as you see them (as shown in Figure 39-5). You also can click and drag to rearrange clips on the storyboard.
7 See how the clips play next to each other by clicking the Play button.
If need be, rearrange the clips by clicking and dragging them into place until you feel comfortable with the sequence.
This is a good point to save your work. Click the Save icon, give your project a name, and click Save again.
8.A project isn’t a movie. A project is the glue that holds a movie together — pointers to clips, instructions for putting them together, transitions, and other effects — but it isn’t a movie and can’t be played like a movie.
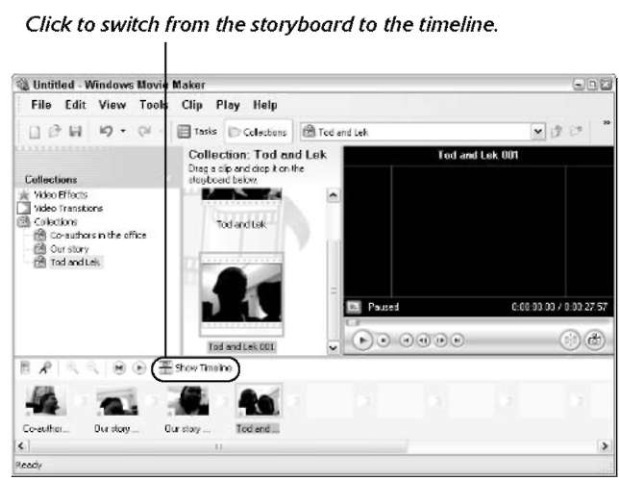
• Figure 39-5: Build the clip collection in the correct order.
Trimming Clips
After you block out the clips, as I describe in the preceding section, I suggest that you trim away the parts at the beginning and end of each clip. You don’t have to follow this advice, but you’ll discover that the beginning and ending of clips (invariably) don’t work out.
When you trim a clip, you’re just telling Windows Movie Maker to skip over part of the beginning or end of the clip. Nothing in the clip is actually removed — the clip isn’t altered in any way.
Trimmin’s easy. Just follow these steps:
1 Open a project.
If you’re continuing from the preceding section, you already have a project underway.
2. At the bottom of the project window, click the Show Timeline icon.
WMM replaces the storyboard at the bottom with a timeline — a representation of what the movie will show with the timing noted above the clips in the storyboard (as shown in Figure 39-6).

• Figure 39-6: The movie’s timeline.
3. Click between clips (or at the beginning of the first clip or the end of the last clip), and your cursor turns into a two-headed arrow (as shown in Figure 39-7).

• Figure 39-7: The two-headed arrow used to trim clips.
4. Click and drag the double-headed arrow to tell WMM that you don’t want to include the beginning or end of the clip in the final movie.
It takes a little practice to do this part right. If you drag around long enough, you’ll get a feel for what’s happening.
5. Check what you’ve done by clicking once inside a clip and then clicking the Play button to see what’s left after the clip is trimmed.
6 This is a good time to save, so click the Save icon on the main toolbar.
Using Transitions and Effects
With the clips blocked out and trimmed, your next job is to set up transitions between the clips that help tell the story. Mechanically, WMM makes that very easy. Aesthetically, well, that’s a fade of a different color.
Here’s how I apply transitions and effects:
7. Start Windows Movie Maker and open the project.
If you’re continuing from the preceding section, you’re in the right place (as shown in Figure 39-8).
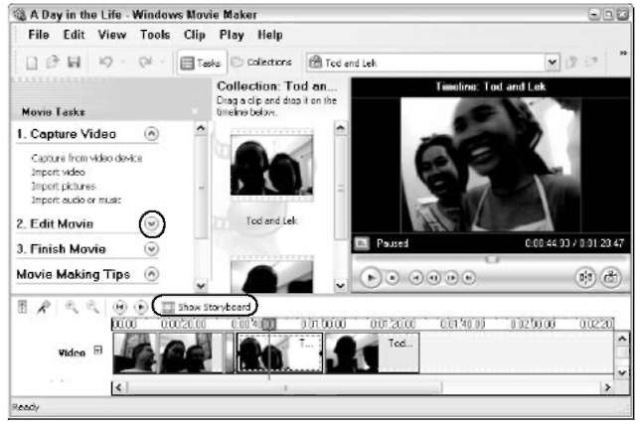
• Figure 39-8: A Day in the Life.
2, At the bottom of the project’s window, click Show Storyboard. On the right, click the down arrow next to the Edit Movie task.
The Edit Movie steps appear (as shown in
Figure 39-9).
3, If you want a video effect, click the View Video Effects task and drag the desired effect onto the clip that you want to distort.
It’s unlikely that you’ll want to add such an effect, but if you do, you can make the clip look pixilated, brown-toned, or cracked and old, or you can add slow-motion effects.
The effects are varied and fun, but I bet you get tired of them quickly.
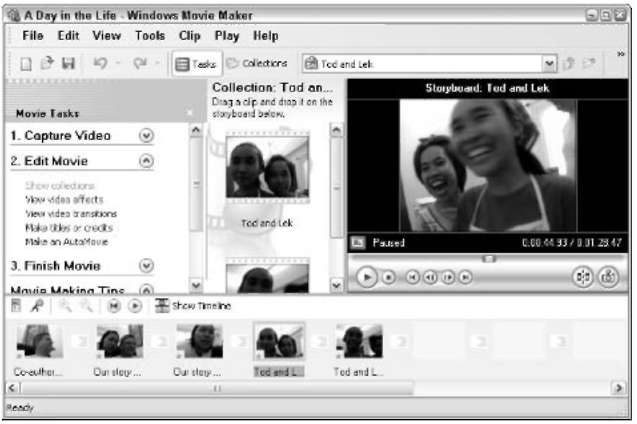
• Figure 39-9: It’s easier to work with transitions if you can see the storyboard.
Effects are cumulative: If you drag the Sepia effect and the Watercolor effect onto a clip, it shows up watercolored (I call it blotched) and in sepia color. To get rid of one or more effects, right-click the clip and choose Video Effects. Use caution with effects because if you don’t like them, you have to waste time removing them one by one.
4. If you want transitions between the clips, click the View Video Transitions task. Then click and drag the transition you want to the gray box between the clips.
The two transitions I rate as least jarring are Fade and Wipe — two well-established methods for moving between clips.
5, Check transitions and effects by clicking a clip and clicking the Play button.
6. Now’s a good time to save your work. Click the Save button (the one on the main toolbar that looks like a diskette).
Note that you’re saving the project — not a movie. The project contains pointers to the clips, with instructions for putting the clips together, trimming them, fades, and the like. I talk about saving the entire movie — turning it into a file that can be played — at the end of this technique. For now, save the project.
Adding Titles and Credits
Every movie can benefit from titles. Some justify adding credits. I don’t know how many hours I’ve wasted composing titles in Word (such as, oh, “Kilkenny County” and “County Cork” and “Dublin”), printing those titles out on sheets of paper, filming the printouts, and cutting the titles in with my home movies. Don’t laugh. Not many years ago, that used to be state-of-the-art.
Windows Movie Maker 2 makes it easy and quick to show titles.
To get titles working, follow these steps:
7. If you aren’t continuing from the preceding section, start Windows Movie Maker and open a project.
2. Click the Edit Movie task, and then click Make Titles or Credits.
Windows Movie Maker offers you five places where you can put the title: at the beginning of
the movie, before any clip, superimposed on top of the video in any clip, at the end of any clip, or at the end of the movie.
3. Click Title at the Beginning. WMM has you fill out a template, which translates into a very short title clip (as shown in Figure 39-10). You can change fonts and the way the title fades by clicking at the bottom.
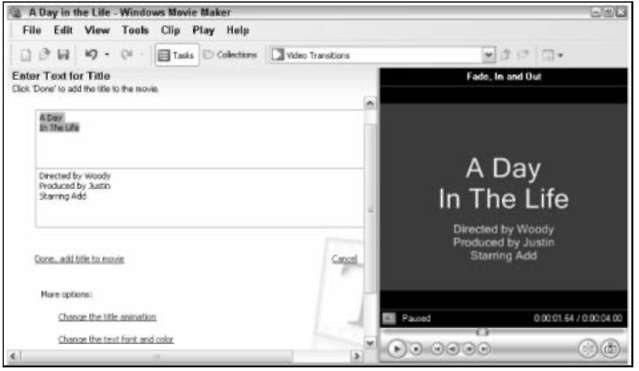
• Figure 39-10: The intro title is generated automatically from text you type.
4. Click the Done, Add Title to Movie link.
The title appears as the first clip (in the timeline).
5. Repeat the same process for an0y other titles you wish to add.
6 Click the Save button (the one on the main toolbar that looks like a diskette) to save your project.
As noted several times in this technique, the project is not a movie — it’s just a bunch of pointers, titles, fades, and so on. To save a real, live movie — one that you can play with Windows Media Player 9 or 10 — see the next section.
Saving the Movie
As mentioned at the beginning of this technique, you have a limited number of options for turning your project into a viewable movie:
You can make a WMV file (playable with Windows Media Player 9 or 10), which you can save on your computer, send by e-mail, or post on one of Microsoft’s partners’ for-pay Web sites. You can also post the WMV file on your own Web site, or share it with other people via one of the file-sharing programs, such as Lime wire (see Technique 25).
You can burn a CD in High MAT format. Windows Media Player has no problem with High MAT CDs. Very few standalone CD players understand it, though.
You can record the movie on a DV camera, if the DV camera is attached to your PC, using a file format commonly called DV-AVI.
To create a WMV file, follow these steps:
7. If you aren’t continuing from the preceding section, start Windows Movie Maker and open a project.
2. In the Movie Task pane, click the down arrow next to Finish Movie.
WMM shows you the output options (as shown in Figure 39-11).
3, Click Save to My Computer on the left.
WMM brings up the Save Movie Wizard.
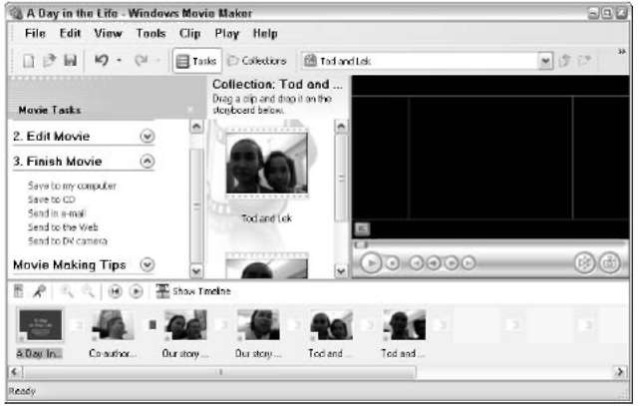
• Figure 39-11: The only WMM output options.
4. Type in a suitable name, and browse to the location where you want to put your movie.
Click Next.
The Save Movie Wizard suggests that you save the file in WMV format, but you can click Show More Choices for a wide array of additional options, including a Pocket PC-suitable WMV format, several variants of NTSC (in WMV format, of course), and even DV-AVI in case you want to copy the movie to a Digital Video camera at some point in the future.
5. Choose the format you like and click Next.
WMM converts the specifications in your project and the video in the clips into a real movie.
6. When WMM is done, click Finish in the wizard’s last dialog box and watch your movie.
