Technique
Save Time By
Understanding what you can — and can’t — do with a CD writer
Burning CD-R and CD-RWs the right way, the first time
Troubleshooting common problems
If you have a CD writer, and you’ve never burned a CD — that is, written data to a CD — you’re in for a treat. Windows Media Player truly makes burning audio CDs simpler than ever. In fact, the toughest part of the job is deciding what kind of CD to burn. There are a few tricks, and a couple of potential traps — Microsoft’s licensing of its copy-protected WMA files can drive you nuts. But I bet you’ll be surprised at how fast and easy burning a CD can be.
Talk about saving time! If you fumble around in your car swapping CDs at 70 miles per hour (or even gently gliding from CD to CD on that big 6-disc changer), you’re a great candidate for burning your own mixes, getting more songs on a single CD, eliminating the lousy tracks from an otherwise-good album, or otherwise pulling together the music you want to hear without all the junk in between. It’s cheap. It’s easy. And now, with WMP, it’s fast.
This technique shows you all you need to know.
Choosing the Type of CD to Burn
If you look on store shelves, you see 74-minute CD-RWs, 80-minute CD-Rs, 90-minute CD-Rs — and heaven-knows-what-all from this manufacturer and that. How do you know what works in your CD burner?
Heh heh heh. That’s a trick question. Chances are mighty good that your burner — if you bought it in the past couple of years anyway — can handle all those types of CDs. With aplomb.
Almost all CD (and DVD) burners can run the full gamut of CD-R and CD-RWs:
CD-R (CD-Recordable): Record with these discs multiple times — in multiple sessions — but each time, the new stuff appends to the end of the disc. You can’t erase and reuse the space occupied by the old stuff.
CD-RW (CD-Record/Write): Record with these discs multiple times, but each time you record a CD-RW, all the old stuff is erased.
DVD-R, DVD-RW, DVD+R and DVD+RW get a touch more complex, but the folks who make DVD burners decided quite some time ago that they should handle all the formats, and do so without bothering you with any details. It’s a rare DVD burner these days that can’t handle everything.
Mostly, it isn’t a question of what your burner can handle. The question you need to ask is: What works in your CD player?
There’s the rub. You can record on almost any kind of CD with fairly recent CD writers, and audio DVDs are like falling off a log. But can your CD player play what the burner has burned?
Older CD players only play songs in the first recording session on a CD-R.
Later CD players play multiple recording sessions on CD-Rs and/or recordings on CD-RWs.
Some CD players can play any kind of audio CD-R or CD-RW, and they can also play MP3 files (or even gasp! WMA files) directly. The best of them can also handle DVDs with any kind of file.
This I know from brutal first-hand experience: It’s hard to tell by reading a CD player’s manual exactly what in the world it can play. Your best bet is to sacrifice a few CDs and try different approaches. If an approach fails, don’t throw away the CD. Chances are good the next CD player you buy can handle it.
Picking Songs to Go on the CD
To pick songs that you want to burn on a CD:
I Start Windows Media Player 10 and click Library.
If you don’t yet have Windows Media Player 10 installed, see Technique 31. Yes, it’s worth installing.
You will save yourself a lot of headaches if you don’t try to burn any copy protected Microsoft-proprietary format WMA files on a CD. If you accidentally ripped audio files in copy-protected WMA format, go back and rip them again. See Technique 32 for details.
2. Find a bunch of songs that you want to burn — say, by bringing up an album or a playlist.
3. Select songs by clicking them, by Ctrl+clicking individual songs, or by Shift+clicking a group of songs.
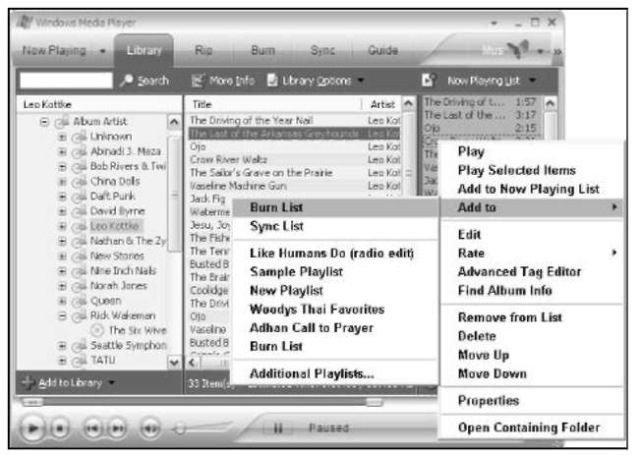
4. Right-click the selected songs and choose Add To Burn List (see Figure 35-1).

• Figure 35-1: Select the songs you want to burn, right-click, and choose Add To: Burn List.
WMP adds all your selected files to the list of files awaiting burning.
5. Click the Burn button at the top of WMP.
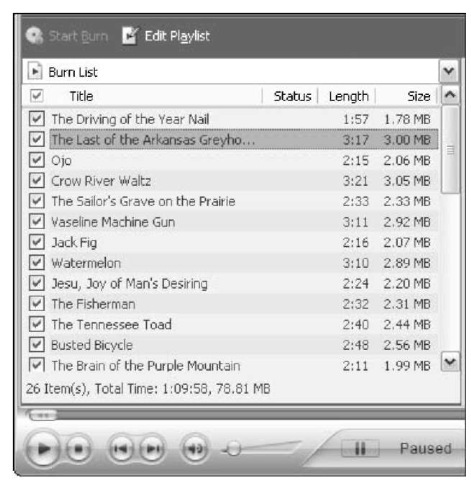
WMP shows you which songs await burning (see Figure 35-2).
Keep an eye on the total amount of space the files require, which appears at the bottom of the Burn List. In Figure 35-2, the selected files occupy a total of 78.81MB, which just barely fits on an 80MB CD-R.

• Figure 35-2: The list of files waiting to be burned.
6, If you have any additional songs you want to copy — or if you want to change the order in which they’re burned — click Edit Playlist.
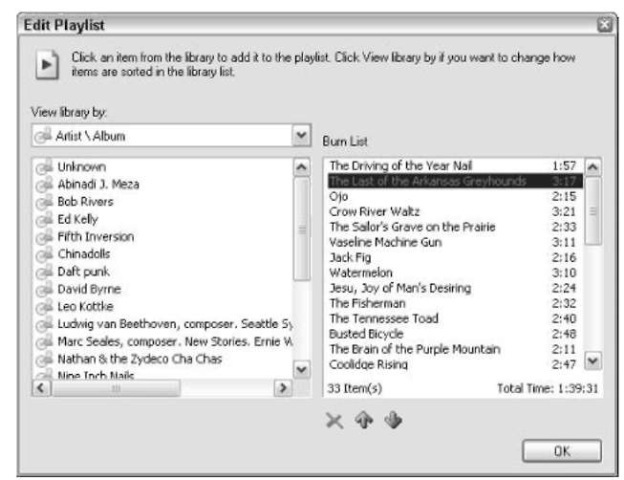
The Edit Playlist dialog box appears (shown in Figure 35-3).
7 Click a song on the left and it appears in the Burn List box on the right. Click a song on the right and click the up and down arrow buttons to change the sequence of songs on the CD you’re about to create. When you’re done, click OK.
Don’t worry so much about the total time in the Edit Playlist dialog box; you can get the timing worked out when you’re back in WMP itself.
8, Check and uncheck the boxes in front of individual tracks, to fill up as much of the CD or DVD as possible without going over.
You are ready to burn the CD or DVD.

• Figure 35-3: Change the order of tracks in this dialog box.
Burning the CD or DVD
After you select the songs for your playlist and determine that all the songs will fit on your CD or DVD, burning an audio CD/DVD is very easy:
7. Start in Windows Media Player 10 with the songs you want to burn, in the correct order, on the left.
Follow the steps in the preceding section if you’re not sure how to get the songs set up right.
2, Put a blank CD in the drive and click Start Burn.
Then go grab a good topic — or clean your poor, neglected mouse. It takes several minutes to about half an hour to burn a typical CD. Fast burners are popular for a reason, eh?
WMP 10 starts by converting the songs into a form that works on audio CDs.
WMP 10 puts a two-second gap between each song. You can’t change it. If you rip and burn an audio CD that plays songs back-to-back with no gap (I won’t mention Nine Inch Nails
by name), you hear an unexpected gap. That isn’t an error, or a bad track on the CD. It’s just the way WMP does things.
3, When WMP is done, your computer ejects the CD from the drive.
4. Take your new CD to whatever player you intend to play it in, and make sure that it works.
As described at the beginning of this technique, compatibility problems with older CD players aren’t unusual.
If you want to erase a CD-RW or DVD-RW, click the Burn button at the top of WMP, then click the Erase Disk icon, which is the last icon on the right side. WMP looks at the CD or DVD, figures out if it only contains music files and, if so, erases all the files from the CD-RW
or DVD-RW. If your CD or DVD contains other
kinds of files (which is to say, any files other than standard audio “CDA” files, MP3, WMA, or WAV files), WMP doesn’t erase it.
Dealing with Hard Drive Space Issues
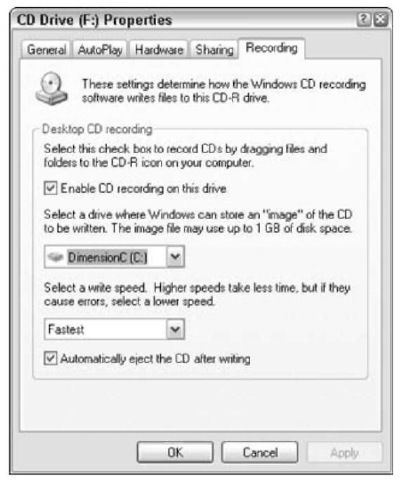
Burning a CD takes a lot of room on your hard drive because WMP has to convert the songs into a format that works on audio CDs. (They’re called CDA files, but they aren’t “files” in the usual PC sense of the term.) If you don’t have an extra 700 to 800MB of free space on your main hard drive, choose Start My Computer, right-click your CD-R drive, and choose Properties Recording. The CD Drive Properties dialog box appears, as shown in Figure 35-4. Change the drive where Windows can store an “image.”
This space is only used temporarily. It has to be on a hard drive, because the CD burning process can’t be interrupted. If you have to copy a bunch of files to another computer on your network, or even compress some files to make room for the temporary image area, go ahead. You can always move them back later. Oh. And while the recording session is underway, don’t edit that home movie or print 200 vacation pictures, okay? The CD burning routine needs a little room.
Yep, the dialog box refers to “CD-R drives,” even if the drive in question is a DVD-RW drive. Not to worry.

• Figure 35-4: Specify a temporary storage location here.
