In This Topic
- Making more orchids by dividing them
- Separating babies from their parents
- Making more orchids from cuttings
- Producing plants from back bulbs
Because orchids are slower growing than most other plants, the process of multiplying them takes more time. To rear an orchid from seed to bloom can take as long as five to seven years! The other methods I show you in this topic are much quicker, but they’re still not as speedy as reproducing common garden plants. Multiplying your orchids is worth the effort, however, because orchids are valuable plants that will keep growing forever.
Dividing Your Orchids
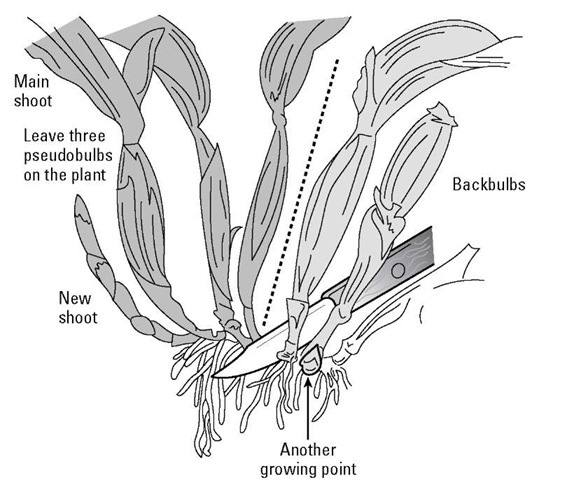
Dividing orchids is the surest and swiftest way to increase your orchids. This method only works with sympodial-type orchids (ones that grow sideways across the top of the pot like cattleya, shown in Figure 8-1). Just about all the orchids in this topic.
For the cattleya types, you want to have divisions of at least three or four growths (called pseudobulbs). For other types, you can divide them with fewer growths, but for best results, the larger the divisions the better.
You may want to divide your orchid because
The plant has grown too big to handle.
You want to share or trade a piece of the orchid you have with another plant lover.
The rhizomes (creeping stems of the orchid) are growing over each other in a tangled mess.
When cutting the orchid plant, use a very sharp knife or pruners that have been sterilized to prevent disease spread. After you’ve divided the plant.
Figure 8-1: When dividing a cattleya, try to have at least three, if not four, front growths.
Do not divide your orchids when they’re too small or when they don’t have enough growths. The largest divisions with the most pseudobulbs will grow quickest to blooming plants. You’ll always get the best blooming from your orchids when they have multiple divisions or growths.
Dividing a large orchid with many growths can be confusing. Make a drawing of the plant growth pattern on a sheet of paper, and mark where you’ll make your cuts before you start doing it, as shown in Figure 8-2.
Figure 8-2: Making a drawing showing how a large orchid will be divided helps simplify the process.
Giving Babies a New Home
The Hawaiian name for baby is keiki. Interestingly, the orchid crowd adopted this name to refer to a baby plant, especially one that sprouts on the stem of a mature orchid.
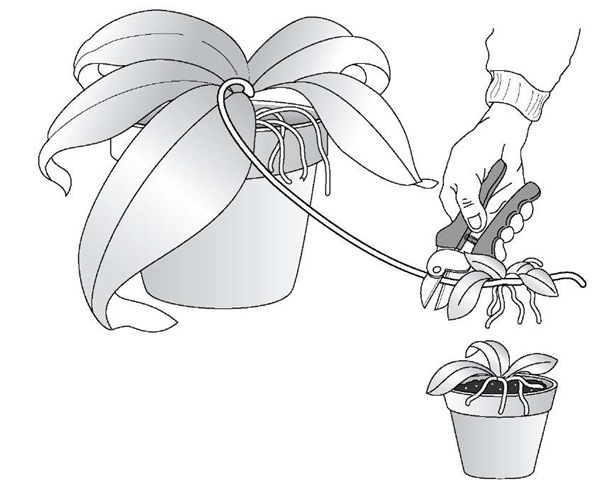
Some plants, like the phalaenopsis, sometimes produce babies on the flower stem (see Figure 8-3). When this happens, leave these young plants on the flower stem until they’ve developed several roots a few inches long.
Figure 8-3: An orchid “baby,” or keiki, being removed from the mother plant and then potted.
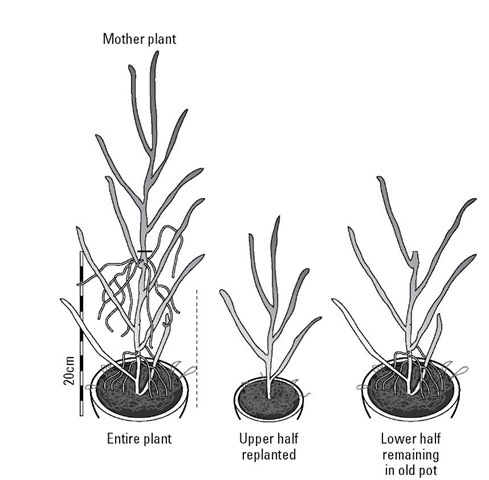
When an orchid grows very tall and has extending roots from its stem, you can create more plants by cutting out the top several inches of the orchid stem that contains the roots and potting it (this is known as topping an orchid). The bottom half of the plant will then usually form baby plants that will sprout along the stem. These babies can eventually be cut off and planted. Figure 8-4 illustrates the three steps of topping an orchid:
1. Remove the top portion of the stem, allowing ample roots.
2. Pot the portion you’ve just removed.
3. Leave the mother plant in its original container and wait for the baby plants to sprout from its stem.
Figure 8-4: The three stages of topping an orchid.
Producing New Plants from Cuttings
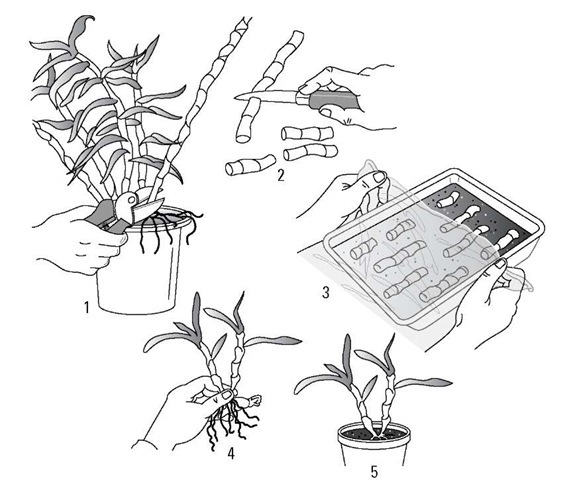
Some orchids have canes, or long stems, that you can cut up into pieces called cuttings. Here’s how this works (see Figure 8-5):
1. Cut off one of the long stems or canes with sharp, clean pruners.
2. With a sharp, sterile knife, cut sections of the cane so that each section contains at least two nodes (the regions of the stems where the leaves used to be attached).
Nodes are marked by circular scars around the stems.
3. Lay the cut stems or canes horizontally, half-buried, on a bed of damp sand or sphagnum moss in a shallow container.
4. Cover the container with glass or plastic wrap to hold in the moisture.
5. Place the container in a warm (70-75°F/21-24°C) area where it will get diffused but not direct sunlight.
About 6 inches under a two-tube fluorescent fixture would be ideal. In a few months, small plants will sprout.
Figure 8-5: Producing more orchids from stem or cane cuttings.
Growing Orchids from Back Bulbs
After some types of orchids, like cymbidiums and oncidiums, bloom, their older stems, called backbulbs, eventually lose their leaves and become lifeless looking. If you leave them in the pot, they probably won’t ever produce new growth. If, however, you remove them from the main plant and handle them in a special manner, they can produce new young plants.
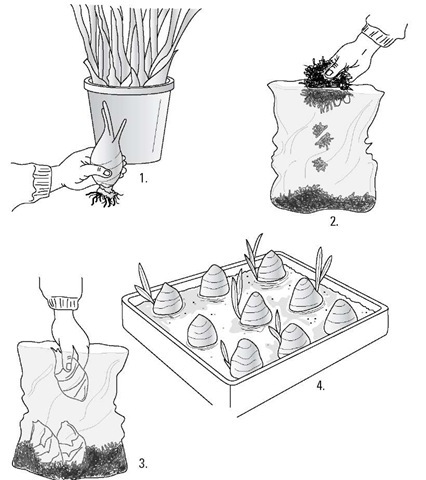
Here are the steps to follow (see Figure 8-6):
1. Cut off from the mother plant the older back bulbs that no longer have leaves.
2. Put a 2-inch (5-cm) layer of damp sphagnum moss in a plastic bag.
3. Place several of the backbulbs with their bottoms about one-fourth buried in sphagnum moss in the plastic bag and seal it.
Put this bag in a warm (70-75°F/21-24°C) spot that receives bright diffused light, not direct sunlight. In about two months, you should start to see some new growth.
4. When the leaves are a few inches long, place the young plants as a group in a shallow container in diffused light.
Let them grow for several months. Then transplant them into their own pots.
Figure 8-6: Growing new orchids from backbulbs.
Growing orchids from seeds: Leave it to the pros
Raising orchids from seeds is not a simple task. In fact, it’s quite complicated — and it wasn’t until the 1920s that the professionals figured it out. The biggest problem is that the orchid seeds are naked, which means they don’t have their own food source like most other plants. As a result, to successfully grow them, you have to provide them with a nutrient solution along with a special fungus that makes this food available to them.
All this is done in laboratory flasks. The seed is incredibly small — one seed can weight as little as 35 millionths of an ounce! They’re so small that a seed pod a few inches across can hold over 100,000 seeds.
Growing orchids from seeds is not something recommended for beginners. Leave raising orchids from seeds to the experts.
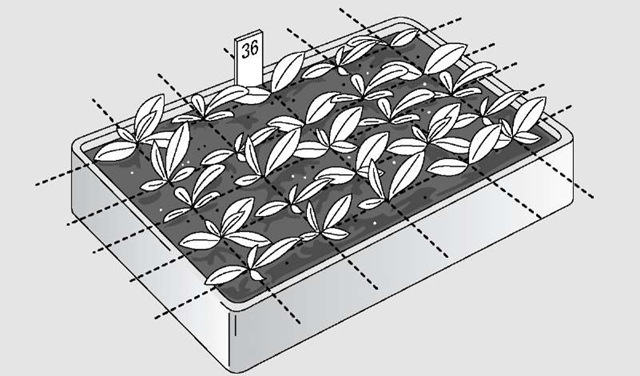
If you’re really interested in growing orchids from seeds, you can try a compromise: Get small plants that have already grown for a year or more in shallow containers outside of a lab environment (see the figure). This is a fun and inexpensive way to have some extra orchids to trade or give to friends. If you’re new to this, start with fast-growing types like phalaenopsis. If you’re lucky, you’ll see blooms in a few years.
