In This Topic
- Selecting the right potting materials
- Choosing the best container
- Planting an orchid in a wooden basket
- Repotting orchids
- Mounting an orchid on a slab
If you’re just starting out with orchids, the process of choosing containers and potting materials and then repotting orchids can be daunting. Orchids do have special requirements, unlike most other houseplants. But have no fear — in this topic, I walk you through all the steps so you have the information you need. When you repot a few orchids, you’ll realize that this is a very fun and rewarding part of orchid growing.
Choosing Potting Materials
Just as you wouldn’t be happy in any old place with four walls and a roof, your orchids won’t be happy in any kind of potting material. In this section, I give you the inside scoop on what goes into potting material and which material is best for your orchid. I also give you some not-so-top-secret recipes for potting material so you can make your own — and I let you know what to do if you’d rather not.
Knowing your potting material options
When I used the words potting material in the heading for this section, it wasn’t just a fancy way of saying dirt. It’s because most orchids have roots that need more air space than soil can provide. Orchids also need potting material that drains rapidly and at the same time retains moisture. Because orchids usually go at least a year, and many times longer, between repotting, they also need materials that are slow to decompose. (So if you were thinking of just throwing a little dirt in a pot and calling it a day, you’ll want to think again.)
No single potting material works best for every orchid or orchid grower. In Table 7-1, I list of some of the most common potting materials used, along with some of their pros and cons.
|
Table 7-1 |
The Pros and Cons of Various Potting Materials |
|
|
Potting Material |
Pros |
Cons |
|
Aliflor |
Doesn’t decompose Provides good aeration |
Heavy |
|
Coco husk chunks |
Retains moisture while also also providing sufficient air |
Must be rinsed thoroughly to remove any salt residue |
|
Slower to decompose than bark |
Smaller grades may retain too much moisture |
|
|
Coco husk fiber |
Retains water well Decomposes slowly |
Does not drain as well as bark or coco husk chunks |
|
Fir bark |
Easy to obtain |
Can be difficult to wet |
|
Inexpensive |
Decomposes relatively quickly |
|
|
Available in many grades (sizes) |
||
|
Gravel |
Drains well |
Heavy |
|
Inexpensive |
Holds no nutrients |
|
|
Hardwood charcoal |
Very slow to decompose Absorbs contaminants |
Holds very little moisture Can be dusty to handle |
Chapter 7: The ABCs of Potting Materials, Containers, and Repotting
|
Potting Material |
Pros |
Cons |
|
Lava rock |
Never decomposes Drains well |
Heavy |
|
Osmunda fiber |
Retains moisture Slow to break down |
Very expensive Hard to find |
|
Perlite (sponge rock) |
Lightweight Provides good aeration and water retention Inexpensive |
Retains too much water if used alone |
|
Redwood bark |
Lasts longer than fir bark |
Hard to find |
|
Sphagnum moss |
Retains water and air Readily available |
Can retain too much water if packed tightly in the pot or after it starts to decompose |
|
Styrofoam peanuts |
Inexpensive Readily available |
Should not be used alone because doesn’t retain water or nutrients |
|
Doesn’t decompose Rapid draining |
Best used as drainage in bottoms of pots Can be too light for top-heavy plants |
|
|
Tree fern fiber |
Rapidly draining Slow to decompose |
Expensive Low water retention |
Figuring out which potting materials are best
If you read the preceding section and you’re thinking, “How the heck am I supposed to choose a potting material when none of them are perfect?” don’t worry. The individual potting materials are rarely used by themselves — they’re usually formulated into mixtures, so the final product will retain water, drain well, and last a reasonable amount of time. Every orchid grower has his own favorite potting formulations — kind of like every grandmother has her favorite apple-pie recipe.
The combination of potting materials that will work best for your orchid depends on various factors. Answer the following questions to get an idea of what you need:
How often do you water? If you tend to be heavy-handed with the sprinkling can or hose, use materials that drain well and decompose slowly.
What type of an orchid are you growing? Some orchids that naturally grow on or in the ground, called terrestrials, usually prefer to be kept slightly damp all the time, while those that live in trees, called epiphytes, or grow on rocks, called litho-phytes, want to dry off thoroughly between waterings. When you look at catalog listings or search for information on the Web about your particular orchid, look for these terms to see what growing conditions suit them best, or ask the grower you’re buying from.
How mature are the plants? Large plants usually do best in coarser potting materials and smaller plants do better in finer potting materials. (See the following sections for potting mixes of varying degrees of coarseness.)
How big are the roots of the plants? In general, smaller roots grow better in finer, more water-retentive materials, while larger roots perform best in coarser materials.
Psst! Getting your hands on some not-so-secret recipes
Although some orchid specialists have complicated formulations for each type of orchid they grow, I’ve simplified this process to two basic mixes that suit most orchids. The mixes are based on the texture or particle size of the mix, which is connected to the size of the orchid roots and their need for water retention. (If this sounds complicated, just read on — I let you know which mix works best for which orchids.)
Recommending specific potting mixes or formulations is a risky thing to do because there are so many opinions as to what works best. In truth, many different mixes will work. The most important thing is to match your watering habits to the potting material you use. If you are a heavy and frequent waterer (as most people are), use a more porous, well draining mix (like the ones I recommend in the following sections). If you tend to water less frequently, use potting mixes that contain higher percentages of some of the more water-retentive materials listed in Table 7-1.
These formulations work well for me, but you may find some other mix works better for your situation.
Keep your watering habits in mind. If your orchids tend to dry out too often, use plastic pots rather than clay and use the fine mix. If you tend to be a heavy waterer, use clay pots with the coarse mix.
Fine mix
4 parts fine-grade fir bark or fine-grade coco husk chips or redwood bark
1 part fine charcoal
1 part horticultural-grade perlite or small-grade Aliflor
This mix works well for smaller plants of all types of orchids, slipper orchids, most oncidiums, miltonias, and any other orchids with small roots that like to stay on the damp side.
Medium mix
4 parts medium-grade fir bark or medium-grade coco husk chunks
1 part medium charcoal
1 part horticultural-grade perlite or medium-grade Aliflor
This is your middle-of-the-road mix. If you aren’t sure which mix to use, try this one. This mix is also good for cattleyas, phalaenopsis, and most mature orchids.
If mixing your own is not your thing
If you’d rather just buy your mix ready-made, potting mixes are readily available from most places that sell orchids, including home-improvement stores. The mixes that they sell are very similar to the ones I outline in the preceding section. Most contain fir bark, perlite, charcoal, and sometimes some peat moss and are suitable for most orchids.
Getting your potting material ready to use
Whatever potting material or mix you choose — whether you mix it yourself or buy it ready-made — it must be wetted before you use it. Otherwise, it will never hold moisture properly and will always dry out. Here’s how you do it:
1. Pour the amount of potting material you intend to use into a bucket that has about twice the volume of the mix.
2. Fill the bucket with hot water.
Hot water penetrates the material better than cold water.
3. Let it soak overnight.
4. The next day, pour out the mix into a colander or strainer.
5. Rinse the mix thoroughly to wash out the dust that was in the mix.
Now the mix is ready to use.
Giving Your Orchids a Home: Potting Containers
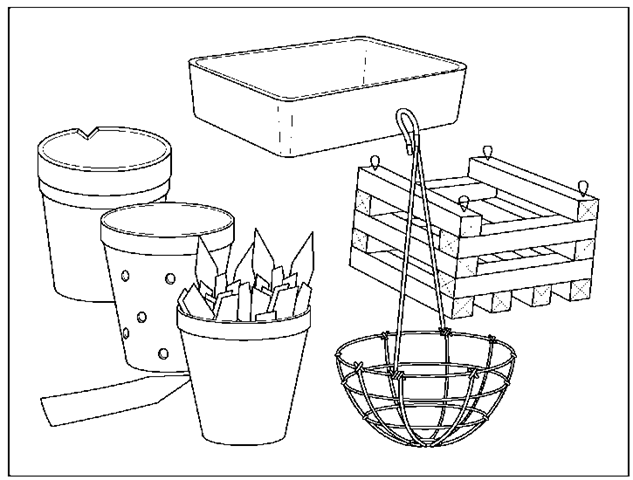
Many different containers are on the market — some are more ornamental, while others have functional differences (see Figure 7-1). The most common container is the basic pot — plastic or clay.
The big differences between standard garden pots and those used for orchids are the number and size of drainage holes in the container. Orchid pots have larger holes and more of them, both in the bottom and sides of the pot, to ensure better drainage. Some are shallow and shorter than standard garden pots, with a larger base — especially useful for top-heavy orchids.
Figure 7-1: You can find many different types of containers for growing orchids.
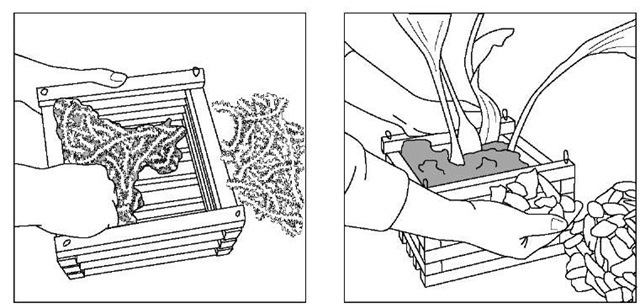
You can also plant orchids in wooden baskets, usually constructed of teak or some other rot-resistant wood (see Figure 7-2).
Figure 7-2: When potting in a basket, line the basket with sheet moss, then add standard potting mix.
Repotting Orchids without Fear
Most beginning orchid growers are afraid to repot their orchids. Despite their reputation, orchids are tough. After all, they were first brought over from the tropics to Europe in the holds of ships and, miraculously, many of them made it alive!
In this section, I give you all the information you need to repot your orchids with confidence.
Mounting orchids
Many orchids that are found naturally growing in trees can be mounted, instead of placed in pots. Mounting gives them perfect drainage, simulates their natural habitat, and can be an easy way to maintain them.
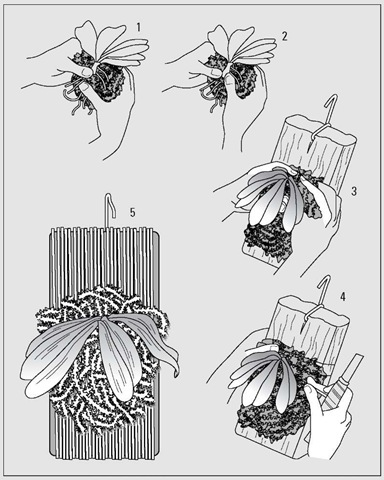
To mount your orchid, follow these steps (and refer to the nearby figure):
1. Place the plant on a small handful of moistened, squeeze-dried sphagnum moss.
2. Spread the roots around the sphagnum moss.
3. Place the orchid on the mount so its center points down.
Don’t position the orchid with the growing point up. If you do, it will collect water in the center of the plant, which can lead to disease that causes the center and growing point of the plant to rot (and can lead to death).
4. After the orchid is centered properly, wrap either stainless-steel wire or clear fishing line (monofilament) around the top and bottom of the moss to hold it in place.
In several months, after the new roots have taken hold, you can remove the wire or line.
5. The finished mounted orchid is ready to hang in a bright place in a home greenhouse or near a window.
Because these mounts drain so rapidly, they need to be watered frequently, sometimes more than once a day during the hot summer months.
Knowing when you should repot
Your orchid will tell you when it’s the right time to repot. No, the plant won’t speak to you (if it does, be afraid — be very, very afraid).
Here are the situations in which you’ll want to repot your orchid:
When the orchid roots are overflowing the pot When the plant itself is going over the edge of the pot When the potting material is getting soggy and drains poorly
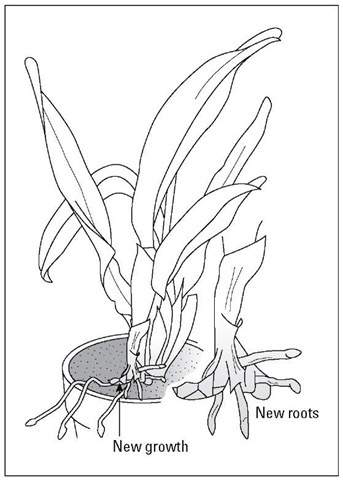
The ideal time to repot most orchids is when the plant starts new growth, usually right after it flowers. With certain orchids like the cattleyas, you’ll see a swelling at the base of the plant, which is the beginning of the new lead or shoot that will form the next stem, leaf, and flowers (see Figure 7-3). This is when orchids are putting out new roots.
Figure 7-3: Cattleyas should be repotted after flowering when the new roots are about 1 inch (2.5 cm) long, the new lead growth is just appearing, and the growth of the plant has reached the edge of the pot.
If you don’t repot your orchid at this new-growth stage, the new roots and growths are easily exposed to breakage and the new roots won’t have any potting material to grow into and, therefore, will be more likely to dry out. If the orchid plant becomes too overgrown, you’ll have trouble transplanting it later without damaging it.
Orchid potting — step by step
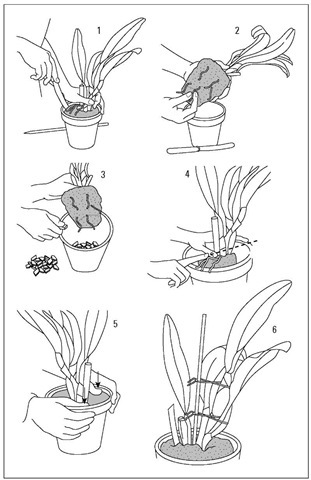
Now that you know this is the right time to repot your orchid, here are the simple steps to follow (see Figure 7-4):
1. Remove the orchid from the pot.
You may need to use a knife to circle the inside of the pot and loosen the roots.
2. Remove the old, loose, rotted potting material and any soft, damaged, or dead roots.
3. If the roots are healthy, firm, and filling the pot, put the orchid in a pot just one size larger than the one you removed it from, placing the older growth toward the back so the new lead or growth has plenty of room.
If the roots are rotted and in poor condition, repot the plant in a container of the same or one size smaller than it was removed from.
If you place a poorly rooted plant in too large of a container, the growing material will stay too damp, which will result in more of the roots rotting.
Some orchid growers like to add a coarse material like broken clay pots or Styrofoam in the bottom of the pots to improve drainage. You don’t have to do this if you’re using shallow, azalea-type pots.
4. Place the plant in the pot so it’s at the same depth as it was originally.
The new shoot should be level with the pot rim.
5. Press the fresh potting material into the pot and around the orchid roots with your thumbs and forefingers.
The orchid should be secure in the pot so it doesn’t wiggle — otherwise, the new roots won’t form properly.
6. Place a wooden or bamboo stake in the center of the pot, and tie up the new and old leads with soft string or twist ties.
Figure 7-4: Potting your orchid.
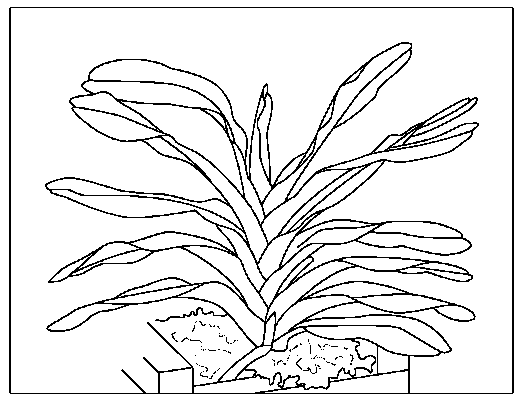
Monopodial orchids are those with one growing point that always grows vertically, not sideways (such as phalaenopsis, angraecums, and vandas), as shown in Figure 7-5. The potting process for these orchids is very similar to the cattleya process (outlined in the preceding steps), except that the orchid should be placed in the center of the container, rather that toward the back.
Figure 7-5: Monopodial orchids should be potted in the center of the pot instead of at the back.
