Technique
Save Time By
Taking shots quickly and accurately
Setting up a camera so you don’t look like you just finished vacuuming
Using time delay for multiple shots — automatically
If you have a Webcam, it probably took you about 30 seconds to figure out that (1) it makes you look like a bag lady — with the bags under your eyes; (2) it produces live, moving images that don’t look the least bit like live, moving images; and (3) nobody really feels like looking at your ugly mug on a Webcam unless you’re under eight or over eighty.
That said, Webcams are remarkably good at taking still photos — if you set them up right.
A Webcam will never replace a scanner. If you have a flat object and need to reproduce it faithfully, a scanner’s your only choice. But the minute you deal with an object that’s only slightly more than two-dimensional, a good Webcam and a creative setup can make all the difference.
In general, Webcams install like a dream, they work the first time, and they’re so easy to use it’s like falling off a log. If you don’t need super-high-resolution pictures, and you don’t mind having the camera tethered to your computer, they’re great. You save money; you save time. This technique shows you how.
If you want good, high quality pics, you should buy a digital camera, of course. (I talk about digital cameras in Technique 40.) But if you only need a quick shot, and your computer’s nearby, a cheap Webcam works well indeed — at a fraction of the cost, with very little hassle. I bet you didn’t know that snapshots with a Webcam were this easy!
Taking the Shot
If your camera has its own proprietary software, you can probably take snapshots by choosing Start the camera manufacturer’s name the name of the viewing program.
On the other hand, if you’re lucky enough to have a camera that leaves the Windows XP native Camera Wizard in charge, you’re in for a real treat. All you have to do is plug the camera into the computer (typically through a USB port) and you’re ready to go. Here’s what you can do:
1 Choose Start Control Panel Printers and Other Hardware.
Control Panel shows you the Printers and Other Hardware applet.
2. Click Scanners and Cameras (in the lower-right corner of the screen).
Windows Explorer opens to the Scanners and Cameras folder.
3. Double-click the name of your Webcam.
The Scanner and Camera Wizard starts.
4. Click Next.
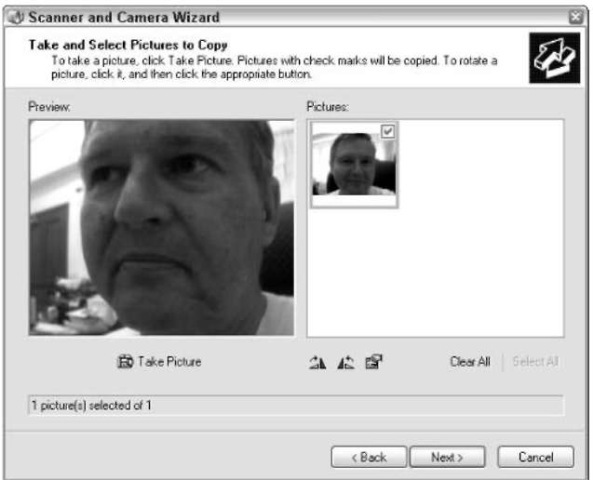
The preview panel on the left shows you the image taken directly from the camera.
5. Use the ideas in the next section (“Setting Up the Shot — F/11 and Be There”) to set up your shot. When you’re ready to take a picture, click the Take Picture icon directly below the camera preview.
Your snapshot appears on the right, as shown in Figure 37-1.

• Figure 37-1: See what I mean about looking like a bag lady?
6 Keep clicking. Rotate the camera 90 degrees or even 180 degrees and click.
The pictures gradually fill the panel on the right.
7 Rotate any pictures at will by first clicking the picture, and then clicking one of the Rotation icons.
8. Select the pictures you want to save and click
Next.
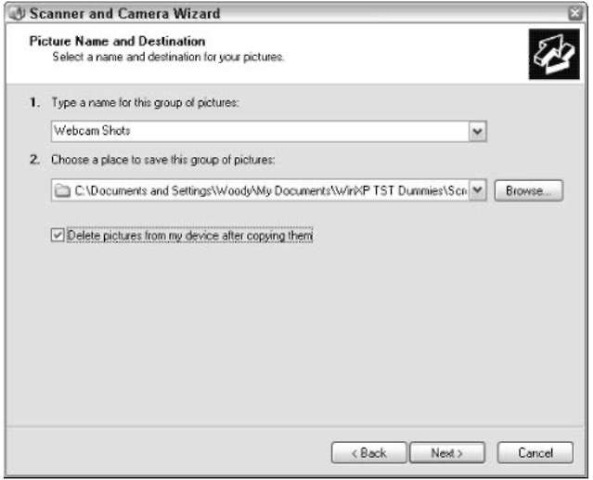
The wizard shows you the Picture Name and Destination pane, as shown in Figure 37-2.

• Figure 37-2: Pick a destination by clicking the Browse button.
9. Type a picture name prefix.
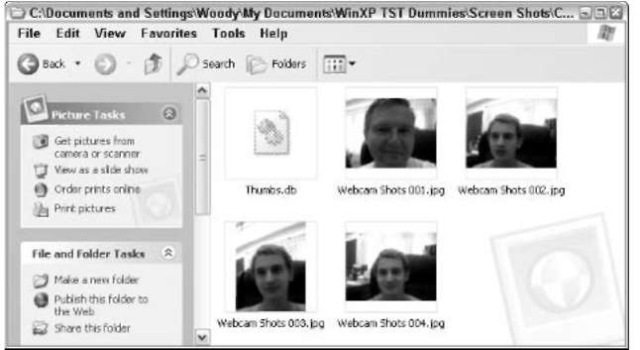
For example, if you use the name Webcam Shots, the pictures are called Webcam Shots 001.jpg, Webcam Shots 002.jpg, and so on.
10, Choose where to save your pics in the second drop-down list. If you want to remove the shots from temporary storage on your PC, check the Delete Pictures from My Device after Copying Them check box. Click Next.
The wizard renames and moves the pictures to the location you specified (see Figure 37-3).
11, To leave the wizard, click Next, and then click Finish.
Even at 320 x 340 resolution — typical for a Webcam, although better cams have higher resolution these days — the pictures are at least discernible.

• Figure 37-3: Note how the picture names are drawn from the entry in Figure 37-2.
Setting Up the Shot — F/11 and Be There
The single most important part of setting up a Webcam shot?
Lighting
Put most of the light on the subject that you’re shooting — usually that’s a face.
Use small amounts of light on the background. Don’t black it out entirely unless you want your Webcam shot to look like a velvet painting of Elvis.
Never light from underneath. Back in the 1930s, lights under the face were called “monster lighting” because they gave Frankenstein and Dracula that certain . . . something.
Here are some other considerations:
Camera location: You can’t really win: Either the camera is too far up, too far down, or too far to the left or right — unless the camera’s right in the middle of your screen (which isn’t a bad idea, actually, if you’re doing snapshots).
Subjects: Have your subjects look straight into the camera. Otherwise, they appear to be untrustworthy. True fact.
Focus: Some cameras have a focus ring. A few have wide-angle and/or telephoto capabilities. For the best shot, use the longest telephoto setting you can get away with and still stay in focus.
Using Time Delay
Microsoft has a very cool, free tool called Timershot that lets you take Webcam shots at time intervals that you pick. Timershot doesn’t work with all cameras, but it’s worth a, uh, shot.
To get it, follow these steps:
1, Start Internet Explorer and go to www.
microsoft.com/windowsxp/pro/downloads/ powertoys.asp.
The PowerToys screen appears.
2. At the bottom of the screen, under Webcam Timershot, download the file called
Timershot.exe.
Although the file is called Timershot.exe on the Web site, when you download it, you see that it’s really called TimershotPowertoySetup.exe.
3. After downloading this file, double-click
TimershotPowertoySetup.exe.
You see a very simple, straightforward wizard.
4. Follow the wizard’s steps to install Timershot.
5, To run Timershot, choose Start All Programs Powertoys for Windows XP Timershot; then click the small > chevron in the lower-right
corner.
Timershot shows you an extensive list of options.
6, Adjust the frequency, filename, location, and the like; then click Apply Settings and click Close Window.
As long as your camera is on, Timershot takes pictures according to your specifications. After you click Close Window, Timershot minimizes itself to the notification area, next to the clock. If you didn’t know where to look for its icon, you probably wouldn’t know that it was there.
7, To turn off Timershot, right-click its icon in the notification area and choose Exit.
