Technique
Save Time By
Identifying common pirate product keys
Changing the product key without reinstalling Windows
So you followed the advice you found on the Internet and used a bootlegged product key to install an illegal copy of Windows, eh? Or perhaps you aren’t quite sure if you have a bootleg copy or not. You went through the steps in the preceding technique, and you’re kind of sitting on a fence, not yet certain if Fast Forward Fanny’s Fawn Shop sold you a legit copy of Windows or not. Either way, the bottom line’s clear: If you have a pirate version of Windows, you need to get legit, quick.
Copyright laws aside, Microsoft hints from time to time that, in the future, bootleg copies of Windows XP won’t get access to Windows Update, or won’t qualify for upgrades. Microsoft can change all of that any time they like, of course: If you’re running pirate software, Microsoft has no obligation to provide any services at all for you — even if you paid for the program.
This technique shows you a few bona-fide pirate keys, and then takes you through two different methods of installing a genuine version of Windows over the top of a bootleg version. Yes, it is possible to “get legal” without completely reformatting your hard drive.
Nailing Pirate Product Keys
A very large percentage of all the pirate versions of Windows XP get installed with one of two specific pirated product keys.
Microsoft intentionally built Service Pack 2 so it would install on all quasi-functional versions of Windows XP, even pirate copies. There’s a reason why. Bootleg versions of Windows XP get infected just as easily as the real thing — and infected Windows computers are bad for everybody. Microsoft decided (correctly, in my opinion) that it was better to fix every copy of Windows XP, regardless of pedigree, and use different methods to encourage folks to run legit versions of Windows XP. The fact that SP2 installed on your computer without a hitch is no guarantee that you have a legitimate copy of Windows XP.
You can tell if you have one of these mass market fakes by clicking Start, right-clicking My Computer, and choosing Properties (see Figure 4-1).

Figure 4-1: Your Windows XP Product ID is at the bottom of the Registered To section.
If your copy of Windows XP was installed with either of the two widespread pirate product keys, your Product ID — that string of 20 digits at the bottom of the Registered To section — is one of the numbers shown in Table 4-1.
Table 4-1: Bogus WinXP Product IDs


If your Product ID appears in the list shown in Table 4-1, two things are certain.
The bad news: You have a pirate copy of Windows XP. You should buy a legitimate copy of Windows XP and use this technique to change your Product ID code so it’s valid.
The good news: You are probably running an unmodified copy of Windows XP. Some pirate copies of Windows XP have been whacked — the bits inside Windows have been changed — so much that you never know exactly what the program is doing. Versions with the bogus Product IDs in Table 4-1 generally aren’t whacked.
I won’t cry any crocodile tears about how the big, bad pirates are stealing revenue from defenseless little Microsoft. But the fact remains that if you run a pirate copy of Windows XP, you’re doing something illegal, and you may get caught. If you get caught, the penalties can be severe. Even if you don’t get caught, Microsoft can shut you off from important updates, or otherwise make your “Windows experience” a little less . . . seamless.
Recently “KeyGen” programs have been developed that spit out valid Windows XP product IDs by the zillions. I’m told that Microsoft has a way to tell if a specific product ID on a specific computer came from a KeyGen system. Whether the folks in Redmond will use that capability in some way in the future — most likely to limit access to the Windows Update site — remains to be seen.
Updating Your Key the Easy Way
If the Windows gods are smiling, you may be able to change your product ID in a few minutes, and carry on as if nothing has happened. In general, your chances of getting away with a quick change improve if You’re using a legitimate copy of Windows.
Sometimes companies change product IDs on perfectly valid systems to bring the computers into compliance with volume licensing requirements. Sounds strange, but true.
You have one of the product IDs listed in Table 4-1. In that case, changing the product ID, coupled with an upgrade to Windows XP Service Pack 2 or later, results in a top-notch system.
You installed Windows XP with a bogus product ID. If you, personally, installed Windows XP on a computer and you used a product ID of dubious lineage, chances are very good that the copy of Windows you’re running works fine.
On the other hand, if you bought your computer with a bogus copy of Windows XP pre-installed, or if you got a “whacked” version of Windows XP that doesn’t require any product ID at all, you may be in for some interesting times. Many different pirate versions of Windows XP are floating around with all sorts of weird whacks. Some reset the 60-day activation clock every time they’re started. Others reset the system clock. At least one bypasses activation checking altogether.
If there’s any chance that you have a whacked version of Windows XP, it’s in your own best interests to follow the instructions in the next section, “Toughing It Out the Hard Way.” That’s the only way to ensure that you’re running a fully functional copy of Windows XP, short of completely reformatting your hard drive.
The easiest way to change your product ID uses Magical Jelly Bean Keyfinder, which I discuss in Technique 3:
7. Buy a legitimate copy of Windows.
If you’re fixing a pirate copy of Windows Professional (identified as such in the dialog box shown in Figure 1-1), buy Windows Professional. If you’re fixing a pirate copy of Windows Home, get Windows Home.
In theory, you’re supposed to buy the “full” version — not the “upgrade” (which is much more readily available, and considerably cheaper) to Windows XP. In practice, I haven’t heard of any problems fixing a pirate copy with an “upgrade” product ID. But you don’t want an OEM product ID (OEM = Original Equipment Manufacturer). OEM copies of Windows are supposed to be installed by the folks who assemble PCs from scratch. I’ve had nothing but trouble with OEM Windows XP packages, except in a scorched-earth install accompanied by a reformat of the hard drive.
2. Go to www.magicaljellybean.com. Click the link to Keyfinder, and then click one of the Download buttons.
3. When IE asks if you want to open or save the file, click Open.
4. Double-click keyfinder.exe to run it. If IE gives you a security warning, click Run.
5. Choose Options Change Windows Key.
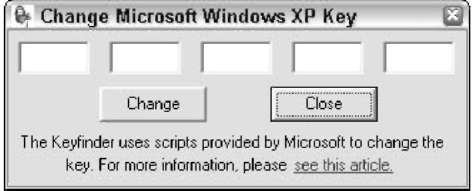
Keyfinder brings up the dialog box shown in Figure 4-2.

Figure 4-2: Magical Jelly Bean Keyfinder does all the hard work in changing product IDs.
6. Tear open the package that contains your new, legitimate version of Windows XP and look for the Product ID.
It’s a 25-character string that looks something like T9TRD-9CTTR-V8X7W-R8888-6TPYR. You can usually find it on a bright orange sticker, either inside the package or on the plastic jewel case that contains the Windows CD.
7 Type the new key in the Change Microsoft
Windows XP Key dialog box and click Change.
If Keyfinder tells you that you don’t have a valid key, you’re going to have to change the key the hard way. See the next section.
8. Choose File Exit to get out of Keyfinder.
9, Choose Start Turn Off Computer and Restart your PC.
When Windows comes back, your new product ID is in force.
Toughing It Out the Hard Way
I’ve hit a few cases where Magical Jelly Bean Keyfinder doesn’t work. I’m not sure exactly why, but some perfectly good-looking product IDs just don’t pass muster.
If you find yourself ready to tear your hair out, and wondering why you’re going through this much trouble to line Microsoft’s coffers, be of good cheer. Another alternative isn’t too difficult, but it is time-consuming. It involves a repair installation of Windows XP.
Before you try a repair installation, you might want to look at support.microsoft.com/ ?kbid=328874 and see if the first method listed there works for you. In my experience, if Jelly Bean Keyfinder doesn’t do the trick, that Knowledge Base article won’t either, but ya never know.
Running a repair installation doesn’t knock out any of your programs, delete any of your data, or change any of your settings. If you have whacked pieces of Windows flying around, it removes the bad parts of Windows and replaces them with good ones.
Here’s how to perform a repair installation with a legitimate copy of Windows XP. It’s confusing:
7. Put your new, legitimate Windows XP CD in your CD drive and boot from the CD drive.
You may need to change a setting in the computer’s BIOS, to allow your computer to boot from CD. You probably need to press a key while the computer is booting to get it to boot from CD. Check your computer manufacturer’s Web site if you need help.
2. This is where it starts to get confusing.
Windows whirs along for a while, and sooner or later you see a screen that says
This portion of the Setup program prepares Microsoft Windows XP to run on your computer:
To setup Windows XP now, press ENTER. To repair a Windows XP installation
using Recovery Console, press R. To quit Setup without installing Windows XP, press F3.
3, Do NOT Choose “To repair a Windows XP installation . . .” Contrary to any known variant of multi-valued logic or rules of English syntax, you must press Enter.
4, Setup asks you to press F8 to accept the License Agreement. Do it.
5, Setup presents you with a list of Windows installations on the computer. You probably only have one. Highlight the bootleg Windows system, and press R to start the repair.
Windows pulls a whole bunch of files off the CD and reboots.
6, Do NOT boot from the CD the second time.
Your PC no doubt offers to let you boot from CD the second time, but you want it to boot normally, from the hard drive. Usually, booting from the hard drive is easy — you simply do nothing and wait for a while, and your computer ignores the CD and boots directly from the hard drive. See, I told you it was confusing.
7 This time when Windows boots, you want it to boot from your hard drive, using the files that the repair routine copied in the preceding step.
Setup acts like it’s performing a full installation. DON’T PANIC. Your data and programs are safe.
8, When asked for your product ID, be sure to enter the ID from the new, legitimate copy of Windows.
D’OH.
9, Continue with a full, normal installation.
When Windows comes back up for air, everything is in place — and your new product ID is in full force.
Immediately after you come back, hit Windows Update (choose Start All Programs Windows Update) and get all the latest patches — including Service Pack 2, of course, if your old copy of Windows XP didn’t have it.
