Creating Title Slides with PowerPoint
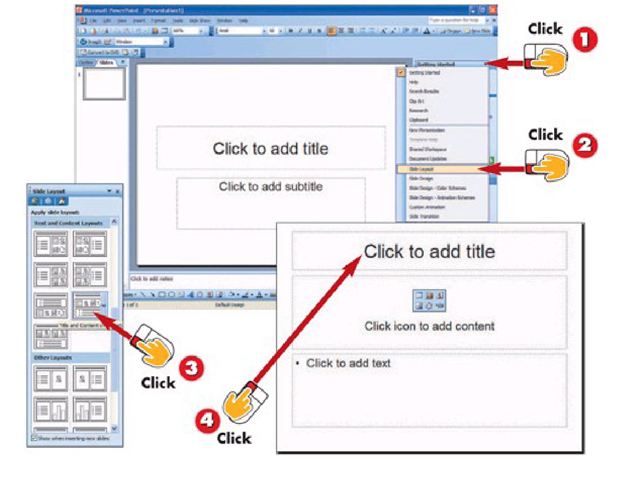
1 Open the PowerPoint application, and then click the arrow next to Getting Started on the Task Pane.
2 Choose Slide Layout from the drop-down menu.
3 Select a Slide Layout from the available options. In this case, we are choosing Title and Content over Text.
4 Click the area labeled Click to add title and type the title information for the slide.
INTRODUCTION
Microsoft PowerPoint is one of the easiest tools to use for creating Movie Maker titles. PowerPoint provides control over text placement, allows users to add custom background designs, and supports inserting images on slides. Exporting a single PowerPoint slide as an image, which is the method used when saving slides for titling, is a standard feature.
TIP
I Don’t See the Task Pane
If the Getting Started task pane isn’t visible when you open PowerPoint, you can access the Slide Layout task pane by selecting Format, Slide Layout.
5 Click the Insert Picture button in the content section of the slide.
6 Choose a picture to include on the slide and click the Insert button.
7 Click the Click to add text item in the bottom section of the slide and type additional text on the slide.
HINT
Incompatible Features
Movie Maker requires PowerPoint slides to be saved as image files, like .JPG, .GIF, or .PNG, so you cannot include any animated text or movies on the title slides created in PowerPoint.
HINT
More PowerPoint Layouts
Microsoft frequently updates the library of available Slide Layouts and Slide Designs with additional content in the template gallery at Microsoft Office Online(http ://office .microsoft. com).
8 Select all the text in the bottom text area by pressing Ctrl+A on the keyboard.
9 Make any desired changes to the default text formatting using the buttons on the Fonnatting toolbar.
10 Adjust the size of the bottom text area by clicking the circle in the top center of the textbox and dragging it toward the bottom of the slide.
After creating a basic layout using a predefined Slide Layout, further customization of the slide is possible. Modifying text attributes, adding backgrounds, and adjusting the position of elements on the slide allows you to fully maximize the versatility of using PowerPoint to create slides.
TIP
Moving Text Boxes
If PowerPoint doesn’t put text boxes where you want them on the slide, hover over the text box with the mouse pointer until it turns into a plus- sign with arrows pointing in all directions. Click and hold the mouse button as you move the text box to a new position on the screen.
11 Click the arrow next to Slide Layout on the task pane and choose Slide Design from the drop-down menu.
12 Select a background design from the list of options by clicking one of the designs in the Available for Use list.
13 Choose File, Save As from the menu (or press the F12 key on the keyboard).
14 Select the location to save your slide, name the file, choose JPEG File Interchange Format (*.jpg) Irom the Save as type options, and then click the Save button.
TIP
Custom Backgrounds
To use your own image as the background for a slide, select Format, Background. In the list of background options, choose Fill Effects and click the Picture tab to add your own image file.
TIP
Changing Text Color
When using one of the background designs from the PowerPoint Design Layout, the text color on your slides changes to match the defaults for the Design Layout you choose. To switch the text color, first select the text on the slide, and then choose a new color from the dropdown text color button on the Formatting toolbar.
Adding Custom Titles to the Movie
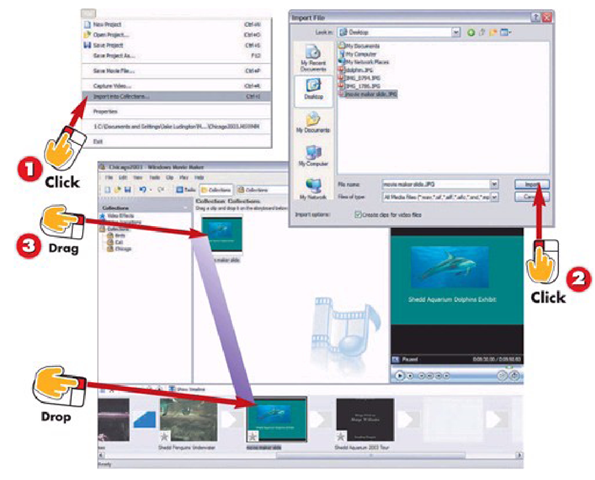
1 Choose File, Import into Collections.
2 Choose your custom title slide and click the Import button.
3 Drag the title from the collections pane to the point on the storyboard where you want to insert the title.
INTRODUCTION
After creating a custom title slide in Microsoft Paint, PowerPoint (or some other program), you can add it to your Movie Maker project. Once a slide is part of the project, you can add it to the movie.
HINT
Custom Title Effects
Custom title slides don’t have to be static pages. Add Movie Maker effects and transitions to still slides to add some pizzazz.
Adding Effects to Movie Clips
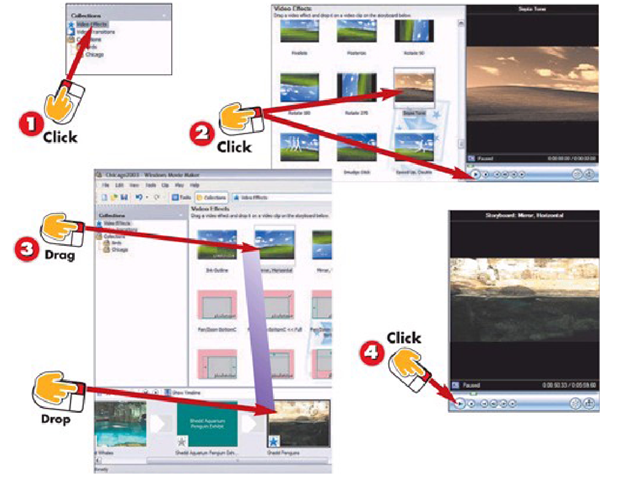
1 Click Video Effects in the Collections pane at the left side of your screen.
2 Click an effect in the group of available video effects and then click Play in the monitor to preview the effect.
3 Find the effect you want to use and drag and drop it to the movie clip on which you want to use the effect.
4 Click Play on the monitor to preview the movie clip and effect.
INTRODUCTION
Video effects enhance movie clips by adding artistic or color correcting tweaks to the video file. Movie Maker’s available effects are stored in the Video Effects collection.
TIP Multiple Effects
Layer multiple video effects on the same video clip to create custom effects for your movie.
HINT
For some effects, trying them out on a video clip provides a better preview. Notice that the star on the clip will turn blue, which signifies a clip with an effect.
Converting Your Movie to Black and White
1 Click Video Effects in the Collections pane at the left side of your screen.
2 Scroll through the list of effects and select Grayscale.
3 Drag and drop the Grayscale effect onto each movie clip in the Storyboard that you want to appear in black and white. Movie Maker won’t show the grayscale effect on the Storyboard; it only appears in the monitor during preview.
Click Play on the monitor to preview the movie clip and effect.
INTRODUCTION
One of the more commonly used video effects is to convert color footage to black and white. In Movie Maker, the Grayscale effect is used to achieve black-and-white footage.
TIP
Sepia Tone
Give your movie an antique tin-type photo appearance with this brown- and- white effect. Anywhere that you see shades of gray in the Grayscale effect, you would see degrees of brown in Sepia Tone.
Enhancing the Brightness of the Movie
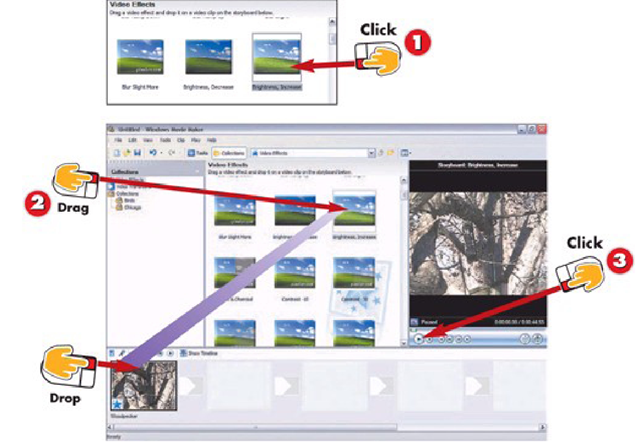
1 With Video Effects selected in the collections pane, click Brightness, Increase to increase brightness (or Brightness, Decrease to reduce the brightness) in the list of effects.
2 Drag and drop the Brightness, Increase effect onto the movie clip in the Storyboard that you want to enhance.
3 Click Play on the monitor to preview the movie clip and effect.
INTRODUCTION
If some of the colors in your video are either too bright or too washed out, the Brightness effects may offer a corrective fix. However, keep in mind that software effects are never a real substitute for good lighting when the video is originally shot.
HINT
Use Brightness Sparingly
Minor adjustments to brightness or contrast can help improve some footage. Too much of either will introduce video noise, making the footage look pixelated.
HINT
Maximizing Effects
Each effect may be added to the same clip up to six times in order to maximize the effect.
Adjusting Contrast with Pixelan Effects
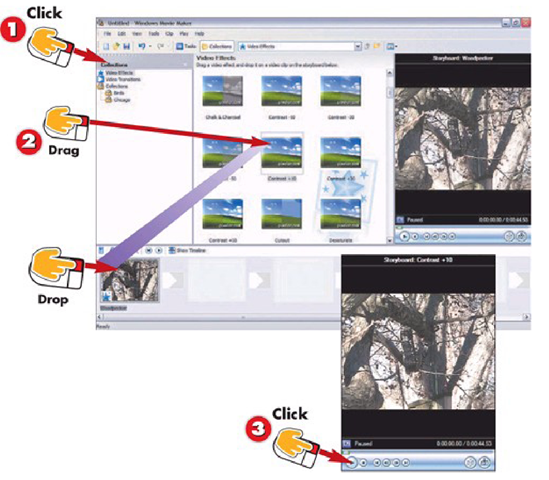
1 Click Video Effects in the collections pane.
2 Drag and drop an effect onto a clip in the Storyboard. The sample clip needs the Woodpecker’s black color to be more distinguishable from the shadow, so Contrast +10 is the effect being used.
3 Click Play on the monitor to preview the movie clip and effect.
INTRODUCTION
Six contrast effects for Movie Maker are available in the Pixelan SpiceFX packs. Contrast adjustment modifies the depth of gray and black tones in movie clips by lighting the highlights in an image and darkening the shadows. The result brings more definition to the image when used in moderation.
TIP Try Again
If the contrast adjustment was not sufficient, replace it with the next greater effect (in this case Contrast Increase +30) and repeat.
HINT Clipping a Clip
If only a small portion of a movie clip has a contrast problem, divide the clip into smaller clips, isolating the trouble spot. This allows you to retain the original coloration for most of the clip, while applying the effect only to the area it is needed.
Applying Color Correction with Pixelan Effects
1 Click Video Effects in the collections pane.
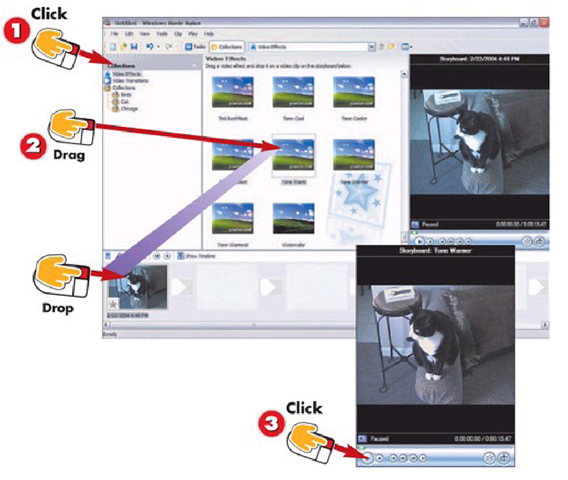
2 Drag and drop a tone effect onto a clip in the Storyboard. In the example, the video has a slightly blue cast to it, so adding a Warner tone should make it look more natural.
3 Click Play on the monitor to preview the movie clip and effect.
INTRODUCTION
SpiceFX includes six color correction effects for adjusting footage that is either too warm (has a reddish cast) or too cool (has a blue cast). The Tone Cooler effects add varying levels of blue tint to the image, while T one Warmer effects add red tints.
HINT Applying Tint
Pixelan also includes 12 tint settings designed to increase a specific color in the video clip. These can be used for color correction or for setting a particular mood within the movie.
![tmp2510-12_thumb[2] tmp2510-12_thumb[2]](http://what-when-how.com/wp-content/uploads/2012/06/tmp251012_thumb2_thumb.png)
![tmp2510-13_thumb[2] tmp2510-13_thumb[2]](http://what-when-how.com/wp-content/uploads/2012/06/tmp251013_thumb2_thumb.png)
![tmp2510-14_thumb[2] tmp2510-14_thumb[2]](http://what-when-how.com/wp-content/uploads/2012/06/tmp251014_thumb2_thumb.png)
