Adding a Title to a Movie Clip
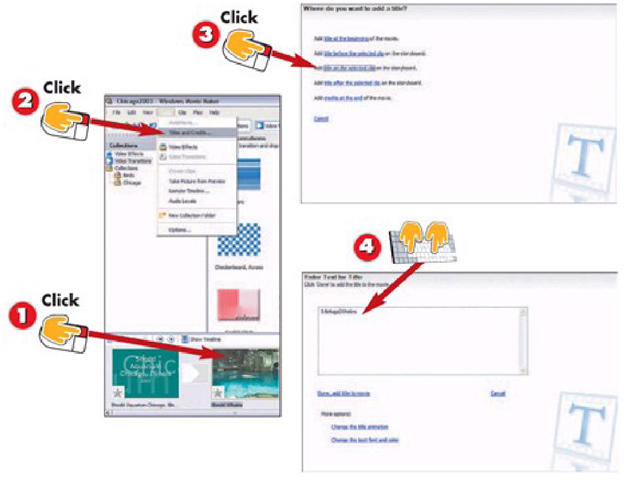
1 Click the movie clip you will be adding a title to in the storyboard.
2 Choose Tools, Titles and Credits from the Menu.
3 Click Add title on the selected clip on the storyboard.
4 Type the text for the title slide.
INTRODUCTION
Adding titles directly to a movie clip is a great way to label footage for the reader, convey date information, or present other statistics.
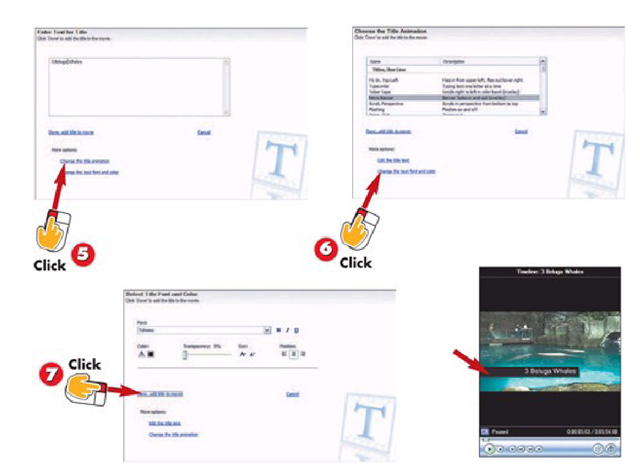
5 Click Change the title animation.
6 Select the animation for the title text. Click Change the text font and color when you are finished.
7 Choose the text attributes you want to modify from the options at the top of the window. Click Done, add title to movie when you finish.
HINT
Overlay Titles Added in Timeline View
Overlay titles display over the top of a movie image. Movie Maker includes Ticker Tape and News Banner overlays, in addition to subtitling. If you add a title with the "(overlay)" designation after it, Movie Maker will warn you it needs to switch to Timeline view to insert the title.
Title overlays appear as a separate item on the video timeline.
HINT
Titles Over Stills
Title overlays can also be added on top of still photos, giving your titles a more colorful background.
Adding Credits to Your Movie
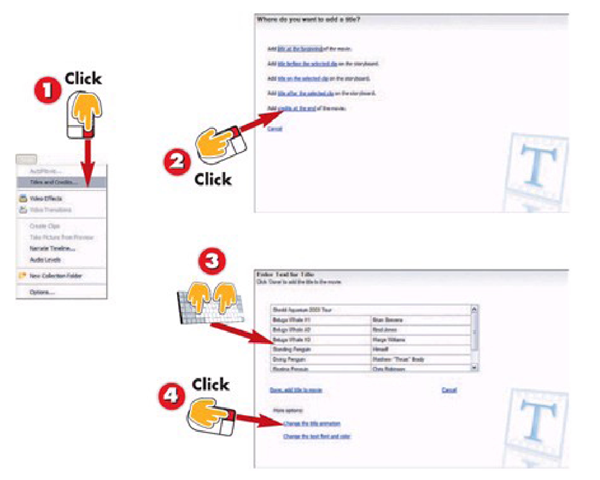
1 Open the title pane by choosing Tools, Titles and Credits from the menu.
2 Click Add credits at the end of the movie
3 Type the credits title text and cast and crew information.
4 Click Change the title animation.
INTRODUCTION
Generations of movie-goers are familiar with the scrolling list of who did what immediately following the final scene of a movie. Movie Maker includes several credit effects for listing the cast and crew of your production.
HINT
Credits Soundtrack
Add a music soundtrack to the credits from Timeline view, just like adding audio to your movie (see Part 8). Reprise the movie’s theme song while the credits roll or select credit-specific music.
5 Choose the animation for your title text and then click Change the text font and color when you are finished.
6 Make any text adjustments, and then click Done, add title to movie when you finish making text changes.
7 Verify the credits now appear at the end of your movie in the storyboard.
TIP
Multiple Credit Styles
To use multiple credit animation styles, create part of the credits in one style, and then click Done, add title to movie. Create a second credit clip containing the additional credits using the other animation style.
TIP
Credit Overlays
The Credits:Video Left and Credits:Video Top animations are designed to show credits on top of a movie clip. Create your own "deleted scenes" reel, or just surprise viewers with extra footage during the credits.
Creating Custom Titles in Microsoft Paint
1 Open Microsoft Paint by choosing Start, AU Programs, Accessories, Paint. From the menu choose Image, Attributes.
2 Type 720 in the Width box and 480 in the FIeight box, which represents standard digital video resolution.
3 Verify Pixels is selected in the Units section and Colors is selected in the Colors section. Click OK when finished.
When the titles bundled in Movie Maker don’t meet your needs, create your own using Microsoft Paint, an imaging application included with Windows.
TIP
Paint Remembers
The next time you open Paint, 720×480 will be the default size because it remembers the most recently used work area configuration.
4 Choose File, Save As.
5 Type a name for your file and click Save to save your work area using the default JPEG setting.
HINT
Other File Formats
Paint also saves images as .bmp, .gif, .tiff, and .png format files.
6 Change the background color of the slide by choosing a color from the Color Box at the bottom of the screen.
7 Select the Fill with Color tool from the Tool Box by clicking it.
8 Click on the work area to change the background color.
Once the basic work area is prepared, it’s time to start the fun part—making a title slide.
TIP
Multicolored Backgrounds
Create a background with several colors by using the Select tool in Paint, choosing a new color, and then coloring the selected area using the Fill with Color tool.
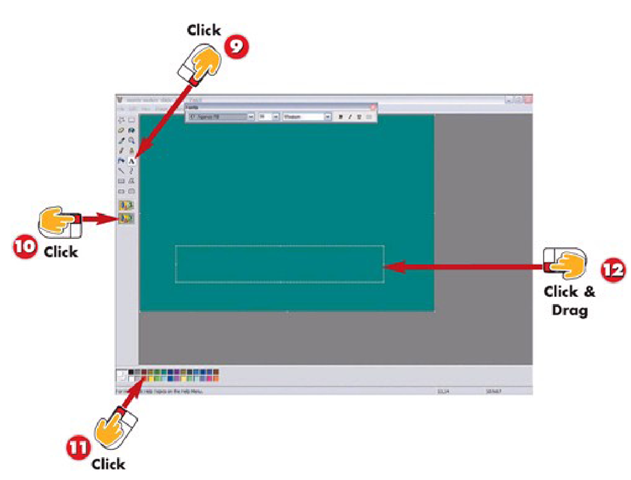
9 Select the Text tool by clicking it.
10 Select the Transparent text box option.
11 Choose a text color from the Color Box.
12 Draw a text box on the work area by clicking and dragging the mouse.
TIP
Text Box Background
To create a text box with a white background, choose the Solid text box option, and then select the text color from the color box.
13 Choose a font from the drop-down menu.
14 Select the font size for your text from the drop-down with numbers, and select any text attributes.
15 Type your title text in the text box.
After laying out the background, add text and image elements to your title slide.
TIP
Multiple Fonts
Paint only allows one font in a text box. To create text using more than one font, type text in the first font, and then create a second text box for the remaining text in the additional font.
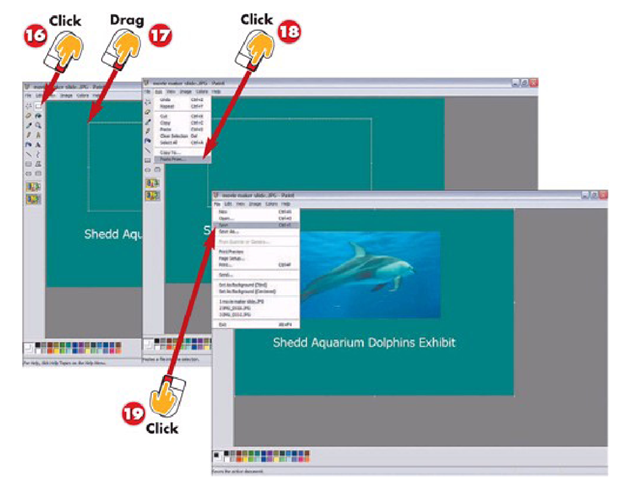
16 Click the Select tool to create an image box.
17 With the left mouse button pressed, drag the mouse on the work area until you get a box sized to fit your image.
18 Click Paste From on the Edit menu, and then select the image you want to insert.
19 Save your slide again by choosing File, Save from the menu. Close Microsoft Paint when you are finished.
TIP
Text Toolbar
If the Text Toolbar isn’t visible, select View, Text Toolbar from the menu.
HINT
TV Safe Area
If you plan on outputting your movie for viewing on a television screen, don’t start text and images at the very edge of the slide. Leave some empty space around the edge of your title slide. TVs overscan projected images by as much as 10% of the image, which means some portion of the image is actually showing off screen.
