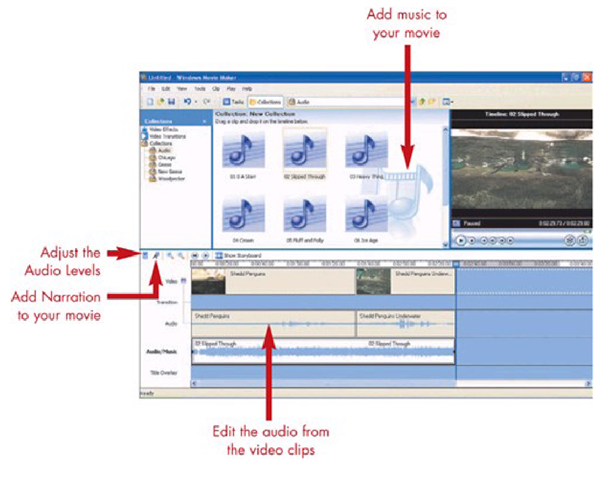
The audio associated with a movie is just as important as the video. In some cases audio is even more important. Audio can consist of the actual sounds or dialog occurring when the video was created. Soundtrack music can be used to enhance the emotions associated with your video. If a description of events transpiring in the movie makes sense, adding a narrative track will improve the experience of your viewers.
Windows Movie Maker, in combination with Windows Media Player, allows you to add soundtrack files to your movie. Using an external audio editing application, it’s possible to level the sound of all the songs in the soundtrack using a process known as normalization. Narration is accomplished easily within the Movie Maker application by viewing the movie and talking into a microphone as you watch.
In addition to adding soundtrack audio and narration, Movie Maker allows you to perform custom edits on the audio tied to your movie clips. J-cuts and L-cuts are two audio edits which act as transitions between scenes. Making minor adjustments to the volume of the original audio file is also possible. In this part of the topic, you will learn how to edit and improve the audio for your video.
Audio Editing on the Movie Maker Timeline
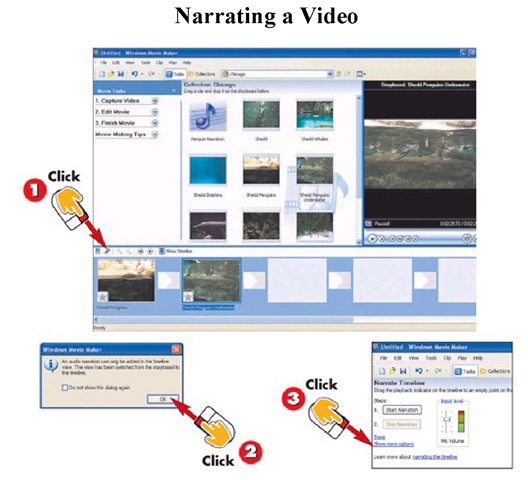
Narrating a video
1 With your movie project open, click the microphone icon on the Storyboard or Timeline toolbar.
2 If Movie Maker is in Storyboard view, click OK on the dialog box informing you of the switch to Timeline view.
3 Click the Show more options link.
INTRODUCTION
Narrating is as easy as talking about what you see in the video as it happens. Movie Maker provides an interface to all the necessary components of Windows for narrating audio.
HINT
Quiet on the Set
Make sure the room is quiet during narration. Close the door and send kids or co-workers out of the room. Computer microphones pick up background noise, which will be permanent in your recordings. Turn off the phones.
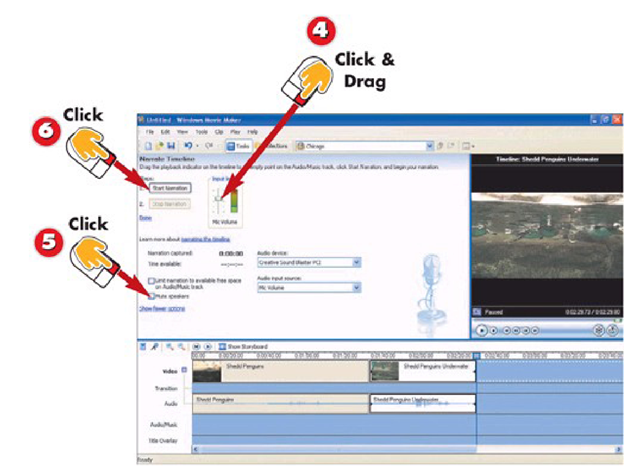
4 Click and drag the slider on the Input level so the Mic volume is somewhere below the red zone near the top.
5 Click the Mute speakers button to eliminate echo during recording.
6 Click S tart Narration, begin talking, and then click Stop Narration when you finish talking.
TIP
Monitoring Narration
If you need to hear yourself as you are recording, use headphones as the speakers for the computer during the narration process. This eliminates the risk of echo caused by external speakers, while allowing you to hear the audio.
TIP
Headset Microphones
To get even better narrative audio, try using a headset microphone. Headsets often combine both earphones and microphones in one unit and position the microphone near your mouth for more consistent audio levels.
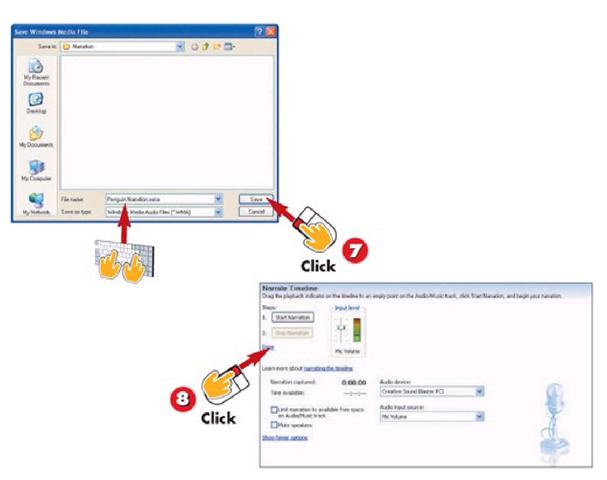
7 Choose a file name and click Save.
8 Click the Done link to return to the Movie Tasks pane.
TIP
Following the Picture
Movie Maker plays the movie in the preview monitor as you record the narration, making it easy to follow along with the action onscreen.
TIP
Dress Rehearsal
It’s a good idea to run through the movie a few times to practice what you will say before recording. Lots of "ums" and "ahhs" distract from what the message of the narrative is.
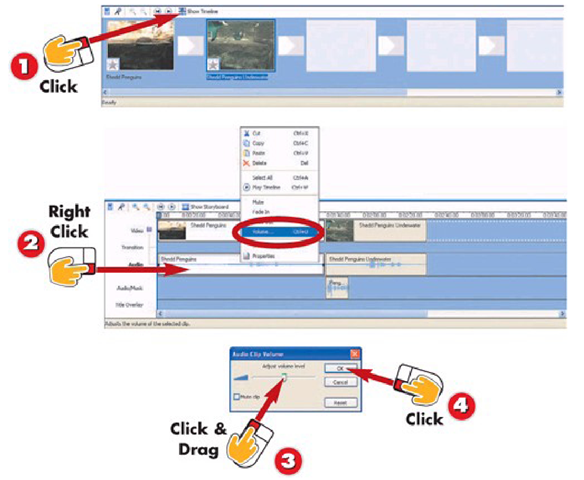
Adjusting Audio Volume
1 Click the Show Timeline button, if Storyboard view is the current view.
2 Right-click on an audio track in the Timeline and choose Volume from the menu.
3 Click and drag the volume control to the desired audio level.
4 Click OK.
INTRODUCTION
The audio volume controls how loud or quiet each individual movie clip will be. Adjusting volume levels is used to add emphasis to certain types of audio, while reducing the importance of other types of audio.
TIP
Muting an audio clip
Mute an entire audio clip by selecting Mute from the right-click menu. Muting an audio clip is useful if you are replacing the original audio clip with a soundtrack, narration, or other outside audio.
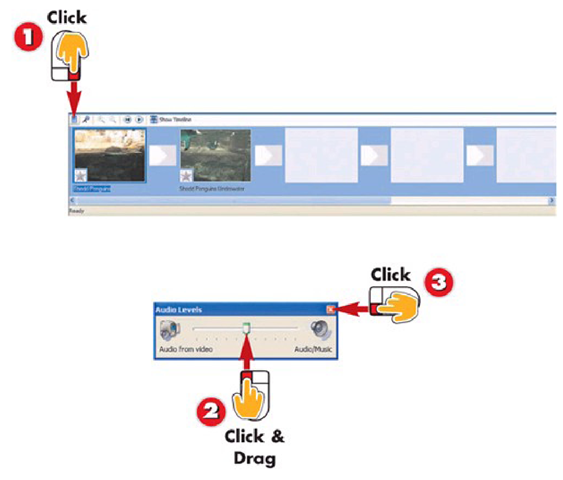
Setting Audio Levels
1 Click the Set Audio Levels button at the far left of the Storyboard toolbar.
2 Click and drag the audio slider toward the type of audio you want to focus on in your video.
3 Close the Audio Levels window by clicking the close window button (the X).
INTRODUCTION
Audio levels determine whether more focus is on the original audio from movie clips, on music and narrations, or if there is an equal balance between movie audio and soundtrack audio. The audio leveling in Movie Maker works just like the front-to-rear fade in a car. You either have a state of balance (the middle of the fader), where the audio is equally distributed between front and rear, or you have the audio skewed one direction or the other.
TIP
Audio control
For greater control over individual sections of audio, leave Audio Levels set to the middle. Balance between audio from video clips and soundtrack is maintained, allowing you to adjust the volume of individual clips more easily.
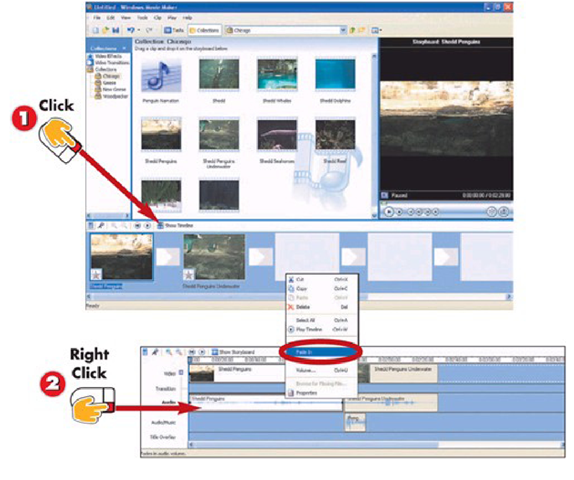
Adding Audio Effects
1 Click Show Timeline, if Storyboard view is the current view.
2 Right-click the audio clip you want to tide in or out and choose a fade from the menu.
INTRODUCTION
Fading audio in introduces viewers to an audio selection more gradually. Fading audio out makes scene changes less abrupt. Windows Movie Maker creates fades about two-thirds of a second in length.
HINT
Fading Versus Reducing Volume
When you adjust the volume of an audio clip in Movie Maker, it reduces the volume of the entire clip. Fading only affects the volume of the first or last 2/3 second of audio.
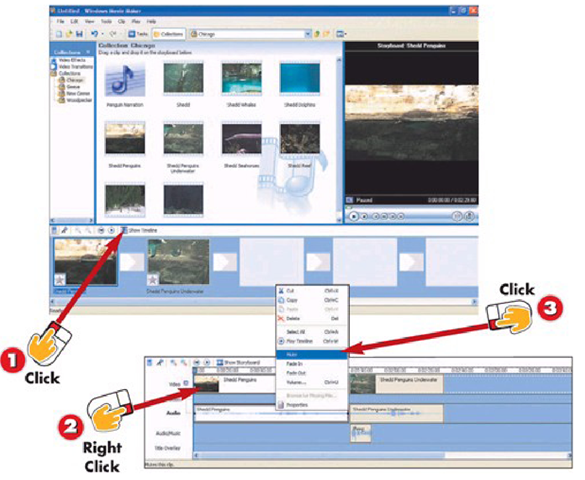
Muting Audio Tracks
1 Click Show Timeline, if Storyboard view is the current view.
2 Right-click the audio clip you want to mute.
3 Click Mute in the menu.
INTRODUCTION
Windows Movie Maker allows you to mute selected audio clips. Muting a clip makes it easy to replace it with something else. This is particularly useful when the audio track of your video contains too much background noise or doesn’t sound good.
TIP Dividing Clips
If only a small portion of an audio clip needs muting, divide the clip into smaller clips to isolate the problem audio, and then mute only the small section instead of having to mute the full clip.
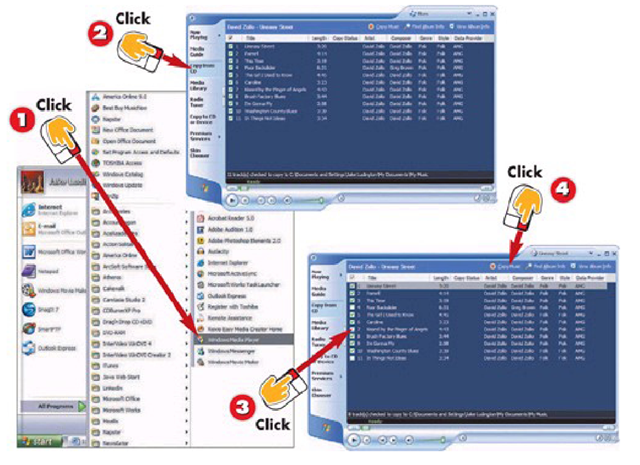
Extracting Music from CD with Windows Media Player
1 Open Windows Media Player by clicking Start, AU Programs, and choosing Windows Media Player.
2 Insert the CD you want to copy and click Copy from CD.
3 Select tracks you want to copy by checking the box next to the tracks. (AU tracks are selected by default.)
4 Click the Copy Music button.
INTRODUCTION
Creating a soundtrack for your movie requires adding additional music tracks. One source for music is your CD collection.
TIP
Copyright Concerns
If you plan on distributing your movie to other people, especially in cases where you might be selling it, you need to acquire permission from the copyright holders of the music before distributing the music as part of the final movie.
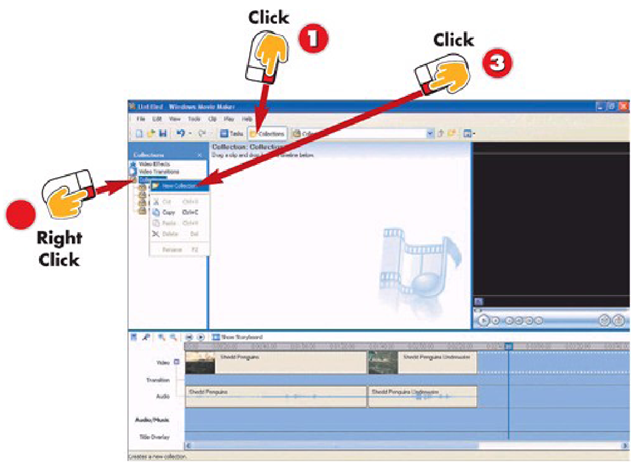
Importing Music in Windows Movie Maker
1 Click the Collections button on the toolbar.
2 Right-click Collections in the Collections Pane.
3 Choose New Collection from the menu.
INTRODUCTION
Once music files have been copied to the hard drive, they must be imported into Movie Maker. After importing audio files into the collections, they can be added to the timeline to create a soundtrack.
TIP
Digital Rights Management
Most of the music from download sites like MusicMatch and Napster will not work in Movie Maker because it has DRM protections in place preventing the files from being re-edited in applications like Movie Maker.
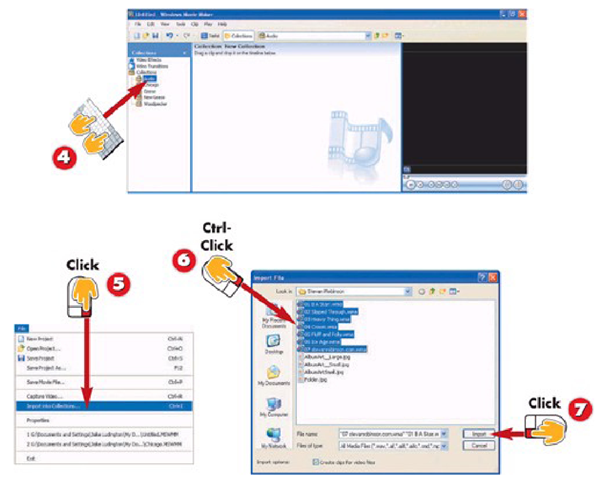
4 Type a name for the new Collection.
5 Audio is a good choice.
6 Click the File menu and choose Import into Collections.
7 Ctrl-click to select the audio files for your soundtrack.
TIP
Select tracks
To import successive audio tracks from the same folder, hold down the Shift key and click the first track you want to select, and then click the last track. Those two tracks and all tracks between them are selected.
