By : James W Zubrick
Email: j.zubrick@hvcc.edu
A melting point is the temperature at which the first crystal just starts to melt until the temperature at which the last crystal just disappears. Thus the melting point (abbreviated M.P.) is actually a melting range. You should report it as such, even though it is called a melting point, for example, M.P. 147-149°C.
People always read the phrase as melting point and never as melting point. There is this uncontrollable, driving urge to report one number. No matter how much I’ve screamed and shouted at people not to report one number, they almost always do. It’s probably because handbooks list only one number, the upper limit.
Generally, melting points are taken for two reasons.
1. Determination of purity. If you take a melting point of your compound and it starts melting at 60 °C and doesn’t finish until 180 °G you might suspect something is wrong. A melting range greater than 2°C usually indicates an impure compound (As with all rules, there are exceptions. There aren’t many to this one, though.).
2. Identification of unknowns.
a. If you have an unknown solid, take a melting point. Many books (ask your instructor) contain tables of melting points and lists of compounds that may have a particular melting point. One of them may be your unknown. You may have 123 compounds to choose from. A little difficult, but that’s not all the compounds in the world. Who knows?? Give it a try. If nothing else, you know the melting point.
b. Take your unknown and mix it thoroughly with some chemical you think might be your unknown. You might not get a sample of it, but you can ask. Shows you know something. Then:
1) If the mixture melts at a lower temperature, over a broad range, your unknown is NOT the same compound.
2) If the mixture melts at the same temperature, same range, it’s a good bet it’s the same compound. Try another one, though, with a different ratio of your unknown and this compound just to be sure. A lower melting point with a sharp range would be a special point called a eutectic mixture, and you, with all the other troubles in lab, just might accidentally hit it. On lab quizzes, this is called
“Taking a mixed melting point.”
Actually, “taking a mixture melting point,” the melting point of a mixture, is more correct. But I have seen this expressed both ways.
SAMPLE PREPARATION
You usually take melting points in thin, closed end tubes called capillary tubes. They are also called melting point tubes or even melting point capillaries. The terms are interchangeable, and I’ll use all three.
Sometimes you may get a supply of tubes that are open on both ends! You don’t just use these as is. Light a burner, and close off one end, before you start. Otherwise your sample will fall out of the tube (see “Closing Off Melting Point Tubes,” following).
Take melting points on dry, solid substances ONLY, never on liquids or solutions of solids in liquids or on wet or even damp solids.
Only on dry solids!
To help dry damp solids, place the damp solid on a piece of filter paper and fold the paper around the solid. Press. Repeat until the paper doesn’t get wet. Yes, you may have to use fresh pieces of paper. Try not to get filter paper fibers in the sample, OK?
Occasionally, you may be tempted to dry solid samples in an oven. Don’t— unless you are specifically instructed to. I know some students who have decomposed their products in ovens and under heat lamps. With the time they save quickly decomposing their product, they can repeat the entire experiment.
Loading the Melting Point Tube
Place a small amount of dry solid on a new filter paper (Fig. 31). Thrust the open end of the capillary tube into the middle of the pile of material. Some solid should be trapped in the tube. Turn the tube over, closed end down. Remove any solid sticking to the outside. The solid must now be packed down.
Fig. 31 Loading a melting point tube.
Traditionally, the capillary tube, turned upright with the open end up, is stroked with a file, or tapped on the bench top. Unless done carefully, these operations may break the tube. A safer method is to drop the tube closed end down, through a length of glass tubing. You can even use your condenser or distilling column for this purpose. When the capillary strikes the bench top, the compound will be forced into the closed end. You may have to do this several times. If there is not enough material in the M.P. tube, thrust the open end of the tube into the mound of material and pack it down again. Use your own judgment; consult your instructor.
Use the smallest amount of material that can be seen to melt
Closing Off Melting Point Tubes
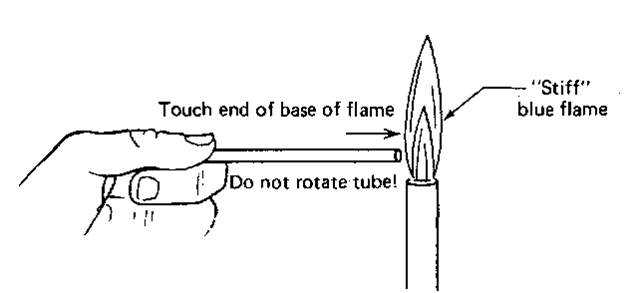
If you have melting point tubes that are open at both ends and you try to take a melting point with one, it should come as no surprise when your compound falls out of the tube. You’ll have to close off one end, to keep your sample from falling out (Fig. 32). So light a burner and get a “stiff’ small blue flame. SLOWLY touch the end of the tube to the side of the flame, and hold it there. You should get a yellow sodium flame, and the tube will close up. There is no need to rotate the tube. And remember, touch— just touch—the edge of the flame, and hold the tube there. Don’t feel you have to push the tube way into the flame.
MELTING POINT HINTS
1. Use only the smallest amount that you can see melt. Larger samples will heat unevenly.
2. Pack down the material as much as you can. Left loose, the stuff will heat unevenly.
3. Never remelt any sample. They may undergo nasty chemical changes such as oxidation, rearrangement and decomposition.
4. Make up more than one sample. One is easy, two is easier. If something goes wrong with one, you have another. Duplicate, even triplicate runs are common.
Fig. 32 Closing off a M. P. tube with a flame.
THE MEL-TEMP APPARATUS
The Mel-Temp apparatus (Fig. 33) substitutes for the Thiele tube or open beaker and hot oil methods (see “Using the Thiele Tube”). Before you use the apparatus, there are a few things you should look for.
Fig. 33 The Mel-Temp apparatus.
1. Line cord. Brings a.c. power to unit. Should be plugged into a live wall socket [See J. E. Leonard and L. E. Mohrmann, J. Chem. Educ., 57,119 (1980), for a modification in the wiring of older units, to make them less lethal. It seems that even with the three-prong plug, there can still be a shock hazard. Make sure your instructor knows about this!].
2. On – off switch. Turns the unit on or off.
3. Fuse. Provides electrical protection for the unit.
4. Voltage control. Controls the rate of heating, not the temperature! The higher the setting, the faster the temperature rise.
5. Light source. Provides illumination for samples.
6. Eyepiece. Magnifies the sample (Fig. 34).
7. Thermometer. Gives temperature of sample, and upsets the digestion when you’re not careful and you snap it off in the holder.
OPERATION OF THE MEL-TEMP APPARATUS
1. Imagine yourself getting burned if you’re not careful. Never assume the unit is cold.
Fig. 34 Close up of the viewing system.
2. Place loaded M.P. tube in one of the three channels in the opening at the top of the unit (Fig. 34).
3. Set the voltage control to zero if necessary. There are discourteous folk who do not reset the control when they finish using the equipment.
4. Turn the on-off switch to ON. The light source should illuminate the sample. If not, call for help.
5. Now science turns into art. Set the voltage control to any convenient setting. The point is to get up to within 20°C of the supposed melting point. Yep, that’s right. If you have no idea what the melting point is, it may require several runs as you keep skipping past the point with a temperature rise of 5-10° C per minute. A convenient setting is 40. This is just a suggestion, not an article of faith.
6. After you’ve melted a sample, throw it away!
7. Once you have an idea of the melting point (or looked it up in a handbook, or were told), get a fresh sample, and bring the temperature up quickly at about 5-10°Cper minute to within 20° C of this approximate melting point. Then turn down the voltage control to get a 2°C per minute rise. Patience!
8. When the first crystals just start to melt, record the temperature. When the last crystal just disappears, record the temperature. If both points appear to be the same, either the sample is extremely pure, or the temperature rise was too fast.
9. Turn the on – off switch to OFF. You can set the voltage control to zero for the next person.
10. Remove all capillary tubes.
Never use a wet rag or sponge to quickly cool off the heating block. This might permanently warp the block. You can use a cold metal block to cool it if you’re in a hurry. Careful. If you slip, you may burn yourself.
THE FISHER-JOHNS APPARATUS
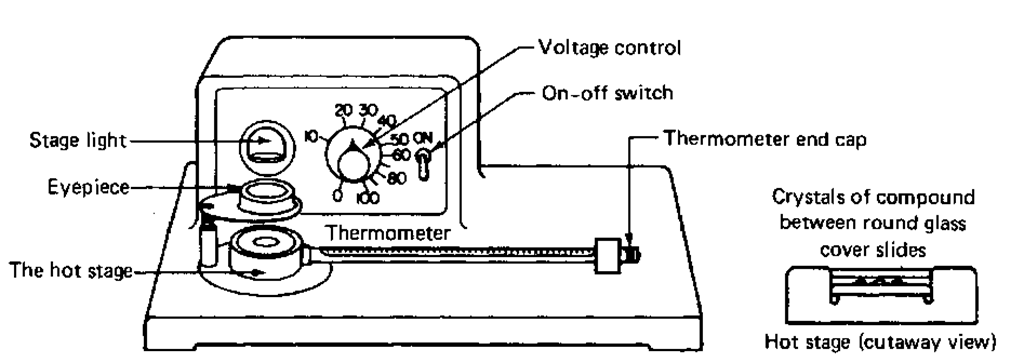
The Fisher-Johns apparatus (Fig. 35) is different in that you don’t use capillary tubes to hold the sample. Instead, you sandwich your sample between two round microscope cover slides (thin windows of glass) on a heating block. This type of melting point apparatus is called a hot stage. It comes complete with spotlight Look for the following.
Fig. 35 The Fisher-Johns apparatus.
1. Line Cord (at the back). Brings a.c. power to unit. Should be plugged into a live wall socket.
2. On — off switch. Turns the unit on or off.
3. Fuse (also at the back). Provides electrical protection for the unit.
4. Voltage control. Controls the rate of heating, not the temperature! The higher the setting, the faster the temperature rise.
5. Stage light. Provides illumination for samples.
6. Eyepiece. Magnifies the sample.
7. Thermometer. Gives temperature of sample.
8. Thermometer end cap. Keeps thermometer from falling out. If the cap becomes loose, the thermometer tends to go belly-up, and the markings turn over. Don’t try to fix this while the unit is hot. Let it cool so you won’t get burned.
9. The hot stage. This is the heating block that samples are melted on.


