This topic covers the following:
■ Using the SWFObject project to embed your application in an HTML page
■ Best practices for organizing and deploying web content
■ Writing an Ant target to deploy your application
■ Using Screenweaver to deploy a desktop application
This topic covers the steps necessary to go from a compiled SWF to a web or desktop-based application that other people can use. I’ll talk about HTML embedding techniques, discuss using Ant to transfer your files, and even look at a couple options to deploy your application without using the Web.
Embedding SWF content
On the Web, linking to a SWF directly is not a very attractive option. You can’t control the content around the SWF or the title of the page in the browser title area. It’s also difficult to add content that’s friendly to search engines, and it’s impossible to detect a Flash version or provide alternate content for people with special needs. For these reasons, most developers choose to embed their SWFs in an HTML page for their end users.
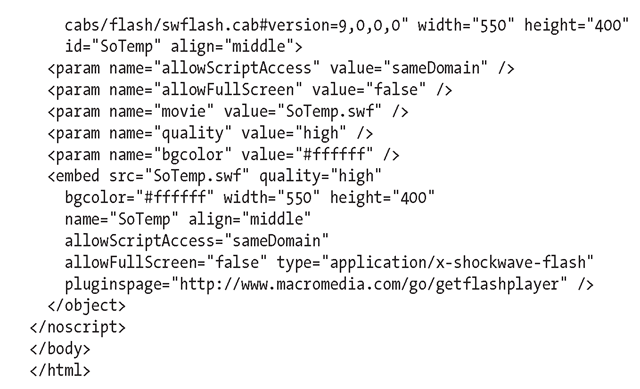
You can embed your SWF content into a web page in several ways, and each has different benefits. If you’re using the Flash IDE and generate an HTML page while compiling, you’ll get output similar to this:
This uses some JavaScript to embed the content with an object tag as a fallback for when JavaScript isn’t available. Although this code works most of the time, it lacks some of the advanced browser and plug-in detection that solutions such as SWFObject have.
Several other strategies for embedding Flash content have been introduced over the years, but most have some significant flaw ranging from a lack of browser support to breaking screen reader support. Many of these solutions have a “click to activate” restriction that requires you to click the Flash movie before it will activate on Internet Explorer 6+ or Opera 9 and newer.
Using SWFObject
Luckily, there is an open source project called SWFObject that solves most of these embedding problems. At the time of this writing, version 2.0 is the production-ready release; you can download it from http://code.google.eom/p/swfobject/.
Even though 1.0 is still widely used today, I’ll concentrate on version 2.0 in this topic. Version 2.0 is a complete rewrite from the original SWFObject project, and up until recently was named SWFFix. At least one Adobe employee is helping to work on SWFObject, and it’s expected to be used in official Adobe products at some point in the future. To do the embedding, SWFObject has two main methods of embedding Flash content into your web page.
The first option, called the static publishing method, is a fully standards-compliant take on things. This option relies on object tags to embed the content in most browsers, plus some JavaScript to work around flaws in some browsers. This is the more complex of the two methods, but it offers the most standards-compliant solution. However, it does suffer from the “click to activate” problem mentioned earlier.
The second option, called the dynamic publishing method, relies mainly on JavaScript to place the SWF in the web page. This option requires you to do a lot less but isn’t 100 percent standards compliant and will fail if the user has JavaScript disabled in their browser. The biggest advantage to using this method is that the end user doesn’t need to click the movie to activate it in Internet Explorer 6+ or Opera 9 and newer.
Installing SWFObject
Before going into the details of each method of using SWFObject, a quick primer on where to download the files from and where to put them is in order. You can download the latest SWFObject release from the Google Code repository at http://code.google.eom/p/swfobject/. Click Downloads, and download the latest released version listed. Then uncompress the ZIP file, placing the files in the same folder as your SWF, and you’re ready to start using it. Alternatively, you could set up a central location where all your Flash-based pages can retrieve the scripts from instead of having a copy of SWFObject for each page.
Besides the main SWFObject download, you can grab several “generator” downloads as well. These are scripts that you can run (either in a web browser using the HTML version or as stand-alone with the AIR version) that ask you for a series of inputs. After filling in those inputs, the generator will give you the required output in a convenient form that you can simply cut and paste into your web page.
SWFObject static publishing method
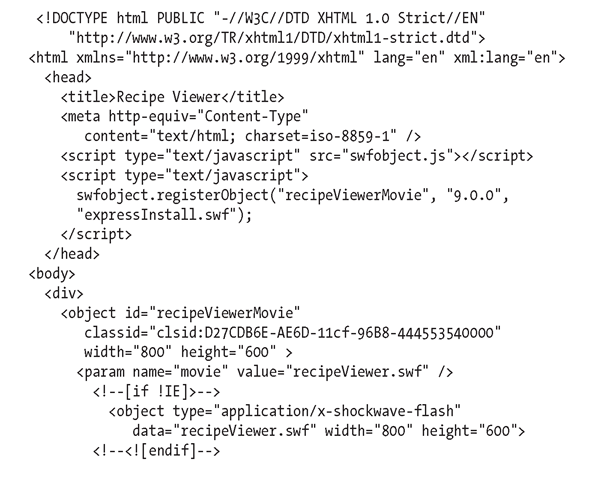
This method of embedding Flash content is the most complete and standards compliant and is the version most likely to work for any user. An example of this method follows, with the important details explained afterward:
Most of the elements in this example are the same each time you use SWFObject. There are a few important elements to change. You should change the following line to match your minimum version of the Flash plug-in required as well as specifying the node ID of where the SWF should be placed:
The node ID should be the same as the id attribute of the first object tag, as shown here:
The SWF file name, as well as the width and height of the movie, must be repeated in two separate object tags. The first is for Internet Explorer, and the second is for most other browsers.
Finally, you should place some sort of fallback content within the inner object tag for people who don’t have the required version of Flash. You could provide a link to a location to download the Flash plug-in, or you could provide a text-only version of the content that the SWF would have displayed.
You may have noticed a reference to the expressinstall.swf file in the JavaScript call to SWFObject. This enables the Express Install functionality of the Flash plug-in to automatically update itself if the required version of the plug-in isn’t installed on the user’s system. The end user will see an installation dialog box requesting them to upgrade by clicking a button in place of your SWF. When it’s complete, the page should reload, and your expected content will be displayed.
SWFObject dynamic publishing method
The second way of using SWFObject is to allow the JavaScript functions to replace part of your page with the required content to display your SWF. An example of using it this way follows, with explanations afterward:
As you can see, this method results in terser code that is easier to read. As mentioned, the biggest drawback to this method is its failure to work with browsers whose JavaScript is disabled, and its biggest benefit is that the movie will be active and available without the user clicking it. The two important sections are as follows:
The previous section represents the place on the page that will be swapped out and replaced by your SWF. Like the previous method, you can specify alternative content that will be displayed in case something goes wrong and the SWF can’t be shown to the user.
This JavaScript does the heavy lifting of actually specifying what to replace. In it you specify the following:
■ "recipeViewer.swf": The file name of your SWF
■ "myAlternativeContent": The ID of the div tag to replace
■ "800", "600": The dimensions of the file
■ "9.0.0": The minimum version of the Flash plug-in
■ "expressInstall.swf": The location to expressInstall.swf
■ flashvars, params, attributes: The FlashVars, parameters, and attributes that should be passed to Flash Player
As mentioned, the content for both of these methods can either be manually coded or generated using one of the SWFObject generators. Which method you choose will largely be a decision about whether you value fully standards-compliant markup that doesn’t require JavaScript or a solution that doesn’t force some users to click the embedded movie first.
Staging strategies
It’s often a good idea to stage your web rollouts from a development environment to a staging (or testing) server and then finally to your production web server. Performing this three-stage process will help you identify problems before the files reach your production web server.
If you’ve followed along in previous topics, you should already have an Ant script that can compile your application and copy it to your development web server.
To roll out the files to the staging and production web servers, I’ll first show how to copy the necessary files to a temporary location and then transfer all the files from that location to the server(s). This way, you can avoid any temporary or old files that you don’t want to transfer. In the following diagram, you can see how your files move from your development workspace to a staging directory and then can be transferred to your staging or production web server.
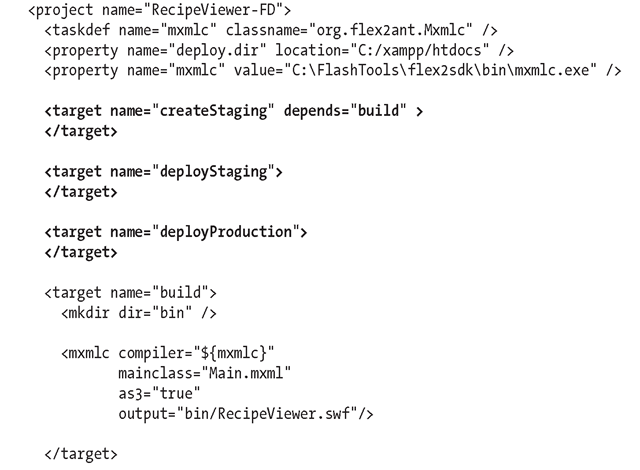
To extend your Ant script, let’s first create the three new targets referenced in the diagram. Open your build.xml file, and add the lines in bold:
The createStaging target should contain all the logic necessary to retrieve and copy the necessary files to the staging directory. It will likely involve copying files from your development workspace, but it might also retrieve assets from other locations.
Imagine you’re working with a designer who sits across the room. You might want to copy art assets from a file share. Or maybe your designer is on the other side of the globe. If they can place their files on a web or FTP server, you can grab those through Ant as well.
A sample createStaging target follows. It illustrates how to copy your local files, how to copy files from another location, and how to download a file from a web server. Here’s the code in full; I’ll run through it in detail after the code:
OK, let’s see what the code does. Before copying files, it’s a good idea to remove files from the previous copy so you don’t inadvertently get old files on your server. The first line in the target accomplishes this:
The next lines create the destination directory and copy files from your local development workspace to it:
The next section copies files that may be located in another directory, perhaps a file share or drop-off location from a designer:
The last section downloads a file from a web server and places it in the destination directory:
To get a script working for your environment, all you have to do is swap in the locations for your files and run the following command:
Alternatively, you could run Ant through Eclipse’s Ant view. To get that view, select the Window > Show View > Other menu option. Then scroll down and select the Ant view. Once that opens in Eclipse, drag your build.xml file into that panel, and you should be able to run all your targets by doubleclicking them.


