Creating your first ActionScript class
To create your first ActionScript class, follow these steps:
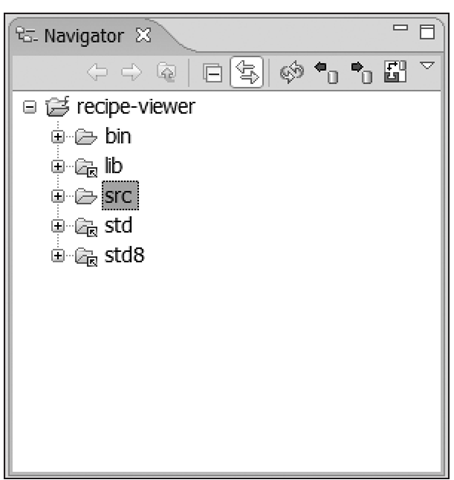
1. On the left side of your workspace, you should see an area called the Navigator (see Figure 3-11). Select the src directory by clicking it.
Figure 3-11. The Navigator panel from within Eclipse after creating the recipe viewer project
2. Select the File > New > New ActionScript Class menu option. As a shortcut, there is also a button that looks like a green circle with a white letter C on the toolbar that performs this function. The NewActionScript Class dialog box will be displayed.
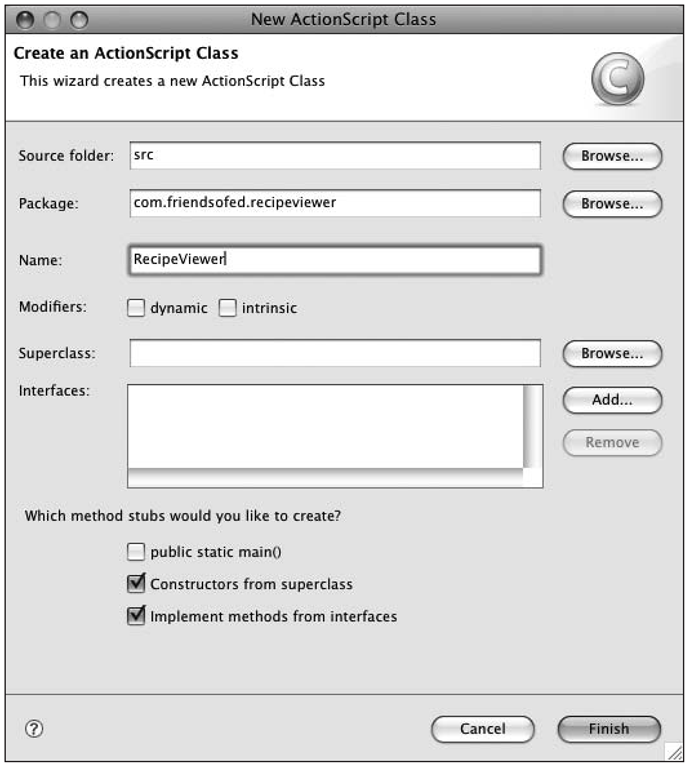
3. Enter com.friendsofed.recipeviewer in the Package field and RecipeViewer in the Name field. Your dialog box should now look like Figure 3-12.
Figure 3-12. The New ActionScript Class dialog box after making the appropriate modifications for the initial class
4. Click the Finish button. Your class will be created and shown to you in your code editor.
You now need to create a new method within that class to actually do something. Let’s create a text field and give it the text “Hello World.” Since this is a Flash application, let’s make it a little flashier and add a little animation to make it scroll in from the bottom and bounce when it hits the top. To perform this animation, I will use Fuse.Enter the following code into your newly created class:
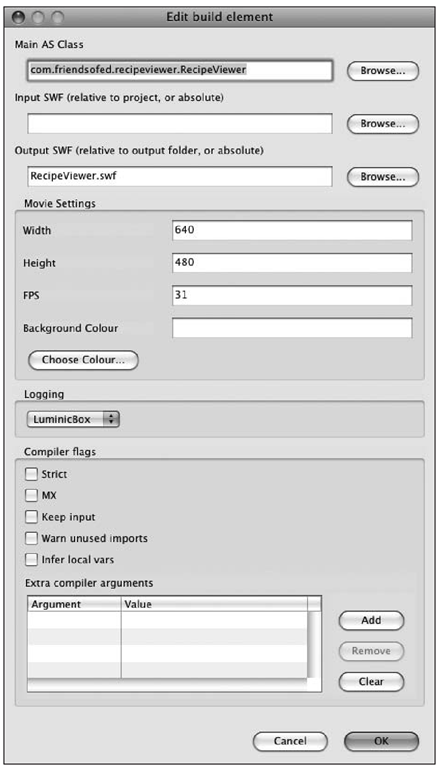
After you’ve entered that code, save the file. ASDT will recognize that you’ve added the static main method and add it to a list of files to compile. While it’s doing that, it needs to know some information about the SWF you want to create and will automatically prompt you with a dialog box like Figure 3-13.
Figure 3-13. The SWF build options
ASDT will immediately attempt to compile your class but will fail because you have forgotten to import some of the external classes you’ve used. The code ZigoEngine.simpleSetup should be underlined in red indicating a problem. In addition, there should be a red X icon in the margin to the left, and a line has been added to your Problems panel below your code editor. Forgetting to import classes is a common mistake. To fix it, add an import line at the beginning of your class. As you type, notice that ASDT gives you contextual help and code completions. ASDT, in contrast to FDT, can detect only the first error in an ActionScript class, so if there were multiple errors, the next one would have been highlighted after you fixed the first error and saved the file. The complete class should be as follows:
Once there are no additional errors, your Problems panel below your code editor should be empty. This means your application has been successfully built and is ready to be run. Open the bin directory in the Navigator panel, and double-click the RecipeViewer.swf file. It should open and be run in a new subwindow of Eclipse. I oftentimes drag the SWF panel to the right of my code window so I can see them both side by side. Whenever I save my ActionScript code, the class is automatically compiled and restarted in that window.
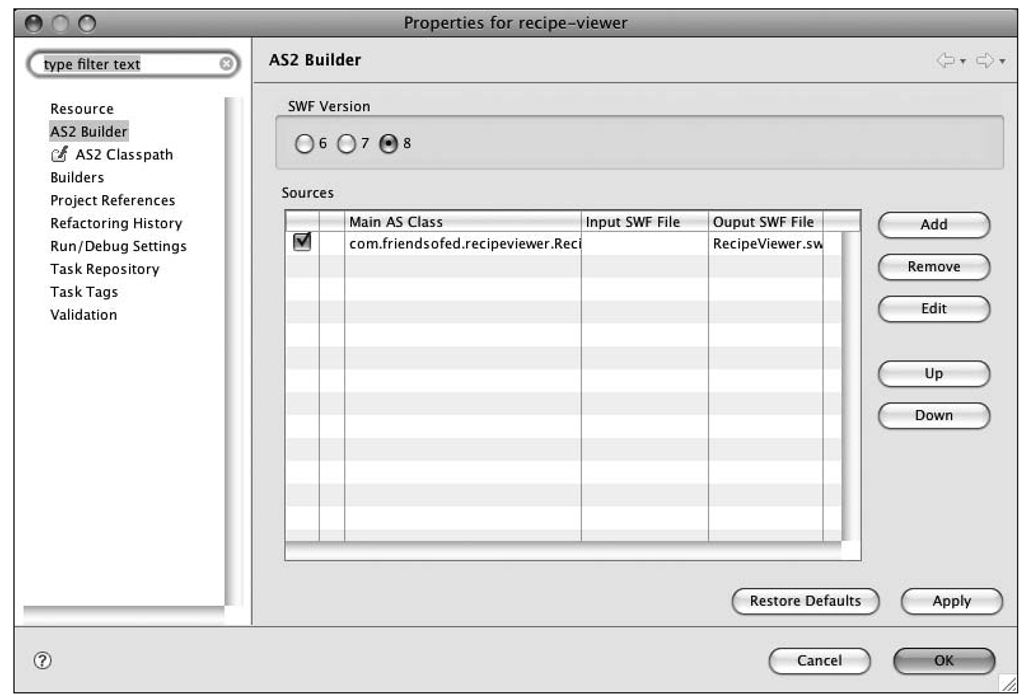
You previously saw that ASDT automatically attempts to compile classes with a static main method. But how does it associate an output SWF file name with the class that generates it? Internally, ASDT added your class to a list of ActionScript 2 build targets. You can access that list at any time by right-clicking the project name in the Navigator panel on the left and choosing Properties. Then select the AS2 Builder option; you should now be looking at a dialog box like Figure 3-14. Notice that ASDT is compiling the class to the RecipeViewer.swf output file. Since you previously selected the option to separate your source and output directories, this will be created in the bin directory of your project. You can now close this dialog box by clicking the OK button.
Figure 3-14. ASDT automatically recognizes new classes with static main methods and creates new AS2 Builder targets for them.
Common components
Besides the compilers and development environments, several open source tools can aid both ActionScript 2 and ActionScript 3 developers.
Installing swfmill
swfmill is a tool to create multimedia assets for use by a Flash application. You can install swfmill by going to the swfmill home page (http://swfmill.org/) and downloading a binary distribution for your platform. Extract the archive you downloaded into the FlashTools directory you previously created, and add that directory to your system’s search path in the same way you added MTASC to your path.
After you’ve completed the installation, running the command swfmill from a terminal or command shell should output version and usage information:
.
Installing Xray
Xray will give you several tools to help debug your application. You need to install two pieces of Xray. The first is the connector, which consists of a small bit of code you compile into your application. The other piece is the Xray interface that has a UI you can interact with.
The Xray interface allows you to inspect the running application in real time. It also provides the display of logging information from your application. To accomplish this, it makes a local connection to the Xray connector that you embed in your application.
Installing the ActionScript 3 connector
To install the ActionScript 3 Xray connector, download the package labeled Xray AS3 SWC for Flex3 logging and inspection from the Xray Google Code repository (http://code.google.com/p/ osflash-xray/downloads/list). You can use this package for both Flex and Flash development.
Next, add this SWC to your mxmlc compilation. If you’re using FlashDevelop, you can go to Project > Properties, click the Compiler Options tab, and then click the … button next to the SWC Libraries option. This will cause a new dialog box to open, allowing you to specify additional libraries to include. Type the path and name of the Xray SWC there. Ifyou saved the SWC to your lib directory, you would enter C:\FlashTools\lib\Xray.swc on Windows or ~/FlashTools/lib/Xray.swc on OS X.
Once that’s done, you can add the import for the Flex2Xray class to your main ActionScript class, create a variable, and instantiate a Flex2Xray object. Assuming this instantiation doesn’t throw any exceptions, you should now have a working Xray connector in your application:
If you want to use the Xray logging functionality in your application, you’ll also want to create an XrayLog object. Don’t forget to import the XrayLog class:
Installing the ActionScript 2 connector
To install the ActionScript 2 Xray connector, download the package labeled Xray AS2 Logger classes and Mtasc Utilities with samples from the Xray Google Code repository (http://code.google. com/p/osflash-xray/downloads/list). Extract the archive to a temporary location on your hard drive. Copy the classes/com directory to the lib directory you previously set up (see “Installing ActionScript 2 libraries”). Copy the xrayConnector-XXXX.swf file to the bin directory inside your project. You’ll have to copy this SWF to the bin directory of every project you create, so make sure to keep a copy handy between projects; we suggest keeping an extra copy in your FlashTools directory
If you’re using the Flash IDE for development, installing the connector is even easier. Just download the package labeled Latest component package for AS2. It contains an MXP file, so if you double-click it, the Flash Extensions Managershould recognize it and install it for you. Then, to use the connector, just drop the Xray connector component onto the stage of your project.
You need to configure two major pieces of Xray to use all the features. One is the execute connection, which allows you to inspect and modify the objects of the running SWF. The other is the logger connection, which will redirect your log statements to the Xray window.
Configuring the execute connection
The execute connection is enabled by adding a few lines of code to your application. Xray comes with a utility class called XrayLoader that loads the connector SWF you previously installed. To use it, you need to make several changes to your code.
Modifying the code for the Xray execute connection
Follow these steps to modify the code for the Xray execute connection:
1. Extract most of the functionality of the code from the static main()method to a new startApp() method.
2. Add a private member variable representing the base MovieClip.
3. Create a constructor that takes a MovieClip as a parameter. In that constructor, set the base clip.
4. In the constructor, set up two event listeners on XrayLoader to call startApp() after either a successful load or a failed load. You do the same thing on fail or load so you can later deploy your application without the Xray connector, and it will still work.
5. Also in the constructor, add a call to XrayLoader to load the connector SWF. Make sure to specify the exact SWF name of your connector because you may have a newer version than what was available at the time of this writing. The second parameter specifies the base MovieClip to use. The third parameter specifies whether to display the FPS meter.


![tmpeeee-25_thumb[2][2] tmpeeee-25_thumb[2][2]](http://what-when-how.com/wp-content/uploads/2012/06/tmpeeee25_thumb22_thumb.png)
![tmpeeee-26_thumb[2][2] tmpeeee-26_thumb[2][2]](http://what-when-how.com/wp-content/uploads/2012/06/tmpeeee26_thumb22_thumb.png)

![tmpeeee-28_thumb[2][2] tmpeeee-28_thumb[2][2]](http://what-when-how.com/wp-content/uploads/2012/06/tmpeeee28_thumb22_thumb.png)

![tmpeeee-30_thumb[2][2] tmpeeee-30_thumb[2][2]](http://what-when-how.com/wp-content/uploads/2012/06/tmpeeee30_thumb22_thumb.png)
![tmpeeee-31_thumb[2][2] tmpeeee-31_thumb[2][2]](http://what-when-how.com/wp-content/uploads/2012/06/tmpeeee31_thumb22_thumb.png)
![tmpeeee-32_thumb[2][2] tmpeeee-32_thumb[2][2]](http://what-when-how.com/wp-content/uploads/2012/06/tmpeeee32_thumb22_thumb.png)
![tmpeeee-33_thumb[2][2] tmpeeee-33_thumb[2][2]](http://what-when-how.com/wp-content/uploads/2012/06/tmpeeee33_thumb22_thumb.png)
![tmpeeee-34_thumb[2][2] tmpeeee-34_thumb[2][2]](http://what-when-how.com/wp-content/uploads/2012/06/tmpeeee34_thumb22_thumb.png)
