Preparation for Crutch-Walking
A number of things can be done in preparation for the use of crutches. The nurse can assist the client with various exercises, aimed at strengthening and conditioning the upper body. While the client sits with the arms extended downward, show him or her how to press the palms down on the bed to exercise the arm muscles or how to lie on the stomach and do bed push-ups. Short crutches are sometimes used, so the client can practice and build strength while still in bed. Push-ups can also be done in a wheelchair.
Clients may be given instruction from the Physical Therapy (PT) department in the use of light hand weights and in various crutch-walking gaits. After the initial teaching, nurses are often responsible for helping the client to practice and master crutch-walking. If a physical therapist is unavailable, nurses do the initial teaching as well. This teaching includes learning a safe and comfortable crutch-walking gait, as well as learning how to go up and down stairs. Documentation of all client teaching is vital.
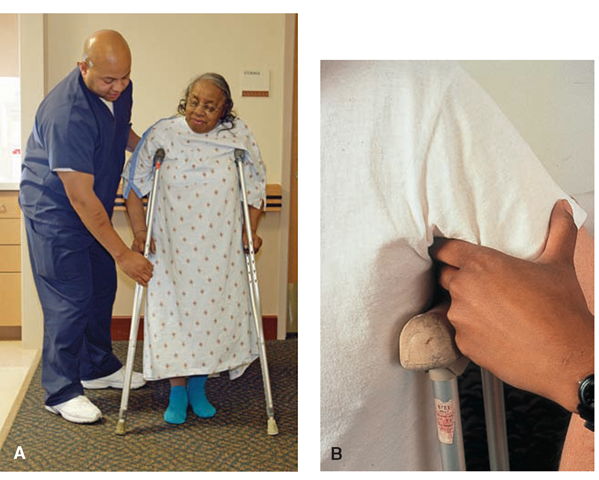
FIGURE 48-13 · (A) Support the client until she is secure and safe in using crutches. (B) Fitting crutches to the client. Crutches should be adjusted so the client’s weight is borne on the hands. The crutch pads should not touch the axillae, and no weight should be borne on the tops of the crutches.
Weight-Bearing Restrictions
The primary care provider determines how much weight the client can safely bear on the legs. In some cases, the client cannot put any weight on an injured leg or hip (which is considered non-weight-bearing). In other cases, the client may be partially or totally weight-bearing on one or both legs. Crutches are also used to support full-weight-bearing as a safety measure. It is important for the nurse to explain these restrictions and the underlying reasons to the client. (Usually, a leg is considered non-weight-bearing if a fracture is not totally immobilized or is not healing well.)
Crutch-Walking Gaits
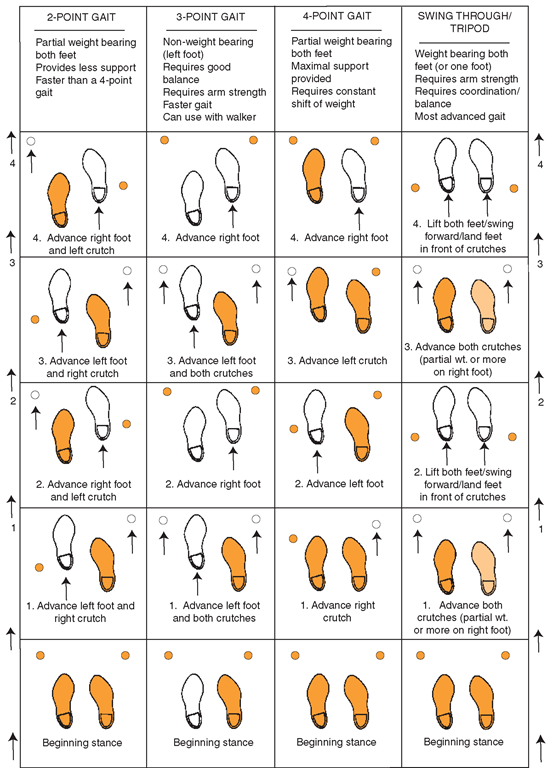
The client’s strength and type of disability are guides to the best possible crutch-walking gait or style of walking (Fig. 48-14). The client should use the muscles and joints as much as possible. A healthcare provider and a physical therapist will determine the gait that is best for each client to use.
• In two-point gait, the client is partially weight-bearing on both legs. (A crutch and the opposite leg are considered one “point.” The other crutch and leg are the second “point.”) The client puts his or her body weight on one leg and on the contralateral (opposite side) crutch. The client then brings the other crutch and leg forward together, and shifts the weight to them. This gait is faster and more like walking than the others, and the client can change the gait as muscle power improves. This gait is used following spinal cord injury; when both legs have about the same strength; and when a client is learning to walk again.
• In three-point gait, each crutch and only one leg support weight. (Each is considered a “point.”) The other leg is non-weight-bearing. The person moves the non-weight-bearing leg and both crutches forward together, balancing the weight on the unaffected leg, while supporting the weight on the crutches and weak leg. He or she then steps forward with the weight-bearing leg. Steps should be of equal length and timed so that no pauses occur. This gait is best when one leg is disabled and the other is strong enough to bear all the client’s weight. This gait keeps most or all of the weight off the weak leg. However, sometimes the client may place a small amount of weight on the weak leg if partial weight-bearing is allowed. This gait is one means of strengthening the weak leg without endangering the client.
• In four-point gait, each crutch and each leg move separately. (Each of the four “points” supports weight.) The client places one crutch forward, and then advances the contralateral foot; he or she then brings the second crutch forward, and the other foot follows. Rhythmic, short, and equal steps are important. Counting helps to develop rhythm: one, right crutch forward; two, advance left foot; three, left crutch forward; four, advance right foot. This gait is the easiest and the safest to use (the client always has three points of support). The client must be able to bring each leg forward and clear the floor with each foot. Those who are partially paralyzed, have fractures of both legs, or have arthritis often can safely use this gait.
• In swing-through or tripod gait, the client stands on the strong leg, moves both crutches forward the same distance, rests his or her weight on the palms, and swings forward slightly ahead of the crutches. The client then rests the weight again on the good leg and balances for the next step. Because this gait is fast, the client should learn to balance before attempting it. This gait is often used following a fracture, when no weight-bearing is allowed on one leg. It also is used following amputation, when the prosthesis is not in place (particularly for young people). The client who is allowed to put weight on only one leg must hold up the other leg, bending the knee (not bending at the hip). Rationale: It is important to prevent hip contracture, which can occur rapidly. A contracture is an abnormal shortening of muscles, which can lead to permanent deformity. This technique also improves balance. Bending the knee is tiring, and the client should rest frequently with the leg elevated. In some cases, a strap is applied to hold the affected leg up.
FIGURE 48-14 · Crutch-walking gaits. Shaded areas indicate weight-bearing. Arrow indicates to advance foot or crutch. (The illustration of each gait begins at the bottom of the picture.) All gaits begin in the "tripod” position, with each crutch and both feet being the three points of the tripod.
Climbing Stairs
When going up stairs, the client holds the handrail on the unaffected side, if one is available. Both crutches are held on the affected side. The stronger leg advances up the first step, with the client’s weight on the crutches and the handrail. Then, the affected leg and the crutches move up to the same step, while the weight is on the stronger leg and the handrail. Rationale: In this way, the client’s weight is borne either by the crutches and the handrail or by the stronger leg and the handrail. The handrail provides added safety and support. When descending stairs, the client reverses this process.
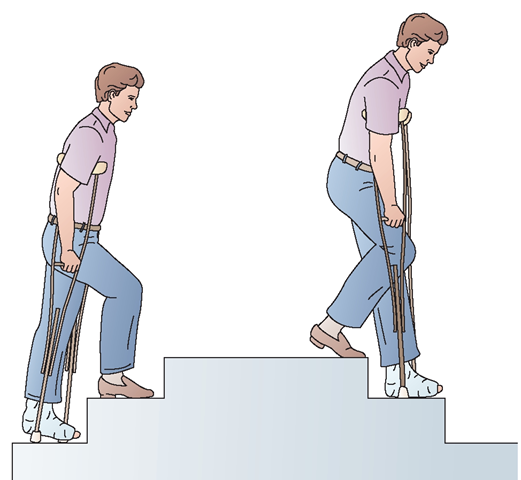
If no handrail is available, climbing stairs is more difficult and dangerous. In this case, as shown in Figure 48-15, one crutch is held in each hand. The affected leg and the crutches move together as a unit, with the strong leg doing the work of climbing. Excellent balance and a fair amount of strength are necessary to climb stairs using crutches when no handrail is available.
Nursing Alert Adequate teaching is vital.
The physical therapist and the nurse bear increased liability if the client does not receive adequate instruction and supervised practice. All instruction must be carefully documented.
Using One Crutch
When the client progresses to using only one crutch, he or she places the crutch on the side of the stronger leg (contralateral to the injury or weakened leg). When the affected leg moves forward, the crutch naturally swings forward with the contralateral hand. In this way, the weight is either on the stronger leg or on the crutch combined with the affected leg at all times.
FIGURE 48-15 · Stair climbing with crutches can be difficult. Balance must be maintained to prevent falls. Step “up with the good”; step "down with the bad.”
Key Concept A number of other special household modifications and pieces of special equipment are described in connection with rehabilitation.
The Client Lift
A client lift is a mechanical device that elevates and transfers immobile clients to and from the bed, stretcher, wheelchair, tub, or toilet.
The mechanical lift assists the nurse to lift a client who would otherwise be too difficult to move or who would be harmed if lifted in the conventional manner. Some lifts have a high load capacity and can handle unusually large clients. Lifts are usually attached to a swivel bar and work much like a car jack, although other mechanisms are also available.
Nursing Alert When using any lift, be sure you have had instruction in its operation. If you are unsure, request assistance. At least two people should carry out a transfer using the mechanical lift. It is also important to consider any equipment attached to the client, such as a catheter or IV, before attempting to move the client. All slings or mats must be disinfected between uses or kept for one client only.
Types of Lifts
Several models of lifts are available.
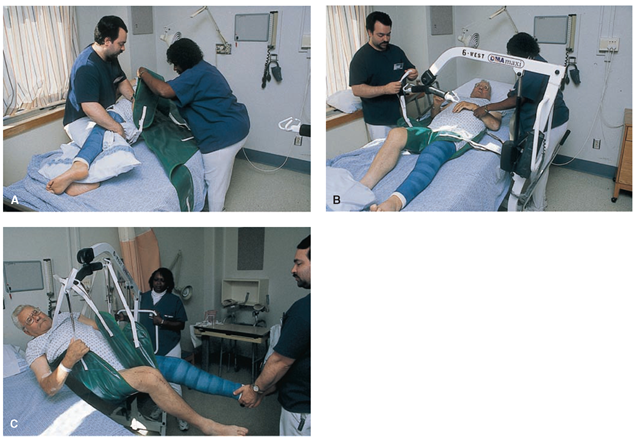
The sling lift (often called the Hoyer lift) is equipped with a special sling that is placed under the client and supports the client’s body in more of a sitting position when lifted (Fig. 48-16). When using this lift, be sure to support the client’s head and any heavy casts or equipment, if necessary.
The E-Z Lift is another type of sling lift. It has a special sling that does not require placement under the client. The sling is placed behind the client’s back, the client’s legs are lifted one at a time, and the wings of the sling placed under the legs. After the sling has been attached to the lift, the client is lifted. (The client’s buttocks will be out of the sling when lifted.) This lift has a capacity of 600 pounds (273 kg), and the legs of the lift can be spread to allow for a wider base of support. The legs of the lift can also be spread wide enough to fit around a wheelchair.
The E-Z Stand is a stand-assist lift that helps to transfer a partially weight-bearing client. It contains a harness that helps support the client when he or she is standing. It works in much the same manner as other types of lifts, except the client is standing.
The supine lift moves the client in a supine (lying down) position and keeps the client flat. This provides support from head to foot. It is used for clients who cannot support their heads or for some clients with burns or other trauma who would be injured by sitting up.
In areas such as the Rehabilitation Department, each room may be equipped with a ceiling lift. This lift is attached to the ceiling above the client’s bed. It operates much the same as the other lifts described above.
FIGURE 48-16 · A hydraulic lift. At least two people should be in attendance when a client is to be moved using a hydraulic lift. The lift should be kept over the bed as much as possible (to provide safety, in case the sling releases accidentally). (A) The device is equipped with a special sling that supports the client’s body and holds it in alignment while he or she is being moved. The client is rolled to the side to place the sling under his body. (B) The sling is attached to a swivel ban One part of the sling holds the client’s back and buttocks. The other part is secured between the client’s legs, to prevent him from slipping forward. (If the client cannot hold up his head, another sling is available to hold the head.) (C) The lift is pressure-driven and works much like a car jack as the lever is pumped. As you lift the client from one surface to another, the sling holds his or her body securely. (The heavy leg cast is supported by the nurse during the transfer) When the next surface is reached, pressure is released and the client is lowered to the new surface. The client can assist by holding onto the sling. This also promotes the client’s self-esteem and provides a feeling of security while being transferred.
The HoverMatt is an expensive device, but it provides for easy movement of clients from one horizontal surface to another. It can also be used to move a client up in bed. It has holes on the bottom surface and is inflated when needed. It then operates like an airfoil, creating a layer of air between the HoverMatt and the mattress or stretcher. This decreases the friction and reduces the amount of weight to be moved by 90%. The mat remains under the client and is inflated when the client is to be moved. Handles on the sides allow staff to easily move even very large clients from place to place.
Key Concept Clients are often classified according to the amount of assistance required to transfer:
• Independent—the client is able to transfer safely and to move about without assistance. There is no recent history of falling and the physical condition will not be endangered if the client moves about.
• One-person assist—the client is able to transfer or ambulate, but may be confused at times or may require minimal assistance. The client is able to perform at least three-fourths of the task. A transfer belt is used in this case.
• Two-or-more-person assist—the client is able to bear some weight, but is unsteady when walking. This person can follow simple instructions, but is confused at times. This assist device is also used when the person’s ability to transfer is unknown. A transfer belt or client lift is used in this case, depending on the client’s abilities.
• Total lift—this client is unable to transfer or ambulate without assistance or is unable to assist with transfer. This patient is mentally or physically unable to safely transfer This category also applies to any client who must be lifted from the floor
Nursing Alert If a client must be transferred from place to place in a hospital bed, two persons are required. If a large bariatric bed is used, at least three persons are required.
MOVING THE CLIENT WHO IS PARTIALLY PARALYZED
Paraplegia
The person with paraplegia is paralyzed from the waist area down. This person has limited or no ability to move the legs, but is usually able to build up adequate arm strength. When assisting this person with a transfer, the nurse will need to move the client’s legs, but the client can help lift with his or her arms. The client can assist by grasping the arms of the chair (client’s left hand—left arm of chair; client’s right hand—right arm of chair). Usually, with minimal assistance, the client can use the arms to swing his or her buttocks into the chair. A transfer board may be used. The nurse moves the legs into position as the client moves the buttocks. If the client is not skilled enough or strong enough to move the upper part of the body, two nurses will usually be needed to complete this transfer safely. If the client cannot stand, the nurse braces the client’s knees (see In Practice: Nursing Procedure 48-7).
Hemiplegia
The person with hemiplegia is paralyzed on one side of the body. This is often the result of a cerebrovascular accident (stroke). To help this client to move into a chair, help the client move to the side of the bed. It is best to work on the client’s strong side. The client is assisted to swing around so the feet are on the floor. Then, the client is assisted to stand on the stronger leg, with the nurse supporting the client on the weaker side. The client is pivoted around in front of the chair and holds the arm of the chair with the stronger arm. Then, the client is gently eased into the chair.
Key Concept Make use of the client’s abilities as much as possible.This helps the nurse and builds the client’s confidence and self-esteem.
MOVING AN IMMOBILE CLIENT
Moving a totally immobile client is difficult and usually requires at least two people, particularly if the client is heavy. It is important to use common sense in moving any client. If the nurse has any question or doubt about moving a client, it is vital to seek assistance. A transfer board or lifting sheet may be used during the move. The use of a client lift or device such as the HoverMatt is often recommended if there is any question.
Nursing Alert In some healthcare facilities, no staff persons are allowed to lift clients. In this case, a mechanical device must be used for all transfers. Some facilities have a “lift team” consisting of staff persons who assist in lifting clients throughout the facility Check the requirements and protocols of your facility before assisting any clients to transfer
Using the Transfer Board or Bridge
A transfer board (sliding board or bridge) may be used for the client who is unable to stand. The board is made of hard plastic and is approximately /2 to /4 inch thick and long enough to reach from the side of the bed to a chair. It is about 1 to 1/2 feet wide. It is lightweight and has handholds on the sides, making it easy to handle. The board’s surface is smooth and allows for ease in sliding the person. Using the board to transfer clients protects them from injury brought about by stretching or pulling on their limbs and reduces the chance that a client will fall. It also conserves the nurse’s energy and prevents injury. Explain to the client what will be done and how he or she can help.
Nursing Alert Whenever you use a transfer/ sliding board, make sure that there are linens between the client and the board. Many clients, particularly older people, have very friable (fragile) skin. If the skin is not protected, the client could be injured by the shearing force of being moved across the board.
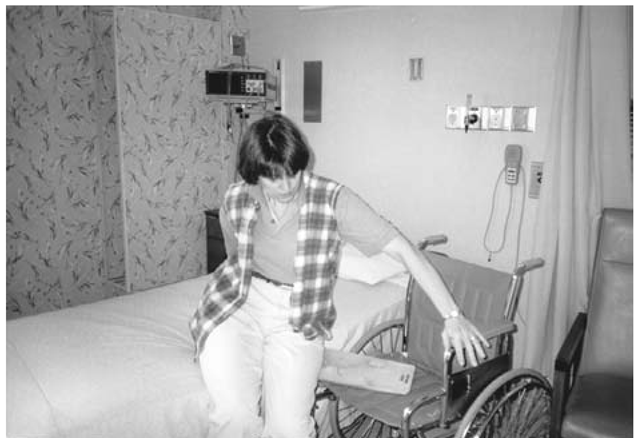
FIGURE 48-17 · This woman is able to transfer herself independently from bed to chair and back with the use of a transfer board. The right arm rest is removed from the wheel chair, to facilitate transfer.
Using the Transfer Board (Transfer Sled) Without Assistance
In some cases, particularly if a client has been disabled for some time and has built up arm strength, the transfer from bed to chair can be made independently, with the use of a transfer board, also called a transfer sled (Fig. 48-17). This requires a fair amount of practice. The nurse should supervise this client until it is evident that he or she can perform the transfer safely.
Nursing Alert The transfer board can also be used as a backboard in an emergency Place it under the client to provide a firm surface for CPR. (Transfer boards can also be used to move injured clients in an emergency evacuation or in a rescue situation.)
Moving the Client With a Lifting Sheet
If a transfer board or client lift is not available, it is possible to transfer a client using only a lifting sheet. It may require several people. The lifting sheet is placed under the client, and the client is lifted, instead of being slid across a transfer board (Fig. 48-18). One or two nurses can also use a lifting sheet to move a client to the side of the bed, up in bed, or down in bed.
This method helps to prevent sheet burns, shearing of tissue, or irritation to the client caused by being pulled across the bed linens. It also helps to prevent client injury, which may be caused by pulling on the client’s shoulders or by nurses placing their hands under the client’s body. This procedure also saves back strain and injury to nurses. (Special care is necessary, particularly to guard against injuring the older or very ill person.) In Practice: Nursing Procedure 48-11 outlines the steps for using the transfer board or bridge and a lifting sheet to move a client from bed to a wheelchair or chair.
