In This Chapter
Attaching and using an SLR lens
Adjusting the viewfinder to your eyesight
Selecting from menus
Working with memory cards
Getting acquainted with your camera
Customizing basic operations
I still remember the day that I bought my first SLR film camera. I was excited to finally move up from my one-button point-and-shoot camera, but I was a little anxious, too. My new pride and joy sported several unfamiliar buttons and dials, and the explanations in the camera manual clearly were written for someone with an engineering degree. And then there was the whole business of attaching the lens to the camera, an entirely new task for me. I saved up my pennies a long time for that camera — what if my inexperience caused me to damage the thing before I even shot my first pictures?
You may be feeling similarly insecure if your Nikon D300s is your first SLR, although some of the buttons on the camera back may look familiar if you’ve previously used a digital point-and-shoot camera. If your D300s is both your first SLR and first digital camera, you may be doubly intimidated.
Trust me, though, that your camera isn’t nearly as complicated as its exterior makes it appear. With a little practice and the help of this chapter, which introduces you to each external control, you’ll quickly become as comfortable with your camera’s buttons and dials as you are with the ones on your car’s dashboard. This chapter also guides you through the process of mounting and using an SLR lens, working with digital memory cards, navigating your camera’s menus, and customizing basic camera operations.

Looking at Lenses
One of the biggest differences between a point-and-shoot camera and an SLR (single-lens reflex) camera is the lens. With an SLR, you can swap out lenses to suit different photographic needs, going from an extreme close-up lens to a super-long telephoto, for example. In addition, an SLR lens has a movable focusing ring that gives you the option of focusing manually instead of relying on the camera’s autofocus mechanism.
Digital SLR lenses are incredibly complex pieces of optical equipment. I don’t have room in this topic to go into a lot of detail about the science of lenses, nor do I think that an in-depth knowledge of the subject is terribly important to your photographic success. But the next few sections share a couple of tidbits that may be of help when you’re first getting acquainted with your lens, shopping for lenses, or trying to figure out whether the bag of old lenses you inherited from your uncle Ted or found on eBay will work with your D300s.
Checking lens compatibility
You can mount a wide range of lenses on your D300s. But some lenses aren’t fully compatible with all camera features. For example, with some lenses, you can’t take advantage of the autofocusing system and must focus manually instead.
Your camera manual has a complete listing of all the lens types that can be mounted on the D300s and explains what features are supported with each type. But for maximum compatibility, look for these types: Type D or G AF Nikkor, AF-S Nikkor, or AF-I Nikkor. (The latter is an older, expensive professional lens that is no longer sold but might be available on the resale market.)
All the aforementioned lens types (as well as some others) offer CPU (central processing unit) technology, which allows the lens to talk to the camera. This feature is critical to getting maximum performance from the autofocus-ing system, exposure metering system, and so on. That’s not to say that you can’t use a non-CPU lens; you just lose the option of using some camera features. An option on the Setup menu helps you get the most functionality possible with a non-CPU lens; check out the section “Cruising the Setup menu,” toward the end of this chapter, for details.
The information in this topic assumes that you are using a CPU lens that supports all the camera’s functions. If your lens doesn’t meet that criteria, be sure to check the camera manual for specifics on what features are unavailable or need to be implemented differently.
Factoring in the crop factor
Every lens can be characterized by its focal length, which is measured in millimeters. Focal length determines the camera’s angle of view, the apparent size and distance of objects in the scene, and depth of field (how much of the scene can be rendered in sharp focus).
According to photography tradition, a focal length of 50mm is described as a “normal” lens. Most point-and-shoot cameras feature this focal length, which is a medium-range lens that works well for the type of snapshots that users of those kinds of cameras are likely to shoot. A lens with a focal length under 35mm is characterized as a wide-angle lens because at that focal length, the camera has a wide angle of view and produces a large depth of field, making it good for landscape photography. A short focal length also has the effect of making objects seem smaller and farther away. At the other end of the spectrum, a lens with a focal length longer than 80mm is considered a tele-photo lens and often referred to as a long lens. With a long lens, angle of view narrows, depth of field decreases, and faraway subjects appear closer and larger, which is ideal for wildlife and sports photographers.
It’s important to know, however, that when you mount a lens on the D300s, the angle of view is different than the lens’ stated focal length. This variation, which holds true for most digital cameras, occurs because of the difference in size between a 35mm film negative — the standard around which lens focal lengths are measured — and the size of an image sensor, which is the light-sensitive component of a digital camera.
With a D300s, the effective angle of view is equivalent to that produced by a focal length about 1.5 times the actual focal length. For example, a 50mm lens on the D300s produces the same angle of view as a 75mm lens on a 35mm film camera. (50 x 1.5 = 75.)
The end result is the same as if you shot a photo with your film camera and then cropped away some of the perimeter, as illustrated in Figure 1-1. For this reason, the value used to calculate the effective angle of view — 1.5 on the D300s, but it varies from camera to camera — is sometimes called a camera’s crop factor. You may also see this value referred to as the lens multiplier.

Figure 1-1: Like most dSLR image sensors, the one on the D300s can’t capture the entire angle of view that the lens can “see” when mounted on a 35mm film camera.
Although the area the lens can capture changes when you move a lens from a 35mm film camera to a digital body, depth of field isn’t affected, nor are the spatial relationships between objects in the frame. So when lens shopping, you gauge those two characteristics by looking at the stated lens focal length — no film-to-digital conversion math is required.
Getting shake-free shots with vibration reduction (VR) lenses
Some Nikon lenses, including the one featured in this topic, offer a feature called vibration reduction. On Nikon lenses, this feature is indicated by the initials VR in the lens name. If you use a non-Nikon lens, the feature may go by another name: anti-shake, vibration compensation, and so on.
Whatever the name, the feature attempts to compensate for small amounts of camera shake that can occur when you handhold your camera and use a slow shutter speed, a lens with a long focal length, or both. Even a small amount of camera movement can produce blurry images, so vibration reduction is a definite Good Thing. Although it can’t work miracles, it does enable most people to capture sharper handheld shots in many situations than they otherwise could. Note that VR is only designed to avoid the blur caused by camera movement, though; if your subject is moving, it may appear blurry due to a too-slow shutter speed. You can explore that issue in Chapter 5.
Here are the basics you need to know about using vibration reduction with Nikon lenses:
For handheld shooting, set the VR switch to the On position, as shown in Figure 1-2. Now vibration reduction will engage whenever you press the shutter button halfway as well as just after you press the button all the way to take the picture. You may notice some slight movement of the scene in the viewfinder while the VR mechanism does its thing.
Check your lens manual for recommendations about disabling VR for tripod shooting. When you use a tripod, vibration reduction can have detrimental effects because the system may try to adjust for movement that isn’t actually occurring. So for some of its VR lenses, Nikon recommends setting the switch to the Off position for tripod shooting, assuming that the tripod is “locked down” so the camera is immovable. Some lenses offer a tripod-detection feature, however, that is specially designed for tripod shooting. To get the specifics for your lens, dig out your lens manual.
If you use a non-Nikon lens, check your lens manual to find out whether the manufacturer recommends disabling the anti-shake feature for tripod shooting and whether the lens offers a choice of vibration-reduction modes. Also,
some lenses have additional options that switch between different types of stabilization (the switch may be called Active/Normal or something similar); again, refer to the lens manual for specifics.
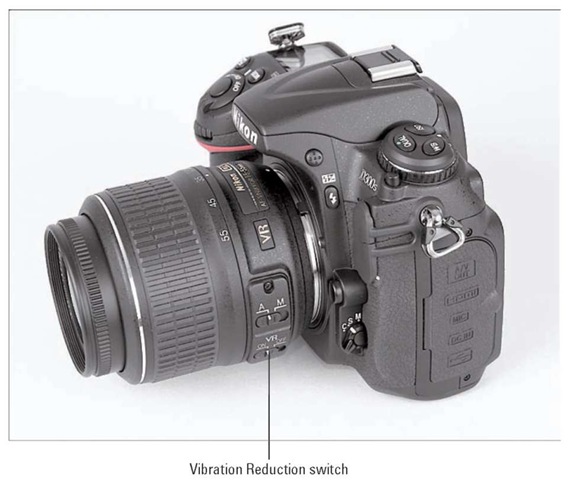
Figure 1-2: Vibration reduction can enable you to get sharper handheld shots.
Attaching and removing lenses
Whatever lens you choose, follow these steps to attach it to the camera body:
1. Remove the cap that covers the lens mount on the front of the camera.
2. Remove the cap that covers the back of the lens.
3. Hold the lens in front of the camera so that the little white dot on the lens aligns with the matching dot on the camera body.
Official photography lingo uses the term mounting index instead of little white dot. Either way, you can see the markings in question in Figure 1-3.
The figure (and others in this topic) shows you the D300s with an 18-55mm AF-S VR Nikon lens. If you buy a lens from a manufacturer other than Nikon, your dot may be red or some other color, so check the lens instruction manual.
4. Keeping the dots aligned, position the lens on the camera’s lens mount.
When you do so, grip the lens by its back collar, not the movable, forward end of the lens barrel.
5. Turn the lens in a counterclockwise direction until the lens clicks into place.
To put it another way, turn the lens toward the side of the camera that sports the shutter button, as indicated by the red arrow in the figure.
6. On a CPU lens that has an aperture ring, set and lock the ring so the aperture is set at the highest f-stop number.
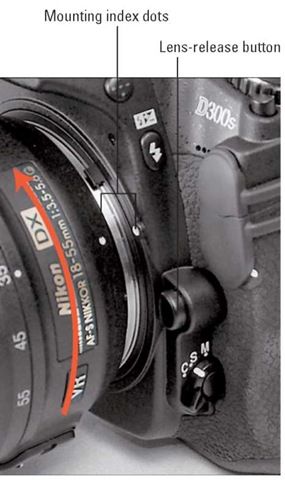
Figure 1-3: When attaching the lens, align the index markers as shown here.
Check your lens manual to find out whether your lens sports an aperture ring and how to adjust it. To find out more about apertures and f-stops, see Chapter 5.
To detach a lens from the camera body, take these steps:
1. Locate the lens-release button, labeled in Figure 1-3.
2. Press the lens-release button while turning the lens clockwise (away from the shutter button) until the mounting index on the lens is aligned with the index on the camera body.
Again, the mounting indexes are the little guide dots labeled in Figure 1-3. When the dots line up, the lens should detach from the mount.
3. Place the rear protective cap onto the back of the lens.
If you aren’t putting another lens on the camera, cover the lens mount with the protective cap that came with your camera, too.
Always attach and remove lenses in a clean environment to reduce the risk of getting dust, dirt, and other contaminants inside the camera or lens. For added safety, point the camera body slightly down when performing this maneuver; doing so helps prevent any flotsam in the air from being drawn into the camera by gravity.
Setting the focus mode (auto or manual)
In addition to the lens-related features covered in the preceding sections, make note of the following two controls, which you use to set the focusing method to manual or autofocusing:
‘ Lens focus mode switch: Assuming that your lens offers autofocusing as well as manual focusing, it likely has a switch that you use to choose between the two options. The switch might be labeled A/M, as shown in Figure 1-4, or AF/MF. Some lenses offer a setting called AF/M (or something similar), which enables you to set initial focus using autofo-cusing and then refine focus manually. (This feature is typically called autofocus with manual override.) Check your lens manual for specifics, and check the Nikon manual to confirm that your lens can autofocus with the D300s.
Your lens also has a focusing ring that you twist to bring the scene into focus when you use manual focusing. The placement of the focusing ring varies from lens to lens; Figure 1-4 shows the ring as it appears on the Nikon 18-55mm AF-S VR lens.
Focus mode selector: Also shown in Figure 1-4, this switch sets the camera’s internal focusing mechanism to manual focusing (M) or one of two autofocusing options (C and S).
Chapter 2 provides focusing basics; Chapter 6 details the myriad auto-focusing options on your camera and offers a few manual-focusing tips as well.
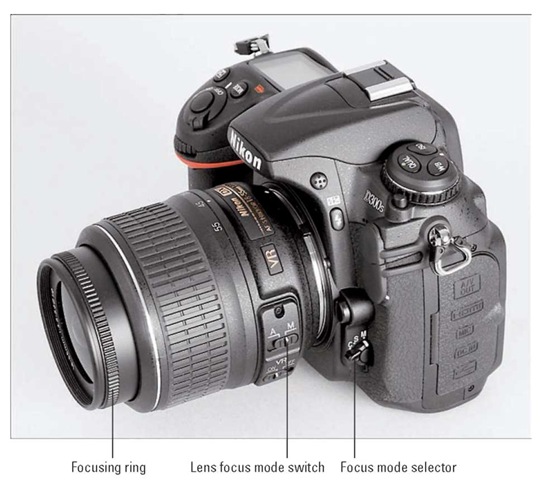
Figure 1-4: Set the focus mode both on the camera body and the lens.
Adjusting the Viewfinder Focus
Tucked behind the right side of the rubber eyepiece that surrounds the view-finder is a tiny dial called a diopter control. With this control, labeled in Figure 1-5, you can adjust the focus of your viewfinder to accommodate your eyesight.
If you don’t take this step, scenes that appear out of focus through the view-finder may actually be sharply focused through the lens, and vice versa. Here’s how to make the necessary adjustment:
1. Remove the lens cap from the front of the lens.
2. Look through the viewfinder and concentrate on the markings in the viewfinder frame, shown on the right side of Figure 1-5.
The markings relate to focusing, which you can read more about in Chapters 2 and 6. Depending on your selected focus options, you may see only the brackets and not the little rectangle in the middle of the frame.
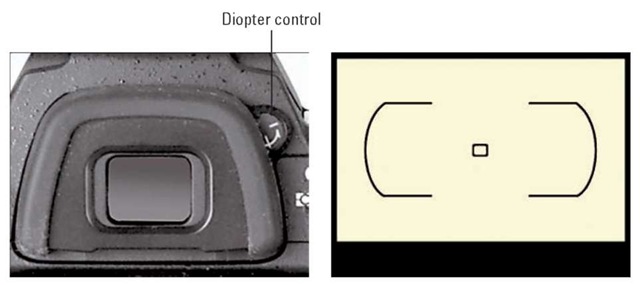
Figure 1-5: Use the diopter adjustment control to set the viewfinder focus for your eyesight.
3. Rotate the diopter adjustment dial until the viewfinder markings appear to be in focus.
The Nikon manual warns you not to poke yourself in the eye as you perform this maneuver. This warning seems so obvious that I laugh every time I read it — which makes me feel doubly stupid the next time I poke myself in the eye as I perform this maneuver.
Ordering from Camera Menus
You access many of your camera’s features via internal menus, which, conveniently enough, appear when you press the Menu button. Features are grouped into six main menus, described briefly in Table 1-1.
Table 1-1 D300s Menus
Table 1-1 (continued)
| Open This Menu . . . | to Access These Functions | |
 |
Retouch | Built-in photo retouching options |
 |
My Menu/Recent Settings | Your custom menu or 20 most recently used menu options |
After you press the Menu button, you see on the camera monitor a screen similar to the one shown in Figure 1-6. Along the left side of the screen, you see the icons shown in Table 1-1, each representing one of the available menus. The icon that is highlighted or appears in color is the active menu; options on that menu automatically appear to the right of the column of icons. In the figure, the Shooting menu is active, for example.
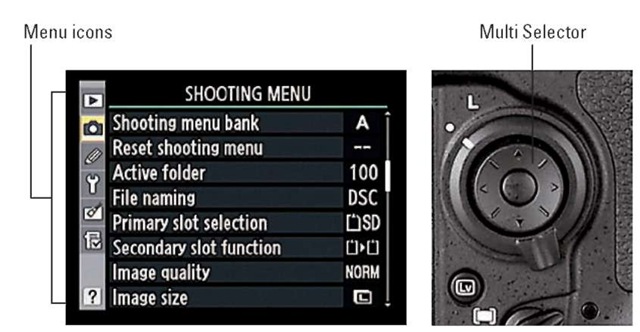
Figure 1-6: Use the Multi Selector to navigate menus.
I explain all the important menu options elsewhere in the topic; for now, just familiarize yourself with the process of navigating menus and selecting options therein. The Multi Selector, shown on the right in Figure 1-6, is the key to the game. Press the edges of the Multi Selector to navigate up, down, left, and right through the menus.
In this topic, the instruction “Press the Multi Selector left” means to press the left edge of the control. “Press the Multi Selector right” means to press the right edge, and so on.
Here’s a bit more detail about navigating menus:
Select a menu. Press the Multi Selector left to jump to the column containing the menu icons. Then press up or down to highlight the menu you want to display. Finally, press right to jump over to the options on the menu.
Select and adjust a function on the current menu. Again, use the Multi Selector to scroll up or down the list of options to highlight the feature you want to adjust and then press the OK button. Settings available for the selected item then appear. For example, if you select the Image Quality item from the Shooting menu, as shown on the left in Figure 1-7, and press OK, the available Image Quality options appear, as shown on the right in the figure. Repeat the old up-and-down scroll routine until the choice you prefer is highlighted. Then press OK to return to the previous screen.
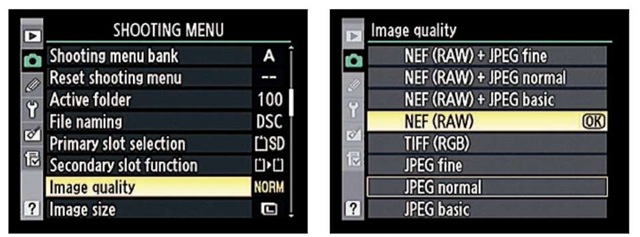
Figure 1-7: Select the option you prefer and press OK again to return to the active menu.
In some cases, you may see a right-pointing arrowhead instead of the OK symbol next to an option. That’s your cue to press the Multi Selector right to display a submenu or other list of options (although pressing OK usually works just as well).
In many cases, you can press the center button of the Multi Selector instead of the OK button to choose menu items. But that option doesn’t always work, so to keep things simple in this topic, I discuss just the OK button.
Create a custom menu or view your 20 most recently adjusted menu items. The sixth menu is actually two menus bundled into one. The My Menu screen, shown in Figure 1-8, enables you to create your own custom menu that contains your favorite options. Chapter 10 details the steps involved in making and using your menu.
Through the Choose Tab option on the menu, you can switch to the Recent Settings menu, shown on the right in the figure. This menu lists the 20 menu items you ordered most recently. So if you want to adjust those settings, you don’t have to wade through all the other menus
looking for them — just head to this menu instead. The Recent Settings screen also contains a Choose Tab option so that you can switch back to the My Menu screen at any time.
The menu icon changes depending on which of these two functions is active; Table 1-1 shows both icons.
Save collections of menu settings in banks. The D300s gives you the option of creating up to four banks to store different groupings of Shooting menu settings. You get another four banks for storing Custom Setting menu settings. The banks enable you to quickly change from settings designed for one type of picture to options that work better for a different subject. Chapter 10 explains the whole process; for now, just note that you can see which bank is active at the top of the respective menu and in the Information screen, as shown in Figure 1-9. Press the Info button to display the Information screen; see the next section for more details.
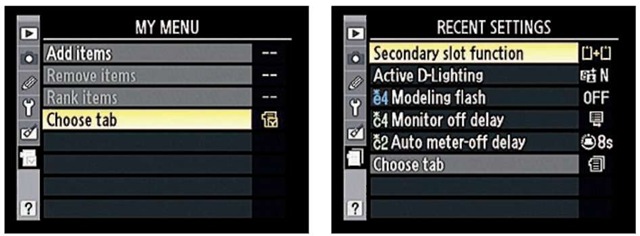
Figure 1-8: The My Menu screen lets you design a custom menu; the Recent Settings menu offers quick access to the last 20 menu options you selected.
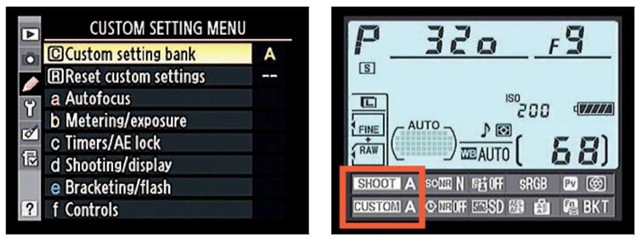
Figure 1-9: Check the menu or Information screen to see which banks are active.
Decoding the Displays
Your D300s gives you three ways to monitor the most critical picture-taking settings:
Control panel: The LCD panel on top of the camera offers an array of shooting data, as shown on the left in Figure 1-10. The data that appears depends on what camera features you’re currently using.
You can illuminate the panel temporarily by rotating the On/Off switch past the On position to the little light bulb marker, shown on the right in the figure, and then releasing the switch.
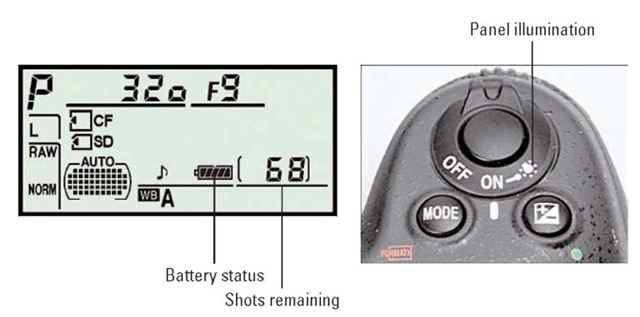
Figure 1-10: Rotate the On/Off switch to the light bulb position to illuminate the Control panel.
Information display: If your eyesight is like mine, making out the tiny type on the Control panel can be difficult. Fortunately, you can press the Info button to display the Information screen on the monitor. As shown in Figure 1-11, this screen displays the current shooting settings at a size that’s a little easier on the eyes. See the section “Customizing shooting and display options” for information on how to adjust the display colors. You can choose a bluish background with dark text, or as shown in this topic, a black background with light text. Like the
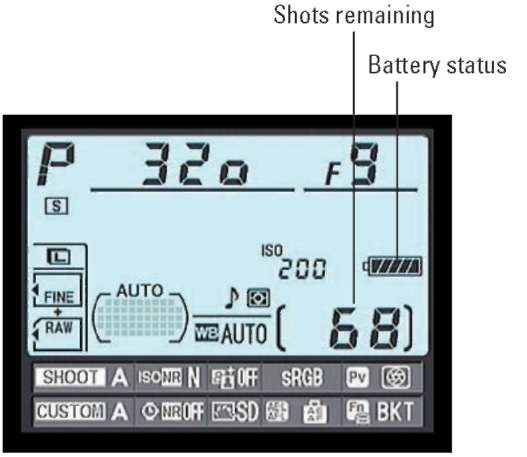
Figure 1-11: Press the Info button to view picture-taking settings on the monitor.
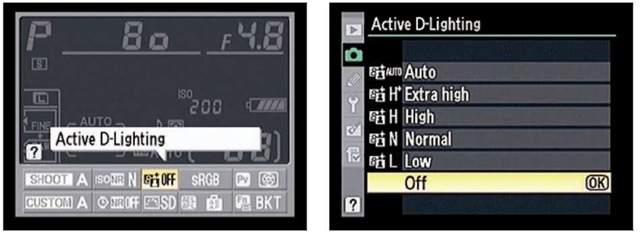
Figure 1-12: Press the Info button while the Information screen is displayed to gain quick access to the settings at the bottom of the screen.
Viewfinder: You can view some camera settings in the viewfinder as well. For example, the data in Figure 1-13 shows the current metering mode icon, shutter speed, f-stop, exposure mode ISO setting, and number of shots remaining. As with the other displays, the view-finder information that appears depends on what action you’re currently undertaking.
If what you see in Figures 1-10 through 1-13 looks like a big confusing mess, don’t worry. Many of the settings relate to options that won’t mean anything to you until you make your way through later chapters and
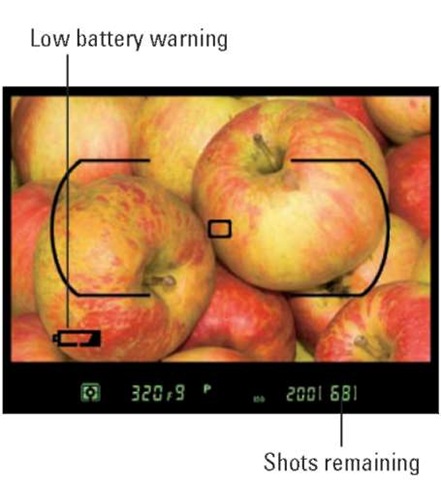
Figure 1-13: You also can view some camera information at the bottom of the viewfinder.
explore the advanced exposure modes. But do make note of the following two key points of data that are helpful even when you shoot in the fully automatic modes:
Battery status indicator: A full battery icon like the one in Figures 1-10 and 1-11 shows that the battery is fully charged; if the icon appears empty, go look for your battery charger. When the battery gets seriously low, a warning symbol appears in the viewfinder, as shown in Figure 1-13. You can disable the viewfinder warning if you like; see the section “Customizing shooting and display options” later in this chapter for details.
Pictures remaining: Labeled in Figures 1-10, 1-11, and 1-13, this value (68, in the figures) indicates how many additional pictures you can store on the current memory card.
The value is presented a little differently if the card can hold more than 999 pictures. The initial K appears next to the value to indicate that the first value represents the picture count in thousands. For example, 1.0K means that you can store 1,000 more pictures (K being a universally accepted symbol indicating 1,000 units). The number is then rounded down to the nearest hundred. So if the card has room for, say, 1,230 more pictures, the value reads as 1.2K.
When no card is installed in the camera, the symbol [-E-] appears in the shots-remaining area of the displays. See the next section for tips about installing and using memory cards.
Working with Memory Cards
Instead of recording images on film, digital cameras store pictures on memory cards. Your D300s can use two types of memory cards, both shown in Figure 1-14. The cards go into the slots hidden under the cover on the right side of the camera, as shown in Figure 1-15.
Always turn off the camera before inserting or removing memory cards to avoid potential damage to the card and the camera. And note these additional details about using and caring for your cards:
SD (or SDHC) cards: The smaller card slot accepts an SD card (for Secure Digital). You can also use the new, high-capacity Secure Digital cards, which are labeled SDHC, as well as Eye-Fi SD cards, which enable you to send pictures to your computer over a wireless network. (Because of space limitations, I don’t cover Eye-Fi connectivity in this topic; if you want more information about these cards, you can find it online at www.eye.fi.)
Place the card in the slot with the label facing the back of the camera, as shown in Figure 1-15. Push the card into the slot until it clicks into place; the memory card access light (circled in the figure) blinks for a
second to let you know the card is inserted properly. To remove the card, depress the memory card slightly until you hear a little click and then let go. The card should pop halfway out of the slot, enabling you to grab it by the tail and remove it.
That little switch labeled lock switch in Figure 1-14 enables you to lock your card, which prevents any data from being erased or recorded to the card. Press the switch toward the bottom of the card to lock the card contents; press it toward the top of the card to unlock the data.
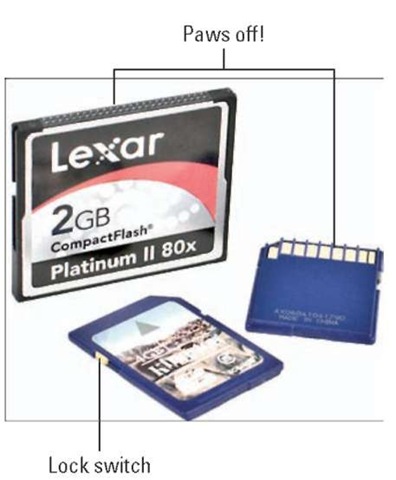
Figure 1-14: Your camera can use SD and CompactFlash cards.
CompactFlash (CF) cards (Type 1 only): The second slot accepts this type of card, which is larger and thicker than SD cards. The D300s can use only Type 1 CompactFlash cards, unlike its older sibling, the D300, which could use Type II CF cards as well as another media type called a MicroDrive.
Again, orient the card with the label facing the back of the camera, as shown in Figure 1-15. Push the card firmly into the slot until the little gray eject button, labeled in the figure, pops up. The access light will illuminate when the card is correctly inserted. To remove the card, depress the eject button. The card should pop partially out of the slot; grab the card and pull it the rest of the way out of the camera.
CompactFlash cards don’t have a locking switch like SD cards, but you can use the camera’s Protect feature, covered in

Figure 1-15: Insert cards with the labels facing the back of the camera.
Chapter 4, to prevent accidental erasure of photos stored on either CompactFlash or SD cards.
Try to avoid touching the card contact areas, highlighted in Figure 1-14. On an SD card, the gold area on the back of the card is the sensitive area; on a CompactFlash card, the little pinholes on the edge of the card comprise the danger zone. Always store cards in the protective cases they came in or in a memory card wallet after removing them from the camera. Keep cards away from extreme heat and cold as well.
Using two cards at the same time
You can put a memory card in each slot if you choose. If you do install both cards, you have three choices for how the camera feeds your photo and movie files to the cards:
Overflow: The camera fills up your preferred card and then automatically switches to the other one.
Backup: The camera records each picture or movie to both cards. This option gives you some extra security — should one card fail, you have a backup on the other card.
Raw Primary/JPEG Secondary: This option relates to the Image Quality option, which determines the file format of still photos. (Chapter 3 has details.) If you select an Image Quality setting that records the photo both in the RAW (NEF) format and the JPEG format, you can tell the camera to store all the RAW versions on one card and put the JPEGs on the other. If you select this option but use an Image Quality setting that captures only a single file type, the camera uses the Backup setting, sending a copy of the file to each card.
The Raw Primary/JPEG Secondary option gives you an easy way to get your pictures to someone who doesn’t have the time or knowledge to deal with RAW files, which must be processed using special software or the in-camera converter before they can be shared online, viewed in many consumer photo programs, or printed at retail sites. (Chapter 8 explains.) When you’re done shooting, just hand over the card containing the JPEG versions, which can be viewed, shared, and printed immediately. Of course, unless you’re really generous, you’ll ask that someone to supply the card or return it after downloading the pictures.
To set up your two-card system, visit the Shooting menu. First, select the card you want to use as the primary file destination, as shown in Figure 1-16. Next, select Secondary Slot Function to access the three options for using the backup slot, as shown in Figure 1-17.
A couple of other critical points about using two cards:
You can tell which secondary slot function is in force by looking at the Image Quality readout of the Information display, highlighted on the left in Figure 1-18. The little card symbols tell you what’s going where. The rectangular symbol represents the CompactFlash card; the symbol with the angled corner represents the SD card. In the figure, the symbols show that the camera is set up to send RAW files to the SD card and the JPEG versions to the CF card. (“Fine” represents one of three available settings for JPEG files, as covered in Chapter 3.) If you see the same file data for each card — for example, the word RAW appears in both cards — the Backup option is selected. And if the file type label appears in only one card, with the other card appearing empty, the Overflow option is selected.
When both cards are installed, symbols representing each card also appear in the Control panel, as shown on the right in Figure 1-18. Otherwise, only the symbol for the single installed card appears. You can’t glean anything about the primary and secondary card functions from this display, however.

Figure 1-16: Use this option to specify which of the two cards should be the primary storage closet for your pictures.
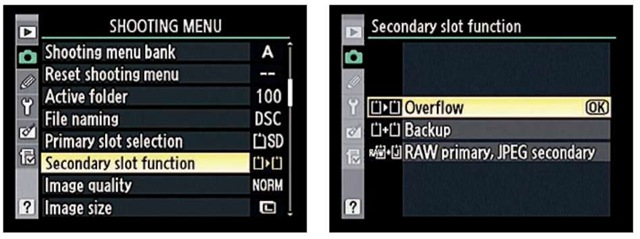
Figure 1-17: These options tell the camera how you want to make use of your second card.
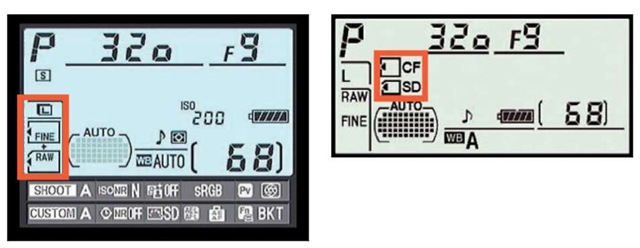
Figure 1-18: These symbols represent your memory cards.
The shots remaining value (68, in the figures) indicates how many more pictures you can store at your current picture-taking settings. When you set the second card to the Backup or RAW/JPEG option, this value is based on whichever card contains the least amount of free space. For the Overflow option, the value tells you the shots remaining for the primary card until you fill that card and then switches to indicate the amount of free space on the overflow card.
You can copy pictures from one card to another using an option on the Playback menu. For details on that feature plus other playback information, see Chapter 4.
Formatting cards
The first time you use a new memory card or insert a card that has been used in other devices, such as MP3 players or phones, you should format it. Formatting ensures that the card is properly prepared to record your pictures. Formatting after you download pictures to your computer is also a good idea. However, don’t use your computer’s file-management tools to format the card; the camera is better equipped to do the job.
Formatting erases everything on your memory card. So before formatting, be sure that you have copied any pictures or other data to your computer.
You can format a card in two ways:
Simultaneously press and hold the Mode and Delete buttons. See the little red Format labels next to the buttons? They’re reminders that you use these buttons to quickly format a memory card. Hold the buttons down for about two seconds, until you see the letters For blink in the Control panel on top of the camera, as shown in Figure 1-19.
After you press the buttons, the Control panel also displays the icon for the memory card that’s designated as your primary card and will be formatted if you go forward. If you have two cards installed in the camera, you can switch to the other card by rotating the main command dial. You also see the shots remaining value, which indicates how many pictures you can fit on the memory card at the current Image Quality and Image Size settings. (If the card contains any
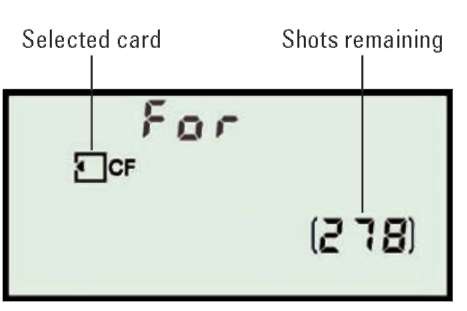
Figure 1-19: To format a memory card, press the Delete and Mode buttons until you see this message in the Control panel; then press both buttons again.
pictures, the number will grow after you complete formatting because those images will be erased.)
While the display is blinking, press and release both buttons again. When formatting is complete, the For message disappears, and the Control panel display returns to normal.
Choose the Format Memory Card command from the Setup menu.
When you select the command, you’re asked to select which card you want to format. After taking that step, you see a screen where you need to confirm your decision to format the card. Highlight Yes and press the OK button to go forward.
If you insert a memory card and see the letters For blink in the Control panel, you must format the card before you can do anything else.
Exploring External Camera Controls
Scattered across your camera’s exterior are a number of buttons, dials, and switches that you use to change picture-taking settings, review and edit your photos, and perform various other operations. In later chapters, I discuss all your camera’s functions in detail and provide the exact steps to follow to access them. This section provides just a basic road map to the external controls plus a quick introduction to each.
One note before you move on: Many of the buttons perform multiple functions and so have multiple “official” names. The Protect button, for example, is also known as the Help button. In the camera manual, Nikon’s instructions refer to these multi-tasking buttons by the name that’s relevant for the current function. I think that’s a little confusing, so I always refer to each button by the first moniker you see in the lists here.
Topside controls
Your virtual tour begins with the bird’s-eye view shown in Figure 1-20. There are a number of controls of note here:

Figure 1-20: Press and hold the Release Mode dial unlock button before rotating the dial.
Control panel: You can view many picture-taking settings on this LCD panel. See the earlier section “Decoding the Displays” for more info.
On/Off switch and shutter button: Okay, I’m pretty sure you already figured this combo button out. But remember that you can illuminate the Control panel by rotating the On/Off switch past the On position to the little light-bulb icon. Moving the switch to that position also activates the exposure meters. After you release the switch, the panel backlight and meters remain active for about six seconds or until you take a picture. You can also turn off the panel light by rotating the switch to the light-bulb position again.
Through options on the Custom Setting menu, you can change the delay time for the meter shutoff and also choose to display the Information screen along with lighting up the Control panel when you move the switch to the light-bulb position. See the section “Reviewing Basic Setup Options,” toward the end of this chapter, for details.
Mode button: You press this button while rotating the main command dial to select the exposure mode (P, S, A, or M). Chapter 2 introduces you to the P mode and Chapter 5 details the others. You also press the Mode button in conjunction with the Delete button to format a memory card, as explained earlier in this chapter.
Exposure Compensation button: When working in the camera’s three autoexposure modes (P, S, and A), you can apply an exposure-adjustment feature called Exposure Compensation by pressing this button while rotating the main command dial (the one on the back of the camera; refer to Figure 1-21). Chapter 5 explains. You also press this button along with the Qual button to reset the main picture-taking settings to their default options; see the end of this chapter for details. (The green dot by each button reminds you of their shared function.)
Release Mode dial: You use this dial to switch from normal shooting, where you take one picture with each press of the shutter button, to one of the camera’s other Release modes, including Self-Timer mode. A letter representing the selected mode appears at the bottom of the dial. For example, in Figure 1-20, the S (Single Frame) mode is selected. See the end of Chapter 2 for a look at all your options.
In order to rotate the dial, you must press and hold the little lock-release button found just above the dial and labeled in Figure 1-20.
Qual button: You can press this button while rotating the main command dial to quickly adjust the Image Quality setting, explained in Chapter 3. Pressing the button while rotating the sub-command dial (the one on the front of the camera) adjusts the Image Size setting, also covered in Chapter 3. And as mentioned a few sentences ago, you also use the Qual button with the Exposure Compensation button to restore the default options for the main picture-taking settings.
ISO button: Pressing this button while rotating the main command dial gives you a quick way to adjust the ISO Sensitivity setting, which determines the camera’s sensitivity to light. Chapter 5 discusses ISO.
WB button: The WB stands for white balance, which is a color-related feature covered in Chapter 6. You can access the basic white-balance options quickly by pressing this button while rotating the main command dial.
Flash hot shoe: A hot shoe is a connection for attaching an external flash head. The contacts on the shoe are covered by a little black insert, as shown in the figure; you need to remove it to attach your flash.
Should you ever need to know the exact distance between your subject and the camera, the focal plane position mark labeled in Figure 1-20 is key. The mark indicates the plane at which light coming through the lens is focused onto the negative in a film camera or the image sensor in a digital camera.
Basing your measurement on this mark produces a more accurate camera-to-subject distance than using the end of the lens or some other external point on the camera body as your reference point.
Back-of-the-body controls
Traveling over the top of the camera to its back side, shown in Figure 1-21, you encounter the following controls:
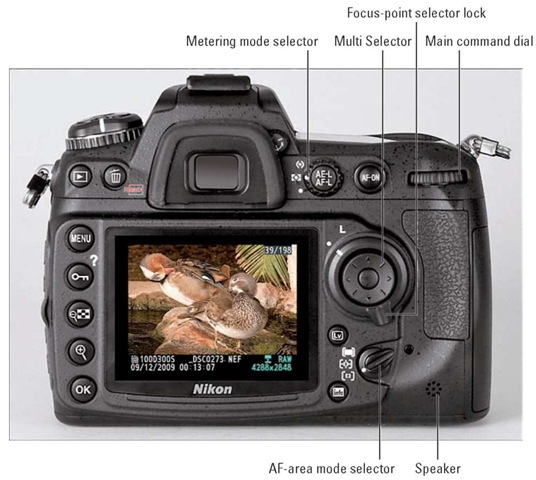
Figure 1-21: You use the Multi Selector to navigate menus and access certain other camera options.
Main command dial: After you activate certain camera features, you rotate this dial, labeled in Figure 1-21, to select a specific setting. For example, to choose a White Balance setting, you press the WB button as you rotate the main command dial. (Chapter 6 explains white balancing.)
AF-ON button: When taking still photos, you can press this button to set focus instead of pressing the shutter button halfway. See Chapter 6 for a discussion of the pros and cons of this option. The button also plays a focusing role when you take advantage of Live View shooting or record movies. See Chapter 4 for details about Live View shooting and movie recording.
Metering mode selector: Use this switch to select an exposure metering mode, which determines what part of the frame the camera considers when calculating exposure. Chapter 5 has details on this one as well.
AE-L/AF-L button: When you’re using automatic focus and exposure, you can lock in the current focus and exposure settings by pressing and holding this button. Chapter 5 explains. You can assign other functions to the button as well. Instructions in this topic assume that you stick with the default setting, but if you want to explore your options, see
Chapter 10.
Multi Selector: You press the outer edges of the Multi Selector left, right, up, or down to navigate camera menus. You press the center button to perform a variety of functions within menus as well as during shooting and playback. Chapter 10 explains ways to select which functions the center button performs, but again, stick with the default settings while you’re working with this topic.
Focus-point selector lock switch: This switch enables you to lock focus on a specific part of the frame when you use autofocusing. Chapter 6 provides the how-tos.
Live View button: You press this button to engage the Live View preview, which enables you to compose your shot using the monitor instead of the viewfinder. Switching to Live View mode is also the first step in recording a movie. Chapter 4 talks about both subjects.
AF-area mode selector: This switch also is related to customizing the camera’s autofocusing behavior. Again, look in Chapter 6 for further info.
Info: Press this button to activate the Information screen, which you can investigate in the earlier section “Decoding the Displays.”
Playback button: Press this button to switch the camera into picture review mode. Chapter 4 details the features available to you in this mode.
Delete button: Sporting a trash can icon, the universal symbol for delete, this button enables you to erase pictures from your memory card. Chapter 4 has specifics.
The little red Format label below the button reminds you that you can press this button together with the Mode button — which also sports the label — to quickly format a memory card. See the earlier section “Working with Memory Cards” for details.
Menu button: Press this button to access menus of camera options. See the next section for details on navigating menus.
Protect/Help button: This button serves two purposes:
Protect: In playback mode, pressing the button locks the picture file — hence the little key symbol that appears on the button face — so that it isn’t erased if you use the picture-delete functions. (The picture is erased if you format the memory card, however.) See Chapter 4 for details.
Help: You also can press this button to display helpful information about certain menu options. See “Asking Your Camera for Help,” later in this chapter, for details.
Zoom Out/Thumbnail button: In playback mode, pressing this button enables you to display multiple image thumbnails on the screen and reduces the magnification of the currently displayed photo. Note the minus sign in the magnifying glass icon — the universal symbol to zoom out. See Chapter 4 for a complete rundown of picture playback options.
Zoom In button: In playback mode, pressing this button magnifies the currently displayed image and also reduces the number of thumbnails displayed at a time. This time, the magnifying glass icon has a plus sign — plus for zoom in.
OK button: You press this button as the last step in many camera operations, such as selecting menu items and applying photo corrections from the Retouch menu.
As for the monitor, I show it in this topic without its protective plastic cover. But when the camera isn’t in use, it’s a good idea to keep the cover on to protect the screen from scratches and other damage.
Also note the tiny little speaker on the lower-right corner of the camera back. When you play movies that contain sound, the audio comes wafting through those little holes.
Front-left controls
On the front-left side of the camera body, shown in Figure 1-22, you find the following controls:
Flash button: Pressing this button pops up the camera’s built-in flash. Chapter 2 provides some flash basics; Chapter 5 goes into more detail. The little round bumps on the button help you to distinguish the button from its neighbor, described next, without taking your eye away from the viewfinder.
Flash mode/Flash Compensation button:
By pressing this button and rotating the main command dial, you can adjust the flash mode (normal, red-eye reduction, and so on). And by pressing the button and rotating the sub-command dial (found just below the shutter button), you can adjust the flash power. See Chapter 5 for help with both features.
Lens-release button:
You press this button before removing the lens from your camera. See the first part of this chapter for help with mounting and removing lenses.
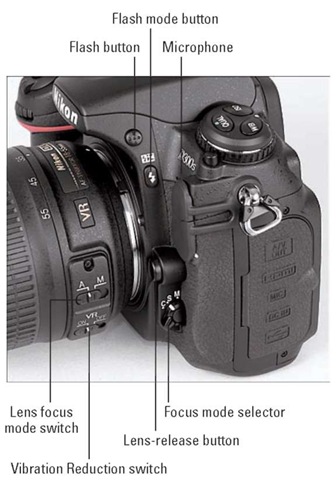
Figure 1-22: Press the Flash button to pop up the built-in flash.
Focus mode selector: This switch sets the camera to either manual focus mode (M) or one of two autofocus modes (S and C). See the earlier section “Setting the focus mode (auto or manual)” for a few more details; see Chapter 6 for the whole story.
Also note the three little holes right below the D300s label, just partially visible in the figure. These holes lead to the camera’s internal microphone, included for capturing sound when you record movies. Chapter 4 explains the art of movie making.
Front-right controls
Wrapping up the list of external controls, the front-right side of the camera offers the following features, labeled in Figure 1-23:
Sub-command dial: This dial is the counterpart to the main command dial on the back of the camera. As with the main dial, you rotate this one to select certain settings, usually in conjunction with pressing another button.
AF-assist/Self-Timer/Red-Eye Reduction lamp: In dim lighting, a beam of light sometimes shoots out from this little lamp to help the camera’s autofocus system find its target. In general, leaving the AF-assist option enabled is a good idea, but if you’re shooting at an event where the light from the lamp may be distracting, you can disable it through an option on the Custom Setting menu. Chapter 6 explains this and other autofocus features.
The lamp also lights before the shutter is released in Self-Timer mode and before the flash fires in Red-Eye Reduction flash mode. Chapter 2 offers more information about both of these features.
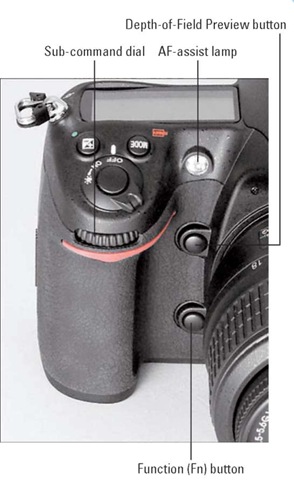
Figure 1-23: You can assign the Function button to perform a variety of operations.
Depth-of-Field Preview button: By pressing this button, you can see how different aperture settings affect depth of field, or the zone of sharp focus in your image. Chapter 5 explains aperture settings, and Chapter 6 delves into depth of field. Chapter 10 shows you how to assign a different function to the button.
Function (Fn) button: By default, pressing this button while rotating the main command dial or sub-command dial enables you to adjust settings related to autobracketing, covered in Chapter 5. Pressing the button by its lonesome displays those settings in the Control panel and Information screen.
As with the Depth-of-Field Preview button, you can change the operation that’s accomplished by pressing the button or pressing the button while rotating the command dials. Again, see Chapter 10 for the scoop.
Hidden connections
Hidden under little covers on the left and left front side of the camera, you find inputs for connecting the camera to various devices.
Under the two little rubber covers on the front-left side of the camera, shown in Figure 1-24, you find the following:
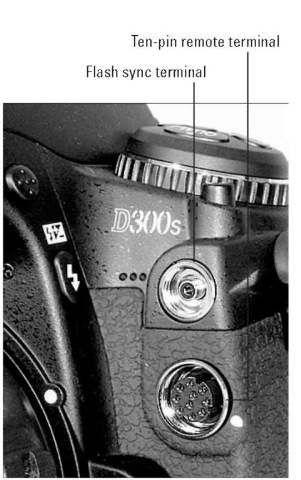
Figure 1-24: You can plug in an external flash cord, remote control, or GPS unit here.
Flash sync terminal: You can connect some external flash units to the camera via a cable, known as a sync cable, here. I don’t cover this type of flash in the topic, but Chapter 5 covers flash basics.
Ten-pin remote terminal: This terminal enables you to connect a variety of devices, including remote-control and GPS units. Again, the size of this topic doesn’t allow coverage of these accessories, but the device manuals should tell you everything you need to know.
Around the corner from the two terminals, open the cover on the left side of the body to reveal these connections, shown in Figure 1-25:
A/V and HDMI jacks: Use these to connect your camera to a television through a regular audio/video cable or high-def (HDMI) cable. The camera comes with the standard A/V cable; the HDMI cable is sold separately. Chapter 9 offers more details.
Stereo microphone jack: If you’re not happy with the audio quality provided by the internal microphone, you can plug in an external microphone here. The jack accepts a 3.5mm microphone plug. See Chapter 4 for all things movie-related.
AC adapter connection: Here’s where you plug in the optional AC power adapter.
USB port: You can connect your camera to your computer through this port, using the USB cable found in your camera box. Chapter 8 has details.
If you turn the camera over, you find a tripod socket, which enables you to mount the camera on a tripod that uses a /<-inch screw, plus the battery chamber. The other little rubber cover is related to the optional MB-D10 battery pack; you remove the cover when attaching the battery pack.
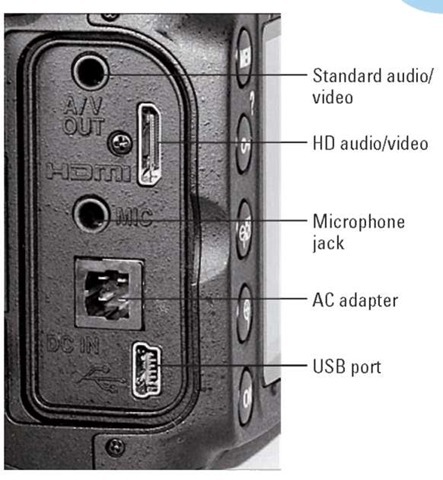
Figure 1-25: Open the cover on the side of the camera to reveal these connections.
Asking Your Camera for Help
Programmed into your camera’s internal software is a handy information help line — a great tool for times when you forget the purpose of a particular feature or would like a little picture-taking guidance.
If you see a small question mark in the lower-left corner of a menu, press and hold the Protect button to display information about the current shooting mode or selected menu option. (The little question mark symbol just above the button reminds you of this function.) For example, Figure 1-26 shows the Help screen associated with the Active D-Lighting setting. If you need to scroll the screen to view all the Help text, keep the button depressed and scroll by using the Multi Selector. Release the button to close the information screen.
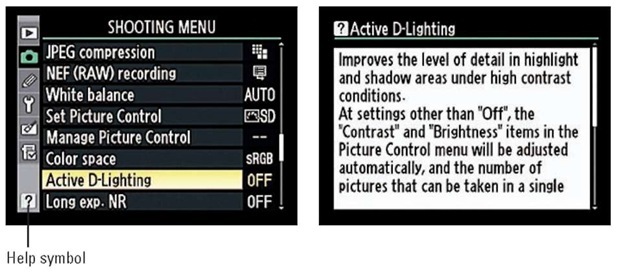
Figure 1-26: Press and hold the Protect button to display onscreen help.
Reviewing Basic Setup Options
Your camera offers scads of options for customizing its performance. Later chapters explain settings related to actual picture taking, such as those that affect flash behavior and autofocusing. The rest of this chapter details options related to initial camera setup, such as setting the date and time, adjusting monitor brightness, and the like.
Cruising the Setup menu
Start your camera customization by opening the Setup menu. Figure 1-27 shows you all the menu options; press the Multi Selector up and down to scroll from one screen to the next.
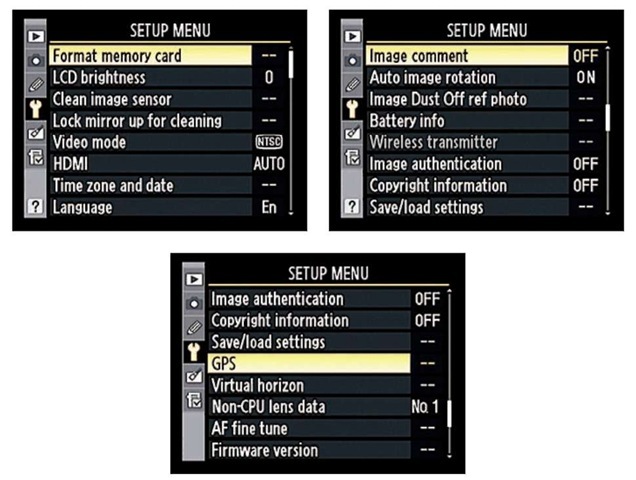
Figure 1-27: Visit the Setup menu to start customizing your camera.
Here’s a quick rundown of each menu item:
Format Memory Card: You can use this command to format your memory card, which wipes all data off the card and ensures that it’s properly set up to record pictures. Or, for quicker results, you can use the two-button formatting process outlined in the earlier section, “Working with Memory Cards.”
LCD Brightness: This option enables you to make the camera monitor brighter or darker. But if you take this step, what you see on the display may not be an accurate rendition of your image. Crank up the monitor brightness, for example, and an underexposed photo may look just fine. So I recommend sticking with the default setting (0). As an alternative, you can display the histogram, an exposure guide that I explain in Chapter 4, when reviewing your images.
Clean Image Sensor: Your D300s has an internal cleaning system designed to keep a filter that’s fitted on to the image sensor — that’s the part of the camera that actually captures the image — free of dust and dirt.
By choosing the Clean Image Sensor command, you can perform a cleaning at any time. Just choose the command, press OK, select Clean Now, and press OK again. You also can tell the camera to perform automatic cleaning every time you turn the camera on or off, only at startup, only at shutdown, or never; to do so, select Clean At Startup/Shutdown instead of Clean Now. Then press the Multi Selector right, highlight the cleaning option you prefer, and press OK.
Lock Mirror Up for Cleaning: This feature is necessary when cleaning the camera image sensor (or, technically, the aforementioned filter) — an operation that I don’t recommend that you tackle yourself because you can easily damage the camera if you don’t know what you’re doing.
If you want to use mirror lock-up to avoid camera shake when shooting long-exposure images, note that you do so through the Mirror Up setting on the Release Mode dial, explained in Chapter 2, and not this Setup menu option.
Video Mode: This option is related to viewing your images and movies on a television, a topic I cover in Chapter 9. Select NTSC if you live in North America or other countries that adhere to the NTSC video standard; select PAL for playback in areas that follow that code of video conduct.
HDMI: See Chapter 9 for information about this setting, which relates to options involved with connecting your camera to an HDMI (high-def) device.
Time Zone and Date: When you turn on your camera for the first time, it displays this option and asks you to set the current date and time. Keeping the date/time accurate is important because that information is recorded as part of the image file. In your photo browser, you can then see when you shot an image and, equally handy, search for images by the date they were taken.
On a related note: If you see the message “Clock” blinking in the Control panel, and you have already set the date and time, the internal battery that keeps the clock running is depleted. Simply charging the main camera battery and then putting that battery back in the camera sets the clock ticking again, but you need to reset the camera time and date.
Language: This option determines the language of text on the camera monitor. You have 17 choices, ranging from English to Swedish to Korean.
Image Comment: See Chapter 10 to find out how to use this feature, which enables you to add text comments into a picture file. You can view those comments during picture playback and when browsing photos in Nikon ViewNX, the software that shipped with your camera. The text does not appear on the image itself.
Auto Image Rotation: This option is one of two that determines whether pictures are rotated to the correct orientation (horizontal or vertical) in playback mode. Chapter 4 has details.
Image Dust Off Ref Photo: This feature enables you to record an image that serves as a point of reference for the automatic dust-removal filter available in Nikon Capture NX 2. I don’t cover this accessory software, which must be purchased separately, in this topic.
Battery Info: Select this option to view detailed information about your battery, as shown in Figure 1-28. The Bat Meter data shows you the current power remaining as a percentage value, and the Pic Meter value tells you how many times you’ve pressed and released the shutter button since the last time you charged the battery. The final readout, Battery Age, lets you know how much more life you can expect out of the battery before it can no longer be recharged. When the display moves toward the right end of the little meter, it’s time to buy a new battery.
The screen in Figure 1-28 shows the display as it appears when you use the regular camera battery. If you attach the optional battery pack, see its manual and the camera manual to find out how to interpret the data that’s reported.
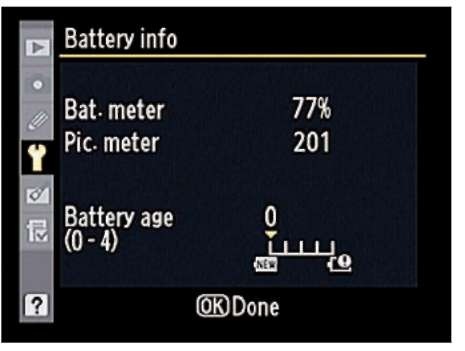
Figure 1-28: You can check the health of your battery via the Battery Info menu item.
Wireless Transmitter: If you purchase the optional WT-4 wireless transmitter to connect your camera to a wireless network, you can set up the connection through this menu option. As with other optional accessories, I must refer you to the product manuals for details, as the publisher absolutely refuses to let me turn this topic into a 10-inch-thick tome.
Image Authentication: This feature may interest you if you do the kind of work that demands that you can prove that a photo has not been altered. (Think crime-scene photographer or insurance-claims specialist.) When you turn this feature on, the camera embeds some invisible data into the file that tags the photo as the original. If the photo is later altered, that data reveals the change. Unfortunately, you need to buy Nikon’s Image Authentication software to detect and interpret the data; it costs about $650. I’m guessing that’s why the default setting for this option is Off.
Copyright Information: By following the steps in Chapter 10, you can add a hidden copyright notice to your photo files. The copyright data can then be read in some photo software, including the free browser software that ships with your camera (Nikon ViewNX).
Save/Load Settings: Through this feature, you can save a file that records the major menu settings and store the file on your memory card. (The camera manual contains a list of the settings that are preserved.) If you later want to use all those settings again, you just load the file from the memory card. This option is especially useful in a work situation where several photographers share the same camera — if you don’t like your co-worker’s settings, you can quickly load your own onto the camera.
The camera stores your settings in a file that has the name NCSETUP5. If you’re using two memory cards in the camera, the file goes on the one that’s selected as the primary card. Don’t change the filename, or you won’t be able to reload the settings later.
GPS: If you purchase the optional Nikon GPS tracking unit for your camera, this menu item holds settings related to its operation. This topic doesn’t cover this accessory, but the camera manual provides some help to get you started.
Virtual Horizon: Here’s a cool aid for shooting pictures that require your camera to be level with the horizon. When you turn this option on, the monitor displays a little gauge that acts sort of like a built-in level. When the camera is level to the horizon, the arrow at the top of the display turns green, as shown in Figure 1-29. (If the entire display is gray, without the little degree markers, the camera is tilted too far forward or backward for the system to do its thing.) Unfortunately, the display shows only on the monitor and not in the viewfinder, so it’s mostly of use when you’re shooting in Live View mode or setting up your camera on a tripod. However, you can display an alignment grid in the view-finder, an option covered a little later in this chapter.

Figure 1-29: The Virtual Horizon display helps you make sure the camera is level.
Non-CPU Lens Data: A CPU lens is equipped with technology that enables it to transmit certain data about the lens to the camera. That data helps the camera’s autofocusing and exposure systems work correctly. When you use a non-CPU lens, you lose access to certain D300s features. (Your manual spells them out.) But you can gain back a little of the lost functionality by “registering” your lens through this Setup menu option. You simply assign the lens a number — you can register up to nine non-CPU lenses — and then enter the maximum aperture and focal length of each lens.
The rest of this topic assumes that you are instead working with a CPU lens that supports all the camera’s features. Again, though, your camera manual offers additional help if you want to go the non-CPU route.
AF Fine Tune: If your focus always seems slightly off when you use autofocusing, you may be able to improve the situation through this feature. It enables you to create a custom focusing adjustment for up to 12 lens types, telling the camera to set the focus point just a tad in front of or behind where it normally would. Nikon recommends not using this feature unless it’s absolutely necessary, and even then, you may want to get some expert assistance.
Eye-Fi Upload: Your camera can work with some Eye-Fi memory cards, which enable you to send your pictures over a wireless network to your computer. If you do put one of the cards in the camera, this option appears on the Setup menu and contains settings for making the transfer. When no Eye-Fi card is installed, the option doesn’t appear, as in the figures in this topic
Unfortunately, Eye-Fi cards are significantly more expensive than regular cards. But if you do use the cards and you find yourself in a situation where wireless devices are not allowed, choose Disable from the Eye-Fi upload menu to shut off the signal. For the whole story on Eye-Fi, including help with setting up your wireless transfers, visit the company’s Web site at www.eye.fi.
Firmware Version: Select this option and press OK to view what version of the camera firmware, or internal software, your camera is running. You see two separate firmware items, A and B. At the time this topic was written, both items were in version 1.0.0.
Keeping your camera firmware up-to-date is important, so visit the Nikon Web site (www.nikon.com) regularly to find out whether your camera sports the latest version. You can find detailed instructions on how to download and install any firmware updates on the site.
Browsing the Custom Setting menu
Displaying the Custom Setting menu, whose icon is a little pencil, takes you to the left screen shown in Figure 1-30. Here you can access six submenus that carry the labels A through F. Each of the submenus holds clusters of options related to a specific aspect of the camera’s operation. Highlight a submenu and press OK to get to those actions, as shown on the right.
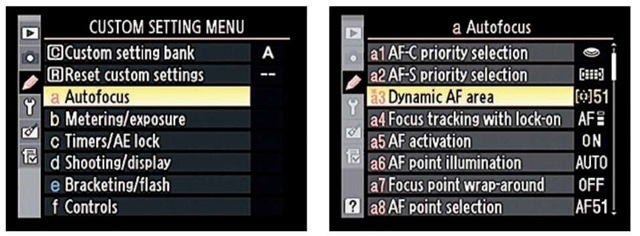
Figure 1-30 Select one of the six submenus and press OK to access the available options.
A few important points about this menu:
After you jump to the first submenu, you can simply scroll up and down the list to view options from other submenus. You don’t have to keep going back to the first screen in Figure 1-30, selecting the submenu, pressing OK, and so on.
An asterisk above a letter, as in the highlighted option on the right in Figure 1-30, indicates that you selected a setting other than the default setting. See the last section of this chapter to find out how to restore the camera defaults.
In the Nikon manual, instructions sometimes reference these settings by a menu letter and number. For example, “Custom Setting al” refers to the first option on the Autofocus submenu. I try to be more specific in this topic, however, so I use the actual setting names. (Really, we’ve all got enough numbers to remember, don’t you think?)
Notice that those option letter/number labels are assigned colors to indicate their submenu categories: Autofocus options are red, metering/ exposure options are yellow, and so forth.
With those clarifications out of the way, the following sections describe only the customization options related to basic camera operations. Turn to the index for help locating information about other Custom Setting options.
Adjusting automatic monitor shutdown
To help save battery power, your camera automatically shuts off the monitor after a period of inactivity. You can specify how long you want the camera to wait before taking that step through the Monitor Off Delay option, found on the Timers/AE Lock portion of the Custom Setting menu, as shown in Figure 1-31. You can specify the auto-off timing for picture playback, menu displays, and the Information display. Additionally, you can adjust the length of time the camera displays a picture immediately after you press the shutter button, known as the Image Review period. Chapter 4 talks more about viewing your photos.
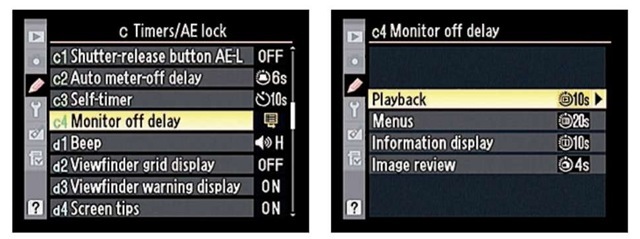
Figure 1-31: Visit the Timers/AE Lock submenu to adjust the timing of automatic monitor shut-off.
Customizing shooting and display options
Head for the Shooting/Display section of the Custom Setting menu, shown in Figure 1-32, to tweak various aspects of how the camera communicates with you, as well as to control a couple of basic shooting functions. Later chapters discuss options related to picture-taking; the following affect the basic camera interface:
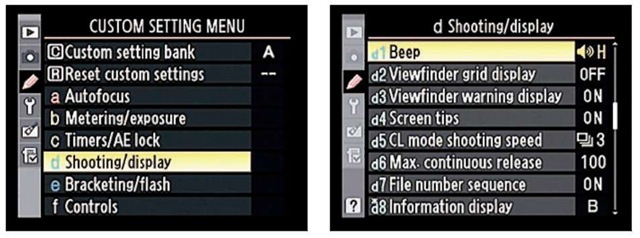
Figure 1-32: Sick of hearing your camera? Turn it off with the Beep option.
Beep: By default, your camera beeps at you after certain operations, such as after it sets focus when you shoot in autofocus mode. If you’re doing top-secret surveillance work and need the camera to hush up, set this option to Off. Or just lower the volume from the default, High, to Low. On the Information and Control panel displays, a little musical note icon appears when the beep is enabled.
Also check out the Release mode section of Chapter 2 for information about the Quiet mode, which tamps down camera noise even further.
Viewfinder Grid Display: You can display tiny gridlines in the viewfinder, as shown in Figure 1-33, by setting this option to On. The gridlines are a great help when you need to ensure the alignment of objects in your photo — for example, to make sure that the horizon is level in a landscape. If you’re using Live View mode or a tripod, the Virtual Horizon feature discussed earlier in the chapter is an alternative, but it requires using the monitor and not the viewfinder.
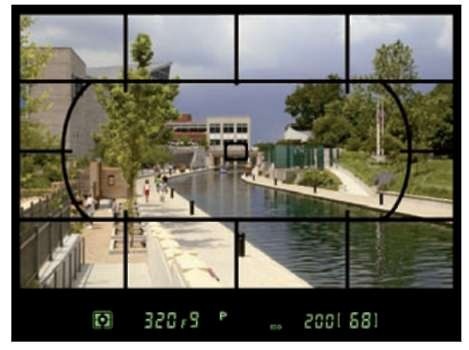
Figure 1-33: The viewfinder grid is another aid for ensuring that the horizon is level in the frame.
Viewfinder Warning Display: By default, you see a low-battery warning in the viewfinder when your battery is about to give out. (Refer to Figure 1-13, earlier in this chapter.) If you don’t want to see the warning — it can be annoying if you know your battery’s low but you have to keep shooting as long as possible anyway — turn this option off.
Screen Tips: If you don’t want to see the little help labels that appear when you adjust settings via the Information display, turn this option Off. For a look at what I’m talking about, revisit Figure 1-12.
File Number Sequence: This option controls how the camera names your picture files. If you set this option to Off, the camera restarts file numbering at 0001 every time you format your memory card or insert a new memory card. Numbering is also restarted if you create custom folders (an advanced option covered in Chapter 11).
Needless to say, this setup can cause problems over time, creating a scenario where you wind up with multiple images that have the same filename — not on the current memory card, but when you download images to your computer. So I strongly encourage you to stick with the default setting, On. Note that when you get to picture number 9999, file numbering is still reset to 0001, however. The camera automatically creates a new folder to hold for your next 9999 images.
As for the Reset option, it tells the camera to look at the largest file number on the current card (or in the selected folder) and then assign the next highest number to your next picture. If the card or selected folder is empty, numbering starts at 0001. Then the camera behaves as if you selected the On setting.
Should you be a really, really prolific shooter and snap enough pictures to reach folder 999, and that folder contains either 999 pictures or a photo that has the file number 9999, the camera will refuse to take another photo until you choose that Reset option and either format the memory card or insert a brand new one.
Information Display: Normally, the camera tries to make the data on the display easier to read by automatically shifting from black text on a light background to light text on a black background, depending on the ambient light. If you prefer one display style over the other, visit this menu item and change the setting from Auto to Manual. You can then select either Dark on Light (for dark lettering on a light background) or Light on Dark (for light lettering on a dark background).
In this topic, I show the Information screen using the Dark on Light display because it reproduces better in print.
LCD Illumination: This setting affects a backlight that can be turned on to illuminate the Control panel. When the option is set to Off, as it is by default, you can illuminate the panel briefly by rotating the On/Off switch past the On setting, to the little light bulb marking. The backlight turns off automatically a few seconds after you release the switch.
If you instead set the LCD Illumination option to On, the backlight comes on automatically anytime the exposure meters are activated (which happens when you press the shutter button halfway). See Chapter 5 for more about the exposure meters. Be aware that this option consumes more battery power than simply using the On/Off switch to light up the panel when you really need it.
Exposure Delay Mode: If you turn this option on, the camera waits to record your picture until about one second after you press and release the shutter button. What’s the point? Well, a tiny mirror inside the camera moves every time you press the shutter button to take a picture. For shots that require a long exposure time, there is a slight chance that the vibration caused by that mirror movement will blur the picture. So by delaying the actual image capture a little, the odds of that mirror-related blur are lessened. (For Live View shooting, this option works only when you use Tripod mode.)
For normal shooting, leave the Exposure Delay Mode setting at its default, Off. And check out Chapter 2 for information on using the camera’s self-timer function as an alternative option when you want to delay the shutter release.
MB-D80 Battery Type and Battery Order: You don’t need to worry about these options unless you buy the optional MB-D80 battery adapter that enables you to power your camera with AA batteries. If you go that route, select the MB-D80 Battery Type option to specify which type of AAs you’re using. (Be sure to read the manual for a list of which AA batteries are acceptable, as well as some other details about using them.) Then use the Battery Order option to tell the camera whether you want it to draw power from the battery pack or the regular camera battery when you have both installed. The Control panel displays the letters BP when the battery pack is the current power source.
Customizing controls
On the Controls section of the Custom Setting menu, you find options that enable you to change the function or behavior of some of the camera’s buttons and dials. Chapter 10 talks about most of these options — I purposely put this information at the back of the topic in hopes that you would leave things at their default settings until you’ve fully explored all the other chapters. If you change the settings, instructions you find along the way won’t work.
There are a few Controls options, though, that I suggest you check out now:
On/Off Light Switch: Normally, rotating the On/Off switch past the On position to the light bulb symbol illuminates the Control panel. But if you set the option highlighted on the left in Figure 1-34 to the setting shown on the right, rotating the switch activates the Information screen as well as the Control panel. (The menu and manual use the light bulb symbol instead of the text name I’ve given it here.) You may find this maneuver easier than pressing the Info button to light up the Information display. The downside is that you use power to light up the Control panel when what you really want to see is the Info display. I leave it up to you to make the call.
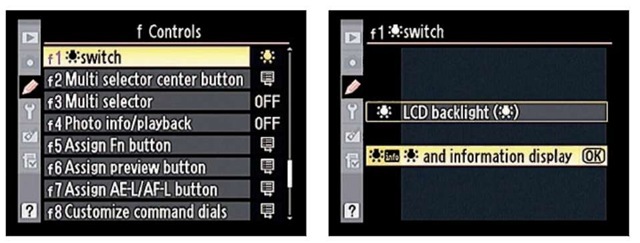
Figure 1-34: Select this setting if you want to use the On/Off switch to activate the Information screen as well as the Control panel light.
No Memory Card?: I suggest setting this option to Release Locked, which disables the shutter button when no memory card is in the camera. At the default setting, Enable Release, you can take a temporary picture, which appears in the monitor with the word “Demo” but isn’t recorded anywhere. (The feature is provided mainly for use in camera stores, enabling salespeople to demonstrate the camera without having to keep a memory card installed.)
Restoring default settings
Should you ever want to return your camera to its original, out-of-the-box state, the camera manual contains a complete list of all the default settings.
You can also partially restore default settings by taking these steps:
Reset all Shooting Menu options. Open the menu, choose Reset Shooting Menu, and press OK.
Reset all Custom Setting Menu options. Choose the Reset Custom Settings option at the top of the menu.
Restore critical picture-taking settings without affecting options on the Custom Setting menu. Use the two-button reset method: Press and hold the Exposure Compensation button and the Qual button simultaneously for longer than two seconds. (The little green dots near the buttons are a reminder of this function.) See the camera manual for a list of exactly what settings are restored.
When you restore the camera defaults, only the settings for the current Shooting bank and Custom Setting bank are affected. For an introduction to the bank system, refer to the section “Ordering from Camera Menus,” earlier in this chapter.


