In This Chapter
Setting the stage for great prints
Preparing a picture for the Web
Creating a slide show
Viewing images on a TV
When my first digital photography topic was published, way back in the 1990s, consumer digital cameras didn’t offer the resolution needed to produce good prints at anything more than postage-stamp size — and even then, the operative word was “good,” not “great.” And if you did want a print, it was pretty much a do-it-yourself proposition unless you paid sky-high prices at a professional imaging lab. In those days, retail photo labs didn’t offer digital printing, and online printing services hadn’t arrived yet, either.
Well, time and technology march on, and, at least in the case of digital photo printing, to a very good outcome. Your D300s can produce dynamic prints even at large sizes, and getting those prints made is easy and economical, thanks to an abundance of digital printing services now in stores and online.
That said, getting the best output from your camera still requires a little bit of knowledge and prep work on your part. To that end, this chapter tells you exactly how to ensure that your picture files will look as good on paper as they do in your camera monitor.
In addition, this chapter explores ways to share your pictures electronically. First, I show you how to prepare your picture for e-mail — an important step if you don’t want to annoy friends and family by cluttering their inboxes with ginormous, too-large-to-view photos. Following that, you can find out how to create digital slide shows and view your pictures on a television.

Preventing Potential Printing Problems
Boy, I love a good alliteration, don’t you? Oh, just me, then. Anyway, as I say in the introduction to this chapter, a few issues can cause hiccups in the printing process. So before you print your photos, whether you want to do it on your own printer or send them to a retail lab, read through the next three sections, which show you how to avoid the most common trouble spots.
For times when you do want to print your photos on your own printer, you can do so through Nikon ViewNX. However, I find the ViewNX printing options both more complex and more limited than those in other programs, which is why I opted not to cover them in this topic. I suggest that you instead print from whatever photo editing program you use or from the software provided by your printer manufacturer.
Match resolution to print size
Resolution, or the number of pixels in your digital image, plays a huge role in how large you can print your photos and still maintain good picture quality. You can get the complete story on resolution in Chapter 3, but here’s a quick recap as it relates to printing:
On the D300s, you set picture resolution (Large, Medium, or Small) via the Image Size option. (Again, see Chapter 3 for specifics.) You must select this option before you capture an image, which means that you need some idea of your ultimate print size before you shoot. And if you crop your image, you eliminate some pixels, so take that factor into account when you do the resolution math.
For good print quality, the minimum pixel count (in my experience, anyway) is 200 pixels per linear inch, or 200 ppi. That means that if you want a 4-x-6-inch print, you need at least 800 x 1200 pixels.
Depending on your printer, you may get even better results at 200+ ppi. Some printers do their best work when fed 300 ppi, and a few (notably, some from Epson) request 360 ppi as the optimum resolution. However, going higher than that typically doesn’t produce any better prints.
Unfortunately, because most printer manuals don’t bother to tell you what image resolution produces the best results, finding the right resolution is a matter of experimentation. (Don’t confuse the manual’s statements related to the printer’s dpi with ppi. DPI refers to how many dots of color the printer can lay down per inch; many printers use multiple dots to reproduce one image pixel.)
So what do you do if you find that you don’t have enough pixels for the print size you have in mind? You just have to decide what’s more important, print size or print quality.
If your print size does exceed your pixel supply, one of two things happens:
The pixel count remains constant, and pixels simply grow in size to fill the requested print size. And if pixels get too large, you get a defect known as pixelation. The picture starts to appear jagged, or stairst-epped, along curved or digital lines. Or at worst, your eye can actually make out the individual pixels, and your photo begins to look more like a mosaic than, well, a photograph.
The pixel size remains constant, and the printer software adds pixels to fill in the gaps. You can also add pixels, or resample the image, in your photo software. Wherever it’s done, resampling doesn’t solve the low resolution problem. You’re asking the software to make up photo information out of thin air, and the result is usually an image that looks worse than it did before resampling. You don’t get pixelation, but details turn muddy, giving the image a blurry, poorly rendered appearance.
Just to hammer home the point and remind you one more time of the impact of resolution picture quality, Figures 9-1 through 9-3 show you the same image as it appears at 300 ppi (the resolution required by the publisher of this topic), at 50 ppi, and resampled from 50 ppi to 300 ppi. As you can see, there’s just no way around the rule: If you want the best quality prints, you need the right pixel count.
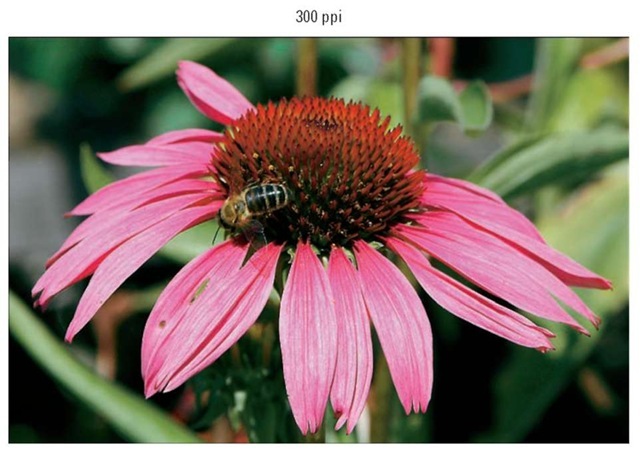
Figure 9-1: A high-quality print depends on a high-resolution original.

Figure 9-2: At 50 ppi, the image has a jagged, pixelated look.
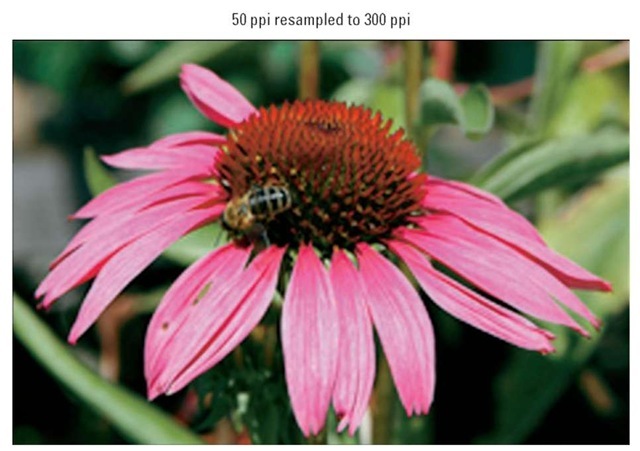
Figure 9-3: Adding pixels in a photo editor doesn’t rescue a low-resolution original.
Allow for different print proportions
Unlike many digital cameras, your D300s produces photos that have an aspect ratio of 3:2. That is, pictures are 3 units wide by 2 units tall — just like a 35mm film negative — which means that they translate perfectly to the standard 4-x-6-inch print size. (Most digital cameras produce 4:3 images, which must be cropped to fit a 4-x-6-inch piece of paper.)
If you want to print your digital original at other standard sizes — 5 x 7, 8 x 10, 11 x 14, and so on — you need to crop the photo to match those proportions. Alternatively, you can reduce the photo size slightly and leave an empty margin along the edges of the print as needed.
As a point of reference, Figure 9-4 shows you a 3:2 original image. The outlines indicate how much of the original can fit within a 5-x-7-inch frame and an 8-x-10-inch frame.
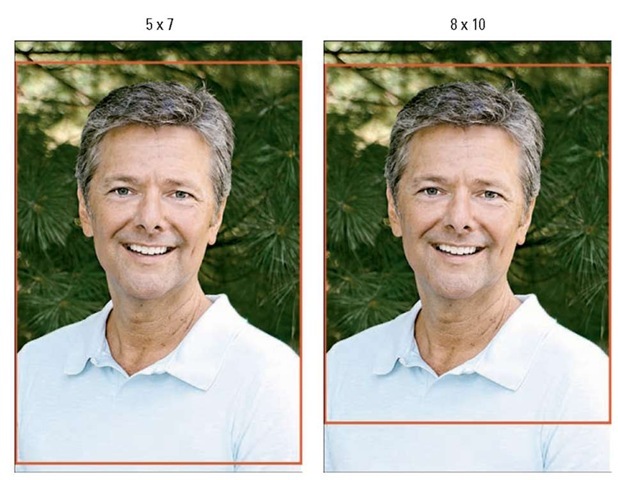
Figure 9-4: Composing your shots with a little head room enables you to crop to different frame sizes.
Your camera’s Trim feature, found on the Retouch menu, enables you to crop your photo, but only to five different aspect ratios (3:2, 4:3, 5:4, 1:1, and 16:9). See Chapter 11 for information. For other proportions, most photo editing programs offer very simple cropping tools. You also can usually crop your photo using the software provided at online printing sites and at retail print kiosks. But if you plan to drop off your memory card of original pictures at a lab, be aware that your pictures will be cropped if you select a print size other than 4 x 6.
To allow yourself printing flexibility, leave at least a little margin of background around your subject when you shoot, as shown in Figure 9-4. Then you don’t clip off the edges of the subject no matter what print size you choose. (Some people refer to this margin padding as head room, especially when describing portrait composition.)
Get print and monitor colors in synch
Your photo colors look perfect on your computer monitor. But when you print the picture, the image is too red, or too green, or has some other nasty color tint. This problem, which is probably the most prevalent printing issue, can occur because of any or all of the following factors:
Your monitor needs to be calibrated. When print colors don’t match what you see on your computer monitor, the most likely culprit is actually the monitor, not the printer. If the monitor isn’t accurately calibrated, the colors it displays aren’t a true reflection of your image colors.
To ensure that your monitor is displaying photos on a neutral canvas, you can start with a software-based calibration utility, which is just a small program that guides you through the process of adjusting your monitor. The program displays various color swatches and other graphics and then asks you to provide feedback about what you see on the screen. Most calibration tools also help you analyze and adjust monitor brightness — a critical step if you want to be able to accurately gauge image exposure when you view your photos. (Newer monitors tend to be set to very high brightness levels by default, which is great for viewing Web pages and movies but can be misleading for photography work.)
If you use a Mac, the operating system offers a built-in calibration utility, called the Display Calibrator Assistant; Figure 9-5 shows the welcome screen that appears when you run the program. (To access it, open the System Preferences dialog box, click the Displays icon, click the Color button, and then click the Calibrate button.) The latest incarnation of the Windows operating system, Windows 7, has a similar tool called Display Color Calibration. You also can find free calibration software for both Mac and Windows systems online; just enter the term free monitor calibration software into your favorite search engine.
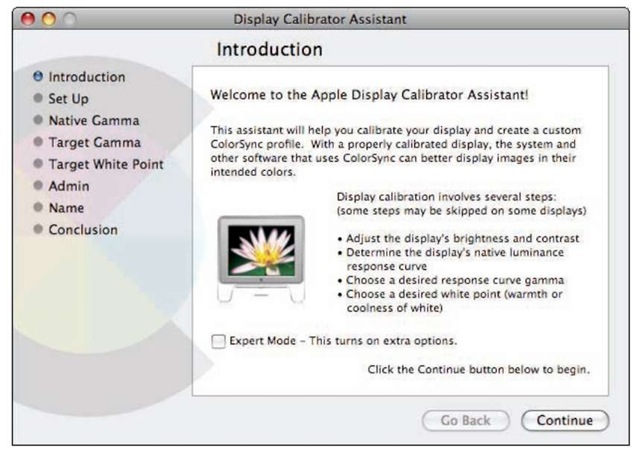
Figure 9-5: Mac users can take advantage of this built-in calibration tool.
Software-based calibration isn’t ideal, however, because our eyes aren’t that reliable in judging color accuracy. For a more accurate calibration, you may want to invest in a device known as a colorimeter, which you attach to or hang on your monitor, to accurately measure and calibrate your display. Companies such as Data color (www.datacolor.com), Pantone (www.pantone.com), and X-Rite (www.xrite.com) sell this type of product along with other tools for ensuring better color matching.
Whichever route you go, the calibration process produces a monitor profile, which is simply a data file that tells your computer how to adjust the display to compensate for any monitor color casts. Your Windows or Mac operating system loads this file automatically when you start your computer. Your only responsibility is to perform the calibration every month or so, because monitor colors drift over time.
One of your printer cartridges is empty or clogged. If your prints look great one day but are way off the next, the number-one suspect is an empty ink cartridge or a clogged print nozzle or head. Check your manual to find out how to perform the necessary maintenance to keep the nozzles or print heads in good shape.
If black-and-white prints have a color tint, a logical assumption is that your black ink cartridge is to blame, if your printer has one. But the truth is that a printer that doesn’t use multiple black or gray cartridges will always have a slight color tint. Why? Because in order to create gray, the printer instead has to mix yellow, magenta, and cyan in perfectly equal amounts, and that’s a difficult feat for the typical inkjet
printer to pull off. If your black-and-white prints have a strong color tint, however, it could be that one of your color cartridges is empty, and replacing it may help somewhat. Long story short: Unless you have a printer that’s marketed for producing good black-and-white prints, you’ll probably save yourself some grief by simply having your black-and-whites printed at a retail lab.
When you buy replacement ink, by the way, keep in mind that third-party brands, while they may save you money, may not deliver the performance you get from the cartridges made by your printer manufacturer. A lot of science goes into getting ink formulas to mesh with the printer’s ink-delivery system, and the printer manufacturer obviously knows most about that delivery system.
You chose the wrong paper setting in your printer software. When you set up your print job, be sure to select the right setting from the paper-type option — glossy, matte, and so on. This setting affects how the printer lays down ink on the paper.
Your photo paper is low quality. Sad but true: The cheap, store-brand photo papers usually don’t render colors as well as the higher-priced, name-brand papers. For best results, try papers from your printer manufacturer; again, those papers are engineered to provide top performance with the printer’s specific inks and ink-delivery system.
Some paper manufacturers, especially those that sell fine-art papers, offer downloadable printer profiles, which are simply little bits of software that tell your printer how to manage color for the paper. Refer to the manufacturer’s Web site for information on how to install and use the profiles. And note that a profile mismatch can also cause incorrect colors in your prints, including the color tint in black-and-white prints I alluded to earlier.
Your printer and photo software are fighting over color-management duties. Some photo programs offer features that enable the user to control how colors are handled as an image passes from camera to monitor to printer. Most printer software also offers color-management features. The problem is, if you enable color-management controls both in your photo software and your printer software, you can create conflicts that lead to wacky colors. So check your photo software and printer manuals to find out what color-management options are available to you and how to turn them on and off.
Even if all the aforementioned issues are resolved, however, don’t expect perfect color matching between printer and monitor. Printers simply can’t reproduce the entire spectrum of colors that a monitor can display. In addition, monitor colors always appear brighter because they are, after all, generated with light.
Finally, be sure to evaluate your print colors and monitor colors in the same ambient light — daylight, office light, whatever — because that light source has its own influence on the colors you see.
DPOF, PictBridge, and computerless printing
Your D300s offers two technologies, called DPOF (dee-poff) and PictBridge, that enable you to print images directly from your camera or memory card, without using the computer as middle-machine. In order to take advantage of direct printing, your printer must also support one of the two technologies, and you must capture the images in the JPEG file format, which I explain in Chapter 3. (You can also capture the photo in the Raw format and then use your D300s’s in-camera conversion tool to make a JPEG copy suitable for direct printing.)
DPOF stands for Digital Print Order Format. With this option, accessed via the Print Set option on your camera’s Playback menu, you select the pictures on your memory card that you want to print, and you specify how many copies you want of each image. Then, if your photo printer has a memory card slot (SD or CompactFlash, depending on which type you use with your D300s) and supports DPOF, you just pop the memory card into that slot. The printer reads your “print order” and outputs just the requested copies of your selected images. (You use the printer’s own controls to set paper size, print orientation, and other print settings.)
PictBridge works a little differently. If you have a PictBridge-enabled photo printer, you can connect the camera to the printer using the USB cable supplied with your camera. A PictBridge interface appears on the camera monitor, and you use the camera controls to select the pictures you want to print. With PictBridge, you specify additional print options, such as page size and whether you want to print a border around the photo, from the camera as well.
Both DPOF and PictBridge are especially useful in scenarios where you need fast printing. For example, if you shoot pictures at a party and want to deliver prints to guests before they go home, DPOF offers a quicker option than firing up your computer, downloading pictures, and so on. And if you invest in one of the tiny portable photo printers on the market today, you can easily make prints away from your home or office — you can take both your portable printer and camera along to your regional sales meeting, for example.
For the record, I prefer DPOF to PictBridge because with PictBridge, you have to deal with cabling the printer and camera together. Also, the camera must be turned on for the whole printing process, wasting battery power. But if you’re interested in exploring either printing feature, your camera manual provides complete details.
Preparing Pictures for E-Mail
How many times have you received an e-mail message that looks like the one in Figure 9-6? Some well-meaning friend or relative has sent you a digital photo that is so large that it’s impossible to view the whole thing on your monitor.
The problem is that computer monitors can display only a limited number of pixels. The exact number depends on the monitor’s resolution setting and the capabilities of the computer’s video card, but suffice it to say that the average photo from one of today’s digital cameras has a pixel count in excess of what the monitor can handle.
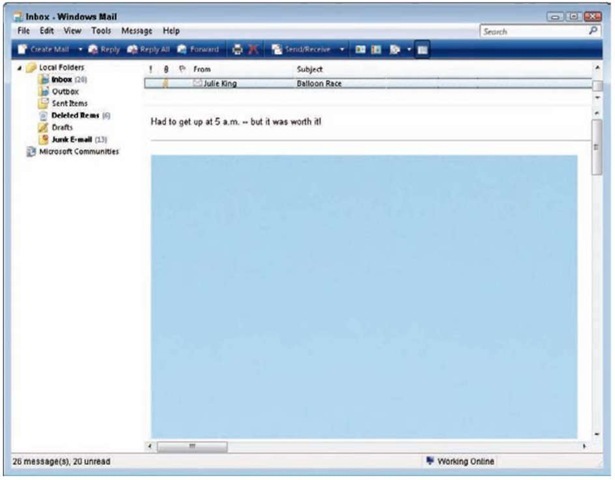
Figure 9-6: The attached image has too many pixels to be viewed without scrolling.
In general, a good rule is to limit a photo to no more than 640 pixels at its longest dimension. That ensures that people can view your entire picture without scrolling, as in Figure 9-7. This image measures 640 x 424 pixels. As you can see, it’s plenty large enough to provide a decent photo-viewing experience. On a small monitor, it may even be too large.
This size recommendation means that even if you shoot at your camera’s lowest Image Size setting (2144 x 1424 pixels), you need to dump pixels from your images before sending them to the cyber post office. You have a couple of options for creating an e-mail-sized image:
Use the Resize feature on your camera’s Retouch menu. This feature enables you to create your e-mail copy right in the camera.
Downsample the image in your photo editor. Downsampling is geekspeak for dumping pixels. Most photo editors offer a feature that handles this process for you. Use this option if you want to crop or otherwise edit the photo before sharing it.
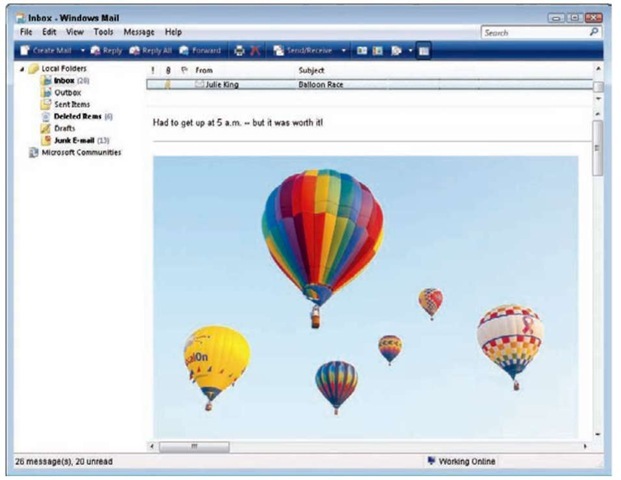
Figure 9-7: Keep e-mail pictures to no larger than 640 pixels wide or tall.
The next two sections walk you through the steps for both methods of creating your e-mail images. You can use the same steps, by the way, for sizing images for any onscreen use, whether it’s for a Web page or multimedia presentation. You may want your copies to be larger or smaller than the recommended e-mail size for those uses, however.
One last point about onscreen images: Remember that pixel count has absolutely no effect on the quality of pictures displayed onscreen. Pixel count determines only the size at which your images are displayed.
Creating small copies using the camera
To create small, e-mailable JPEG copies of your images without using a computer, take advantage of your camera’s Resize feature, found on the Retouch menu.
As with all the Retouch menu options, the camera doesn’t destroy your original but instead makes a copy at the smaller size. Resized pictures are created in the JPEG format, but the JPEG quality level that’s used depends on your original. For JPEG originals, your resized copy is saved at the same
Image Quality setting as the original (Fine, Normal, or Basic). Copies created from RAW, RAW+JPEG, or TIFF originals are saved at the top JPEG quality setting (Fine).
Step this way to create your small copy:
1. Choose Resize from the Retouch menu, as shown on the left in Figure 9-8.

Figure 9-8: The Resize feature creates a low-resolution, e-mail-friendly copy of a photo.
2. Press OK.
You see the screen shown on the right in the figure.
3. If you have two memory cards installed, specify where you want to store the copy.
Make the call through the Choose Destination option. If you have only one card in the camera, you can skip this step.
4. Select Choose Size and press the Multi Selector right.
You see the screen shown in Figure 9-9.
5. Select a picture size.
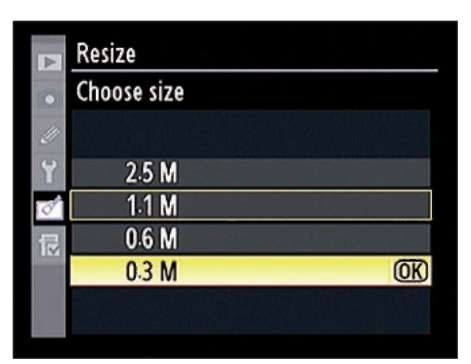
Figure 9-9: The 0.3M setting results in a 640 x 424-pixel copy, which is perfect for e-mail.
Choices are presented in terms of total resolution, in megapixels. To save you from having to do the math, here are the image pixel dimensions (horizontal and vertical pixel count) you get with each setting:
• 2.5M: 1920 x 1280
• 1.1M: 1280 x 856
• 0.6M: 960 x 640
• 0.3M: 640 X 424
6. Press OK.
7. Choose Select Image, as shown on the left in Figure 9-10, and press the Multi Selector right.
You see thumbnails of all your pictures, as shown on the right in the figure.
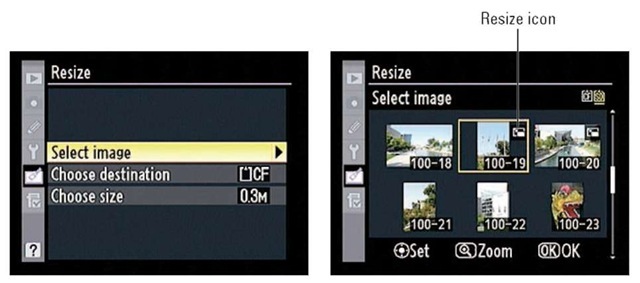
Figure 9-10: Press the Multi Selector center button to mark a photo for resizing.
8. Select a photo and then press the center button of the Multi Selector to tag it for resizing.
The yellow box indicates the selected photo; use the Multi Selector directional buttons to move the box over a photo you want to select. Then press the center button to place the little resize icon in the upper-right corner of the thumbnail, as shown in the figure. Press the center button again to remove the tag if you change your mind.
9. After selecting all your pictures, press OK.
You see a screen asking you to confirm that you want to create small copies of the pictures.
10. Highlight Yes and press OK.
The camera creates your resized copy. Note that file numbers are assigned automatically and don’t match that of your original image even if you start with only a RAW or TIFF original.
When you view your resized copies on the monitor, you see the new file size and the Retouch icon, as shown in Figure 9-11. (The placement of the icon and file size depend on the playback display mode; check out Chapter 4 for details on changing the display mode.) Note that you can’t zoom in to magnify the view of small-size copies as you can with your original images.
If you want to create a small copy of only one picture, you can set the camera to Playback mode, display the photo in full-size view, and then press OK to jump to the Retouch
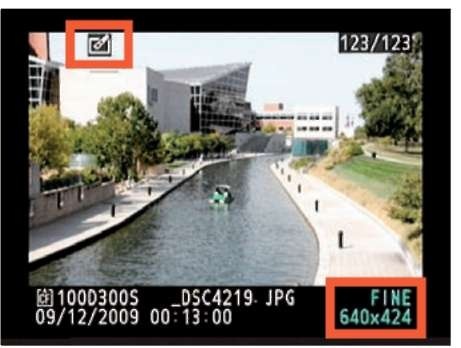
Figure 9-11: In single-image playback, you can see the file size of the small copy.
menu. From there, choose the Resize option, select the memory card where you want to store the small copy, select the picture size, and then give the camera the go-ahead to make the copy.
Downsizing images in Nikon ViewNX
You can also create a low-resolution, JPEG copy of your image in ViewNX. However, be aware that the program restricts you to a minimum size of 320 pixels along the photo’s longest side. If you need a smaller version, use your photo editing software to do the job.
Assuming that the 320-pixel restriction isn’t a problem, the following steps show you how to create your small-size copy in ViewNX. You can use this process to create a small JPEG copy of JPEG, NEF (RAW), and TIFF originals.
1. Select the image thumbnail in the main ViewNX window.
Chapter 8 explains how to view your image thumbnails, if you need help. Just click a thumbnail to select it.
2. Choose File Convert Files.
You see the dialog box shown in Figure 9-12. (As with other figures, this one shows the box as it appears in Windows Vista; it may appear slightly different on a Mac or in other versions of Windows, but the essentials are the same.)
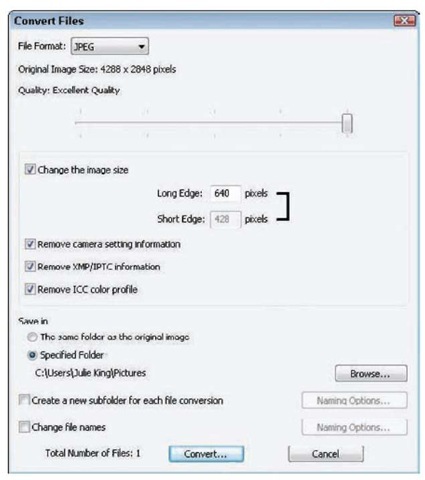
Figure 9-12: You also can use ViewNX to create a small-sized JPEG copy for e-mail sharing.
3. Select JPEG from the File Format drop-down list, as shown in the figure.
The other format option, TIFF, is a print format. Web browsers and e-mail programs can’t display TIFF images, so be sure to use JPEG.
4. Select the Change the Image Size check box.
Now the Long Edge and Short Edge text boxes become available.
5. Type the desired pixel count of the longest side of your picture into the Long Edge box.
The program automatically adjusts the Short Edge value to keep the resized image proportional.
Again, to ensure that the picture is viewable without scrolling when opened in the recipient’s e-mail program, I suggest that you keep the Long Edge value at 640 pixels or less.
6. Adjust the Quality slider to set the amount of JPEG file compression.
As Chapter 3 explains, a greater degree of compression results in a smaller file, which takes less time to download over the Web, but it reduces image quality. Notice that as you move the slider to the right, the resulting quality level appears above the slider. For example, in Figure 9-12, the level is Excellent Quality.
Because the resolution of your image already results in a very small file, you can probably use the highest quality setting without worrying too much about download times. The exception is if you plan to attach multiple pictures to the same e-mail message, in which case you may want to set the slider a notch or two down from the highest quality setting.
7. Select the next three check boxes (Remove Camera Setting Information, Remove XMP/IPTC Information, and Remove ICC Color Profile), as shown in Figure 9-12.
When selected, the three options save the resized picture without the original image metadata, the extra text data that your camera stores with the image. (Chapter 8 explains.) Including this metadata adds to the file size, so for normal e-mail sharing, strip it out. The exception is when you want the recipient to be able to display the metadata in a photo program that can do so.
8. Set the file destination.
In layman’s terms, that just means to tell the program the location of the folder or drive where you want to store your downsized image file. You have two Save In options: Choose the first option to put the file in the same folder as the original, or select Specified Folder to put the file somewhere else. If you choose the first option, you’re done. If you choose the second option, the last folder you specified is shown to the left of the Browse button. To choose a different folder, click that Browse button.
By selecting the Create a New Subfolder for Each File Conversion check box, you can create a new subfolder within your selected storage folder. If you do, the resized file goes into that subfolder, which you can name by clicking the Naming Options button.
9. (Optional) Specify a filename for the resized copy.
If you want to put the small copy in the same folder as the original, the program protects you from overwriting the original by automatically assigning a slightly different name to the copy. By default, the program uses the original filename plus a two-number sequential tag: If the original filename is DSC_0186.jpg, for example, the small-copy filename is DSC_0186_01.jpg. You can change a couple of aspects of this filenaming routine by selecting the Change File Names check box and then clicking the Naming Options button and adjusting the settings in the resulting dialog box. After making your wishes known, click OK to return to the Convert Files dialog box.
If you don’t store the copy in the same folder as the original, the program doesn’t alter the filename of the copy automatically. That can lead to problems down the road because you will end up with two files, both with the same name but with different pixel counts, on your computer. In this scenario, be sure to input your own filenames for your copies.
10. Click the Convert button to finish the process.
Creating a Digital Slide Show
Many photo editing and cataloging programs offer a tool for creating digital slide shows that can be viewed on a computer or, if copied to a DVD, on a DVD player. You can even add music, captions, graphics, special effects, and the like to jazz up your presentations.
But if you want to create a simple slide show — that is, one that simply displays the photos on the camera memory card one by one — you can create and run the show right on your camera by using the Slide Show function on the Playback menu. And by connecting your camera to a television, as outlined in the last section of this chapter, you can present your show to a whole roomful of people.
A couple of things to note about the Slide Show feature:
The pictures displayed in the show depend on the current setting of the Playback Folder option on the Playback menu. For more about choosing which folder (and which memory card, if you’re using two at a time) you want to view, see Chapter 4.
‘ Any pictures that you hid through the Hide Image function, also explained in Chapter 4, do not appear in the show.
With those details out of the way, follow these steps to present a slide show:
1. Display the Playback menu and highlight Slide Show, as shown on the
left in Figure 9-13.
2. Press OK to display the Slide Show screen shown on the right in
Figure 9-13.
3. Highlight Frame Interval and press the Multi Selector right.
On the next screen, you can specify how long you want each image to be displayed. You can set the interval to 2, 3, 5, or 10 seconds.
4. Highlight the frame interval you want to use and press OK.
You’re returned to the Slide Show screen.
5. To start the show, highlight Start and press OK.
The camera begins displaying your pictures on the camera monitor.
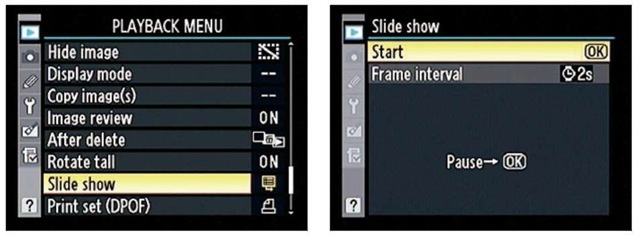
Figure 9-13: Choose Slide Show to set up automatic playback of all pictures on your memory card.
When the show ends, you see a screen offering three options: You can choose to restart the show, adjust the frame interval, or exit to the Playback menu. Highlight your choice and press OK.
During the show, you can control playback as follows:
Pause the show. Press OK. Select Restart and press OK to begin displaying pictures again. When you pause the slide show, you also have the option to change the interval — a handy option if the pace is too quick or slow — or exit the show. To change the frame interval, highlight the option and press OK. Choose the desired interval from the next screen and press OK. Highlight Restart and press OK to restart the show with the new interval.
Exit the show. You’ve got three options:
• To return to full-frame, regular playback, press the Playback button.
• To return to the Playback menu, press the Menu button.
• To return to picture-taking mode, press the shutter button halfway.
Skip to the next/previous image manually. Press the Multi Selector right or left.
Change the information displayed with the image. Press the Multi Selector up or down to cycle through the info-display modes. (See Chapter 4 for details on what information is provided in each mode.)
Viewing Your Photos and Movies on a Television
Tired of passing your camera around to show people your pictures or movies on the monitor? Why not display them on a television instead? Your camera is equipped with both an HDMI outlet, or jack, for connecting the camera to a high-definition TV (or other video device), and an AV (audio/visual) jack, for connecting the camera to a regular TV or video device. Both connection points are tucked under the little rubber cover on the left-rear side of the camera and highlighted in Figure 9-13. A cable for making a regular video connection is included in the camera box. (It’s the cable that has two plugs at one end, one white and one yellow.) For HDMI connections, you need to purchase a cable. You need something called a Type C mini-pin cable.
Before connecting your camera, double-check the following menu options, both on the Setup menu and shown in Figure 9-15:
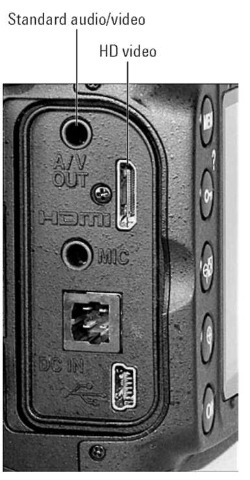
Figure 9-14: You can connect your camera to a television for big-screen playback.
Video Mode: You get just two options here: NTSC and PAL. Select the video mode that is used by your part of the world. (In the United States, Canada, and Mexico, NTSC is the standard.)
HDMI: Unless you have trouble, stick with the Auto setting; the camera then automatically selects the right format for the HD device you’re using. You also can select from four different formats, if you feel comfortable doing so.
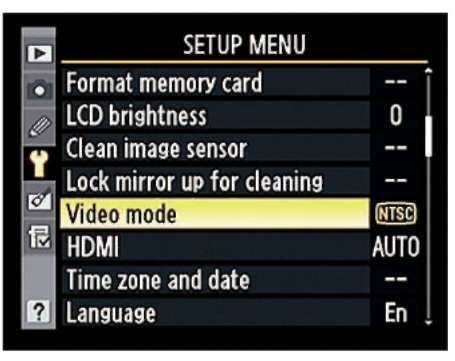
Figure 9-15: The options related to television playback live on the Setup menu.
Whether you go high def or regular def — what the industry now wants us to call standard definition — turn the camera off before connecting the devices. Then do the following:
Regular A/V: For a regular video connection, plug the black end of the cable into the camera. Then connect the white plug at the other end of the cable into the audio input jack of your video device and the yellow plug into the video input jack. (You can leave the audio plug disconnected for still photos or movies recorded without sound.) During playback, your pictures will appear both on the camera monitor and the TV.
HDMI: With HDMI, everything goes through a single connector. After the two are linked, http://what-when-how.com/wp-admin/edit.phpyou can press the Info button to toggle the monitor display on and off.
When the two devices are connected, turn the camera and TV or video device on. At this point, you need to consult your TV manual to find out what channel to select for playback of signals from auxiliary input devices like your camera. After you sort that issue out, you can control playback using the same camera controls as you normally do to view pictures and movies on your camera monitor. You can also run slide shows by following the steps outlined in the preceding section.
