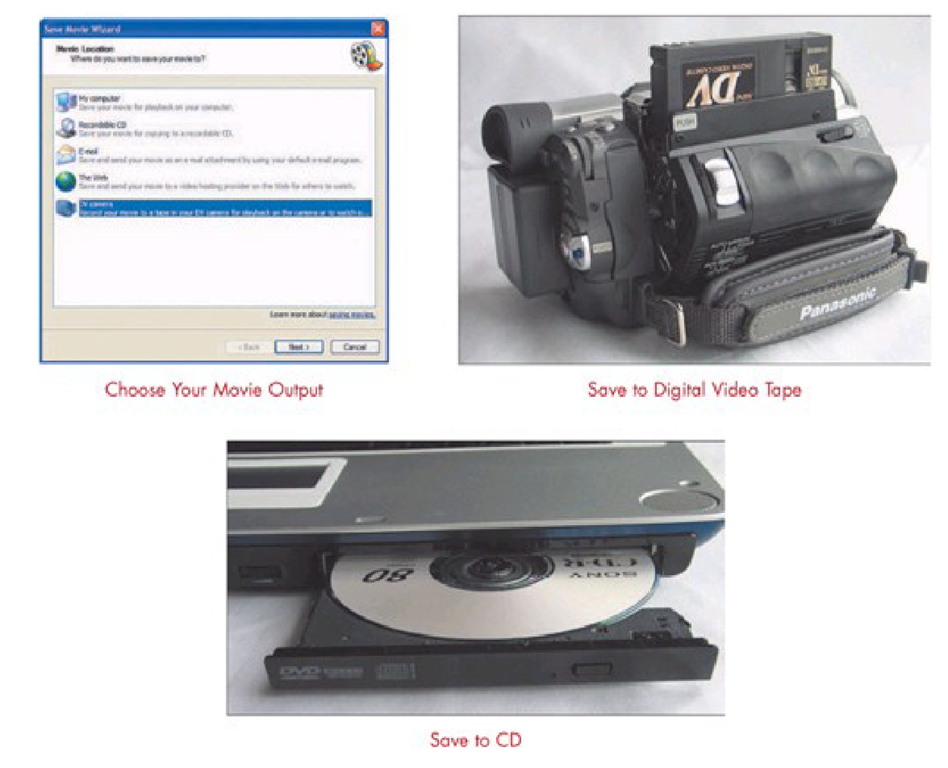
The goal of any movie maker, from home movie enthusiasts to professional cinematographers, is to output something for other people to watch. Other people may consist of your children’s grandparents or it may be the audience in a local movie theater. Either way, your movie needs to be exported from Windows Movie Maker to a medium designed for playback. This part of the topic examines some of the more common ways to export movies.
Similar to importing, external devices must be properly connected to the computer during export in order for the process to work smoothly. Since many people still don’t own a DVD burner, this section provides several ways to share your digital movie using common solutions. We show you how to export your movie to MiniDV tape, VHS, and CD, including all the steps to achieve success in performing each of these tasks. Other sections detail the process of emailing your movie, creating DVDs, or sharing your movie from a Web site.
This part of the topic offers several solutions for exporting your movie.
Output Options
Preparing Your DV Camera to Save a Movie
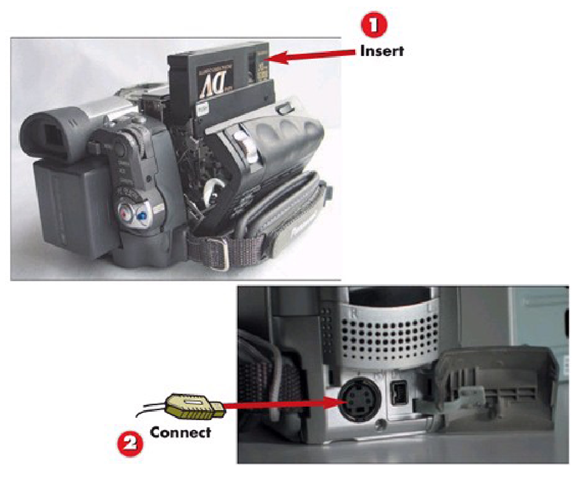
1 Make sure the DV camera is turned off and insert a blank MiniDV tape in the DV camera.
2 Connect the 4-pin end of the FireWire cable to the FireWire port on your camera. (This port is sometimes labeled DV.)
INTRODUCTION
The same hardware connection used to import raw footage is used to save the finished movie. When you save the movie, data is transferred from the computer to the tape in the DV camera. This is great for storing a tape archive of the movie, or for storing longer movie files in the absence of a DVD burner.
HINT Check for Updates
Video editing software periodically gets updated with bug fixes and new features. Before transferring video from the DV tape to your hard drive, check for software updates to make sure the latest version of your editing software is installed.
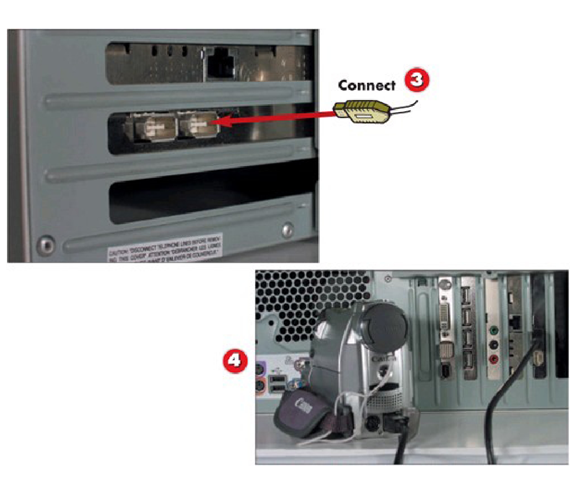
3 Connect the 6-pin end of the FireWire cable to your PC.
4 Turn on the DV camera in playback mode (usually marked VTR or VCR on the camera).
HINT Notebook FireWire
Notebook computers with built-in FireWire connections generally use a 4-pin connector similar to the ones on DV camcorders. Most electronics stores offer both 4-pin-to-6-pin FireWire cables for standard PC ports, as well as 4-pin-to-4-pin cables for transferring movies between a notebook computer and a DV camcorder.
HINT
Cable Length
The length of the cable has no effect on transfer speed, so if you are unsure which length you need, opt for the longer cable to ensure the FireWire cable is long enough to easily reach the connection on the computer.
Saving a Movie to Your DV Camera
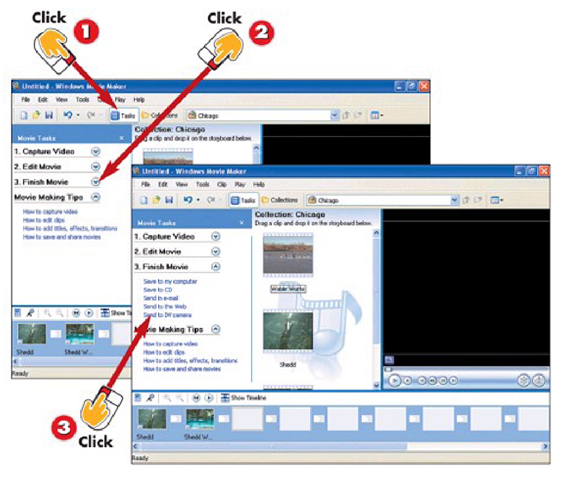
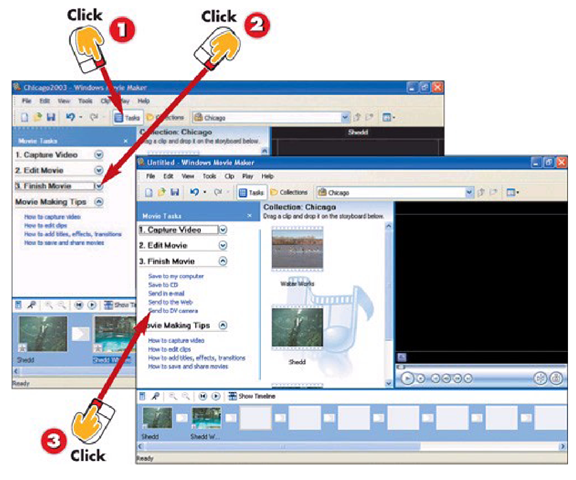
1 Click T asks on the toolbar.
2 Expand the Finish Movie section by clicking the down arrow.
3 Click Send to DV camera.
INTRODUCTION
Windows Movie Maker automatically controls the process of saving your movie to DV tape using a built-in wizard. The wizard steps you through the configuration process. Assuming you followed the steps in the previous task, "Preparing your DV Camera to Save a Movie," saving to DV tape should work seamlessly.
HINT
Use a New DV Tape
Use a new tape when transferring a finished movie from Movie Maker. This allows the original raw footage to be archived on the tape you used to shoot the footage, while also making sure nothing embarrassing is left on the tape at the end of the finished movie.
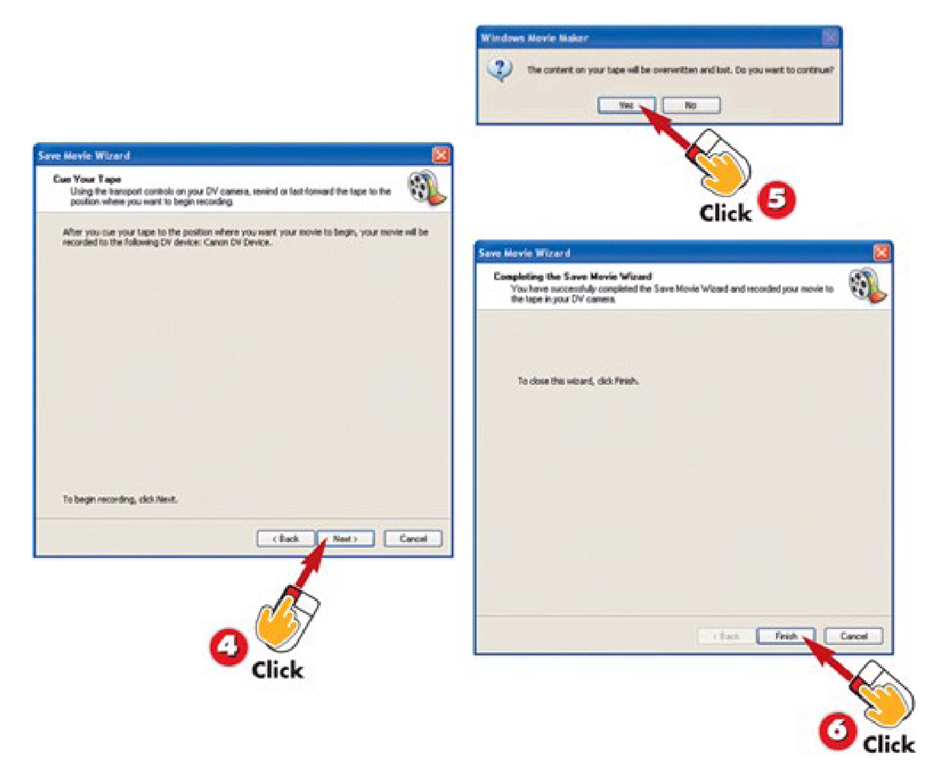
4 Verify you have a tape in your DV camera, the camera is set to VTR mode, and the tape is at the point where you want to begin recording. Click Next on the Cue Your Tape screen of the Save Movie Wizard.
5 Answer Yes to the warning message if you are ready to record your movie to the MiniDV tape in your camera.
6 Click Finish when the transfer from computer to tape is complete.
HINT
Use the AC Power
Plug your DV camera in using the power cable while the movie is being saved to tape. Depending on the speed of your computer, the process may take more time than your battery has available life. If the battery dies in the middle of the save process, you will have to start over from the beginning.
HINT
Close Programs
Before saving a movie in any format, it’s best to close any extra programs that might be open, including browser windows and email clients.
Closing programs helps free up resources for use by the video editing application.
Connecting a DV Camera and VCR for Recording to VCR
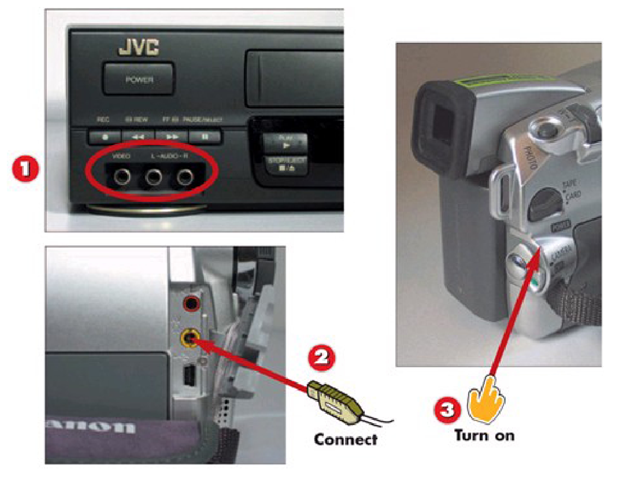
1 Connect the red, white, and yellow ends on the stereo video cable supplied with your digital video camera to the corresponding connectors on the Video In section of your VCR.
2 Connect the mini-plug end of the video cable to the AV port on your camera.
3 Turn on your digital video camera in VTR (or VCR) mode. Verify the correct tape is inserted in the DV camera and rewind it.
INTRODUCTION
Many people still don’t have DVD players; some don’t have a computer, which makes sharing your home movies with them via digital methods difficult. To get around this technological void, transferring your finished movie to VHS remains a necessity. The process of connecting your DV camera and VCR is outlined here to simplify the transfer.
TIP Color Connections
If your VCR doesn’t have color coded receptacles, the yellow cable always connects to Video In. To properly connect the left and right audio signals, just remember right and red both start with the letter R, making white the left channel.
Saving a Movie from DV Tape to VHS
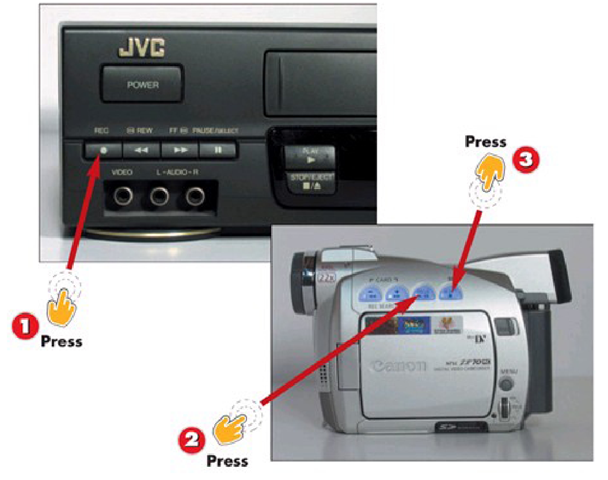
1 Insert a blank tape in the VCR and press Record on the VCR.
2 Press play on the DV camera.
3 Stop recording when all video has been transferred from the DV camera.
INTRODUCTION
Recording a movie from your DV camera is just like copying a tape between two VCRs. The DV camera is the source; the VCR records the source information to tape. Once the appropriate connections have been made, the transfer process is essentially automatic.
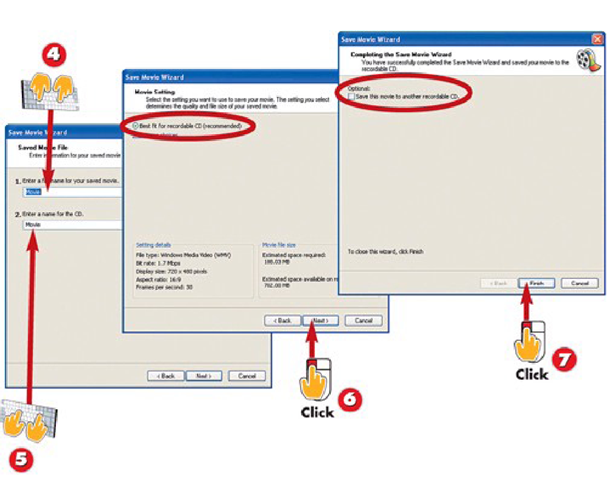
Saving a Movie to CD
1 Click T asks on the toolbar.
2 Expand the Finish Movie section by clicking the down arrow.
3 Click Send to DV camera.
INTRODUCTION
Saving a movie to CD is great for storing a backup or sharing with friends and relatives. These CDs are playable on any Windows computer with Windows Media player, as well as any consumer electronics device supporting the HighMAT format.
TIP HighMAT Format
HighMAT is an information organization format for devices like DVD and CD players. It provides a common interface for browsing video, image, and audio files using a menu system that looks a little like the Windows Explorer. In the context of making movies, DVD players and PCs are the only devices currently supporting HighMAT. If your CD or DVD player supports HighMAT, the logo will be displayed prominently on the player.
4 Type a name for your movie.
5 Type a name for the CD and then insert a blank CD-R in your CD burner.
6 Accept the Movie Setting Best fit for recordable CD (recommended) and click Next.
7 Wait for the CD to record. When recording is complete, click Finish to return to the Movie Maker edit window or check the Optional check box to make an additional CD.
HINT
Where CDs Won’t Play
In general, saving a movie to CD is only useful for giving it to someone else for playback on their computer or archiving the video on CD, unless you own a HighMAT DVD player with video support.
TIP
Creating VCDs
VCD is a CD format supported by some consumer DVD players. Movie Maker does not directly support the creation of VCDs. To create a VCD, save the finished movie as a DV-AVI file to the computer’s hard drive and use the directions for creating a VCD in Part 10 of this topic on Sonic MyDVD.
