Editing video is an organizational process involving the creation of a story from your raw video footage. Editing helps you eliminate the moments where the DV camera was pointed at your shoes, in addition to creating a logical flow of events. Editing can be as simple as choosing not to include specific video clips in your final movie, or it can be a complex process of trimming sections of each clip to build a better story. This part of the topic leads you through the editing process.
Windows Movie Maker simplifies editing by making the process visually oriented. Your movie is outlined using the Storyboard and then fine-tuned using the Timeline. Each editing view offers specific strengths designed to make creating a solid visual story. The Storyboard allows you to rapidly build the sequence of events by inserting video clips in the order they should appear. Transitions between clips and visual effects are quickly added to the movie using the Storyboard view, creating a rough draft of the final movie presentation.
Switching to the Timeline, video clips are trimmed to remove unwanted material, sections of video may be divided to isolate specific content, and all of the little details used to turn raw video into a professional-looking movie are added. In this part of the topic you learn how to add additional video footage, work with the Timeline and Storyboard, and edit video clips, all leading toward the creation of an audio-visual story.
Editing Views in Movie Maker
Adding Movie Clips to a Project
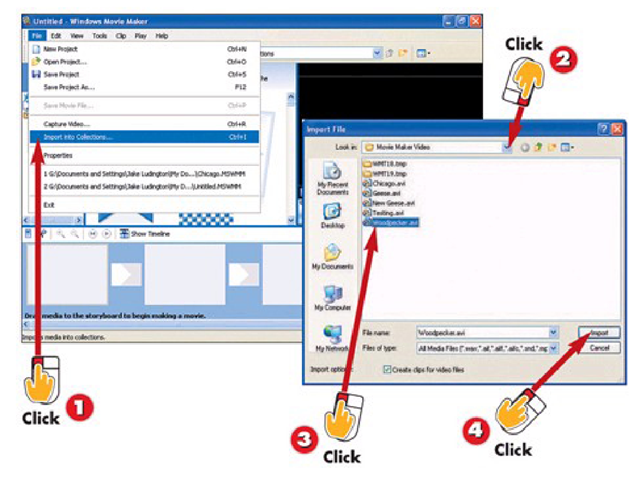
1 Open the File menu and click Import into Collections.
2 Browse to the location of your video files.
3 Select the video file you want to add to your project.
4 Click Import.
INTRODUCTION
In order to create a movie, you need video clips. The clips can come from your DV camera, or be clips you have already stored on your computer. Adding clips from your hard drive to your video project allows you to use the clips in your movie.
TIP Optional Import
In addition to using Movie Maker’s Import into Collections, there is another way to add movie clips to a project. Open an Explorer window by right-clicking the Start menu and choosing Explore from the menu. Navigate to the movie clip you want to include, and then drag and drop the clip into the Movie Maker collections.
Removing Clips from a Project
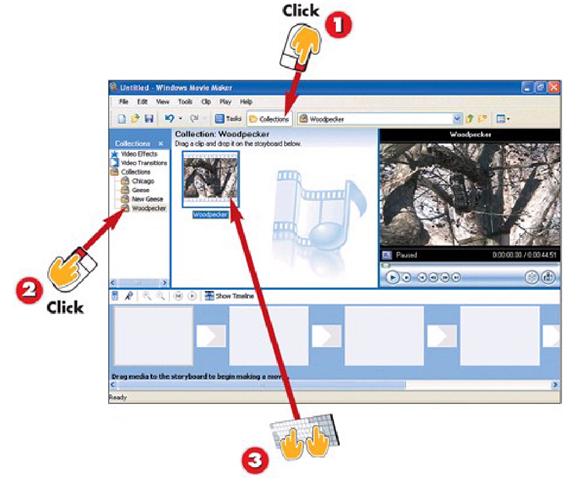
1 Click the Collections button on the toolbar.
2 In the Collections pane, select the Collection containing the video clip you want to remove.
3 Click the video clip to select it and press the Delete key on your keyboard.
INTRODUCTION
Some clips added to a project may not be used. Removing these unused clips keeps your Collection organized. Removing video clips from your project only removes them from the current Movie Maker project; it does not delete the clips permanently from your hard drive.
HINT Recovering a Deleted Clip
Changing your mind about a deleted clip can be complicated. If the clip is part of a larger video file, Movie Maker requires you to re-import the original file, and then re-create the clip by trimming it from the section of the video file where it is located.
Adding and Removing Clips on the Storyboard
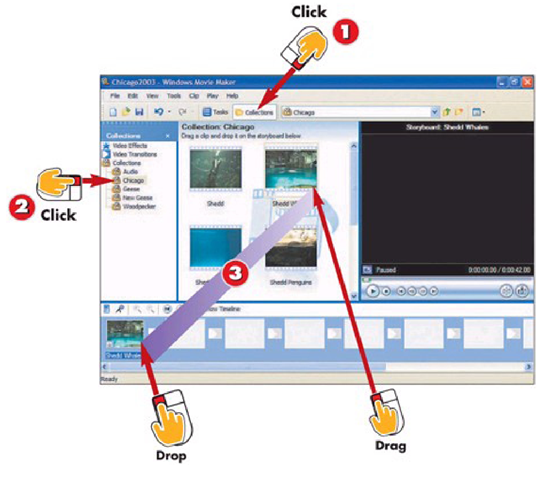
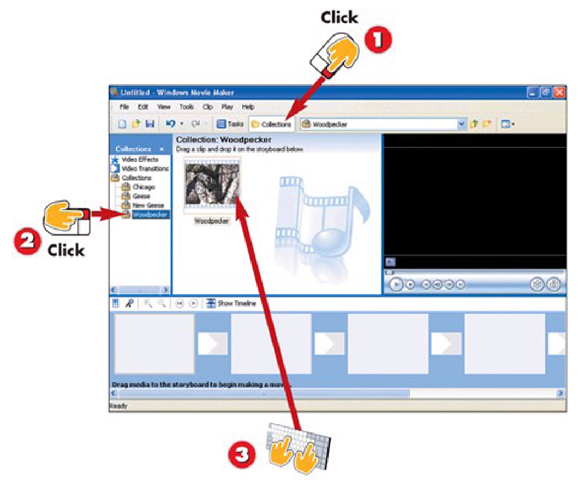
1 Click the Collections button on the toolbar.
2 Click the Collection containing your video clips in the Collection pane.
Drag a clip from the collection to the Storyboard. Drag additional clips, until you have several clips for your movie added to the Storyboard.
INTRODUCTION
The Storyboard is used to organize video clips into the sequence of shots comprising your movie. Clips are ordered with the first segment of your movie appearing first in the storyboard, with successive clips following after. Adding clips to the Storyboard makes it easy to visually follow the flow of events as they progress in your movie.
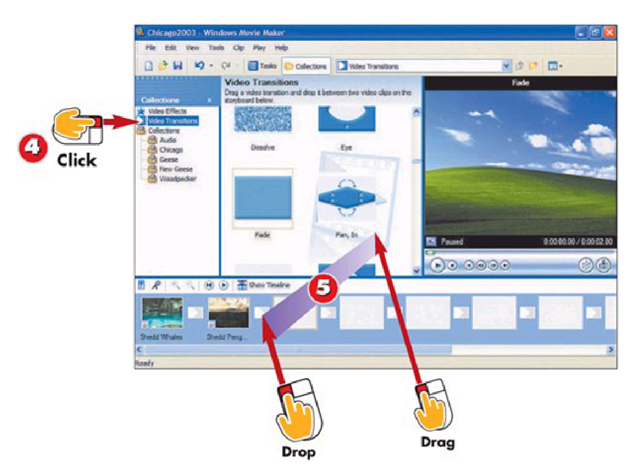
4 Click on Video Transitions in the left Collections pane.
5 Drag the transition you want to use between clips to the transition marker between the clips.
TIP
Add All Clips
To add every clip in a collection to the Storyboard at once in the order they appear in the collection, first select one clip. Press Ctrl+A to select all the clips in the collection. Click and drag the clips to the first open spot on the Storyboard.
TIP
Repeat Clips
To repeat a video clip on the Storyboard, it isn’t necessary to drag it from the collection again. Highlight the clip on the Storyboard, press Ctrl+C on the keyboard to copy the clip, and then Ctrl+P to paste it in an open slot on the Storyboard.
Removing Collections from a Project
1 Click the Collections button on the toolbar.
2 In the Collections pane, select the Collection you want to remove.
3 Press the Delete key on the keyboard.
INTRODUCTION
Having too many Collections makes organizing your movie confusing. Removing a Collection allows you to keep the Collections in your project narrowed down to the ones containing footage you plan on using in your movie.
HINT
Are You Sure?
Before you remove a collection from Movie Maker, be certain it isn’t being used in any of the projects saved to your computer. One unfortunate side effect of removing a collection from Movie Maker is the collection is removed for all projects. The video files referenced in the collection remain on your hard drive after deleting the collection from Movie Maker.
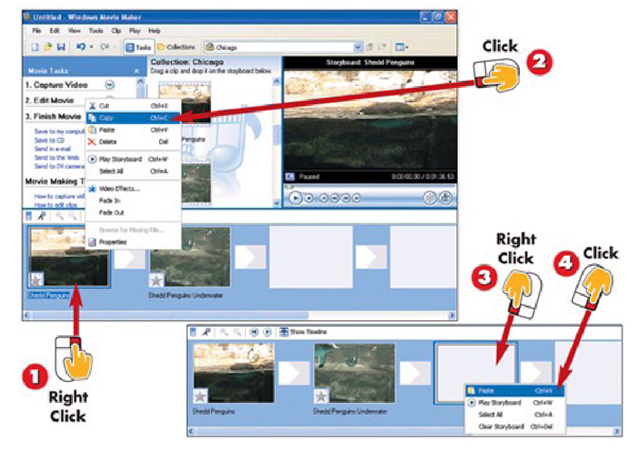
Copying a Clip on the Storyboard
1 Right-click the clip on the Stoiyboard to be copied.
2 Click Copy in the menu.
3 Right-click on the space on the Stoiyboard where the copy will be pasted.
4 Click Paste in the menu.
INTRODUCTION
Windows Movie Maker supports copying of clips to make repeating sections of your movie easy. Copying a clip allows you to repeat it in a loop, or paste it further along the storyboard to reintroduce it later in the movie.
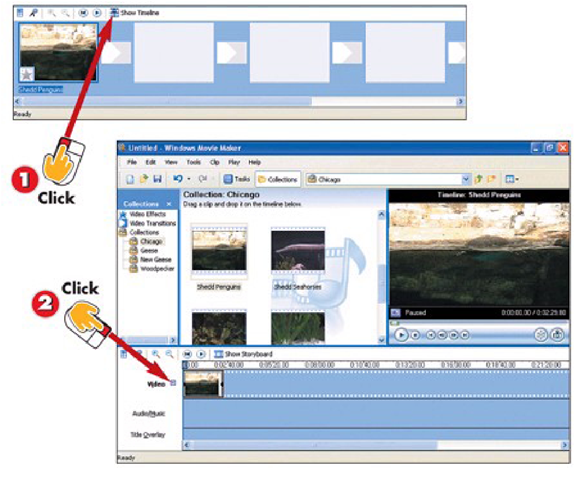
Using the Timeline
1 Click the Show Timeline button above the Storyboard to switch to Timeline View.
2 Expand the detailed Video view to expose Transitions and Audio by clicking the + next to Video on the Timeline.
INTRODUCTION
The Timeline is a detailed view of your movie. It shows the length of each clip, shows where transitions and effects overlap the clips, and lets you make adjustments accordingly. Additionally, most audio editing in Windows Movie Maker happens from the Timeline view.
TIP
Fade In
Movie Maker doesn’t support using a transition at the beginning of a movie. To introduce the first scene of your movie gradually, right-click the first movie clip on the Timeline and choose Fade In from the list of options.
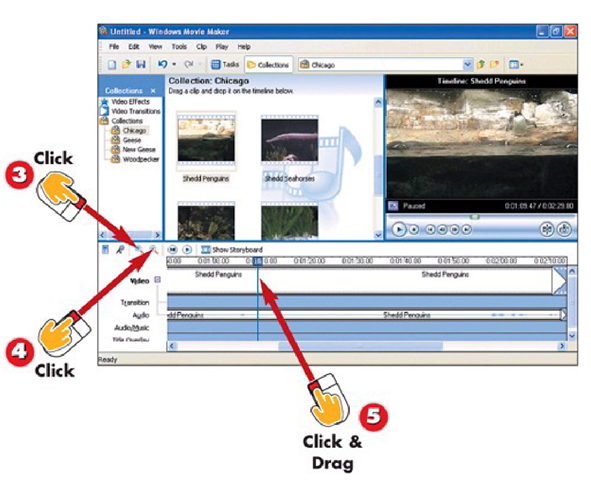
3 Zoom in on the Timeline to select a more precise section of video by clicking on the + magnifying glass.
4 Zoom out to gain a broad picture of your project by clicking the – magnifying glass.
5 Move to a specific frame in your movie by adjusting the slider on the Timeline.
HINT
Timeline Fading
Create a fade between two video clips on the Timeline by dragging the beginning of one clip over the last few seconds of the preceding clip. Movie Maker will automatically fade out the first clip as the second clip fades in.
TIP
Adjusting Timeline View
Because the Timeline contains a great deal of information, it is often easier to work with movie and audio clips by increasing the size of the Timeline. To increase its size, hover the mouse pointer over the blue line separating the collections from the Timeline until you see a doubleended arrow. Click and drag the line toward the top of the screen until the Timeline is adjusted to a size where all sections are easily visible.

