In This Chapter
Putting your stamp on your BlackBerry Curve
Watching your BlackBerry Curve’s back
Blocking spam e-mail and unwanted SMS messages
Regardless of how long you’ve had your BlackBerry Curve — one week, one month, one year, or more — you’ll want to have it around for as long as you possibly can. (Or at least until you have the bucks for that way-cool new model that’s surely coming down the pike.) And for the duration that you do have your device, you’ll want to trick it out so that it doesn’t feel and sound exactly like the millions of other BlackBerry Curve devices out there. (C’mon, admit it — your BlackBerry Curve is definitely a fashion statement, so you’d better feel comfortable with what that statement is saying.)
In addition to customizing your BlackBerry Curve so that it expresses the inner you, you want to make sure that you keep your Curve in tip-top shape by watching out for such things as its battery life and information security. Luckily for you, this chapter puts all such worries to rest by filling you in on all you need to know to keep your BlackBerry Curve a finely tuned (and yet quirkily personal) little smartphone.
Making Your BlackBerry Curve Yours
BlackBerry smartphones are increasingly popular, so much so that close to 30 million BlackBerry smartphones are out there serving the needs of people like you. Because of this fact, we’re certain that finding ways to distinguish your BlackBerry Curve from your colleagues’ is high on your list of priorities.
Branding your BlackBerry Curve
Like any number of other electronic gadgets, your BlackBerry Curve comes to you off the shelf fitted with a collection of factory settings. This section helps you put your name on your BlackBerry Curve, figuratively and literally. You can start by branding your name on your BlackBerry Curve. Follow these steps:
1. Press the menu key, and then highlight and select the Options (wrench) icon.
2. Select the Owner setting.
You see places to enter your owner information.
3. Enter your name in the Name field and your contact information in the Information field.
The idea here is to phrase a message (like the one shown in Figure 3-1) that would make sense to any possible Good Samaritan who might find your lost BlackBerry Curve and want to get it back to you.
If you lock or don’t use your BlackBerry Curve for a while, the standby screen comes on, displaying the owner information that you entered. Read how to lock your BlackBerry Curve, either manually or by using an auto setting, in the later section “Keeping Your BlackBerry Curve Safe.”
4. Press the menu key and then select Save from the menu that appears.
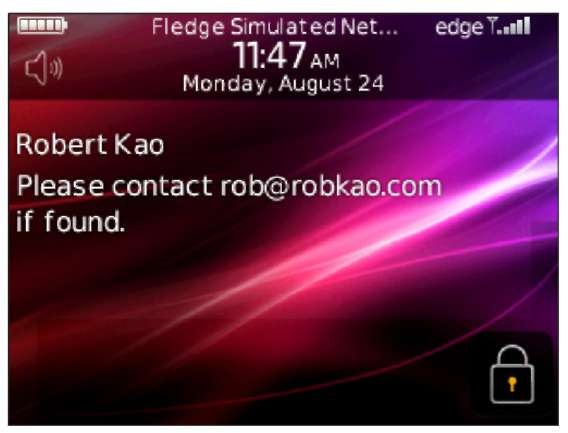
Figure 3-1:
List your owner info here.
Choosing a language, any language
Branding your BlackBerry Curve with your own John Hancock is a good start, but setting the language to your native tongue so that you don’t need to hire a translator to use your Curve is equally important — and equally easy. You can also set your input method of choice here, which can affect whether AutoText shows up. Don’t worry. We explain what that means in the next section.
Here’s how you choose a language:
1. Press the menu key and then select the Options (wrench) icon.
2. Select the Language setting.
Here, you can choose the language and input method of your choice.
3. Select the Language field and then select your native tongue.
Depending on your network provider, as well as your region (North America, Europe, and so on), the language choices you have can vary. Most smartphones sold in North America default to English or English
(U.S.).
If your network provider supports it, you can install more languages in your BlackBerry Curve by using Application Loader in BlackBerry Desktop Manager. For more information on Application Loader, see Chapter 19.
4. Press the menu key and then select Save from the menu that appears.
Isn’t it great when you can actually read what’s onscreen? But don’t think that you’re finished quite yet. You still have some personalizing to do.
Typing with ease using AutoText
Even the most devoted BlackBerry Curve user has to admit that typing on a full keyboard is easier than thumb-typing on a BlackBerry Curve. In an attempt to even the score a bit, your BlackBerry Curve comes equipped with an AutoText feature, which is a kind of shorthand that can cut down on how much you have to type.
AutoText basically works with a pool of abbreviations that you set up. You then just type an abbreviation to get the word you associated with that abbreviation. For example, after setting up b/c as an AutoText word for because, any time you type b/c, you automatically get because onscreen.
Your BlackBerry Curve comes with a few default AutoText entries. Here are some useful ones:
mypin: Displays your BlackBerry PIN
mynumber: Displays your BlackBerry phone number
myver: Displays your BlackBerry model number and OS version
The whole AutoText thing works best if you set up your own personal code, mapping your abbreviations to their meanings. (This is why we discuss AutoText as part of personalization.)
To set up your own code, do the following:
1. Press the menu key and then select the Options (wrench) icon.
2. Select the AutoText option.
Here, you can choose to see (or search for) existing AutoText words or create new ones.
3. Press the menu key and then select New.
The AutoText screen appears, as shown in Figure 3-2.
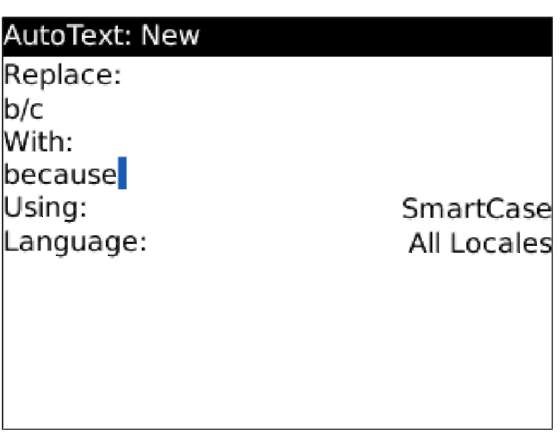
Figure 3-2:
Create AutoText here.
4. In the Replace field, enter the characters that you want to replace (in this example, b/c). In the With field, type what replaces your characters (in this example, because).
5. In the Using field, choose between the SmartCase and Specified Case options.
• SmartCase capitalizes the first letter when the context calls for that, such as the first word in a sentence.
• Specified Case replaces your AutoText with the exact text found in the With field.
For example, say you have the AutoText bbg set up for the term blackber-ryGoodies.com and you want it to appear as is, in terms of letter cases (the first b isn’t capitalized). If you use Specified Case, your AutoText always appears as blackberryGoodies.com no matter where it is in the sentence. If you instead were to choose SmartCase for this particular AutoText, it would be capitalized as the first word in a sentence, which isn’t what you want.
6. In the Language field, select All Locales from the list of options.
Our preference for this setting for any self-created AutoText is All Locales. What this means is that regardless of the language input method (for example, English UK, English U.S., or French), any self-created AutoText is available for you to use. So in the case of the AutoText bbg (blackberryGoodies.com), whether you are typing in French or Chinese, you can use this AutoText. On the other hand, if you select only the French input method for bbg as the Language field, you would be able to use this only if your input method is set to French in the Language option.
You can choose the input method in the Language options. We go over choosing a language input method next.
7. Press the menu key and then select Save from the menu that appears.
If you specify a language input method other than All Locales, your input method setting in the Language option must match the Language field in AutoText to use your newly created AutoText. Follow these steps:
1. Press the menu key and then select the Options (wrench) icon.
2. Scroll through the list of options until you find the Language setting and then select it.
Here, you can choose the language and input method.
3. Select the Input Method field and then select the input method you need from the list.
For your new AutoText setting to work (assuming that you didn’t choose All Locales as the language for your AutoText), this option needs to match the input method set in your Language option.
4. Press the menu key and then choose Save.
Getting your dates and times fined up
Having the correct date, time, and time zone is important when it comes to your BlackBerry Curve for, we hope, obvious reasons. Many of the fine features that make up the BlackBerry Curve core experience, as it were, depend on the time, date, and time zone being accurate.
Need an example? How about your BlackBerry Curve calendar events? Imagine, if you will, that you have a make-or-break meeting set for 9 a.m. (in your time zone) with a client in Paris, who is in who-knows-what time zone.
You definitely want to be on time for that appointment, but you probably won’t be if you’re planning on having your BlackBerry Curve remind you — that is, if you haven’t set up the appropriate date, time, and time zone. Follow these steps to do that:
1. Press the menu key and then select the Options (wrench) icon.
2. Select the Date/Time setting.
The Date/Time screen appears.
3. For the Time Zone field, select a time zone.
The Date/Time screen confirms the time zone that you chose. Note that if you travel to a different time zone, you need to adjust this field because it does not adjust automatically.
4. For the Time field, select the proper hour and minutes.
Here, you adjust the time to current hours and minutes.
5. For the Date field, select the date.
6. For the Date/Time Source field, select Network.
This sets your date and time source to your service provider’s server time (see Figure 3-3). By having this option set to Network, the time will always be accurate. However, if you are someone who always has the time set 10 minutes earlier than the actual time (so you can be on time for those important meetings), you would set the Date/Time Source field to BlackBerry.
7. Press the menu key and then select Save from the menu that appears.
Doing so saves your date and time settings in perpetuity — a really long time, in other words.
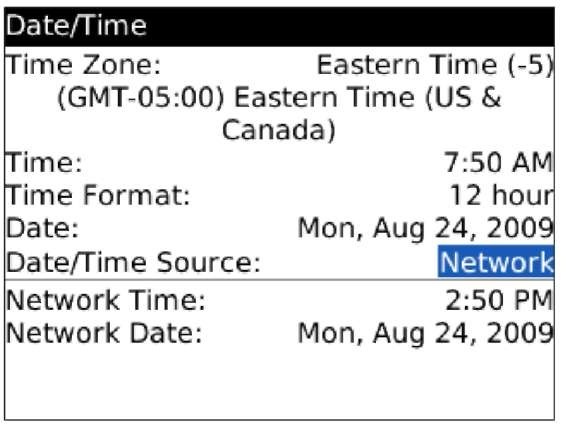
Figure 3-3:
Set the date and time of your BlackBerry Curve.
Customizing your screen’s look and feel
Right up there with making sure that your date and time settings are accurate is getting the display font, font size, and screen contrast to your liking. Now we know that some of you don’t give a hoot if your fonts are Batang or Bookman as long as you can read the text, but we also know that other folks won’t stop configuring the fonts until they get them absolutely right. For all you tweakers out there, here’s how you play around with your BlackBerry Curve’s fonts:
1. Press the menu key and then select the Options (wrench) icon.
2. Select the Screen/Keyboard setting.
The Screen/Keyboard screen appears with various customizable fields, as shown in Figure 3-4.
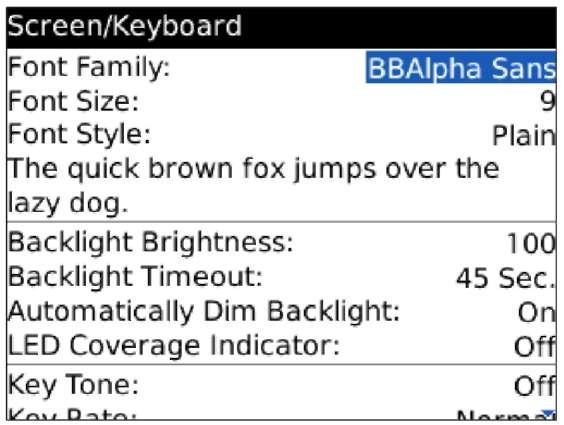
Figure 3-4:
The Screen/ Keyboard screen, waiting for personalization.
3. For the Font Family field, select a font from the drop-down list.
You can choose three to ten fonts, depending on your provider.
4. For the Font Size field, select a font size.
One thing to keep in mind is that the smaller the font size, the more you can see onscreen; however, a smallish font is harder on the eyes.
Note: As you scroll up and down the list of fonts and font sizes, notice that the text The quick brown fox jumps over the lazy dog below the Font Style setting takes on the look of the selected font and size so that you can preview what the particular text looks like. (In case you were wondering, this sentence uses every letter in the alphabet.)
5. Press the menu key and then select Save from the menu that appears.
Similar to setting Font Size, you can play with Font Style to set it to Bold, Italic, or Plain.
With fonts out of the way, it’s time to change the brightness of your screen as well as a few other viewing options, including how to program the convenience key to exactly what is convenient to you:
1. Press the menu key and then select the Options (wrench) icon.
2. Select the Screen/Keyboard setting.
The Screen/Keyboard screen appears with its various customizable fields (refer to Figure 3-4).
3. For the Backlight Brightness field, select the desired brightness from the drop-down list.
You can choose 0 to 100, where 0 is the darkest and 100 is the brightest.
4. For the Left Side Convenience Key Opens field, select from the dropdown an application for your left convenience key to open when you press it.
5. Repeat Step 4 for the Right Side Convenience Key Opens field.
6. For the Backlight Timeout field, select the time period for the backlight timeout.
You can choose 10 seconds up to 2 minutes. The lower this setting, the less time you’ll have backlighting (after you press each key). However, a low setting helps you conserve battery life.
7. Change the Automatically Dim Backlight field, if necessary.
When you’re outdoors with a bright sun on your BlackBerry Curve, you’ll probably have difficulty reading the screen. When the Automatically Dim Backlight feature is on (the default), it autoadjusts the backlight to be bright enough for you to read your BlackBerry Curve while outdoors.
8. For the Horizontal Sensitivity field, select how sensitive you want the trackball or trackpad to be horizontally.
You can choose 20 to 100, where 20 is the least sensitive and 100 is the most sensitive.
9. For the Vertical Sensitivity field, select how sensitive you want the trackball or trackpad to be vertically.
Again, 20 is the least sensitive and 100 is the most sensitive. Keep in mind that if your trackball or trackpad is too sensitive, it will be hard to control.
10. To confirm your changes, press the menu key and then select Save.
Choosing themes for your BlackBerry Curve
Your BlackBerry Curve is preloaded with different themes, which are predefined sets of looks (wallpaper, fonts, menu layout). You can download themes from BlackBerry Curve’s mobile Web site.
Follow these steps to change your theme:
1. Press the menu key and then select the Options (wrench) icon.
2. Select the Theme setting.
You see a list of available themes.
3. Select the theme you want.
You see a preview of the theme you selected (see Figure 3-5).
4. Press the menu key and then select Activate.
You should be able to see the change immediately.
It usually takes a while for a new theme to fully activate.
You can download other themes. Just remember that you have to use your BlackBerry Curve, not your PC, to access the following URL: http:// mobile.blackberry.com.
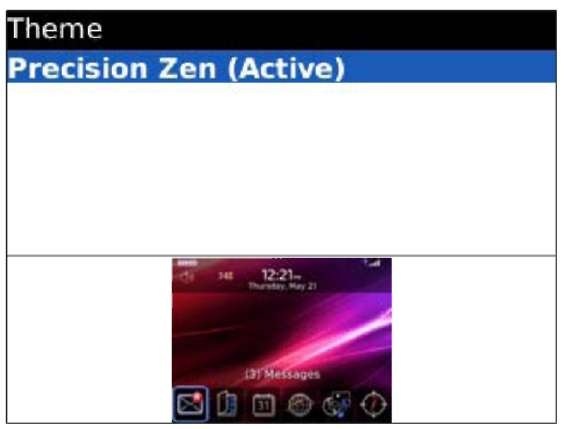
Figure 3-5:
Preview of currently selected theme.
Wallpapering your BlackBerry Curve
Like your desktop PC, the BlackBerry Curve Home screen can be personalized with wallpaper. You set an image to be your BlackBerry Curve Home screen background by using the BlackBerry Curve Media application. Follow these steps:
1. Press the menu key and then select the Media icon.
The following categories are in Media: Music, Video, Ring Tones, Pictures, and Voice Notes.
2. Select the Pictures category.
Doing so brings up four choices:
• Camera: Turns on the BlackBerry camera.
• All Pictures: Displays all the pictures stored on your BlackBerry.
• Picture Folders: Displays the pictures stored on your BlackBerry, organized by folders.
• Sample Pictures: Displays the pictures that came with your BlackBerry.
3. Select the picture you want to use for your Home screen background.
The selected picture appears in full-screen view.
4. Press the menu key and then select Set as Home Screen Image.
The picture is now your new Home screen wallpaper.
5. Press and hold the escape key to return to the Home screen and see the result.
You can download free wallpapers from the following Web sites (as long as you use your BlackBerry Curve, not your PC, to access the URLs):
http://mobile.blackberry.com www.blackberrywallpapers.com www.crackberry.com/free-wallpapers
After you have your BlackBerry Curve’s look and feel just the way you want, there’s just one thing left to do before you can move on. You need to get your BlackBerry Curve to sound how you want it to.
Letting freedom ring
The whole appeal of the BlackBerry phenomenon is the idea that this little electronic device can make your life easier. One of the ways it accomplishes this is by acting as your personal reminder service — letting you know when an appointment is coming up, a phone call is coming in, an e-mail has arrived, and so on. Basically, your BlackBerry Curve is set to bark at you if it knows something it thinks you should know, too. Figure 3-6 lists the kinds of things your BlackBerry Curve considers bark-worthy, ranging from browser alerts to task deadlines.
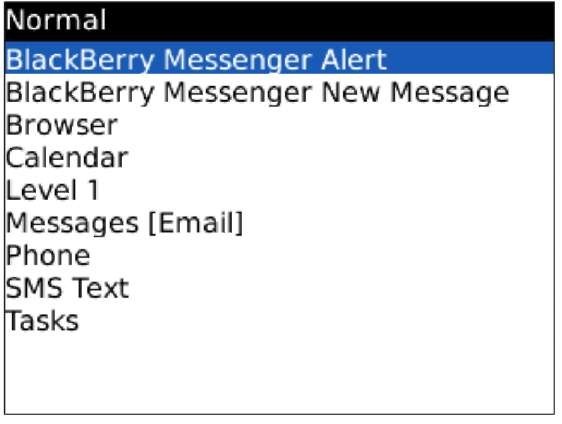
Figure 3-6:
Set attention-needy applications here.
Different people react differently to different sounds. Some BlackBerry Curve barks would be greatly appreciated by certain segments of the population, whereas other segments might react to the same sound by pitching their BlackBerry Curve under the nearest bus. The folks at Research In Motion are well aware of this and have devised a great way for you to customize how you want your BlackBerry Curve to bark at you — they call it your profile.
You can jump right into things by using a predefined profile, or you can create your own profile. The upcoming sections take a look at both approaches.
Whether you create your own profile or customize a predefined profile, each profile is divided into several categories that represent the application for which you can define alerts.
In BlackBerry OS 4.6, the application to set your profiles is named Profiles and includes the following categorizations:
BlackBerry Messenger Alert: Alerts you when BlackBerry Messenger has something to notify you regarding new contact notification.
BlackBerry Messenger New Message: Alerts you when BlackBerry Messenger has a new message from a BlackBerry Messenger contact.
Browser: Alerts you when you receive a new channel push, which is just a Web page sent to your BlackBerry Curve.
Calendar: Alerts you when you have upcoming appointments.
Level 1: Alerts you with a special tone when you have an urgent (as defined by your sender) e-mail. A BlackBerry PIN-to-PIN message can also be considered urgent. For more on PIN-to-PIN, see Chapter 9.
Messages [Email]: Alerts you when a new e-mail message is in your inbox.
Phone: Alerts you if you have an incoming call or a new voice mail.
SMS Text: Alerts you when you have an SMS (Short Messaging Service) message.
Tasks: Alerts you to an upcoming to-do deadline.
In BlackBerry OS 5.0, profiles can be found in the Sounds application, and Sound items are organized into the following categories:
Phone: Alerts you if you have an incoming call or voice mail.
Messages: Alerts you if you have an incoming e-mail, SMS, MMS, or BlackBerry PIN message. Also, you can set different alerts for each individual e-mail account.
Instant Messages: Alerts you if you have any BlackBerry Messenger Alerts; if you have third-party instant messaging installed (such as Google Talk), you can set the alerts here as well.
Reminders: Alerts you if you have set up calendar reminders, tasks reminders, or e-mail follow-up flags (see Chapter 8).
Other: This category is a notification setting for third-party applications such as Facebook a well as the Browser application.
You can personalize all the listed applications according to how you want to be alerted. Because how you customize them is similar, we use one application, Messages, as an example in the text that follows.
After this, we go over creating a profile from scratch. You may be wondering why you need to create a profile if you can personalize the predefined ones. If your needs are different from the predefined settings, creating a profile is the way to go.
Using factory settings
If you’re okay with customizing a predefined, factory-loaded profile, just do the following if you have OS 4.6:
1. From the BlackBerry Curve Home screen, select the Profile application.
A pop-up screen appears, listing different profiles (Quiet, Vibrate, Normal).
2. Select Advanced, which appears at the end of the list.
A screen appears, listing different profiles.
3. Highlight the Normal profile in the list, press the menu key, and then select Edit.
The Normal screen appears, listing the applications with alert capabilities mentioned in the preceding section (refer to Figure 3-6).
4. Select the Messages [Email] application.
You’re faced with the Messages for Normal profile, which is divided into an Out of Holster section and an In Holster section, as shown in Figure 3-7. A holster (in this context) is simply the belt clip or case that houses your BlackBerry Curve while you aren’t using it. BlackBerry Curve is smart enough to know when it is in a holster. With RIM’s BlackBerry holster, a magnet built into the holster auto switches the Curve to In Holster mode within the selected profile.
5. For the Out of Holster field, select a tone from the drop-down list of alert options.
Doing so enables sound in Out of Holster mode.
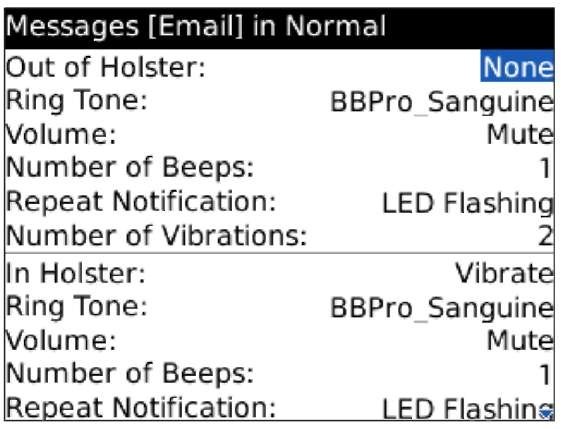
Figure 3-7:
Choose a tone to alert you when your BlackBerry Curve is out of its holster.
6. For the Ring Tone field, select the tune you want from the drop-down list.
As you scroll through the tunes and pause, your BlackBerry Curve plays the tune so that you know what it sounds like before you change it.
7. Press the menu key and then select Save.
As you may have guessed from how Messages in the Normal profile is divided, your BlackBerry Curve can notify you in different ways based on whether your BlackBerry Curve is in plain view (Out of Holster) or tucked away next to your belt (In Holster). To set up a different sound for In Holster mode, just put the necessary info in the fields for the In Holster section — and be sure to choose a different tune this time. (Choosing the same tune kind of defeats the purpose, doesn’t it?)
If you’re like us and get more than 200 e-mails daily, you probably don’t want your BlackBerry Curve sounding off 200 times a day. You can set up your Curve so that it notifies you only if an e-mail has been marked urgent, requiring your immediate attention. You can do this by setting the notification for your Messages application to None for both In Holster and Out of Holster. Then, in the Level 1 option (refer to Figure 3-6), you can set your desired notification for both In Holster and Out of Holster. That way, you conveniently filter any unnecessary e-mail notifications, leaving just the urgent stuff to sound off to you.
For BlackBerry OS 5.0, follow these steps to customize alerts for your BlackBerry:
1. From the BlackBerry Curve Home screen, select the Sounds application.
A pop-up screen appears, listing different profiles (Silent, Vibrate, Normal, Loud, Medium, Phone Calls Only, All Alerts Off).
2. Select Edit Profiles, which appears at the end of the list.
A screen appears, listing different profiles.
3. Highlight the Normal profile in the list, press the menu key, and then select Edit.
The Normal screen appears, listing the applications with alert capabilities mentioned in the preceding section (refer to Figure 3-6).
4. Expand the Messages heading by pressing the trackball or trackpad once, and select any of the e-mail accounts you have.
A screen appears with options to set the ring tone, LED, and vibration.
5. For Ring Tone, you can set the following options:
• Ring Tone: The ring tone you want.
• Volume: How loud you want the ring tone, from Silent to 10 (the loudest).
• Count: The number of times the ring tone repeats, from 1 to 3.
• Play Sound: Whether the ring tone will play while your BlackBerry Curve is in or out of the holster or whether it will always play.
6. For LED, set it On or Off.
7. For vibration, set it to be On, Off, or Custom.
If you choose Custom, you have the following options:
• Length: How long each vibration lasts: Short, Medium, or Long.
• Count: The number of times the vibration occurs; you can choose 1, 2, 3, 5, or 10.
• Vibrate: Whether the vibration will occur while your BlackBerry is in or out of holster or will always vibrate.
8. Press the menu key and then select Save. Creating your own profile
You need to know which applications on your BlackBerry Curve have alert capabilities because then you can personalize each “Hey, you!” to your liking. You can have your BlackBerry Curve so personalized that you can tell whether you have a phone call or an incoming message just by how your BlackBerry Curve sounds.
If you’re already familiar with the different applications and are clear how you want each one to alert you, go on and create your own profile. As we mention earlier, you can achieve the same result by personalizing the predefined profiles that come with your BlackBerry Curve. But if you like to keep the predefined profiles the way they are, create a new profile by following the steps for your OS version.
If you have OS 4.6, follow these steps to create a new profile:
1. From the BlackBerry Curve Home screen, select the Profile application.
A pop-up screen appears, listing different profiles (Quiet, Vibrate, Normal).
2. Select Advanced, which appears at the end of the list.
A screen appears, listing different profiles.
3. Press the menu key and then select New.
A new Profile screen appears, as shown in Figure 3-8, prompting you to name your profile.
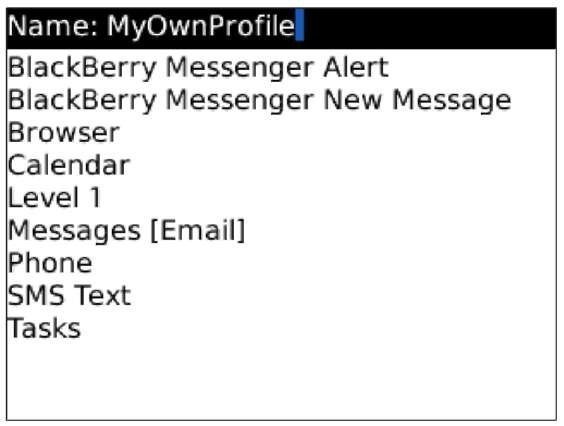
Figure 3-8:
Create your own profile from this menu in OS 4.6.
4. In the Name field, enter a name for your profile. For this example, just type My Own Profile.
5. Configure your new profile.
To customize each of the nine applications, refer to the OS 4.6 part of the preceding section, “Using factory settings,” Steps 3-7.
6. Press the menu key and then select Save.
Your newly created profile appears in the Profile screen.
7. Select My Profile.
You can start to use your newly created profile. If you have OS 5.0, follow these steps to create a new profile:
1. From the BlackBerry Curve Home screen, select the Sound application.
A pop-up screen appears, listing different profiles.
2. Select Edit Profiles, which appears at the end of the list.
A screen appears, with a line Add Custom Profile and also a list of profiles.
3. Select Add Custom Profile.
A New Custom Profile screen appears, prompting you to name your profile.
4. In the Name field, enter a name for your profile. For this example, just type MyOwnProfile.
5. Configure your new profile.
To customize each of the categories of applications, refer to the OS 5.0 part of the preceding section, “Using factory settings,” Steps 3-7.
6. Press the menu key and then select Save.
Your newly created profile appears in the Profile screen.
7. Select My Profile.
You can start to use your newly created profile.
You can switch between your current profile and the Quiet profile by pressing and holding the # key.
Regardless of whether the ring tone is for an incoming call or an incoming e-mail, you can download more ring tones to personalize your BlackBerry Curve. Also, you can use any MP3 file in your Media application as your personalized ring tone. Follow these steps:
1. From the Home screen, press the menu key and then select the Media application.
2. In Media, select the Music category.
Doing so brings up various music classifications such as Artist, Album, and Genres.
3. Highlight the music file you want to use for your ring tone.
4. Press the menu key and then select Set as Phone Tune.
This sets the music file as your new phone tune.
5. Press and hold the escape key to return to the Home screen.
Keeping Your BlackBerry Curve Safe
The folks at RIM take security seriously, and so should you. Always set up a password on your BlackBerry Curve. If your BlackBerry Curve hasn’t prompted you to set up a password, you should do so immediately. Here’s how:
1. From the BlackBerry Curve Home screen, select the Options (wrench) icon.
2. Select the Password option.
3. Highlight the Password field and then select Enabled.
All this does for now is enable the Password feature. You won’t be prompted to type a password until you save the changes you just made.
4. Click the Set Password button.
At this time, you should be prompted to enter a new password, as shown in Figure 3-9.
If you have set a password before, the button will be called Change Password.
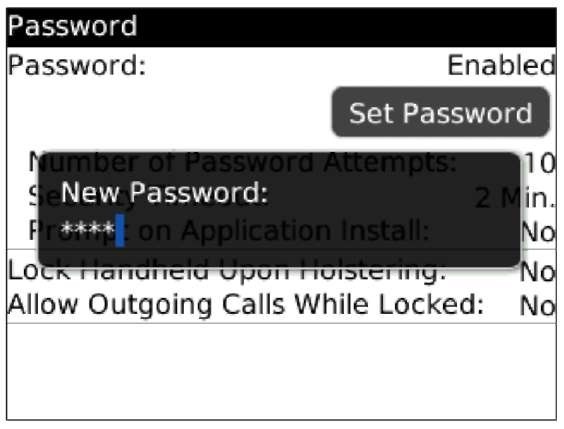
Figure 3-9:
It’s time to enter a new password.
5. Type a password and then type it again for verification.
From this point on, whenever you lock your BlackBerry Curve and want to use it again, you have to type the password. How do you lock your BlackBerry Curve? Good question. Keep reading.
When you set your password on a BlackBerry Curve, you must make sure that you know what letters your password uses and not just which keys you pressed. You need the same password if you link your BlackBerry Curve with Desktop Manager for synchronization. For more on Desktop Manager, read Chapters 16, 17, and 18.
Setting up your password is a good first step, but just having a password won’t help much if you don’t take the further step of locking your BlackBerry Curve when you aren’t using it. (You don’t want people at the office or at the table next to you at the coffee shop checking out your e-mails or phone history when you take a bathroom break, do you?) So how do you lock your BlackBerry Curve? Let us count the ways . . . we came up with two.
You can go the Autolock after Timeout (also known as Security Timeout) route by following these steps:
1. Press the menu key and then select the Options (wrench) icon.
2. Select the Password option.
The Password screen appears.
3. Highlight the Security Timeout field and then select the desired minutes.
The preset times range from 1 minute to 1 hour.
4. Press the menu key and then select Save.
If you’re more the hands-on kind of person, you can go the Manual Lockout route by scrolling to the keyboard Lock icon on your Home screen and pressing the trackball. (Pressing K while on the Home screen does the same thing. Make sure to turn off the Dial from Home Screen option. See Chapter 2 for more info on using Home screen shortcuts.)
As a shortcut, to lock your BlackBerry Curve, just press and hold the asterisk (*) key.
No matter what route you take to lock your BlackBerry Curve, you use your (newly created) password to unlock it when you get back from wherever you’ve been.
Blocking That Spam
With your BlackBerry Curve, you can block certain e-mails, SMS numbers, or BlackBerry PINs from getting to your inbox. It’s like having your own spam blocker on your Curve!
To set up your personal spam blocker, follow these steps:
1. From the Home screen, select the Options (wrench) icon.
2. Select the Security option.
3. Select the Firewall option.
This opens the Firewall screen.
4. Highlight the Status field and select Enable.
This enables the spam blocker.
5. Under Block Incoming Message, make sure what you want to block is selected:
• SMS: Blocks SMS messages.
• PIN: Blocks BlackBerry PIN messages.
• BlackBerry Internet Service: Blocks e-mail messages (for example, the e-mail account that you set up from Google or Yahoo! Mail).
• Enterprise Email: Blocks enterprise e-mail (if you’re in a corporate e-mail network).
6. In the Except Messages From area, select the desired options:
• Contact: Blocks everything except the e-mails and phone numbers in your Contacts.
• Specific Address: Blocks everything specified by you (you can set up the list described in Steps 7 and 8).
7. Press the menu key and then select Configure Exception.
This opens the Firewall exception screen.
8. Press the menu key and then select the desired options:
• Add Email: Specify the e-mail you want to block by selecting this check box.
• Add PIN: Specify the BlackBerry PIN you want to block by selecting this check box.
• Add Phone Number: Specify the SMS number you want to block by selecting this check box.
