Adding hatching
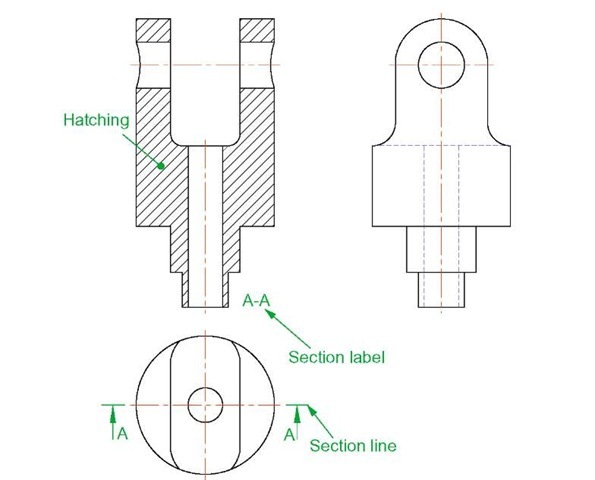
In order to show internal shapes of a solid being drawn in orthographic projection, the solid is imagined as being cut along a plane and the cut surface then drawn as seen. Common practice is to hatch the areas which then show in the cut surface. Note the section plane line, the section label and the hatching in the sectional view (Fig. 7.10).
To add the hatching as shown in Fig. 7.10:
Fig. 7.10 A sectional view
1. Call the Hatch tool with a left-click on its tool icon in the Home/Draw panel (Fig. 7.11). A new tab Hatch Creation is created and opens the Hatch Creation ribbon (Fig. 7.12), but only if the ribbon is active.
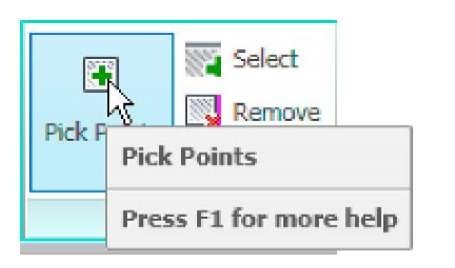
Fig. 7.11 The Hatch tool icon and tooltip from the Home/Draw panel
Fig. 7.12 The Hatch Creation tab and ribbon
2. In the Hatch Creation/Pattern panel click the bottom arrow on the right of the panel and from the palette which appears pick the ANI31 pattern (Fig. 7.13).
3. In the Hatch Creation/Properties panel adjust the Hatch Scale to 2 (Fig. 7.14).
Fig. 7.13 Selecting ANSI31 pattern from the Hatch Creation/Pattern panel
Fig. 7.14 Setting the Hatch Scale to 2 in the Hatch Creation/Properties panel
4. In the Hatch Creation/Boundaries panel left-click the Pick Points icon (Fig. 7.15).
5. Pick the points in the front view (left-hand drawing of Fig. 7.16) and the picked points hatch. If satisfied the hatching is correct right-click (right-hand drawing of Fig. 7.16).
Fig. 7.15 Select Pick Points from the Hatch Creation/Boundaries panel
Fig. 7.16 The result of hatching
Isometric drawing
Note
Isometric drawing must not be confused with solid model drawing, examples of which are given in topics 12-19. Isometric drawing is a 2D method of describing objects in a pictorial form.
Setting the AutoCAD window for isometric drawing
To set the AutoCAD 2011 window for the construction of isometric drawings:
1. At the command line:
And the grid dots in the window assume an isometric pattern as shown in Fig. 7.17. Note also the cursor hair lines which are at set in an Isometric Left angle.
Fig. 7.17 The AutoCAD grid points set for isometric drawing
Fig. 7.18 The three isoplanes
2. There are three isometric angles – Isoplane Top, Isoplane Left and Isoplane Right. These can be set by pressing either the F5 function key or the Ctrl and E keys. Repeated pressing of either of these ‘toggles’ between the three settings. Fig. 7.18 is an isometric view showing the three isometric planes.
The isometric circle
Circles in an isometric drawing show as ellipses. To add an isometric circle to an isometric drawing, call the Ellipse tool. The command line shows:
Fig. 7.19 The three isocircles
And the isocircle appears. Its isoplane position is determined by which of the isoplanes is in operation at the time the isocircle was formed. Fig. 7.19 shows these three isoplanes containing isocircles.
Examples of isometric drawings
First example – isometric drawing (Fig. 7.22)
1. This example is to construct an isometric drawing to the details given in the orthographic projection (Fig. 7.20). Set Snap on (press the F9 function key) and Grid on (F7).
2. Set Snap to Isometric and set the isoplane to Isoplane Top using F5.
3. With Line, construct the outline of the top of the model (Fig. 7.19) working to the dimensions given in Fig. 7.18.
4. Call Ellipse tool and set to isocircle and add the isocircle of radius 20 centred in its correct position in the outline of the top (Fig. 7.21).
5. Set the isoplane to Isoplane Right and with the Copy tool, copy the top with its ellipse vertically downwards 3 times as shown in Fig. 7.22.
6. Add lines as shown in Fig. 7.21.
7. Finally using Trim remove unwanted parts of lines and ellipses to produce Fig. 7.22.
Second example – isometric drawing (Fig. 7.24)
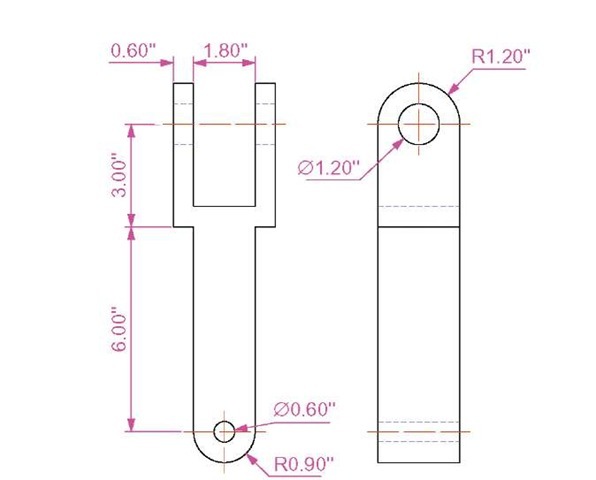
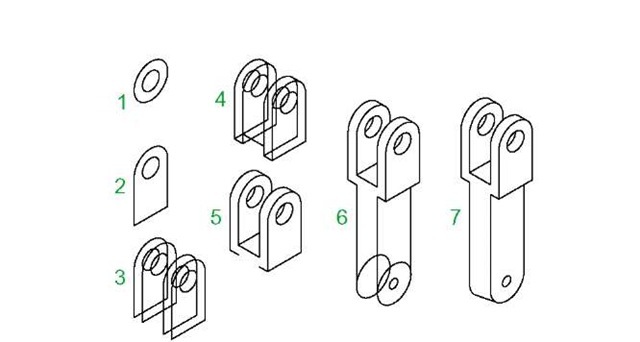
Fig. 7.23 is an orthographic projection of the model of which the isometric drawing is to be constructed. Fig. 7.24 shows the stages in its construction.
The numbers refer to the items in the list below:
1. In Isoplane Right construct two isocircles of radii 10 and 20.
2. Add lines as in drawing 2 and trim unwanted parts of isocircle.
Fig. 7.20 First example – isometric drawing – the model
Fig. 7.21 First example – isometric drawing – items 3, 4, 5 and 6
Fig. 7.22 First example – isometric drawing
3. With Copy copy 3 times as in drawing 3.
4. With Trim trim unwanted lines and parts of isocircle (drawing 4).
5. In Isoplane Left add lines as in drawing 5.
6. In Isoplane Right add lines and isocircles as in drawing 6.
7. With Trim trim unwanted lines and parts of isocircles to complete the isometric drawing – drawing 7.
Fig. 7.23 Second example – isometric drawing – orthographic projection
Fig. 7.24 Second example – isometric drawing – stages in the construction
REVISION NOTES
1. There are, in the main, two types of orthographic projection – first angle and third angle.
2. The number of views included in an orthographic projection depends upon the complexity of the component being drawn – a good rule to follow is to attempt fully describing the object in as few views as possible.
3. Sectional views allow parts of an object which are normally hidden from view to be more fully described in a projection.
4. When a layer is turned OFF, all constructions on that layer disappear from the screen.
5. Frozen layers cannot be selected, but note that layer 0 cannot be frozen.
6. Isometric drawing is a 2D pictorial method of producing illustrations showing objects. It is not a 3D method of showing a pictorial view.
7. When drawing ellipses in an isometric drawing the Isocircle prompt of the Ellipse tool command line sequence must be used.
8. When constructing an isometric drawing Snap must be set to Isometric mode before construction can commence.


