Alt and Shift
The Alt key activates the alternate mode for nearly all ZBrush brushes. When sculpting with ZAdd on, holding down Alt will cause the brush to carve away instead of building up form.
The Shift key serves as a way to access the Smooth brush. In ZBrush you cannot directly select the Smooth brush; instead, you press and hold the Shift key to change your current brush to Smooth. While holding Shift, your draw circle will become blue to let you know you are smoothing the surface. Typically, it is helpful to have a larger Smooth brush than a sculpting brush. To change the default size of the Shift Smooth brush, adjust the Alt Brush slider in the Smooth Brush Modifiers menu under the Brush menu.
If you want to change the brush settings such as Draw Size and ZIntensity, do so while pressing the Shift key. These changes will only apply to the Smooth brush. Ifyou want to make adjustments to the brush curve for the Smooth brush, do so while holding down Shift and the curve edits will only apply to the Smooth brush.
Rotating is the simplest movement to accomplish. With the mouse off your model in the document window, notice that it becomes a circular arrow. Left-click and drag, and the model will rotate with your movements. If you right-click and drag while hovering your mouse over the object, the model will rotate. Note that if you tap the right mouse button, it will bring up the quick menu. The benefit of this right-click navigation is that it provides another option for rotating the model when zoomed into full screen. If you zoom both your document and your ZTool, you will notice there is nowhere to left-click to rotate other than a small rectangle around the border of the document. This rotate safe area allows you to click and drag to rotate the model while zoomed in. You can rotate the model at any time by pressing the left mouse button and clicking anywhere on the document or model to rotate.
To zoom in and out from the model, hold down the Alt key and left-click somewhere on the document window other than the model, release the Alt key, and move the mouse up and down. The object will now appear to zoom in and out. In reality it is scaling, but this differentiation is not important when navigating a ZTool. Panning is accomplished by the same combination of Alt and left-click, but you don’t release Alt. Simply move the mouse and the object moves with you.
If your model is off center and you want to return to the default view, press the F key to bring it back into focus. Another useful option is the Local button found on the right side of the screen or under the Transform menu. Click Local and your rotations will occur around the last point you edited on the model.
These movements and combinations may take some practice and may seem strange if you are used to other programs, but with a little experience you’ll find they become second nature. You can always use the quick navigation icons at the right side of the screen if the button combinations are too difficult.
Masking and Visibility Brushes
In previous versions, masking and mesh visibility were handled with hotkeys. ZBrush’s Masking and Visibility tools are now brushes in version 4.0, and you select them from the main Brush menu. You have several options for each. Masking brushes include Mask
Pen, which is the default mask painting style; Mask Lasso; Mask Circle; Mask Curve; and Mask Rect. When a masking brush is selected, ZBrush knows these brushes are only accessed when the Ctrl key is pressed, so it will only change the brush selected when you press Ctrl. ZBrush will display a dialog box asking if you want to change the brush (Figure 1.15). This dialog gives you the option to skip the brush change note until the next restart. This is recommended if you change your masking or visibility brush modes often as the extra mouse click can become tiresome. Please see the DVD for a video showing these brushes and stroke types in action.
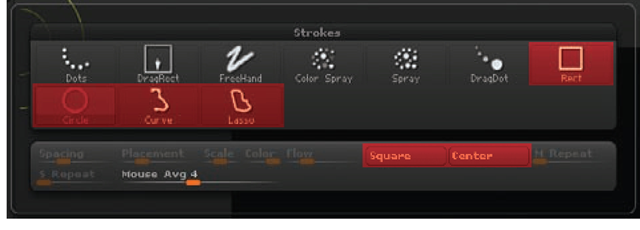
The new Masking and Visibility brushes make use of some new stroke types: Curve, Lasso, Circle, and Rectangle. If you open the Stroke menu while holding Shift, these strokes will be visible (Figure 1.16).
Figure 1.15 The brush change dialog box
Figure 1.16 The new Stroke types
Rectangle and Circle will create selections by dragging a circular or rectangular shape. You’ll see Square and Center options in the Stroke menu as well. Square will cause the two strokes to create perfect circles or squares rather than ellipses or rectangles. Center will force the shape to generate from the center out.
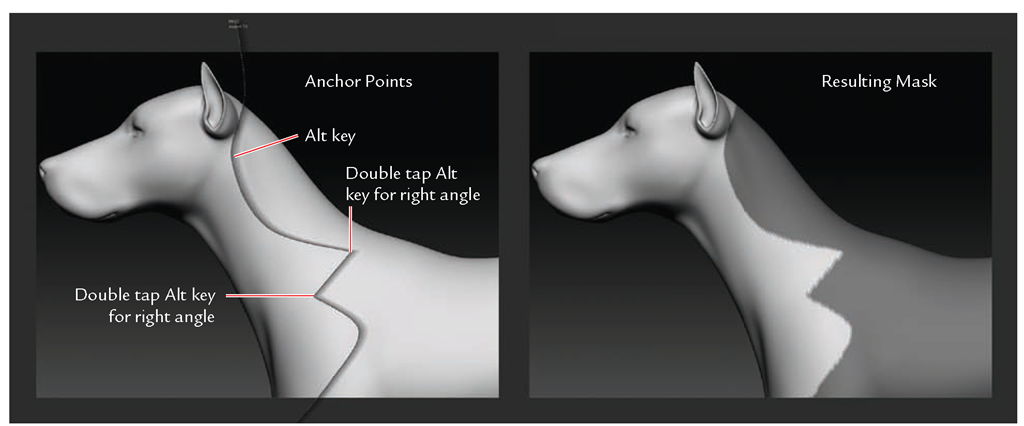
The Curve stroke type is used by the Mask Curve brush. This brush allows you to define a selection by isolating it to one side of a curve. To use the Curve brush, press Ctrl, click the stylus on the screen, and drag it. A curve will start to draw with a gradient down one side. This is the active side that will be masked. You can invert this by pressing Alt before releasing the stylus.
While drawing the curve, press Alt once to add an anchor point to the curve. Press Alt twice to add a hard right angle to the curve. Release the stylus to apply the masking (Figure 1.17).
Figure 1.17 A masking curve with examples of anchor points and hard angles
Customizing the Interface
The ZBrush interface can be fully customized and saved for later sessions. To drag any interface option and dock it elsewhere in the UI, select Preferences + Custom UI + Enable Customize. Now when you hold down Ctrl+Alt and click and drag a button from any menu to another part of the interface, you can dock it there for easy access. To save your custom UI for later use, press Ctrl+Shift+1 or select Preferences + Config + Store Config. If at any time you want to restore the default interface, select Preferences + Restore Standard UI.


