Now that you have camera bookmarks for several angles of the face and have sculpted the basic shape of Amy’s head, face, and neck, you can begin sculpting the facial features – the first one will be the nose. Create a new layer and name it as Nose, then press Shift + D to subdivide the model to level 4. You may want to turn off the wireframe (press W) because at this subdivision level, the wireframe lines can be distracting. The tool sizes and strengths indicated are approximations, and feel free to change the settings to fit your sculpting style.
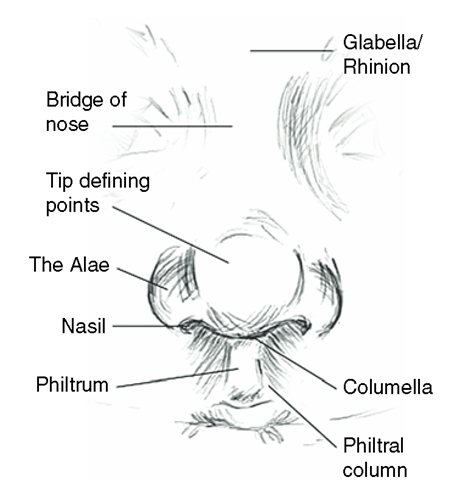
While reshaping and sculpting the head in the previous section, you actually sculpted some of the nose anatomy. When you pushed and pulled on the face and forehead and aligned the tip of the nose with the reference sketches, you defined the bridge and length of the nose. Without even knowing it, you have already come a long way in sculpting the nose. For you to follow along with this section of the tutorial, you will need to know the following nose anatomy (Figure 3.19). The following are some important things you should know about a child’s nose:
• There is very little bridge to a child’s nose, and the bridge is less defined as seen from the front because it blends into the cheeks.
• A child’s nose is usually more bulbous and tipped up than an adult’s nose. While looking from the top, the bulbous look is less apparent.
• The nostrils are smaller.
Widening the Bridge of the Nose
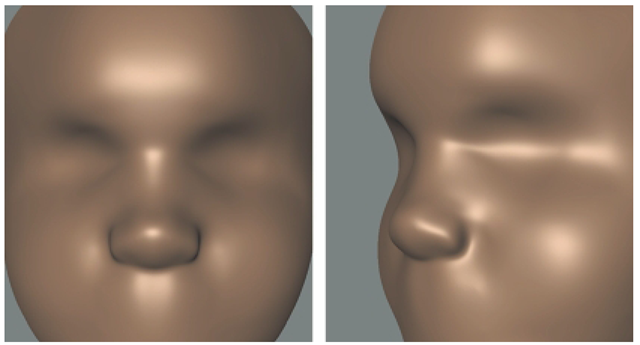
The first task is to widen the bridge of Amy’s nose. Use the Grab tool (size 10, strength 9) to pull the sides of the bridge of the nose. Next, use the Fill or Wax tools to sculpt the skin that connects the bridge of the nose to the face (Figure 3.20). Switch to the Side camera to compare your work with the side reference sketch to make sure that the bridge of the nose generally follows the sketch.
FIG 3.19 The External Anatomy of the Nose.
FIG 3.20 Widen the Bridge of the Nose and Sculpt the Sides of the Nose as They Blend into the Cheeks.
Sculpting the Alae and Tip of the Nose
If you are unsure of how wide to make the nose, it is wider than you think. Look at a front-view photograph, and if you measure the width of the nose from the edge of one alae to the edge of the other, you will find that about 1V3 nose widths will fit between an alae edge and the edge of a cheek (Figure 3.21). These types of comparative measurements help with proportional sculpting.
Now that you know about how wide to make the nose, select the Foamy tool (size 10, strength 10) and apply short strokes to slowly build up the alae as seen in Figure 3.22. Remember to smooth as you sculpt. Switch to the Front camera and compare your work with the front reference sketch. A few attempts may be required to create the alae as seen in the reference materials. Once you are finished, see if your model’s nose is the right width by comparing it with the measurement that you got from the photograph.
Refining the Tip of the Nose
You are probably getting better at positioning the camera, switching between cameras, and using camera bookmarks to get the best view to sculpt a specific feature. So, place the camera in a position where you can easily see the tip of the nose. Select the Foamy tool and begin sculpting the part of the tip that is below the bridge of the nose but just above the tip itself.
FIG 3.21 Comparing the Width of the Nose to the Width of the Cheek.
FIG 3.22 Roughing In the Alae.
These areas are the tip-defining points (Figure 3.23). Be sure to view the nose from different angles to ensure that it is being correctly sculpted. You may even look down at the nose from above or up from below to make sure that it is not flat. Constantly compare the model with the photographic reference. You may also use the Grab tool to move parts of the tip into position as you sculpt with the Foamy tool. Once again, check the width of the nose with the 1V3 measurement and also with the front-view reference sketch to ensure correct proportions.
FIG 3.23 Refining the Alae and the Tip of the Nose.
Adding Nostrils
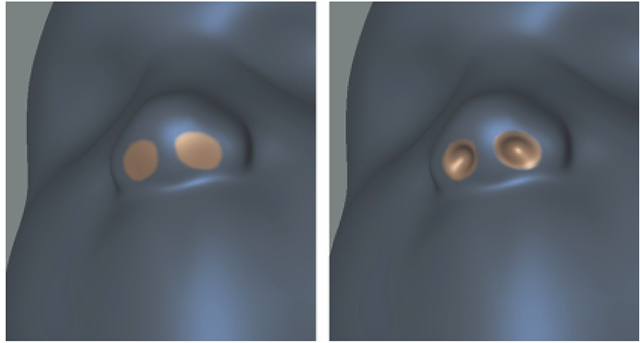
What is a nose without nostrils? In these next few steps, you will sculpt the nostrils. Rotate the camera until you can see the bottom of the nose. Refer to the reference photographs in which you can see the bottom of the nose. Select the Freeze tool (size 5, strength 100). Paint the area shown in Figure 3.28. Press Shit + I to invert the freeze. Then, with the Bulge tool inverted (size 5, strength 5), push in the nostrils (Figure 3.24). Alternate between the Bulge and Smooth tools to control sculpting the nostrils and sculpt from different views. When you are finished, press Shift + U to delete the Freeze and use the Smooth tool to soften the edges of the nostrils.
Refining the Alae
The next task is refining the alae so that the groove or transition from the tip of the nose to each alae is more distinct. Refer to the reference photographs often as you sculpt the alae. Rotate the camera so that you can see a side or a three-quarter view of the model. Select the Freeze tool (size 12), carefully paint the area shown in the first panel of Figure 3.25, and then invert the freeze. With an inverted Bulge tool (size 5, strength 10), lightly sculpt the alae facial groove, and smooth as you sculpt. Now with the Grab tool (size 5, strength 25), move the alae back toward the cheek and also down a bit. Undo the freeze and smooth both the groove and alae being careful not to smooth out the groove that you have just created. Just remove the jaggedness within the groove if there is any. Should you find that you need more mass at the columella, the structure between the nostrils, use the Foamy tool (size 10, strength 7).
FIG 3.24 Use the Freeze Tool to Mask the Area Where the Nostrils Will Be Sculpted. Invert Freeze and Then Use an Inverted Bulge Tool to Push In the Nostrils.Use the Smooth Tool to Get Rid of Any Unwanted Artifacts.
FIG 3.25 Refining the Alae.
After sculpting the features of the nose, remember to check the model against the reference sketches in the Front and Side cameras. Should you discover that the nose does not align with a reference sketch, then use the Grab tool to reposition it as necessary.
Sculpting with Negative Space
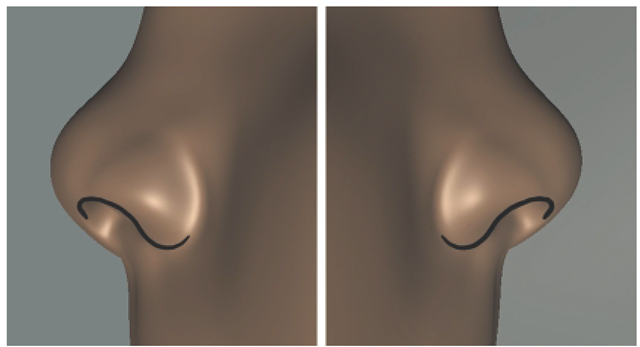
Sometimes, looking at a structure in a different way helps to highlight its shape and its relationship with its surrounding structures. For example, the bottom of the alae and the columella form the nostrils. In essence, the nostrils are negative space between these structures. To help get the right shape of the alae, the columella, and by default the nostrils, try the following: Look at a side view of the nose in one of the reference photographs. From the left side, as the outer edge of the alae makes its way around to the columella, it forms a backward S (on the right side, it’s a normal S). Look at this S shape to help you gauge the shape of the nostril and surrounding structures (Figure 3.26). The space between the alae and the columella or the nostrils forms a negative space.
FIG 3.26 Sculpt the Negative Space Created by the Nostrils and the S Shape Created by the Alae and the Columella to Get the Right Shapes.
Sculpting the Philtrum
Once you have completed the bridge, alae, nostrils, and bottom of the nose, you are almost finished. However, you are sculpting more than just a nose stuck on a face. Each part of the face is dependent on the shapes surrounding it. To complete the lower portion of the nose, you have to take the philtrum and philtral columns into consideration. The philtrum is the dip everyone has between the nose and the upper lip and the philtral columns are the ridges on either side of the philtrum. The philtrum blends into the columella and the philtral columns into the nostrils. Therefore, the edges of the nostrils do not complete a circle all the way around the bottom of the nose. In Amy’s nose, the philtrum and philtral columns are more subtle than in an adult’s nose, but they are there and have to be sculpted.
To sculpt the philtral columns, use the Wax tool (size 5, strength 5) and slowly build up the shapes shown moving downward and outward as to create the triangular mass as seen in Figure 3.27. Check your work with the reference sketches to make sure that everything is still in place and that you are not making this portion of the lip too thick.
Up to this point, you have done a lot of work to sculpt proportions, the shape of the head, and now the nose. This is a good time to save an incremental copy of your work. By sculpting the philtrum, you have already begun to sculpt the mouth.


