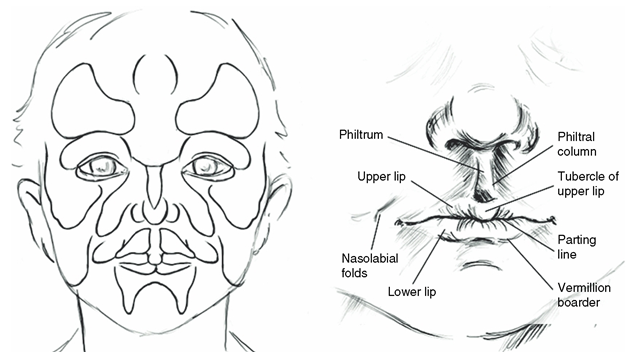
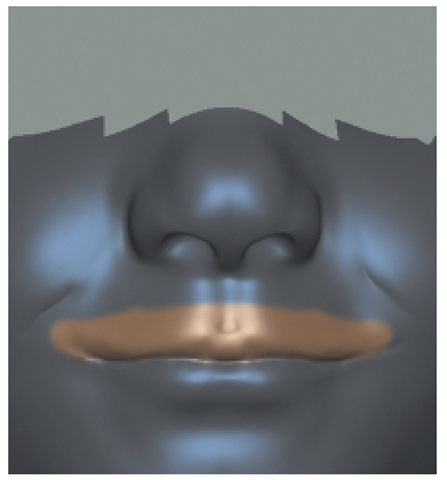
In this section, you will sculpt the mouth and continue to work on surrounding features like the chin and cheeks. Novice artists tend to draw or sculpt the mouth as if it were on a flat plane when, in fact, it is the 3D structure that is influenced by the contours of the jaws, face, muscles, and fat. To sculpt the mouth and surrounding structures, convincingly, you must understand the underlying anatomy and the relationships between the structures of the face (Figure 3.28). The following are some things that you need to know about the mouth.
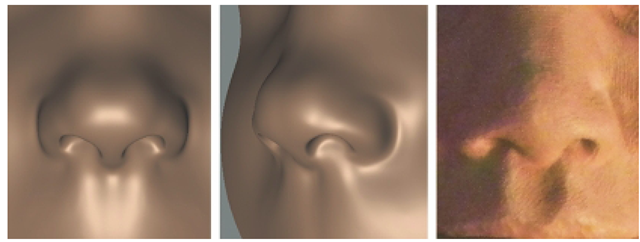
FIG 3.27 Sculpting the Philtrum and Philtral Columns In Mudbox and the Completed Nose In a Traditional Sculpture.
FIG 3.28 Understanding the Anatomy of the Mouth as Well as the Masses of the Face Will Help In Properly Sculpting the Mouth.
• As seen in profile, the lips and mouth are on a downward angle between the nose and the chin.
• The upper lip is composed of three masses and the lower lip is composed of two masses.
• The lips and mouth follow the round contours of the jaw and face.
• The teeth influence the shape of the lips.
• The underlying fat and muscle dictate the shape of the lips and mouth.
Take time to study the reference photographs to get a general understanding of how Amy’s mouth is formed. Be aware that different emotions and expressions will change the shape of the mouth.
Hiding Part of the Model
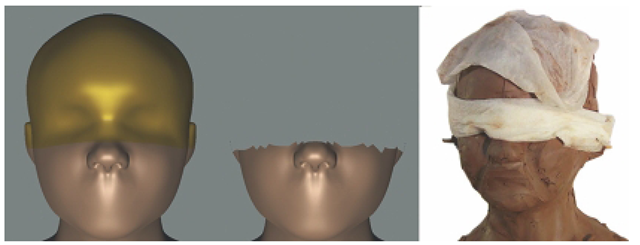
Sometimes, when you work on one area of the model, other areas can be distracting. In this case, as you are working on the lower half of the head, the upper half can draw your attention away. In traditional sculpting, some artists will wrap a cloth around the top half of the head to hide the eyes and other features to avoid distractions (Figure 3.29). In Mudbox, you can hide parts of the model so that you can focus on what you are sculpting. Also hiding the part of the model you are not working on helps the computer work faster because Mudbox has fewer polygons to display. Go to the Select/Move Tools tray. Select the Faces tool, and in the Properties window, enable Mirroring across the x axis. Then, begin to paint over the top half of the model including the eyes, top of the ears, and the back of the head. The selection you are creating will turn yellow. Now, go to Display menu and choose Hide Selected. When you are ready to see the entire model again go to the Display menu and choose Show All.
FIG 3.29 Hiding Part of the Model In Mudbox and Hiding Part of the Sculpture In Traditional Sculpting.
Marking the Location of the Lips
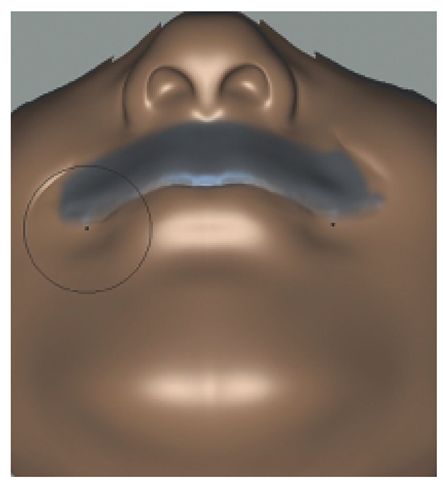
Before getting started on the mouth, create a new layer and name it as Mouth. The correct placement of the facial features like the mouth, eyes, and ears can be challenging. Sometimes, the fear of making an error in placing the facial features can stifle your progress. To avoid time-consuming errors, the first thing you will do is mark the location of the mouth. Use the front reference sketch as a guide and the Knife tool or an inverted Bulge tool to trace the part of the lips. Try using the tools with Steady Stroke on, as this feature helps to trace details. The lip parting line is not a straight line across, but curves up toward the corners and has a bit of a dip in the middle (Figure 3.30).
The Upper Lip
Next, you will sculpt the general shape of the upper lip. When studying the reference photographs, it may be easy to be confused by the color of the lips when trying to figure out the shape of the lips. This happens because the edge of the vermillion, or the color of the lips, does not necessarily follow the edge of the lip. Focus on the shape and mass of the lips instead of just the color.
The upper lip is composed of three masses two on either side and one in the middle. To rough in these masses, you can try either the Wax or Bulge tools set to a small size and strength or a combination of both tools. Smooth as you fill in the upper lip. Experiment with the Falloff profiles to determine which one works best to shape the lip. Falloff profile 6 worked well in shaping the upper lip. As you rough in the upper lip, connect the top edge of the lip to the philtrum and philtral columns to blend the upper lip into this area. Check your work with the reference sketches (Figure 3.31).
FIG 3.30 Sketching the Parting Line In the Lips.
FIG 3.31 Sculpting the Upper Lip and Blending It into the Philtrum.
Falloff profiles determine how a stroke from a sculpt tool blends from its center to its outer edge. Certain falloff profiles blend the stroke smoothly, whereas others may create hard edges. In certain circumstances, you may want to change the falloff profile to get a different effect. For example, while sculpting the lips, you may want to use a profile that has a smoother blend (like profile 6). Mudbox ships with a half a dozen falloff brushes ready to be used, but you can change the falloff of the brush on the fly by adjusting the falloff shape in the Falloff section in the Properties window. You may also save your new falloff profile.
The Lower Lip
Freeze the upper lip to avoid accidentally changing it while working on the lower lip. Then, slowly, build up the shapes that make up the lip with the Wax and Bulge tools (Figure 3.32). Avoid making huge changes all at once. Check with the side reference sketch to see if the lips line up. If necessary, push back the lower lip according to the side reference sketch. Look at the model from the top down or from the bottom up and make sure that the shape of the lower lip/mouth is round. If you find that the line that parts the lips disappears while you sculpt, just go over it with an inverted Bulge tool and use the Pinch tool to keep it distinct.
Sculpting the lips is a balance between adding the masses, smoothing, pushing and pulling, and defining the parting line between the lips. Continuously check the model from all angles and compare your work to the reference materials. You may have to go back and forth for a while making changes in one area and then adjusting another until the lips begin to take the appropriate shape. Using Freeze and Invert Freeze tools will aid you in working on each lip, individually, without affecting the other (Figure 3.33).
The masses on each side of the lower lip extending down toward the chin help to shape the mouth and naturally blend the lower lip into the surrounding areas. Use the Wax tool to build up these masses. Also note that the roundness of the chin combined with the masses on either side of the lower lip creates a noticeable indentation right under the lower lip. Finally, you may have noticed that Amy’s chin has a subtle, barely noticeable dent or dimple in the middle. Invert the Bulge tool, set it to a small size and low strength, temporarily turn off mirroring, and carefully push in to create the dimple.
FIG 3.32 Sculpt the Masses of the Lower Lip. Check with Side Reference Sketch to Make Sure the Lips Line Up.
FIG 3.33 Work with Freeze and Invert Freeze to Adjust Lips.
Refining the Mouth
After working on the upper and lower lips, compare the model to the reference photographs and sketches again to make sure that the general proportions are still good. Use the camera bookmarks that you created earlier to check how the model compares with the reference photographs. Inspect the model from all angles and revise anything that looks off. Remember that in this sculpture, Amy has a subtle smile so you will have to take that into account when looking at photographs where she has a different expression. Look at the model from the bottom up and top down to make sure that the mouth is round and as seen from these views. You may have to push back the corners of the mouth or move the cheeks to get the right look. The upper lip is a bit farther forward than the lower lip, even at the corners. So freeze the upper lip and push back the corners of the lower lip (Figure 3.34).
Amy’s smile makes the nasolabial folds prominent and creates small dimples at the corners of the mouth. To sculpt the nasolabial folds, Freeze the area shown in Figure 3.35 and use an inverted Bulge tool to accentuate the fold. When finished, release the freeze and use the Grab tool to make any necessary adjustments.
FIG 3.34 With the Upper Lip Frozen Push Back the Corners of the Mouth.
FIG 3.35 Defining the Nasolabial Folds Will Help In Shaping the Corners of the Mouth.
Refine the mass in the middle of the upper lip; this is formed by a subtle protrusion. Use the Bulge tool and set to a small size and low strength to add this mass to the upper lip (Figure 3.36). To control where you sculpt, you may need to freeze the surrounding areas. This feature of the upper lip is very subtle, so use the Smooth tool to blend it into the rest of the lip.
Lips have a noticeable texture created by folds or furrows in the thin skin of the lips. These folds run from the inside of the mouth toward the edge of the lip following the curve of the lip. It’s possible to sculpt these folds with different sculpting tools or even with a texture. But, in this case, try an inverted Bulge or Foamy tool set to a very small size and low strength to create the folds (Figure 3.37). Once you have finished working on the mouth and surrounding structures, you can unhide the top part of the head by going to the Display menu and choosing Show All.
FIG 3.36 Add Small Mass, Tubercle of Upper Lip, to the Middle of the Upper Lip and Pull Down over Lower Lip.
FIG 3.37 Add Texture to the Lips by Sculpting Subtle Folds and Furrows. The Traditional Sculpture In Clay.
Do not forget to work on the areas of the face around the lips. Accentuating the cheeks will help to make the lips look like they belong to the face, and further define the smile. Defining the jawline between chin and cheeks will also help to increase the smile and add to the contour of the face (Figure 3.38).
FIG 3.38 Defining Cheeks and Jawline Will Aid In Blending the Mouth to the Rest of the Face.
By now, you should be comfortable with Mudbox’s sculpting tools and even have favorites that you like working with. You will want to spend a bit more time on the lower face. It is up to you to decide on which sculpting tools to use; remember that you can use the Freeze tool to protect certain areas from being changed accidentally. Refer to the reference photographs, the anatomy, the masses of the face, and the references sketches as you finalize the mouth. Also don’t forget to save your work as an incremental file.
