Regardless of what kind of network connection you want to create, your first stop is at the Network and Sharing screen. To get there, follow these steps:
1. Go to the Start Menu and select Control Panel, Network and Internet (see Figure 9.1).
note
Note that this is different from the equivalent in Vista, where the process of setting up your network involved selecting specific options,some-times on the Control Panel and sometimes elsewhere. With Windows 7, the options all start with those listed on the Control Panel. Networking options on the right side of the Control Panel screen list Devices and Printers, Home Group, Internet Options, Network and Sharing Center, Remote App and Desktop Connections, and Windows Firewall,all of which have something to do with networking.
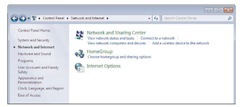
FIGURE 9.1
The Control Panel is your destination when setting up a network under Windows 7.
2. Click Network and Sharing Center on the right side of the screen (see Figure 9.2). Note that this is different from the Network and Sharing Center that appeared in Vista, as shown in Figure 9.3. In Windows 7, the Network and Sharing Center automatically finds the networks to which your computer is connected. If you’re connected to the Internet, you will see the path from your computer via whatever network you’re using to the Internet. In the example shown in Figure 9.2, the name of that network was simply “Network.” Below that is a list of your currently active networks. If your computer is at home, your home network will appear here, as will any available Wi-Fi connections near your home. Below that is where you set up your network connections, both internal to your home and external to other networks, including the Internet.
3. In the section labeled View Your Active Networks, click Connect or Disconnect. In the small box on the upper right, the list of networks Windows 7 has detected appears. The ones that are currently active are listed in the top half of the window, and the ones to which you could connect but haven’t are in the bottom half. If you want to connect to one of these, this is the place to do it. Simply click the Connect button and enter the information requested. Likewise, if you want to disconnect from one of these networks, do it here and follow the instructions.
Setting Up Your Home Network
Assuming your computer is a laptop that travels with you from home to work, to the local coffee shop or library, or to other locations, one of your first tasks after installing Windows 7 should be setting up your home network.
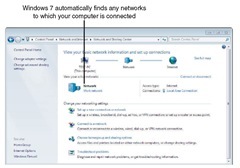
FIGURE 9.2
Windows 7 simplifies network discovery, automatically finding any network to which your computer is connected.
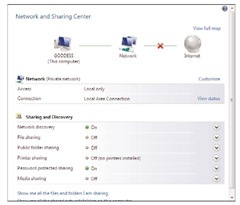
FIGURE 9.3
The Network and Sharing Center in Windows Vista is quite different from what you’ll see in Windows 7.
In Windows 7, when you select the Home network profile, your system knows that you are “at home” and will start the essential services
required for successful file and printer sharing in the home. This provides an intuitive entry point into Home Group, and after you are “at home,” the automatic network discovery facility starts looking for other Win7 PCs in the home. If you already have an active Home Group, you can join it— or, if not, create one.
When you click Networks and Sharing on the Control Panel and click on the name of the first network (not the icon) shown under View Your Active Networks, you see the screen shown in Figure 9.4.
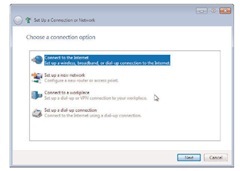
FIGURE 9.4
The Network and Sharing options let you choose which type of network you want to set up.
Picking one of these types of network does two things:
1. It gives Windows some basic information that allows the system to automatically set up some of the connections and specifications that are normally found in that type of network. You can tailor these specifications later on, but at least you’ll have the framework with which you can work.
2. It gives this network a default name (which you can change later).
Basically, your home network is where you’re likely to set up two or more computers, a printer, maybe a scanner, maybe some external storage devices, and so on. You can add more connections to other devices, such as an automatic connection to your cell phone or to a wide screen TV, through the Media Center or Home Group later on.
Your office network doesn’t have to be in a physical office, nor does it have to be in a different place from your home network. This type of network is
more about higher levels of security, such as using your laptop in a coffee shop, or connecting to a corporate network to let you work at home.
A public network is also about security. More importantly, it provides additional levels of security to protect your computer from others using the same network, such as might be found in a hotel’s network where there are in-room connections.
To set up a home network, follow these steps:
1. If your PC does not have a network adapter (often called a NIC) installed, you will need to install it first. Follow the instructions that came with the adapter. Most likely, however, your computer came with a network adapter already installed.
2. On the Control Panel, click the Network and Sharing option.
3. Select Home Network.
4. If your computer is not already connected to a network, see “Connecting to the Internet for the First Time or Setting Up a New Home Network,” later in this topic.
If your computer is connected to a network, but you’re setting it up so that Windows 7 can recognize it, you’ll see a screen like that shown in Figure 9.5 describing the active network, with whatever name (or lack of name) you’ve given it. (If you have already connected your computer to the network adapter so you can reach the Internet, that connection will be shown here as depicted in Figure 9.5.)
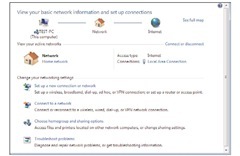
FIGURE 9.5
Setup all your network connections to computers, peripheral devices,and other networks in one place.
note
Note that the top portion of the dialog box shown in Figure 9.5 shows what the system can automatically detect about the network you’re setting up.The bottom portion of the screen displays the options you have for your network settings.
The following sections walk you through many of the network setup options available to you. However, understand that networking is an enormous topic and not one that we can cover in its entirety here. If you want to learn more about Windows 7 networking, we suggest you pick up a copy of Microsoft Windows 7 Unleashed, by Robert Cowart and Brian Knittel, published by Que.
note
Two other items found on the Network and Sharing screen—Choose HomeGroup and Sharing Options and”Troubleshoot Problems”—are discussed in detail later in this topic.
Connecting to the Internet for the First Time or Setting Up a New Home Network
Follow these steps if you are connecting to the Internet for the first time or are setting up a new Home Network:
1. Click on Set Up a New Connection or Network. On the next screen choose your connection option.
2. If you’re connecting to the Internet for the first time with this computer, select the first option and click the Next button.
3. On the next screen, select Create a New Connection and click the Next button.
4. On the next screen, select the type of connection option you want to use. Since you have already installed your network connector device, you will know what kind of data transmission it is using— broadband, cable modem, Wi-Fi, and so on. Select the appropriate option. If it isn’t shown, select Show Connection Options That This Computer Is Not Set Up to Use, and follow the instructions.
5. If you’re connecting to the Internet, enter the information from your Internet Service Provider (ISP) and click the Connect button. The system will automatically connect you to the Internet to the default web page with Internet Explorer 8, and you can browse to just about anywhere on the Internet.
6. If you’re setting up a new network, be sure you have set up a router or network access device (follow the manufacturer’s directions to install it). When it’s been set up correctly, navigate to the Home Network screen depicted earlier in Figure 9.4, select Set Up a New Network and click the Next button.
7. On the next screen, Windows 7 lists the wireless routers or other access devices it can detect. Select the one you want to use and click the Next button.
8. Type in any connection information your ISP might have provided you. ISPs will often provide you with a user name and password to secure your login. If they did, then you should enter them at this time. Your connection might not require a login, however, so if your ISP’s instructions ignore that issue, you will not need to put that information in here.
Setting Up a Connection to an Existing Network
In order to connect to an existing network, you will need to follow these steps:
1. If this network is to connect to the Internet, set up the connection with a cable or DSL modem and an account with an Internet service provider. You will likely be sharing this connection with other computers in the house, so make sure they are connected to the cable or DSL modem, too. If you’re using a cable connection, such as Comcast, you’ll receive directions for setting up the hardware and this connection from the service provider. Follow these instructions:
• If you’re using a DSL or other high speed connection, you’ll be connecting to a special phone line. If this is provided by your phone company, they will usually provide the connection to the main phone wiring box for your house and you’ll need to provide the wiring from there to your computer. You can either string the phone wire yourself (frequently under your house, if you have a basement or crawl space) or have a technician do it. That phone wire will end in a junction box, and your phone company will show you what kind of box this needs to be. You can buy this junction box at most hardware stores.
• If you’ll be using a Wi-Fi connection to the Internet, please see topic 10.
• If you’re connecting to an existing network in your house or office, there will be a network connection device to which other
computers and devices may be already connected. Simply plug in to the device a cable with an Ethernet connector and plug the other end of the cable into the Ethernet port on your computer.
• Another popular option is to have a wireless connection included as part of your network connection, allowing you to wirelessly connect from anywhere in your home or office.
• Alternately, you may have a more sophisticated network in your home or office, using network switches to connect the computers, printers, and other devices in your home. If so, you will plug your computer into the switch, rather than directly into your network device.
2. Once you’ve plugged your computer into the network, return to the Network and Sharing screen and choose Connect to a Network.
3. The right side of the screen shows you that you’re connected to a network, which might be simply named “Network,” unless you’ve given it a name such as “Home” or “Office.” The choices below that indicate the types of network connection you can choose. If you have a DSL or cable connection, Broadband Connection will appear with a blue box around it as shown in Figure 9.6, which means it’s the default type of connection. Select it and click the Connect button. If you’re connecting to a dial-up modem, or to a VPN network, and you’ve set up the connection, those choices will appear as blue on this screen. Choose the appropriate one and click the Connect button.
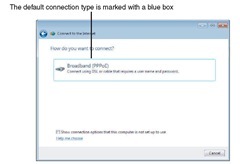
FIGURE 9.6
If you have a broadband connection, it will appear as shown here. Unless you’ve set up other types of access, this is likely to be the only connection type shown.
4. In either case, the connection will be made and you’ll be prompted for a user ID and password. Enter the appropriate information and click the Connect button. Your connection will then be live and you can communicate via the network you just joined.
Connecting to Your Office Network
Follow these steps to connect to your office network:
1. Click on Set Up a New Connection or Network. On the next screen choose your connection option.
2. Select Connect to a Workplace and click the Next button.
3. On the next screen, choose either the Virtual Private Network (VPN) option or the dial-up option. If you already have an Internet connection, the system will use it to set up what amounts to a private tunnel through the Internet to reach your workplace’s servers. If you have to dial into the workplace network, you’ll need to provide the appropriate phone number that your system can use to place the phone call.
4. If you’re using a dial-up connection (usually a modem that automatically dials a phone number to set up a connection), make sure your modem is switched on and connected to a phone line;then select Set Up a Dial-up Connection and click the Next button.
5. Enter the phone number as requested and click the Next button. You will have to provide appropriate login ID and password information each time you connect.
6. In either case, once you’ve completed the process, you’ll have a live connection. You will likely have to provide appropriate login ID and password information each time you connect.
Adding Another Computer to Your Home Network
1. Plug in the connecting cable between the other computer and your network adapter or router. See “Setting Up a Connection to an Existing Network,” earlier in this topic. Windows will automatically try to determine what other computers are on the network and will store that information for you.
2. When the other computer was first started, whoever set up or configured it was required to give it a name (such as Perry, George, Living Room, or something meaningful). That became the system name, and is what your system looks for. Now you need to set up a network connection.
• If you want to connect to another Windows 7 system, you probably want to set up a Home Group. See the “Your Home Group” later in this topic for how to set up and connect to a Home Group.
• If, however, you want to connect a non-Windows 7 computer, or you don’t want to use a Home Group, you need to do things a little differently. So start up Windows Explorer by clicking on the Explorer icon on the taskbar as shown in Figure 9.7.

FIGURE 9.7
Start Windows Explorer from the taskbar.
3. Click on the Network item on the left side to see all of the computers (and other network devices) on your local network that your system was able to find as shown in Figure 9.8.
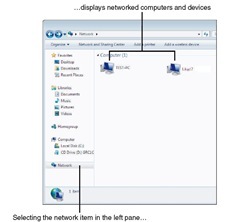
FIGURE 9.8
Use Windows Explorer to find systems on your network.
4. Next, click on the system that you want to connect to. You will probably be asked for a user ID and password. What you need to enter is the user name and password from that other system that you want to use to log in.
5. Once you have logged in to the other computer, you can see the various resources that are shared and available on the other computer, as shown in Figure 9.9.
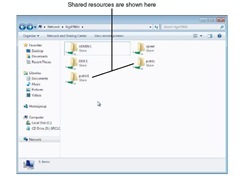
FIGURE 9.9
Now,you can see shared resources on another networked computer.
Understanding Domains
An additional concept that occasionally can cause problems is that of domains. Domains are used by Windows as a central repository of login information. Within a domain, you can use the same user name and password on all systems in the domain. Windows 7 turns on domains by default—and if you do not connect to an outside domain—declares your Windows 7 system as the controller of the domain.
If you attempt to log in to a non-Windows 7 computer that isn’t part of that domain, you will receive a login failure (see Figure 9.10). To work around this problem, you will need to click Use Another Account, and
then force the login to be domainless by adding a backslash (\) character in front of the user name (see Figure 9.11).
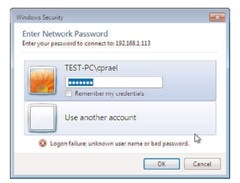
FIGURE 9.10
Attempting to access a non-Windows 7 computer that is not part of the domain will result in an error.
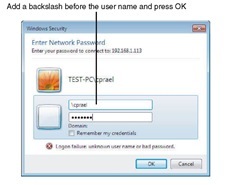
FIGURE 9.11
You can force a domainless login by choosing Use Another Account and adding a backslash to the username.
