Introduction
In this topic, various modelling techniques will be introduced. Many of the materials are from NAFEMS (1986). Some of these techniques are a must when carrying out finite element analysis to ensure the reliability and accuracy of the results obtained. With developments in computer hardware and software, a FEM analysis can now be performed very easily. Therefore, FEM packages are very often used as a ‘black box’ for many actual design projects by analysts who may not have a proper background in finite element analysis. However, improper use of commercial software can lead to erroneous results, often hidden behind colourful stress plots or other post-processed results without the knowledge of the analyst. Having described the theories and procedures of the FEM, readers should have quite a good idea on what is really going on in a commercial FE software package. The primary objective of this topic is therefore to throw some additional light into the black box, so that readers can avoid unnecessary mistakes in creating a FEM model when using a commercial package.
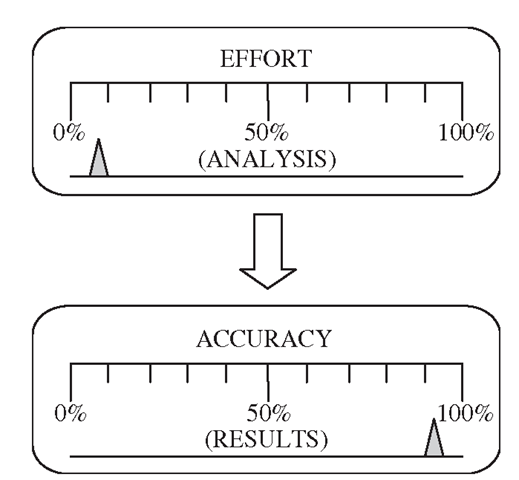
Another reason for learning some of these modelling techniques is to improve efficiency in computing the finite element results, as well as the accuracy of the results. An experienced analyst should be able to obtain accurate results with as little effort in modelling and computer resources as possible. The efficiency of the FE analysis is measured by the effort to accuracy ratio, as shown in Figure 11.1. For example, the use of a symmetrical model to simulate a problem with symmetrical geometry can greatly reduce the modelling and computation time with even more accurate numerical results. Therefore, a good analysis requires more than just meshing up the problem domain with elements. To come up with a good finite element model, the following factors need to be considered:
• Computational and manpower resources that limit the scale of the FEM model.
• Requirement on results that defines the purpose and hence the methods of analysis.
• Mechanical characteristics of the geometry of the problem domain that determine the type of elements to use.
• Boundary conditions.
• Loading and initial conditions.
Figure 11.1. Minimum effort to yield maximum accuracy.
CPU Time Estimation
Despite advances in the computer industry, computer resources can still be one of the decisive factors on how complex a finite element model can be built. The CPU time required for a static analysis can be roughly estimated using the following simple relation (called the complexity of a linear algebraic system):
where nd of is the number of total degrees of freedom in the finite element equation system, and a is a constant in the range of 2.0 to 3.0, depending on the different solvers used in the FEM package and the structure of the stiffness matrix.
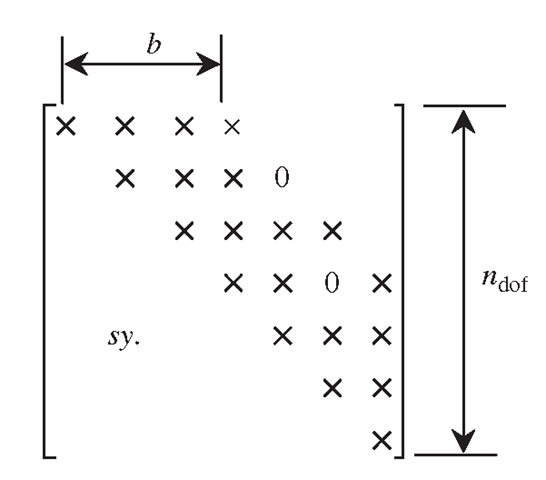
One of the very important factors that affect α is the bandwidth of the stiffness matrix, as illustrated in Figure 11.2. A smaller bandwidth leads to a smaller value of a, and hence a faster computation. From the direct assembly procedure described in Example 4.2, it is clear that bandwidth depends upon the difference in the global node number assigned to the elements. The element that has the biggest difference in nodal number controls the bandwidth of the global stiffness matrix. The bandwidth can be changed even for the same FEM model by changing the global numbering of the nodes. Therefore, tools have been developed for minimizing the bandwidth through a re-numbering of nodes. Most FEM packages are equipped with one or more such tools. All the user needs to do is use the tool to minimize the bandwidth after meshing the problem domain. This simple operation can sometimes drastically reduce the CPU time.
Equation (11.1) clearly indicates that a finer mesh with a large number of Degrees Of Freedom (DOFs) results in an exponentially increasing computational time. This implies the importance of reducing the DOFs. Many techniques discussed in this topic are related to the reduction of DOFs. Our aims are
1. to create an FEM model with minimum DOFs by using elements of as low a dimension as possible, and
2. to use as coarse a mesh as possible, and use fine meshes only for important areas. These have to be done without sacrificing any accuracy in the results.
Figure 11.2. Schematic of the structure of the stiffness matrix.
Geometry Modelling
Actual structures are usually very complex. The analyst should decide on how, where possible, to reduce a complex geometry to a manageable one. The first issue the analyst needs to consider is what type of elements should be used: 3D elements? 2D (2D solids, plates and shells) elements? Or 1D (truss and beam) elements? This requires a good understanding of the mechanics of the problem.However, it can be extremely expensive if 3D elements are used everywhere in the entire problem domain, because it will definitely lead to a huge number of DOFs. Therefore, for complex problems, the mesh is often a combination of different types of elements created by taking full geometrical advantage of the problem domain. The analyst should analyse the problem in hand, examine the geometry of the problem domain, and try to make use of 2D and 1D elements for areas or parts of the structure that satisfy the assumptions which lead to the formulation of 2D or 1D elements. Usually, 2D elements should be used for areas/parts that have a plate- or shell-like geometry, and 1D elements should be used for areas/parts that have a bar- or arch-like geometry. 3D elements are only used for bulky parts of the structure to which 2D or 1D elements cannot apply. This process is very important, because the use of 2D and 1D elements can drastically reduce the DOFs.
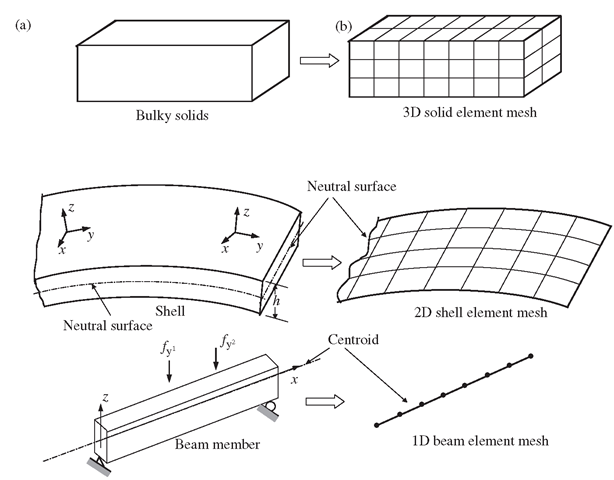
As shown in Figure 11.3, in modelling the geometry for areas or parts where 3D elements are to be used, 3D objects that have the same geometrical shapes as the structure have to be created. For areas or parts where 2D elements are to be used, only the neutral surfaces that are often the geometrical mid surfaces need to be created. For areas or parts where 1D elements are to be used, only the neutral axes that are often the geometrical mid axes need to be created. Therefore, the additional advantage of using 2D and 1D elements is that the task of creating geometry is drastically reduced.
Figure 11.3. Geometrical modelling. (a) Physical geometry of the structural parts; (b) geometry created in FEM models.
At the interfaces between different types of elements, techniques of modelling joints can be used, which will be discussed in detail in Section 11.9. These techniques are required because the type of DOFs at a node is different for different types of elements.Table 11.1 lists the number of DOFs for some different types of elements.
The required result is another important factor when it comes to the creation of the problem domain. For example, analysts will usually give a detailed modelling of the geometry for areas where critical results are expected. Note that many structures are now designed using Computer Aided Design (CAD) packages. Therefore, the geometry of the structure would already have been created electronically. Most commercial preprocessors of FEM software packages can read certain formats of CAD files. Making use of these files can reduce the effort in creating the geometry of the structure, but it requires a certain amount of effort to modify the CAD geometry to be suitable for FEM meshing. There is also ongoing research activity to automatically convert proper 3D geometries into 2D and 1D geometry for a FEM mesh, but to-date there is no such commercial package available.
Table 11.1. Type of elements and number of DOFs at a node
|
No. |
Description |
DOFs at a node |
|
1 |
2D frame analysis (using 2D frame element) |
3 (2 translations and 1 rotation) |
|
2 |
3D frame analysis (using 3D frame element) |
6 (3 translations and 3 rotations) |
|
3 |
2D analysis for plane strain or plane stress analysis |
2 (translational displacements) |
|
4 |
3D analysis for solids with general geometries and loading conditions |
3 (translational displacements) |
|
5 |
2D analysis for axisymmetric solids with axisymmetric or asymmetric loading |
2 (translational displacements) |
|
6 |
plate bending analysis for out-of-plane loading (bending effects only) |
3 (1 translation and 2 rotations) |
|
7 |
general plate and assembled plate analysis with general |
5 or 6 (3 translations and 2 or 3 |
|
loading conditions (combined membrane and bending effects) |
rotations) |
|
|
8 |
general shell analysis for shell structures (coupled |
5 or 6 (3 translations and 2 or 3 |
|
membrane and bending effects) |
rotations) |
|
|
9 |
1D analysis for axisymmetric shells with axisymmetric loading (membrane and bending effects) |
3 (2 translations and 1 rotation) |
Meshing
Mesh Density
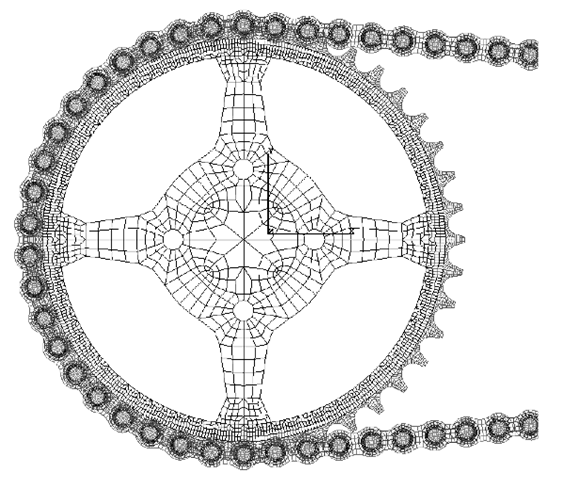
To minimize the DOFs, we often create a mesh of varying density. The mesh only needs to be finer in areas of importance, such as areas of interest, and expected zones of stress concentration, such as at re-entrant corners, holes; slots; notches; or cracks. An example of a finite element mesh exhibiting mesh density transition is shown in Figure 11.4. In this example of the sprocket-chain system, the focus of the analysis is the contact forces between the sprocket and the chain. Hence, the region at the centre of the sprocket is actually not that critical, and the mesh used at that region is relatively coarse.
In using FEM packages, control of the mesh density is often performed by using so-called mesh seeds. The mesh seeds are created before meshing after the geometry has been created. All the user needs to do is place denser mesh seeds in the areas of importance.
Element Distortion
It is not always possible to have regularly shaped elements for irregular geometries. Irregular or distorted elements are acceptable in the FEM, but there are limitations, and one needs to control the degree of element distortion in the process of mesh generation. The distortions are measured against the basic shape of the element, which are
• Square ^ Quadrilateral elements
• Isosceles triangle ^ Triangle elements
Figure 11.4. Finite element mesh for a sprocket-chain system (Courtesy of the Institute of High Performance Computing and SunStar Logistics(s) Pte Ltd(s)).
• Cube ^ Hexahedron elements
• Isosceles tetrahedron ^ Tetrahedron elements
Five possible forms of element distortions and their rough limits are listed as follows:
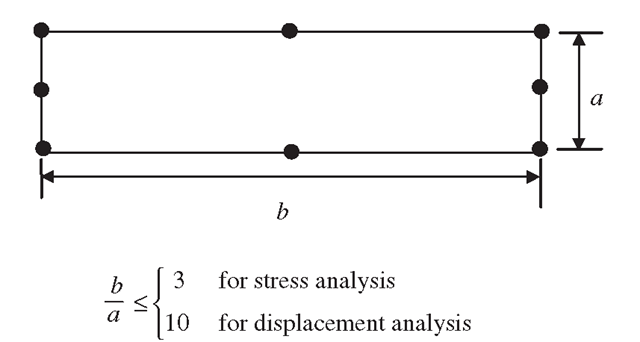
1. Aspect ratio distortion (elongation of element) (Figure 11.5).
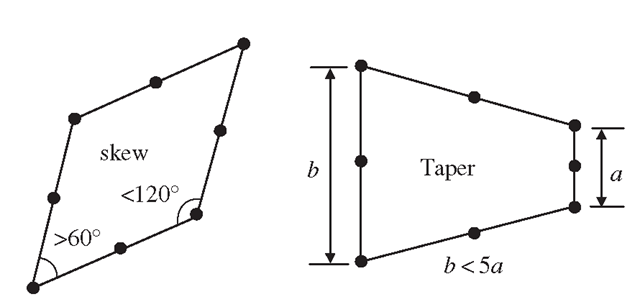
2. Angular distortion of the element (Figure 11.6), where any included angle between edges approaches either 0° or 180° (skew and taper).
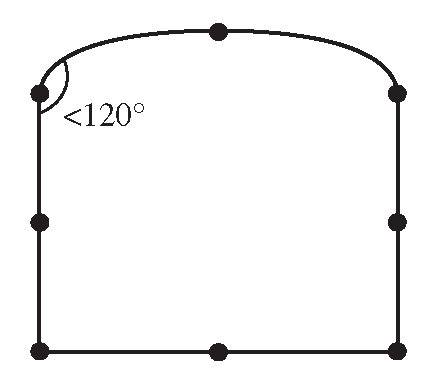
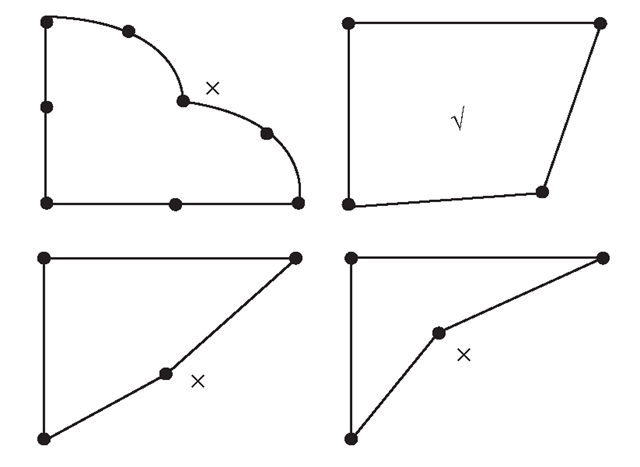
3. Curvature distortion of element (Figure 11.7), where the straight edges from the element are distorted into curves when matching the nodes to the geometric points.
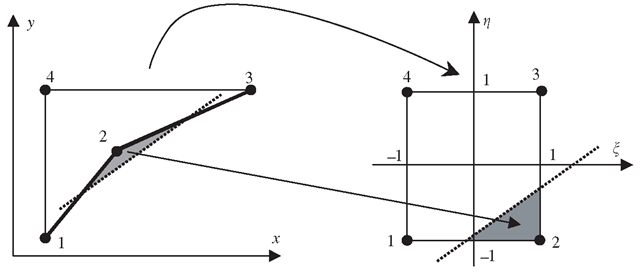
4. Volumetric distortion occurs in concave elements. For concave elements, there are areas outside the elements (see the shadowed area in Figure 11.8) that will be transformed into an internal area in the natural coordinate system. The element volume integration for the shadowed area based on the natural coordinate system will thus result in a negative value. A few unacceptable shapes of quadrilateral elements are shown in Figure 11.9. 5.
Figure 11.5. Aspect distortion.
Figure 11.6. Angular distortion.
Figure 11.7. Curvature distortion.
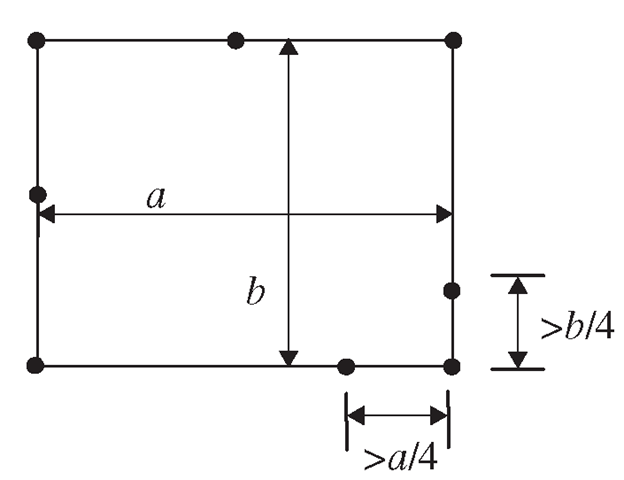
Mid-node position distortion occurs with higher order elements where there are mid nodes. The mid node should be placed as close as possible to the middle of the element edge. The limit for mid-node displacement away from the middle edge of the element is a quarter of the element edge, as shown in Figure 11.10. The reason is that this shifting of mid nodes can result in a singular stress field in the elements, as discussed in Section 10.2.
Many FEM package preprocessors provide a tool for analysing the element distortion rate for a created mesh. All the user needs to do is invoke the tool after the mesh has been created before submitting it for analysis. A report of the distortion rates will be generated for the analyst’s examination.
Figure 11.8. Mapping between the physical coordinate (x — y) and the natural coordinate (ξ — η) for heavily volumetrically distorted elements leads to mapping of an area outside the physical element into an interior area in the natural coordinates.
Figure 11.9. Unacceptable shapes of quadrilateral elements.
Figure 11.10. The limit for mid-node displacing away from the middle edge of the element.
Mesh Compatibility
A mesh is said to be compatible if the displacements are continuous along all edges between all the elements in the mesh. The use of different types of elements in the same mesh or improper connection of elements can result in an incompatible mesh. Detailed reasons for mesh incompatibility and methods for fixing or avoiding an incompatible mesh are discussed next.
Different Order of Elements
Mesh incompatibility issues can arise when we have a transition between different mesh densities, or when we have meshes comprised of different element types. When a quadratic element is joined with one or more linear elements, as shown in Figure 11.11, incompatibility arises due to the difference in the orders of shape functions used. The eight-node quadratic element in Figure 11.11 has a quadratic shape function, which implies that the deformation along the edge follows a quadratic function. On the other hand, the linear shape function used in the four-node linear element in Figure 11.11 will result in a linear deformation along each element edge. For the case shown in Figure 11.11(a), the displacement of nodes 1 and 3 for the quadratic element and the linear elements are the same, but deformation of the edges between nodes 1 and 3 will be different. Assuming that nodes 1 and 2 stay still, and node 3 moves a distance, the deformation of these edges is then as shown by the dotted lines in Figure 11.11. A crack-like behaviour is clearly observed, which can lead to severely erroneous results. For the case shown in Figure 11.11(b), the displacements of nodes 1, 2 and 3 for the quadratic element and two linear elements are the same, but deformation of the edges between nodes 1 and 2 and nodes 2 and 3 will be different. If nodes 1 and 3 stay still, and node 2 moves a distance, the deformation of these edges is as shown by the dotted lines in Figure 11.11. Again, a crack-like behaviour is clearly observed.
Solutions for this kind of problem of an incompatible mesh are:
1. Use the same type of elements throughout the entire problem domain. This is the simplest solution and is a usual practice, as complete compatibility is automatically satisfied if the same elements are used as shown in Figure 11.12.
Figure 11.11. Incompatible mesh caused by the different shape functions along a common edge of the quadratic and linear elements. (a) A quadratic element connected to one linear element; (b) a quadratic element connected to two linear elements.
Figure 11.12. Use of elements of the same type with complete edge-to-edge connection automatically ensures mesh compatibility.
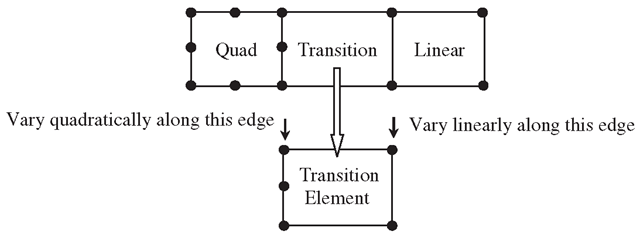
Figure 11.13. A transition element with five nodes used to connect linear and quadratic elements to ensure mesh compatibility.
2. When elements of different orders of shape functions have to be used for some reason, such as in ^-adaptive analysis, use transition elements whose shape functions have different orders on different edges. An example of a transition element is shown in Figure 11.13. The five-node element shown can behave in a quadratic fashion on the left edge and linearly on the other edges. In this way, the compatibility of the mesh can be guaranteed.
3. Another method used to enforce mesh compatibility is to use multipoint constraints (MPC) equations. MPCs can be used to enforce compatibility for the cases shown in Figure 11.11(a). This method is more complicated, and requires the ability to create MPC equations. The use of MPC will be covered in Section 11.10.
