By : James W Zubrick
Email: j.zubrick@hvcc.edu
When light travels from one medium to another it changes velocity and direction a bit. If you’ve ever looked at a spoon in a glass of water, the image of the spoon in water is displaced a bit from the image of the spoon in air, and the spoon looks broken. When the light rays travel from the spoon in water and break out into the air, they are refracted, or shifted (Fig. 102). If we take the ratio of the sine of the angles formed when a light ray travels from air to water, we get a single number, the index of refraction, or refractive index. Because we can measure the index of refraction to a few parts in 10,000, this is a very accurate physical constant for identification of a compound.
The refractive index is usually reported as nff, where the tiny 25 is the temperature at which the measurement was taken, and the tiny capital D means we’ve used light from a sodium lamp, specifically a single yellow frequency called the sodium D line. Fortunately, you don’t have to use a sodium lamp if you have an Abbe refractometer.
Fig. 102 The refraction of light.
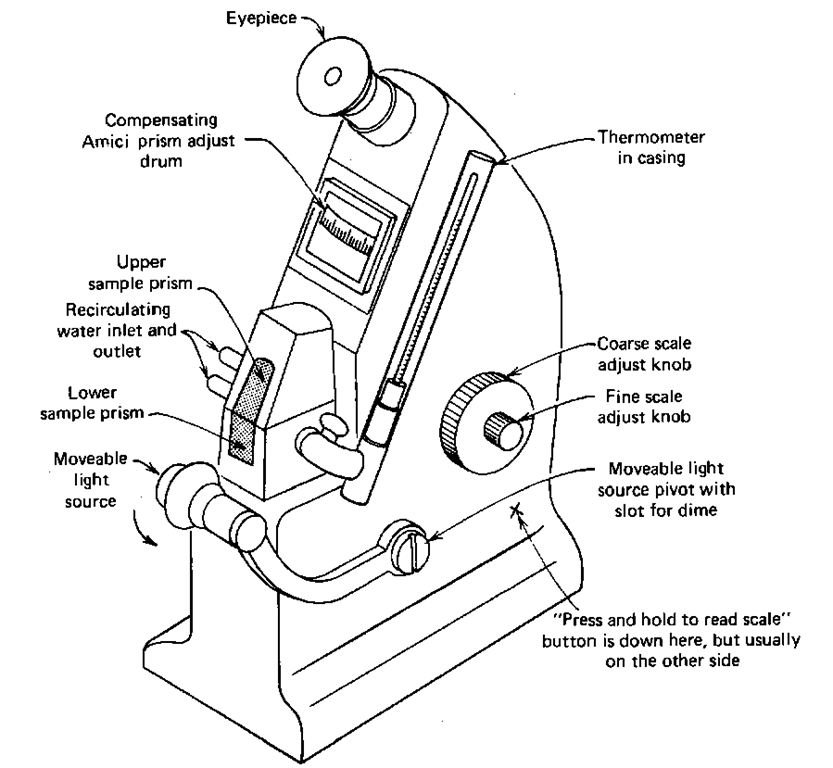
THE ABBE REFRACTOMETER
The refractometer looks a bit like a microscope. It has
1. An eyepiece. You look in here to make your adjustments and read the refractive index.
2. Compensation prism adjustment. Since the Abbe refractometer uses white light and not light of one wavelength (the sodium D line), the white light disperses as it goes through the optics and rainbow-like color fringing shows up when you examine your sample. By turning this control, you rotate some compensation prisms that eliminate this effect.
3. Hinged sample prisms. This is where you put your sample.
4. Light source• This provides light for your sample. It’s on a moveable arm, so you can swing it out of the way when you place your samples on the prisms.
5. Light source swivel arm lock. This is a large slotted nut that works itself loose as you move the light source up and down a few times. Always have a dime handy to help you tighten this locking nut when it gets loose.
6. Sample and scale image adjust. You use this knob to adjust the optics such that you see a split field in the eyepiece. The refractive index scale also moves when you turn this knob. The knob is often a dual control; use the outer knob for a coarse adjustment and the inner knob as a fine adjustment.
7. Scale/sample field switch. Press this switch, and the numbered refractive index scale appears in the eyepiece. Release this switch, and you see your sample in the eyepiece. Some models don’t have this type of switch. You have to change your angle of view (shift your head a bit) to see the field with the refractive index reading.
8. Line cord on – off switch. This turns the refractometer light source on and off.
9. Water inlet and outlet. These are often connected to temperature-controlled water recirculating baths. The prisms and your samples in the prisms can all be kept at the temperature of the water.
Fig. 103 One model of a refractometer.
USING THE ABBE REFRACTOMETER
1. Make sure the unit is plugged in. Then turn the on – off switch to ON. The light at the end of the moveable arm should come on.
2. Open the hinged sample prisms. NOT touching the prisms at all, place a few drops of your liquid on the lower prism. Then, swing the upper prism back over the lower one and gently close the prisms. Never touch the prisms with any hard object or you’ll scratch them.
3. Raise the light on the end of the moveable arm so that the light illuminates the upper prism. Get out your dime and, with permission of your instructor, tighten the light source swivel arm lock nut as it gets tired and lets the light drop.
Fig. 104 Your sample through the lens of the refractor.
4. Look in the eyepiece. Slowly, carefully, with very little force, turn the large scale and sample image adjust knob from one end of its rotation to the other. Do not FORCE! (If your sample is supposedly the same as that of the last person to use the refractometer, you shouldn’t have to adjust this much if at all.)
5. You are looking for a split optical field of light and dark (Fig. 104). This may not be very distinct. You may have to raise or lower the light source and scan the sample a few times.
6. If you see color fringing at the boundary between light and dark (usually red or blue), slowly turn the compensating prism adjust until the colors are at a minimum. You may now have to go back and readjust the sample image knob a bit after you do this.
7. Press and hold the scale/sample field switch. The refractive index scale should appear (Fig. 105). Read the uppermost scale, the refractive index, to four decimal places. (If your model has two fields, with the refractive index always visible, just read it.)
Fig. 105 A refractive index of l .4398.
REFRACTOMETRY HINTS
1. The refractive index changes with temperature. If your reading is not the same as that of a handbook, check the temperatures before you despair.
2. Volatile samples require quick action. Cyclohexene, for example, has been known to evaporate from the prisms of unthermostatted refracto-meters more quickly than you can obtain the index. It may take several tries as you readjust the light, turn the sample and scale image adjust, and so on.
3. Make sure the instrument is level. Often organic liquids can seep out of the jaws before you are ready to make your measurement.


