By : James W Zubrick
Email: j.zubrick@hvcc.edu
Just about 80% of the reactions in organic lab involve a step called refluxing. You use a reaction solvent to keep materials dissolved and at a constant temperature by boiling the solvent, condensing it, and returning it to the flask.
For example, say you have to heat a reaction to around 80°C for 17 hours. Well, you can stand there on your flat feet and watch the reaction all day. Me? I’m off to the reflux.
Usually, you’ll be told what solvent to use, so selecting one should not be a problem. What happens more often is that you choose the reagents for your particular synthesis, put them into a solvent, and reflux the mixture. You boil the solvent and condense the solvent vapor so that ALL the solvent runs back into the reaction flask (see “Fractional Distillation”). The reflux temperature is near the boiling point of the solvent. To execute a reflux,
1. Place the reagents in a round-bottomed flask. The flask should be large enough to hold both the reagents and enough solvent to dissolve them, without being much more than half full.
2. You should now choose a solvent that
a. Dissolves the reactants at the boiling temperature.
b. Does not react with the reagents.
c. Boils at a temperature that is high enough to cause the desired reaction to go at a rapid pace.
3. Dissolve the reactants in the solvent. Sometimes the solvent itself is a reactant. Then don’t worry.
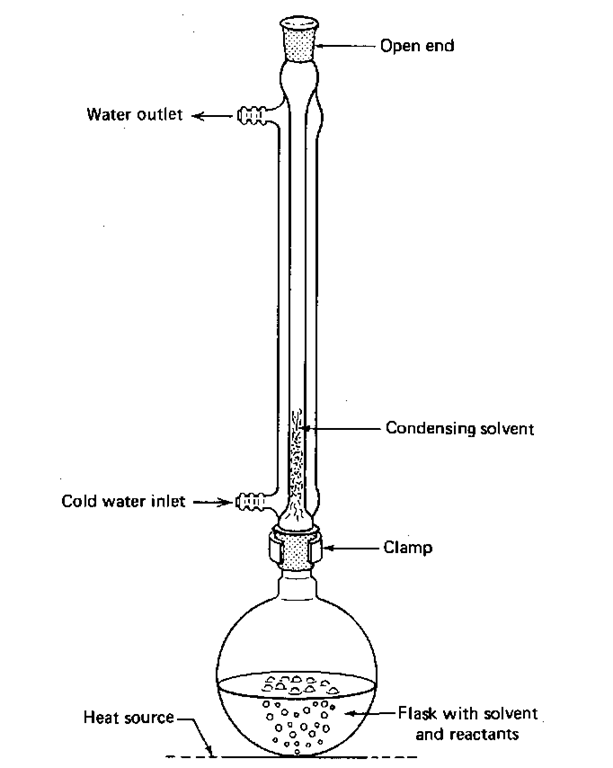
4. Place a condenser, upright, on the flask, connect the condenser to the water faucet, and run water through the condenser (Fig. 83). Remember —in at the bottom and out at the top.
5. Put a suitable heat source under the flask and adjust the heat so that the solvent condenses no higher than halfway up the condenser. You’ll have to stick around and watch for a while, since this may take some time to get started. Once the reaction is stable, though, go do something else. You’ll be ahead of the game for the rest of the lab.
6. Once this is going well, leave it alone until the reaction time is up. If it’s an overnight reflux, wire the water hoses on so they don’t blow off when you’re not there.
Fig. 83 A reflux setup.
7. When the reaction time is up, turn off the heat, let the setup cool, dismantle it, and collect and purify the product.
A DRY REFLUX
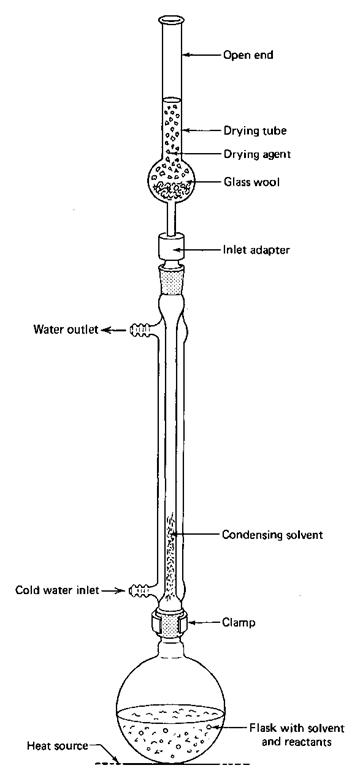
If you have to keep the atmospheric water vapor out of your reaction, you must use a drying tube and the inlet adapter in the reflux setup (Fig. 84). You can use these if you need to keep water vapor out of any system, not just the reflux setup.
Fig. 84 Reflux setup a la drying tube.
1. If necessary, clean and dry the drying tube. You don’t have to do a thorough cleaning unless you suspect that the anhydrous drying agent is no longer anhydrous. If the stuff is caked inside the tube, it is probably dead. You should clean and recharge the tube at the beginning of the semester. Be sure to use anhydrous calcium chloride or sulfate. It should last one semester. If you are fortunate, indicating Drierite, a specially prepared anhydrous calcium sulfate, might be mixed in with the white Drierite. If the color is blue, the drying agent is good; if red, the drying agent is no longer dry, and you should get rid of it (see Chapter 7, “Drying Agents”).
2. Put in a loose plug of glass wool or cotton to keep the drying agent from falling into the reaction flask.
3. Assemble the apparatus as shown, with the drying tube and adapter on top of the condenser.
4. At this point, reagents may be added to the flask and heated with the apparatus. Usually, the apparatus is heated while empty to drive water off the walls of the apparatus.
5. Heat the apparatus, usually empty, on a steam bath, giving the entire setup a quarter-turn every so often to heat it evenly. A burner can be used if there is no danger of fire and if heating is done carefully. The heavy ground glass joints will crack if heated too much.
6. Let the apparatus cool to room temperature. As it cools, air is drawn through the drying tube before it hits the apparatus. The moisture in the air is trapped by the drying agent.
7. Quickly add the dry reagents or solvents to the reaction flask, and reassemble the system.
8. Carry out the reaction as usual like a standard reflux.
ADDITION AND REFLUX
Every so often you have to add a compound to a setup while the reaction is going on, usually along with a reflux. Well, you don’t break open the system, let toxic fumes out, and make yourself sick to add new reagents. You use an addition funnel. Now, we talked about addition funnels back with separa-tory funnels (Chapter 11) when we were considering the stem, and that might have been confusing.
Funnel Fun
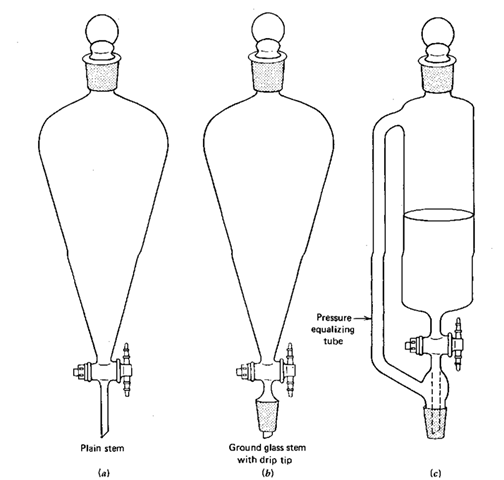
Look at Fig. 83a. It is a true sep funnel. You put liquids in here and shake and extract them. But could you use this funnel to add material to a setup? NO. No ground glass joint on the end; and only glass joints fit glass joints. Right? Of course, right.
Figure 85c shows a pressure-equalizing addition funnel. See that sidearm? Remember when you were warned to remove the stopper of a separatory funnel so you wouldn’t build up a vacuum inside the funnel as you emptied it? Anyway, the sidearm equalizes the pressure on both sides of the liquid you’re adding to the flask, so it’ll flow freely, without vacuum buildup and without you having to remove the stopper. This equipment is very nice, very expensive, very limited, and very rare. And if you try an extraction in one of these, all the liquid will run out the tube onto the floor as you shake the funnel.
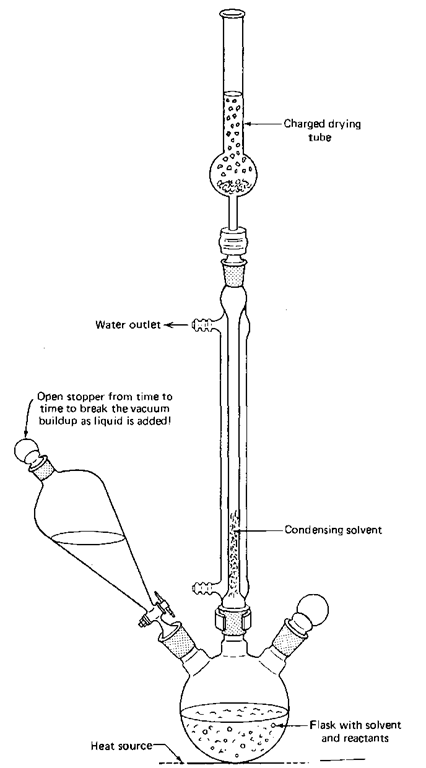
So a compromise was reached (Fig. 856). Since you’ll probably do more extractions than additions, with or without reflux, the pressure-equalizing tube went out, but the ground glass joint stayed on. Extractions; no problem. The nature of the stem is unimportant. But during additions, you’ll have to take the responsibility to see that nasty vacuum buildup doesn’t occur. You can remove the stopper every so often or put a drying tube and inlet adapter in place of the stopper. The latter keeps moisture out and prevents vacuum buildup inside the funnel.
How to Set Up
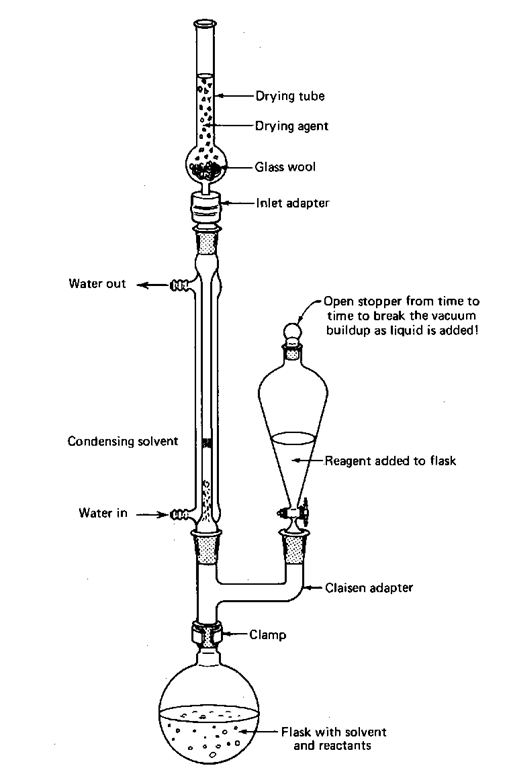
There are at least two ways to set up an addition and reflux, using either a three-neck flask or a Claisen adapter. I thought I’d show both these setups with drying tubes. They keep the moisture in the air from getting into your reaction. If you don’t need them, do without them.
Often, the question comes up, “If I’m refluxing one chemical, how fast can I add the other reactant?” Try to follow your instructor’s suggestions. Anyway, usually the reaction times are fixed. So I’ll tell you what NOT, repeat NOT, to do.
Fig. 85 Separatory funnels in triplicate, (a) Plain, (b) Compromise separator addition funnel, (c) Pressure-equalizing addition funnel.
If you reflux something, there should be a little ring of condensate, sort of a cloudy, wavy area in the barrel of the reflux condenser (Figs. 86 and 87). Assuming an exothermic reaction, the usual case, adding material from the funnel has the effect of heating up the flask. The ring of condensate begins to move up. Well, don’t ever let this get more than three quarters up the condenser barrel. If the reaction is that fast, a very little extra reagent or heating will push that ring out of the condenser and possibly into the room air. No No, no, no.
Fig. 86 Reflux and addition by Claisen tube.
Fig. 87 Reflux and addition by three-neck flask
