By : James W Zubrick
Email: j.zubrick@hvcc.edu
Pressure and Temperature Corrections
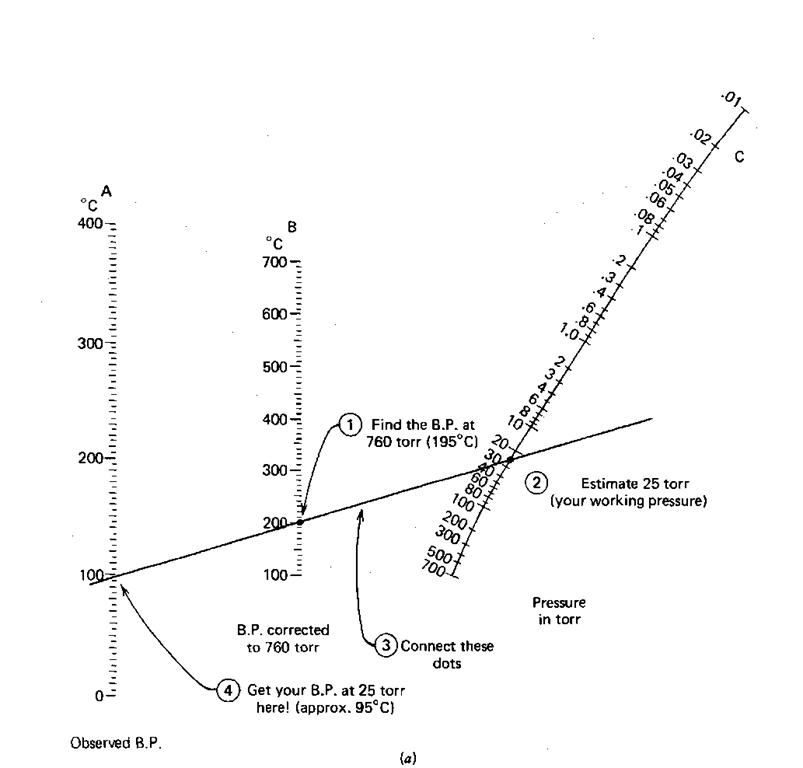
You’ve found all the leaks and the pressure in your vacuum distillation setup is, say, 25 torr. Now you need to know the boiling point of your compound, 1-octanol, this time at 25 torr and not 760 torr. You realize it’ll boil at a lower temperature, but just how low? The handy nomographs in (Figs. 76 and 77) can help you estimate the new boiling point.
This time you have the boiling point at 760 torr (195°C) and the pressure you are working at (25 torr) so you
1. Find the boiling point at 760 (195°C) on line B (the middle one).
2. Find the pressure you’ll be working at (25 torr) on line C (the one on the far right). You’ll have to estimate this point.
3. Using a straightedge, line up these two points and see where the straightedge cuts the observed boiling point line (Line A, far left). I get about 95°C.
So a liquid that boils at 195 °C at 760 torr will boil at about 95 °C at 25 torr. Remember, this is an estimate.
Now suppose you looked up the boiling point of 1-octanol and all you found was: 9819. This means that the boiling point of 1-octanol is 98° C at 19 torr. Two things should strike you.
1. This is a higher boiling point at a lower pressure than we’d gotten from the nomograph.
2. I wasn’t kidding about this process being an estimation of the boiling point.
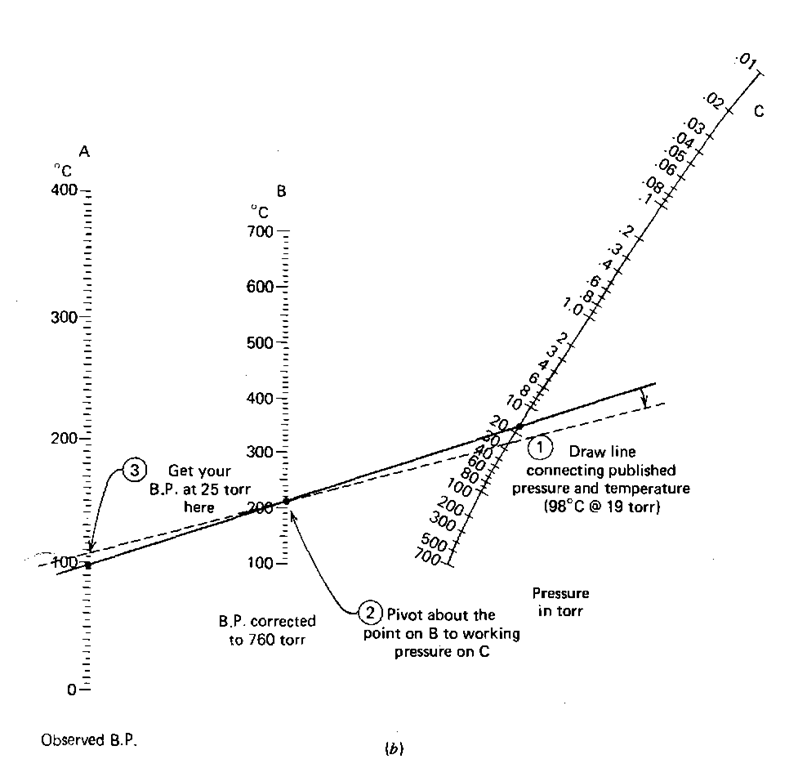
Now we have a case of having an observed boiling point at a pressure that is not 760 torr (1-octanol again; 98°C at 19 torr). We’d like to get to 25 torr, our working pressure. This requires a double conversion.
1. On the observed B.P. line (line A) find 98°C.
2. On the pressure in torr line (line C) find 19.
3. Using a straightedge, connect those points. Now read the B.P. corrected to 760 (line B): I get 210°C.
Fig. 76 (a) One point conversion.
(b) Two point conversion.
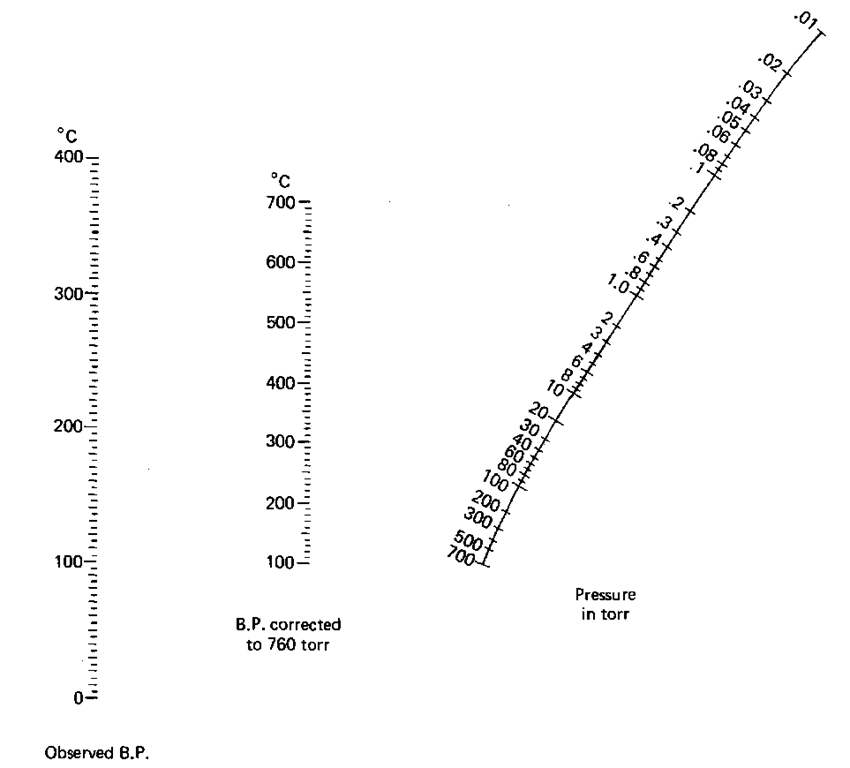
Fig. 77 A clean nomograph for your own use.
4. Now, using the 210 ° C point as a fulcrum, pivot the straightedge until the 210 ° C point on line B and the pressure you’re working at (25 torr) on line C line up. You see, you’re in the same position as in the previous example with a “corrected to 760 torr B.P.” and a working pressure.
5. See where the straightedge cuts the observed boiling point line (line A). I get 105 °C.
So, we’ve estimated the boiling point to be about 105° C at 25 torr. The last time it was 95 ° C at 25 torr. Which is it? Better you should say you expect your compound to come over from 95-105°C. Again, this is not an unreasonable expectation for a vacuum distillation.
The pressure-temperature nomograph is really just a simple, graphical application of the Clausius-Clapyron equation. If you know the heat of vaporization of a substance, and its normal boiling point, you can calculate the boiling point at another temperature. You do have to assume that the heat of vaporization is constant over the temperature range you’re working with, and that’s not always so. Where’s the heat of vaporization in the nomograph? There is one built in, built into the slopes and spacings on the paper. And, yes, that means that the heat of vaporization is forced to be the same for all compounds, be they alkanes, aldehydes, or ethers. So do not be surprised at the inaccuracies in this nomograph; be amazed that it works as well as it does.
Vacuum Distillation Notes
1. Read ALL the notes on class 1.
2. The thermometer can be replaced by a gas inlet tube. It has a long, fine capillary at one end (Fig. 74). This is to help stop the extremely bad bumping that goes along with vacuum distillations. The fine stream of bubbles through the liquid produces the same results as a boiling stone. Boiling stones are useless, since all the adsorbed air is wisked away by the vacuum and the nucleating cavities plug up with liquid. The fine capillary does not let in a lot of air, so we are doing a vacuum distillation anyway. Would you be happier if I called it a reduced pressure distillation? An inert gas (nitrogen?) may be let in if the compounds decompose in air.
3. If you can get a magnetic stirrer and magnetic stirring bar you won’t have to use the gas inlet tube approach. Put a magnetic stirring bar in the flask with the material you want to vacuum distill. Use a heating mantle to heat the flask and put the magnetic stirrer under the mantle. When you turn the stirrer on, a magnet in the stirrer spins, and the stirring bar (a Teflon-coated magnet) spins. Admittedly, stirring through a heating mantle is not easy, but it can be done. Stirring the liquid also stops the bumping.
Remember, first the stirring, then the vacuum, THEN the heat— or WOOSHI Got it?
4. Control of heating is extremely critical. I don’t know how to shout this loudly enough on paper. Always apply the vacuum first and watch the setup for awhile. Air dissolved or trapped in your sample or a highly volatile leftover (maybe ethyl ether from a previous extraction) can come flying out of the flask without the heat. If you heated such a setup a bit and then applied the vacuum, your sample would blow all over, possibly right into the receiving flask. Wait for the contents of the distilling flask to calm down before you start the distillation.
5. If you know you have low-boiling material in your compound, think about distilling it at atmospheric pressure first. If, say, half the liquid you want to vacuum distill is ethyl ether from an extraction, consider doing a simple distillation to get rid of the ether. Then the ether (or any other low-boiling compound) won’t be around to cause trouble during the vacuum distillation. If you distill first at 1 atm, let the flask cool BEFORE you apply the vacuum. Otherwise your compound will fly all over and probably will wind up, undistilled and impure, in your receiving flask.
6. Grease all joints, no matter what (see “Greasing the Joints”). Under vacuum, it is easy for any material to work its way into the joints and turn into concrete, and the joints will never, ever come apart again.
7. The vacuum adapter is connected to a vacuum source, either a vacuum pump or a water aspirator. Real live vacuum pumps are expensive and rare and not usually found in the undergraduate organic laboratory. If you can get to use one, that’s excellent. See your instructor for the details. The water aspirator is used lots, so read up on it.
8. During a vacuum distillation, it is not unusual to collect a pure compound over a 10-20°C temperature range. If you don’t believe it, you haven’t ever done a vacuum distillation. It has to do with pressure changes throughout the distillation because the setup is far from perfect. Although a vacuum distillation is not difficult, it requires peace of mind, large quantities of patience, and a soundproof room to scream in so as not to disturb others.
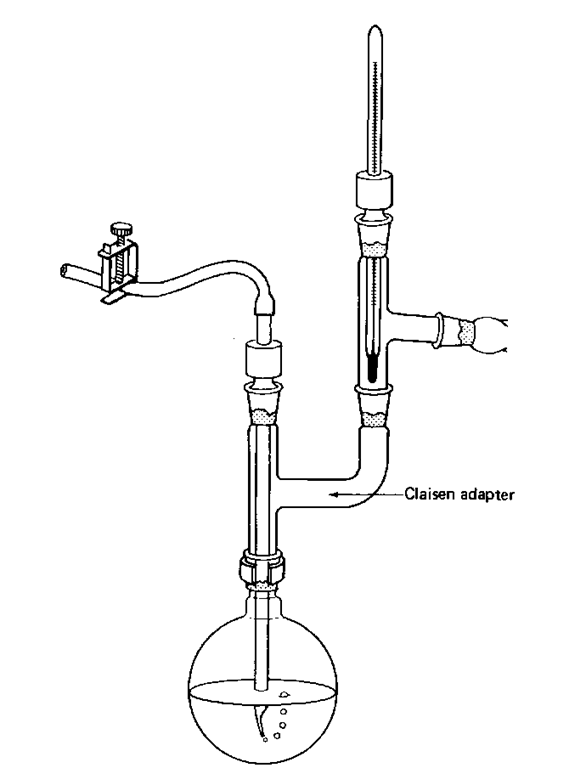
9. A Claisen adapter in the distilling flask allows temperature readings to be taken and can help stop your compound from splashing over into the distillation receiver (Fig. 78). Also, you could use a three-neck flask (Fig. 79). Think! And, of course, use some glassware too.
Fig. 78 A Claisen adapter so you can vacuum distill and take temperatures too.


