In This Chapter
Shaping a fabulous bag and a sweet baby sweater Knitting a simple shell and great coats for women.The patterns in this chapter use slightly more complex shapes than the rectangles in Chapters 8 and 9. They’re “almost rectangles,” as you’ll notice from looking at the schematics. These patterns feature simple shaping largely accomplished by casting on and binding off in the right places — and they all have plenty of style. Looking at the photographs, what you see are great clothes and accessories that you’re sure to get a lot of use out of. I firmly believe that simple patterns can be both stylish and fun to knit. So, if you’re done knitting scarves and other strictly rectangular shapes, why not try a bag, a shell, or a coat? Or how about making a sweater for the new baby on the block? If you can knit, purl, cast on, and bind off, you’re ready to dive into these projects.
Felted Messenger Bag
This stylish bag can go everywhere with you — it has plenty of room and a stylish strap that you can adjust to fit your needs. The matching buckle closure adds panache and keeps your belongings safely inside. You can see this great bag in Figure 10-1.
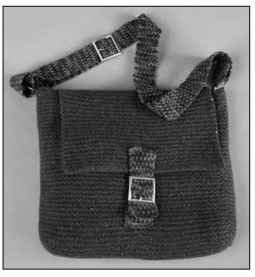
Figure 10-1:
The felted messenger bag has linen stitch straps.
New skill: The cable cast-on
This messenger bag, like the other patterns in this chapter, relies on casting on and binding off to create its shape. But because you cast on in the middle of the project instead of just at the beginning, you can’t use the long-tail cast-on (you won’t have a long tail; indeed, you won’t have any tail at all!). So what do you do? There are several ways, but my favorite is the cable cast-on.
If you want to try the cable cast-on, here’s how:
1. If you’re at the beginning of a project, make a slip knot and put it on the left needle.
To make a slip knot, lay the yarn over the first two fingers of your left hand with the tail hanging down over your palm. Wrap the yarn loosely around your two fingers one time ending with the working yarn at the back of your hand. With your right hand, reach through the loop you’ve made, grab the working yarn, and pull it though the loop. Tug gently on both ends to form the slip knot. Place it on your needle and tighten the knot so that it loosely hugs the needle; this is your first cast-on stitch.
2. Knit 1 stitch in the loop of the slip knot, but don’t drop the slip knot from the left-hand needle.
There will be 1 stitch on each needle as shown in Figure 10-2. Transfer the new stitch to the left needle. I like to insert the left needle into the stitch on the right needle from right to left to transfer it, which twists the stitch and gets my needles into position for the next stitch. But the left needle can also be inserted from left to right. Feel free to experiment to see what works best for you.
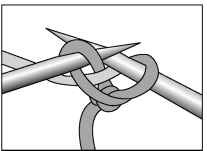
Figure 10-2:
The first step of the cable cast-on.
3. Instead of putting the right needle into the next stitch as if to knit, put it between stitches as shown in Figure 10-3.
Knit a new stitch, again without dropping any stitches from the left-hand needle, and then transfer the new stitch to the left needle.
4. Repeat Step 3 until you have cast on as many stitches as you need.
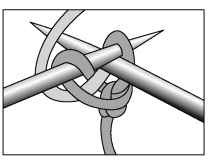
Figure 10-3:
Putting your needle between the stitches.
New skill: Working linen stitch by slipping stitches
Linen stitch creates a beautiful woven texture that resists stretching, lays obediently flat, and looks great on both the front and the back. So this stitch makes a great choice for things like the straps on a bag. The stitch is also compact; you’ll get a very firm gauge even on big needles. The reason linen stitch acts as it does is that each stitch is knit only every other row, which means that stitches are slipped as often as they are knit.
As you might guess, linen stitch has a lot in common with half linen stitch. With linen stitch, you slip stitches every row. In half linen stitch, you slip stitches only on right-side rows. So, half linen stitch is stretchier and less dense than true linen stitch. You can read about half linen stitch in Chapter 5.
The linen stitch pattern is composed of 2 rows: a right-side row and a wrong-side row. The pattern works over any odd number of stitches.
Starting with the right-side row, follow these steps:
1. Knit 1 stitch.
2. Bring the yarn to the front as if to purl.
Be sure to bring the yarn between and under the needles when you do this; see Chapter 8 for more details.
3. Slip the next stitch purlwise. That is, put the right needle into the stitch as though you were going to purl and transfer the stitch to the right needle without purling it.
4. Bring the yarn back between stitches to the knit position.
This step leaves a horizontal float across the front of the slipped stitch.
5. Repeat these four steps until you’ve reached the last stitch. Knit the last stitch.
Wrong-side rows are a bit more difficult to describe because you’re slipping the first and last stitches of the row. Do it as you read it and the steps will fall into place!
1. With the yarn in front as if to purl, slip the first stitch purlwise.
2. Bring the yarn around the outside of the work to the back and then between the first and second stitch, returning it to the purl position.
You’ve wrapped the yarn around the edge stitch counterclockwise (see Figure 10-4).
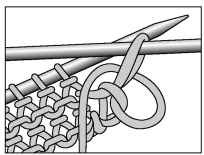
Figure 10-4:
Wrapping the yarn around the edge stitch.
3. Purl the next stitch.
4. Bring the yarn to the back of the work, as if to knit.
5. Slip the next stitch purlwise.
6. Bring the yarn back to the front of the work.
7. Repeat Steps 3 through 6 until you’ve reached the last stitch.
8. Bring the yarn to the back of the work.
9. Slip the last stitch purlwise.
10. Bring the yarn to the front of the work, wrapping the last stitch and putting the yarn in the correct position to knit the first stitch of the next row.
Continue repeating these 2 rows (right-side and wrong-side) as directed in the pattern you’re working.
Materials and vital statistics
Yarn: You need two kinds of yarn for this project:
• For the bag: Cascade 128 (100% wool); 128 yards (118 meters) per 100 grams; 4 skeins; color: 627 Grey Tweed
• For the straps: Schaefer Yarns Miss Priss (100% merino wool); 280 yards (256 meters) per 115 grams; 1 skein; color: Rosa Parks
Needles: You need two types of needles for this project:
• For the bag: US 13 (9 mm) needles
• For the straps: US 10K (6.5 mm) needles
It is easiest to work with short straight needles or 2 double-pointed needles for the straps and a long circular needle for the bag, but any straight or circular needles of the appropriate size will work.
Other materials: Two D-rings, 2 inches wide; 2 buckles, 2 inches wide; yarn needle; sewing needle and matching heavy-duty thread to attach the straps to the bag
Size: See a schematic of the bag in Figure 10-5
• Before felting: 18>2 inches wide, 17 inches tall, and 3K inches deep
• Finished size: 15 inches wide, 12 inches tall, and 3 inches deep Gauge: You’ll work at two different gauges on this project:
• For the bag: 9 stitches and 18 rows per 4 inches in garter stitch before felting; 11 stitches and 26 rows per 4 inches in garter stitch after felting
• For the straps: 26 stitches and 40 rows per 4 inches in linen stitch
This bag is knit in one piece starting with the front. From there you cast on a few stitches on each side to form the sides of the bag, which are knit at the same time as the back. After you bind off the side gusset stitches, you continue working the flap. When the knitting is complete, you sew the bag together and felt it in the washing machine. While it’s drying, cast on for the eye-catching straps.
Knitting the bag
Cast on 42 sts with a US 13 (9 mm) needle and the Cascade 128 yarn. Knit 94 rows in garter stitch (knit all rows); 47 garter ridges will be visible.
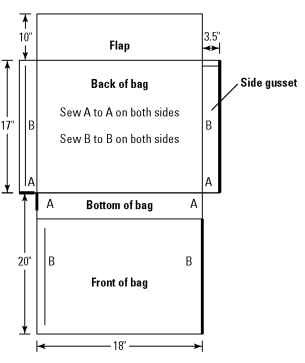
Figure 10-5:
The dimensions of the messenger bag before felting.
Side gussets and back
To give the bag depth, stitches are cast on each side of the work. The sides are created as you knit the back of the bag.
Using the cable cast-on, cast on 8 sts at the beginning of the next 2 rows. There are 58 sts on the needles.
Knit 76 rows. There are 39 garter ridges visible from the beginning of the side gussets.
Bind off 8 sts at the beginning of the next 2 rows. There are 42 sts on the needle. (The appendix has details on binding off.)
Flap
Knit 44 rows. There will be 22 garter ridges visible after the last bind-off. Bind off remaining 42 sts.
Creating the straps
Using US 10>2 (6.5 mm) needles and the Miss Priss yarn, cast on 13 sts. Begin working in linen stitch.
Row 1: *K1, slip 1 purlwise wyif, repeat from * to last st, k1.
Row 2: *Slip 1 purlwise wyib, purl 1, repeat from * to last st, slip 1 purlwise wyib.
The abbreviation “wyif” stands for “with yarn in front”; the abbreviation “wyib” stands for “with yarn in back.” Find out more about these terms in Chapter 9.
Repeat these 2 rows until the piece measures 45 inches.
Bind off and weave in ends.
For the buckle closure you need 2 more straps:
For each one, cast on 13 sts and work in linen stitch. Make one piece that’s 5 inches long and another piece that’s 3 inches long.
Finishing your bag
Using Cascade 128 and the yarn needle, sew the bottom of the side gusset to the front (the sections marked A on Figure 10-5) using mattress stitch. Sew the long vertical edges of the gussets to the sides of the front (the sections marked B), being sure that the top edge of the bag front is aligned with the top (bound-off) edges of the gussets. (You can read up on finishing in the appendix.)
Now it’s time to felt your bag. Felting, which will make your bag smaller and sturdier, is accomplished by exposing the knitted bag to hot water and agitation in the washing machine. See the appendix for step-by-step felting instructions.
Don’t felt the beautiful straps you’ve made! Only put the bag itself in the washing machine!
When the bag is dry (which may take a couple of days depending on your climate) attach the straps by following these steps:
1. Sew the two D-rings to the top edges of the side gussets using a sewing needle and matching thread.
2. Slip one end of the longest strap through a D-ring from the outside toward the bag, making sure that the right side of the strap is out.
3. Fold an inch of the loose end of the strap over the D-ring and stitch it down.
4. Thread one buckle onto the long strap, placing it roughly in the middle of the strap.
Because it’s adjustable, it doesn’t matter where you put it for now.
5. Insert the free end of the strap through the D-ring on the opposite side of the bag, putting it through from the outside toward the bag and bringing the free end up along the wrong side of the strap.
6. Bring the strap under the center bar of the buckle and fold it over the bar, and then stitch it down using a sewing needle and thread.
7. Attach the 5-inch-long strap to the center of the front flap as shown in Figure 10-6. Attach the first 2 inches of the strap to the flap itself, with the remaining 3 inches hanging down from the edge of the flap.
8. Attach one end of the 3-inch-long strap to the center bar of the second buckle using a sewing needle and thread.
The buckle will be at the top of the strap. Be sure that the right side of the strap faces out.
9. Thread the strap from the flap through the buckle to determine the correct placement of the strap with the buckle on the front of the bag.
10. Close the bag and sew the last strap in place.
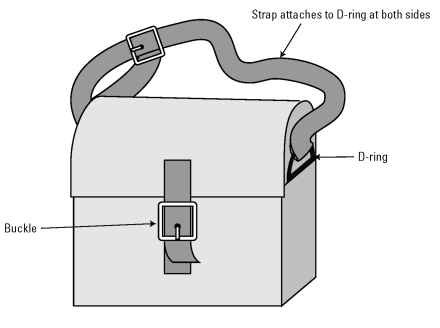
Figure 10-6:
Attaching he straps to your bag.
One-Piece Baby Sweater
Legions of baby sweater patterns claim to be quick and easy. Here’s an updated take on the classic kimono that suits both boys and girls (see Figure 10-7). It’s unrealistic to expect to finish this sweater in one day, but you can still finish it pretty quickly. Pair this sweater with a set of retro slippers (see Chapter 8) and one of the great hats in Chapter 8 or Chapter 11, and baby’s got a fantastic layette.
New skill: Making a buttonhole
There are lots of ways to make a buttonhole when you knit. For a small buttonhole, for instance, you can simply use a yarn over and a single decrease and be done with it (see Chapter 6 for more about these stitches). For anything larger, I like to use a simple two-row buttonhole, which I explain later in this section. This type of buttonhole can be 2 or 3 (or more) stitches wide, though I find that it’s better to underestimate the number of stitches you use; most times you can get a bigger button than you think through your buttonhole. However, I still like to make the buttonholes before I buy my buttons. I find that it’s a lot easier to find a button that fits the hole than to make a hole that fits the button.
Here are a few tips to bear in mind when making your buttonholes:
Be sure to place them far enough in from the edges. You don’t want the button to hang over the edges of the sweater. So, for example, if you’re using a 1-inch-diameter button, give yourself at least an inch on all sides of the buttonhole. That gives you half an inch for the button’s radius, plus half an inch beside it. The bigger the buttonhole, the more room you should leave around it.
Buttonholes do stretch out. If you find that your buttons are slipping out of their holes, replace the buttons with bigger buttons. This solution is particularly helpful when a sweater has been passed down to its fourth baby.
Buttonholes aren’t just for buttons. The two-row buttonhole technique can be used any time you need to create a slit in something that’s knitted. I use it to make a thumbhole in the wrist warmers pattern and a purse handle in the mosaic bags pattern (both in Chapter 11).
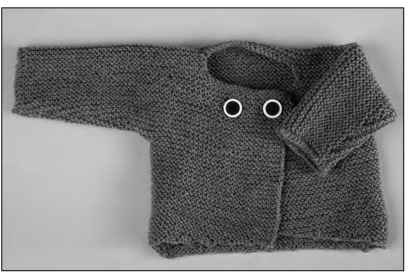
Figure 10-7:
This baby sweater is knit all in one piece.
Are you ready to go? If you’re working from a pattern, work to the spot directed, and then make your two-row buttonhole by following these steps:
1. Bind off 2 stitches (or more for a larger buttonhole).
Continue knitting across the row.
2. In the next row, knit to the gap created by your bound off stitches and cast on 2 stitches (or as many as you bound off in the first row).
You won’t be able to use the long-tail cast-on here because you won’t have a tail. Use the cable cast-on to get the job done. (See more on the cable cast-on earlier in this chapter.)
3. Knit to the end of the row.
Your buttonhole is complete.
Materials and vital statistics
Yarn: Cascade 220 Superwash (100% superwash wool); 220 yards (201 meters) per 100 grams; 2 (2, 3) skeins; color: 860 Gray Heather
Needles: US 7 (4.5 mm), or the size needed to match gauge
Other materials: Two 1-inch buttons; sewing needle and thread to match buttons; yarn needle for sewing up seams
Size: Newborn (6-12 months, 1-2 years)
• Finished chest circumference: 18 (22, 26) inches
• Finished length: 9 (11, 13) inches See the schematic in Figure 10-8.
Gauge: 18 stitches and 36 rows per 4 inches in garter stitch
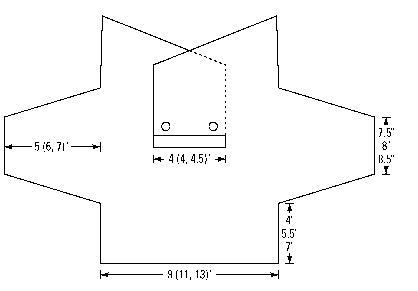
Figure 10-8:
The shape and dimensions of the baby sweater.
This sweater is worked in one piece. You start at the lower edge of the back and knit straight to the beginning of the sleeves, which are increased gradually. When you get to the shoulders, you bind off stitches for the neck opening, and then work each side of the front separately, casting on stitches for the front neckline. When you’re done knitting, you have just one seam to sew on each side from the cuff to the waist. Then you attach the buttons.
Directions
Cast on 36 (44, 54) sts.
Work in garter stitch (knit all rows) until the sweater measures 4 (5>2, 7) inches.
Sleeves
You’ll cast on gradually for both sleeves. Using the cable cast-on (see the earlier section “New skill: The cable cast-on” for details) or your preferred method, cast on 4 sts at the beginning of the next 12 (14, 16) rows. There are now 84 (100, 118) sts on the needle.
Work even until the sweater measures 9 (11, 13) inches. The back is now complete.
Neck
You now bind off stitches for the neck and work the left front and right front separately.
Next row: Knit 33 (41, 49) sts; bind off the center 18 (18, 20) sts; knit to the end of the row. You now have 2 sets of 33 (41, 49) sts.
Continue working on the set of stitches with the yarn attached. If you want, you can slip the other set of stitches to a holder. You can also just leave them on the needle and ignore them.
Left front
Knit 6 rows on the 33 (41, 49) sts for the left front.
Knit across the 7th row, and at the end (the neck edge), turn the work and cast on 18 (18, 20) sts using the backward-e or cable cast-on. There are 51 (59, 69) sts on the needle.
Work even on these sts for 1 inch, ending with the yarn at the sleeve edge. Now work buttonholes over the next 2 rows as follows:
Next row: K37 (45, 53) sts, bind off 2 sts, k5 (5, 7) sts, bind off 2 sts, k3. There are 6 (6, 8) sts between the 2 buttonholes.
Next row: K4, cast on 2 sts, k6 (6, 8) sts, cast on 2 sts, knit to end.
Work even until the left side measures 10% (14, 17>4) inches from the cast-on edge, ending with the yarn at the sleeve edge.
Next WS row (at the wrist edge): Bind off 4 sts, knit to end.
Next row: Knit.
Repeat the previous 2 rows 5 (6, 7) more times. There are 27 (31, 37) sts.
Work even until the sweater measures 2>2 (3%, 5) inches from the bottom of the sleeve, ending with the yarn at the front (tummy) edge.
Next row: Bind off 4 sts, knit across.
Next row: Knit.
Repeat the previous 2 rows 6 (7, 8) more times, and then bind off the remaining sts.
Some people care which side their sweaters button on (for example, right over left or left over right). This sweater has buttons on two sides, and the left side of the lapel goes on top. But if you want the right side of the lapel to go on top, turn the sweater inside out before you do the finishing.
Right front
Reattach the yarn at the neck edge and knit 5 rows on the 33 (41, 49) sts for the right front.
Knit across the 6th row, and at the end (the neck edge), cast on 18 (18, 20) sts using the backward-e, knitted, or cable cast-on. There are 51 (59, 69) sts on the needle.
Work even until this side of the sweater measures 10% (14, 17M) inches from the cast-on edge, ending with the yarn at the sleeve edge.
Next RS row (at the wrist edge): Bind off 4 sts, knit to end.
Next row: Knit.
Repeat the previous 2 rows 5 (6, 7) more times. There are 27 (31, 37) sts.
Work even until the sweater measures 2>2 (3%, 5) inches from the bottom of the sleeve, ending with the yarn at the tummy edge.
Next row: Bind off 4 sts, knit to end.
Next row: Knit.
Repeat the previous 2 rows 6 (7, 8) more times, and then bind off the remaining stitches.
Finishing
Block the sweater so the edges are smooth and the side seams are the same length. Sew the seam on each side from cuff to underarm to hem. Using the buttonholes as guides, place the buttons on the opposite lapel and then sew them firmly in place using a needle and thread. (Read more on blocking and sewing seams in the appendix.)
You can make a good sweater great with the right buttons. So, I like to wait until the sweater is done to pick them. This way I know I’ve chosen the right ones. Even if I think I know how the sweater’s going to look, I find I almost always pick a different button when the sweater’s done.
Deceptively Simple Shell
Like the box top in Chapter 8, this shell has an incredibly simple shape, but when worn on the body, it looks much more interesting. By simply splitting the front in half for the last couple of inches (think of making a slit in the front of a tight-fitting T-shirt), and then binding off all the neck stitches in one go, you get plenty of va-va-voom! This top has negative ease, which means that when worn it stretches to hug your curves. See the top in Figure 10-9.
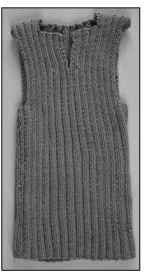
Figure 10-9:
The deceptively simple shell is curve-hugging.
Materials and vital statistics
* Yarn: Cascade Venezia (70% merino wool, 30% silk); 102 yards (94 meters) per 100 grams; 4 (5, 5, 5, 6) balls; color: Melon
* Needles: US 10 (6 mm) needles, or the size needed to match gauge
* Other materials: Yarn needle; stitch holder
* Size: XS (S, M, L, 1X)
• Finished chest circumference (unstretched): 20 (22, 24, 27, 30) inches
• Finished chest circumference (stretched): 30 (34, 38, 42, 46) inches
• Finished length: 22 (23, 23, 24, 24) inches
See Figure 10-10 for a schematic.
Gauge: 22 stitches and 20 rows over 2 x 2 rib (unstretched); 14 stitches and 20 rows over 2 x 2 rib (stretched)
This top is a quick knit that you’ll love to wear. Wear it on its own in summer or under a jacket year-round. It’s knit in two easy pieces and is a cinch to sew up.
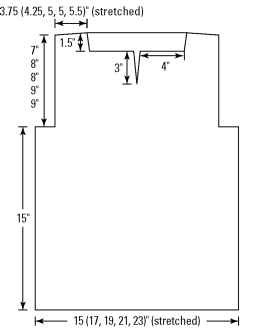
Figure 10-10:
The dimensions of the deceptively simple shell.
Starting with the back
Cast on 54 (62, 66, 74, 82) sts.
Begin 2 x 2 rib as follows:
Row 1 (RS): K2, *p2, k2, repeat from * to end.
Row 2 (WS): P2, *k2, p2, repeat from * to end.
Repeat these 2 rows until the back measures 15 inches (all sizes).
Shape armholes
Bind off 2 (4, 4, 6, 8) sts at the beginning of the next 2 rows. There are 50 (54, 58, 62, 66) sts.
Continue with the rib pattern, knitting the knit sts and purling the purl sts, until the back measures 22 (23, 23, 24, 24) inches.
Bind off all sts.
Moving to the front
Work the front the same as the back through the armhole shaping.
Continue with the rib pattern until the front measures 17K (18>2, 18K, 19>2, 19>2) inches, ending with a RS row.
You now divide the left and right halves of the neck and work them separately.
Right neck
Next row (WS): Work 25 (27, 29, 31, 33) sts in rib pattern. Do not complete the row; place the remaining stitches on a stitch holder.
Continue in rib pattern on these 25 (27, 29, 31, 33) sts until this side measures 3 inches from the beginning of neck shaping, ending with a WS row.
Next row (RS): Bind off 12 (12, 12, 14, 14) sts, work in rib pattern to the end of the row. There are 13 (15, 17, 17, 19) sts on the needle.
Work 1>2 inches in rib pattern, measuring from the last bind off.
Bind off. Left neck
Replace the held stitches on the needle with the WS facing and rejoin the yarn. Work these 25 (27, 29, 31, 33) stitches in rib pattern as set for 3 inches, ending with a RS row.
Next row (WS): Bind off 12 (12, 12, 14, 14) sts at the neck edge, and then work in rib pattern to the end of the row. There are 13 (15, 17, 17, 19) sts on the needle.
Work 1>2 inches in rib pattern as set.
Bind off.
Finishing your shell
Using mattress stitch, sew the shoulder seams together, matching the outer edges of the front and back shoulders and lining up the rib pattern. Sew the side seams from the bottom of the armhole to the hemline. Weave in any loose ends and block if desired.
Leave the edges unfinished for a somewhat deconstructed look as I have (refer to Figure 10-9), or finish them with a row of single crochet if desired. (See the appendix for more about blocking and crocheted edging.)
Shawl-Collared Coat
After finding a beautiful vintage hand-knit coat, I got a bee in my bonnet about creating my own. A knitted coat may not be the first thing you think of when you’re looking for a simple project, but trust me, while the scale is a bit larger than a scarf or purse, the knitting itself couldn’t be simpler. And while you can’t really convince yourself that it’s okay to wear the same pullover every day, you’re justified in wearing the same coat all season long — so it’s well worth making.
The basic version of this coat (see Figure 10-11) is just three simple rectangles joined at the shoulders with a three-needle bind-off. From there, stitches are picked up all the way around the front panels and back neck to make a shawl collar. The sleeve caps aren’t shaped, so knitting and attaching the sleeves is straightforward.
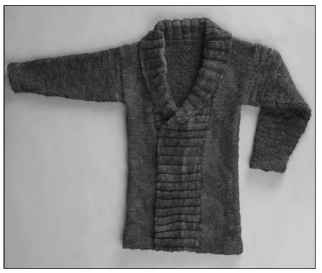
Figure 10-11:
The shawl-collared coat can be worn in all seasons.
New skill: The three-needle bind-off
Okay, so it’s awkward to say, difficult to hyphenate properly, and doesn’t have a catchy abbreviation. But the three-needle bind-off is lovable nonetheless. It allows you to attach two knitted pieces together tidily and sturdily without sewing. It’s perfect for shoulder seams.
To use the three-needle bind-off, you need two pieces of knitting that are still on the needles, with an equal number of stitches on each, and a spare needle of the same size.
If you don’t have three needles that are the same size, put one set of stitches on a smaller needle and bind off with the correctly sized one.
Follow these steps for a seamless three-needle bind-off:
1. Hold the two pieces with their right sides (public sides) together and both needle tips parallel and pointing to the right as shown in Figure 10-12.
If the stitches on one needle are facing the wrong way, slip the stitches onto a circular needle and then back to the working needle so that they’re facing the right way. Hold both needles in your left hand.
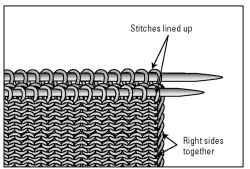
Figure 10-12:
Lining things up for the three-needle bind-off.
2. Take the third needle in your right hand and stick it into the first stitch on the front needle as you would to knit it.
Continue through to the first stitch on the back needle, and then stick the needle through this stitch knitwise.
3. Wrap the yarn as shown in Figure 10-13 and knit these 2 stitches together.
There’s 1 stitch on the right-hand needle.
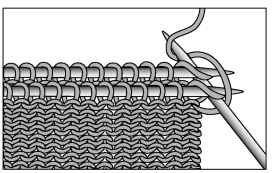
Figure 10-13:
Knitting the first stitch from both needles together.
4. Knit together the next stitch from the front needle with the next stitch from the back needle.
There are 2 stitches on the right needle.
5. Bring the rightmost stitch on the right needle over the stitch that you just worked (as you do when you bind off normally).
Check out Figure 10-14 to see how to bind off the first stitch.
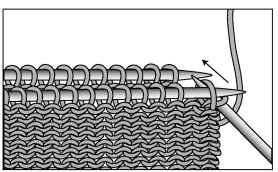
Figure 10-14:
Binding off the first stitch.
6. Repeat Steps 4 and 5 until all the stitches are bound off.
Cut the yarn and pull the tail through the last stitch to secure.
New skill: Pick up and knit vertically
To pick up stitches along a vertical edge, like the front edges of this shawl-collared coat, you need the smaller-sized knitting needles to knit the collar, the working yarn, and maybe a crochet hook.
Look closely for a moment at the edge of your knitted piece, comparing it to Figure 10-15. Between the first and second stitches on the edge, you should see a series of running threads that look like the rungs of a ladder; this is where the action is — just like when you’re sewing something up with mattress stitch (see the appendix for details).
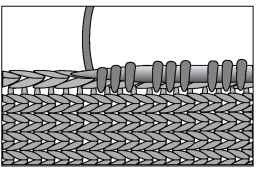
Figure 10-15:
Picking up stitches on a vertical edge.
With the right (public) side facing up, start at the right edge of the work and follow these steps:
1. Stick your needle between the first two rungs of the ladder from the front to the back of the piece.
2. Wrap the working yarn around the needle as you would if you were working a knit stitch and pull it through.
3. Continue picking up stitches in the same way until you’ve picked up the correct number of stitches.
If you find the previous steps awkward, you can use a crochet hook and the following steps instead:
1. Stick the crochet hook between the ladder rungs from the front of the piece to the back.
2. Grab the working yarn and pull through a loop.
Transfer the loop to your knitting needle and give the yarn a gentle tug to snug it up.
3. Continue picking up stitches in the same way until you’ve picked up the correct number of stitches.
To compensate for the difference between the number of stitches and the number of rows per inch, you need to skip spaces in the ladder regularly as shown in Figure 10-15. If you’re knitting 3 stitches and 4 rows per inch, for example, you need to pick up 3 stitches for every 4 rows. Or, said more simply, you need to pick up and knit stitches in the next 3 spaces, skip 1 space, pick up and knit stitches in the next 3 spaces, skip 1, and so on across the piece.
A moment to flex the math brain gives you the specific information needed for this project. Verify your gauge from your swatch for the collar and the body of the coat. But remember to be honest with yourself about your gauge! Like buying pants based on the listed size rather than on how they fit, fudging your gauge is a mistake. If your gauge is different than mine, now’s the time to deal with it. So, you need to plan your pick up based on what you’ve actually knit. Here’s what you do for this particular pattern:
The collar is knit in rib at 5>4 stitches per inch.
The body of the coat is knit in half linen stitch at 6 rows per inch.
Given these facts, you need to pick up 5>4 stitches for every 6 rows. Because you can’t pick up a quarter stitch, you need to noodle a bit with fractions. For instance, 5% divided by 6 is 0.875, which is the same as J8. So, you have to pick up 7 out of every 8 stitches.
If you don’t want to think through the math, place markers every 2 inches around the edges where you’ll be picking up stitches, and then pick up your stitch gauge per inch times 2 between each set of markers. Using the previous example, 5>4 x 2 = 10>2, so you pick up 10>2 stitches between each set of markers. And, again, because you can’t pick up half a stitch, compensate by picking up 10 stitches between the first set of markers, 11 stitches between the second set markers, and so on.
New skill: Pick up and knit horizontally
Turn the coat so that the back is up with the right side facing you. You’ll see a row of stitches, like little Vs, just below the bound-off edge along the neck. This is where you’ll be picking up stitches horizontally, as shown in Figure 10-16.
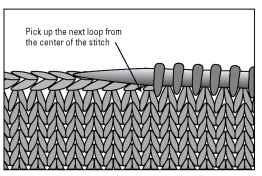
Figure 10-16:
Picking up stitches on a horizontal edge.
Still working from right to left, use your knitting needle or crochet hook as you did along the vertical edge in the previous section. Make sure that you’re inserting your needle into whole stitches and not into the bound-off edges.
If you’re picking up stitches along a horizontal edge and working your add-on at the same gauge as the body of the garment, you simply pick up 1 stitch in every bound-off stitch. But because you’re working with two gauges in this project (half linen stitch versus rib), you have to do some math. But I promise that I’ve made it easy to get right. Choose the option that makes the most sense to you, and then do it:
Pick up 5 stitches for every 4 stitches. Pick up 2 stitches in every 4th stitch. ‘ Pick up 9>2 stitches for every 2 inches. Pick up 39 stitches across the back of the neck.
Generically, pick up as many stitches per inch as you’re knitting for the new piece in every inch of the existing piece.
Materials and vital statistics
Yarn: Cascade Jewel (100% hand-dyed Peruvian wool); 142 yards (130 meters) per 100 grams; 10 (11, 12, 13, 13, 14) skeins; color: 9969
Needles: US 10 (6 mm) needles, or the size needed to match gauge; US 8 (5 mm) needles for ribbing and hem facings; one very long circular needle or two or three shorter ones to work the collar
Other materials: Stitch holders or spare needles; US H (5 mm) or smaller crochet hook; stitch markers or safety pins; yarn needle for finishing
Size: Women’s XS (S, M, L, 1X, 2X)
• Finished chest circumference: 36 (40, 44, 48, 52, 56) inches, with front edges overlapped about 2 inches
• Finished length: 30 inches (all sizes) See Figure 10-17 for the schematic
Gauge: 15 stitches and 24 rows per 4 inches in half linen stitch on US 10 (6 mm) needles; 21 stitches and 24 rows per 4 inches in 3 x 3 rib on US 8 (5 mm) needles
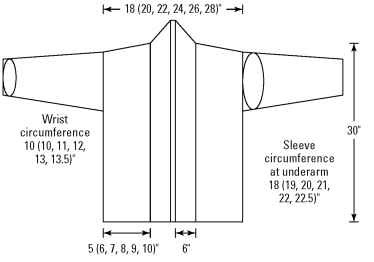
Figure 10-17:
The shape and dimensions of the shawl-collared coat.
This coat is worked in half linen stitch (see Chapter 5), which creates a wonderful, almost woven-looking fabric. Because this technique involves slipping stitches, it minimizes vertical stretch, which is perfect for a longer, heavier garment like a coat. The coat also features a hem that’s knit in. This type of hem may sound fancy, but it’s easy to work and makes the edges of your coat sit properly. It also allows the half linen stitch pattern to continue all the way to the edges without being interrupted.
Starting with the back
With smaller needles, cast on 69 (75, 83, 91, 99, 105) sts.
Work 10 rows in stockinette stitch (knit RS rows, purl WS rows) to form the hem facing, ending with a WS row.
Purl 1 RS row to create a turning ridge.
Next row: Switch to larger needles and purl.
Begin half linen stitch as follows:
Row 1 (RS): K2, *sl 1 purlwise wyif, k1, repeat from * to last 3 sts, sl 1 purlwise wyif, k2.
Row 2 (WS): Purl.
Row 3: K3, *sl 1 purlwise wyif, k1, repeat from * to last 4 sts, sl 1 purlwise wyif, k3. Row 4: Purl.
Repeating these 4 rows, continue in pattern until the back measures 29.5 inches from turning ridge, or desired length, ending with a WS row.
Shoulder and neck shaping
The shoulders on your coat are worked with simple short rows. I didn’t wrap the stitches at the turning points, but if you want to wrap them, see Chapter 12.
Next row (RS): Work across in half linen stitch to last 9 (11, 13, 15, 17, 19) sts. Turn work, leaving remaining sts unworked.
Next row (WS): Slip first st, and then purl to last 9 (11, 13, 15, 17, 19) sts. Turn work, leaving remaining sts unworked.
Next row: Slip first st, and then work across, maintaining the half linen stitch pattern, to last 19 (22, 26, 30, 34, 37) sts. Turn work, leaving remaining sts unworked.
Next row (WS): Bind off the center 31 sts and cut the yarn. There are 19 (22, 26, 30, 34, 37) shoulder sts on either side awaiting three-needle bind-off. Slip these sts to holders or spare needles while you knit the front panels.
Moving to the left front panel
For this coat, you make two front panels, each of which is only as wide as the shoulder sections of the back. The center portion of the front is worked later as a wide shawl collar.
Cast on 19 (23, 27, 31, 35, 37) sts with smaller needles.
Work 10 rows in stockinette stitch to form the hem facing, ending with a WS row.
Purl 1 RS row to create a turning ridge.
Next row (WS): Switch to the larger needles and purl.
Work in half linen stitch as you did for the back until the front measures the same as the back to the shoulder shaping, ending with a WS row.
Shoulder shaping
Work the first row of shoulder shaping appropriate for your size as follows: Next row for sizes XS and 2X only (RS): Work in pattern.
Next row for sizes S, M, L, 1X only (RS): Work in pattern to last 4 sts, k2tog, k2. There are now 19 (22, 26, 30, 34, 37) sts on the needle.
All sizes continue:
Next row (WS): Purl to last 9 (11, 13, 15, 17, 19) sts. Turn work, leaving the remaining sts unworked.
Next row (RS): Slip first st and then work across row, maintaining the half linen stitch pattern. Do not bind off; cut the yarn, leaving a tail that’s at least 4 feet long. Slip all sts to holders or spare needles.
Continuing with the right front panel
Work the right front the same as the left front to shoulder shaping ending with a RS row.
Shoulder shaping
Work the first row of shoulder shaping appropriate for your size as follows: Next row for sizes XS and 2X only (WS): Work in pattern.
Next row for sizes S, M, L, 1X only (WS): Work in pattern to last 4 sts, p2tog, p2. There are now 19 (22, 26, 30, 34, 37) sts on the needle.
All sizes continue:
Next row (RS): Work in half linen stitch to last 9 (11, 13, 15, 17, 19) sts. Turn work, leaving remaining sts unworked.
Next row (WS): Slip first st and then purl to end. Don’t bind off or cut yarn.
Attaching the front and back panels
Slip sts from the back right shoulder to a needle so that the RS faces up and the needle points toward the neck.
Place right front, WS up, on top of the back so that the needles are parallel. Use the three-needle bind-off described earlier in this chapter to attach the two pieces.
Repeat the three-needle bind-off to attach the second shoulder.
Making the sleeves
Make 2 sleeves that are the same as follows:
With smaller needles, cast on 37 (37, 43, 45, 49, 51) sts.
Work 6 rows in stockinette stitch to form the hem facing, ending with a WS row. Next row (RS): Switch to the larger needles and purl. Work 6 rows in half linen stitch as you did for the back. Begin increases for sleeves.
Row 1 (Increase Row): K1, m1, sl 1, k1, *sl 1 purlwise wyif, k1, repeat from * to last 2 sts, sl 1, m1, k1.
The abbreviation “m1″ stands for “make 1.” For more details, see Chapter 14.
Row 2 (WS): Purl.
Row 3 (RS): K3, *sl 1 purlwise wyif, k1, repeat from * to last 4 sts, sl 1 purlwise wyif, k3.
Row 4 (WS): Purl.
Row 5 (RS): K2, *sl 1 purlwise wyif, k1, repeat from * to last 3 sts, sl 1 purlwise wyif, k2.
Row 6 (WS): Purl.
Repeat these 6 rows 14 (16, 15, 16, 16, 16) more times. There are 67 (71, 75, 79,
83, 85) sts.
Work even, maintaining the stitch pattern, until your sleeve measures 18 inches from turning ridge, or your desired length.
Bind off.
Creating the shawl collar
The next step involves picking up a lot of stitches (I show you how to pick up vertically and horizontally earlier in this chapter). Grab a cup of coffee, all the size 8 circular needles you’ve got, and your trusty crochet hook.
Using the circular needle and with the right (public) side facing you, start at the turning ridge on the right front (make sure you’re working on the front edge at the tummy rather than on the side edge!) and pick up and knit 357 stitches — that is, pick up 159 stitches along the right front, 39 stitches along the back of the neck, and 159 stitches down the left front, ending at the turning ridge.
I know that 357 is a lot of stitches. Here’s a tip to help you manage all of them: Put them on more than one circular needle; maybe two longer ones for the fronts and one shorter one for the back. If you’re using more than one needle, just work the stitches on each needle with the ends of that needle, but make sure that you complete all 357 stitches in each row.
After you pick up the stitches, it’s time to make the collar itself. Row 1 (WS): *P3, k3, repeat from * to last 3 sts, p3. Row 2: *K3, p3, repeat from * to last 3 sts, k3.
Repeat these 2 rows until ribbing measures 6 inches, or your desired length. Bind off loosely in rib (see Chapter 13 for details on this type of binding off).
Finishing your coat
Measure 9 (9>2, 10, 10>2, 11, 11>4) inches down from the shoulder seam on the front and place a marker or safety pin on the side edge at this point. Do the same on the back so that you have two markers 18 (19, 20, 21, 22, 22>2) inches apart.
Fold one sleeve in half lengthwise to find the center of the upper (bound-off) edge and mark it with a pin. Line up the center of the sleeve with the shoulder seam and the edges of the sleeve with the markers on your coat. Sew the sleeve in place with mattress stitch. Attach the second sleeve the same way. Sew the sleeve seams and side seams of the coat. Sew the hem facings to the wrong side of the coat. Weave in all ends. (See the appendix for information on sewing seams.)
Variation: A beautiful border
Think of the body of your coat as a backdrop for the collar — it’s a lot like a scarf that’s attached. You can use any yarn for your collar, regardless of gauge. Choose a hand-spun or hand-dyed yarn that you have a limited quantity of, or any dreamy yarn that you’ve fallen in love with. Work with your chosen yarn for 2 inches for a subtle border, or go all the way to 8 inches if you want the two sides of the shawl collar to completely overlap.
Simply swatch with the yarn you’ve chosen to figure out the gauge per inch in your desired stitch pattern (see Chapter 2 for help). Then pick up that number of stitches for every inch along the front edges and back neckline of the coat. If you’re working a stitch pattern that requires a certain number of stitches, it’s okay to add or subtract a few stitches as needed. Out of the hundreds of stitches that you’re picking up, a couple of stitches more or less simply won’t make a difference.
Hooded Coat
This hooded coat (shown in Figure 10-18) has the same shape as the shawl-collared coat, but it’s worked in plain stockinette stitch. The hems are worked with a subtle and feminine picot detailing, which works great with the simple lines of the coat. This version of the coat features a hood and a contrasting color-shifting yarn worked in seed stitch for the shawl collar. You can also vary the coat by knitting the collar and hood in feather and fan stitch (see the later variation).
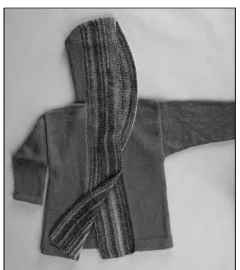
Figure 10-18:
The hooded coat features contrasting seed stitch on the hood and front panels.
Materials and vital statistics
Yarn: You need two yarns for this project:
• Yarn A: Cascade Eco + (100% Peruvian Highland wool); 478 yards (441 meters) per 250 grams; 3 (3, 3, 3, 4, 4) skeins; color: 7076 Periwinkle
• Yarn B: Dive Teseo (53% wool, 47% microfiber); 98 yards (90 meters) per 50 grams; 6 skeins (all sizes); color: 44147
Needles: US 10 (6 mm) needles, or the size needed to match gauge; US 8 (5 mm) needles for collar and hem facings; one long circular needle or two to three shorter ones to work the collar
Other materials: Stitch holders or spare needles; US H (5 mm) crochet hook; stitch markers or safety pins; yarn needle for finishing
Size: Women’s XS (S, M, L, 1X, 2X)
• Finished chest circumference: 36 (40, 44, 48, 52, 56) inches
• Finished length: 30 inches (all sizes)
Figure 10-19 shows the schematic
* Gauge: 14 stitches and 20 rows per 4 inches in stockinette stitch on US 10 (6 mm) needles with yarn A; 17 stitches and 26 rows per 4 inches in seed stitch on US 8 (5 mm) needles with yarn B
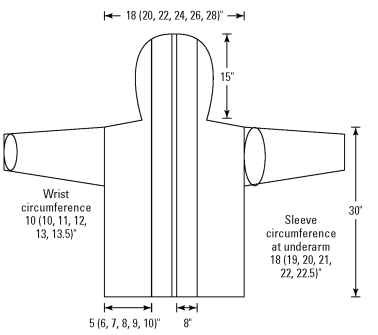
Figure 10-19:
The shape and dimensions of the hooded coat.
This coat is simple to knit and easy to wear; it’s definitely something you’ll love to wrap up in on chilly days. The hood isn’t fitted but drapes to form an attractive collar highlighted by the contrasting yarn. Try fastening the coat with a shawl pin or brooch — or even a spare double-pointed knitting needle! This eye-catching coat is knit in three almost rectangles for the back and the two front panels. The sleeves are drop-shouldered, so sewing them in place is straightforward. The contrasting shawl collar and sides of the hood are knit all at once from stitches that you’ll pick up from the body.
Starting with the back
With smaller needles and yarn A, cast on 63 (71, 77, 85, 91, 99) sts.
Work 10 rows in stockinette stitch (knit a row, purl a row) to form the hem facing, ending with a WS row.
Next row (RS): K1, *k2tog, yo, repeat from * to last 2 sts, k2. This row forms a picot edge for the hem when the facing is turned under.
For more information about knit 2 together (k2tog) and yarn over (yo), head to Chapter 6.
Next row (WS): Switch to larger needles and work in stockinette stitch, beginning with a purl row, until the back measures 29.5 inches from picot turning edge, or desired length, ending with a WS row.
Shoulder shaping
The shoulders of your coat are worked with simple short rows. I didn’t wrap the stitches at the turning points, but if you want to wrap them, see Chapter 12 for details.
Next row (RS): Knit to last 8 (10, 12, 14, 15, 17) sts. Turn work, leaving remaining stitches unworked.
Next row (WS): Slip first st, and then purl to last 8 (10, 12, 14, 15, 17) sts. Turn work, leaving remaining sts unworked.
Next row (RS): Slip first st and then knit across to last 17 (21, 25, 29, 31, 35) sts. Turn work, leaving remaining sts unworked.
Moving to the hood
Next row (WS): Slip first st, p28. Slip the first and last 17 (21, 24, 28, 31, 35) sts to holders or spare needles. 29 sts remain on the needle.
Work these 29 back neck sts in seed stitch for 15 inches (or less for a more fitted hood). Work each row as *k1, p1, repeat from * to last st, k1.
Bind off.
Knitting the left front
For this coat, you make two front panels, each of which is only as wide as the shoulder sections of the back. The center portion of the front is worked later along with the sides of the hood.
Cast on 17 (21, 25, 29, 31, 35) sts with smaller needles.
Work 10 rows in stockinette stitch to form the hem facing, ending with a WS row.
Next row (RS): K1, *k2tog, yo, repeat from * to last 2 sts, k2. This row forms a picot turning row for the hem.
Next row (WS): Switch to larger needles and purl.
Switch to larger needles and work in stockinette stitch, beginning with a purl row, until the front measures 29.5 inches, or the same as back to shoulder shaping, ending with a RS row.
Next row (WS): Purl to last 8 (10, 12, 14, 15, 17) sts. Turn work, leaving remaining sts unworked.
Next row (RS): Slip first st, and then knit to end. Do not bind off. Cut the yarn, leaving a tail that’s at least 4 feet long. Slip all sts to holders or spare needles for later.
Knitting the right front
Work the right front the same as the left front to shoulder shaping, ending with a WS row.
Shoulder shaping
Next row (RS): Knit to last 8 (10, 12, 14, 15, 17) sts. Turn work, leaving these sts unworked.
Next row (WS): Slip first st, and then purl to end. Do not bind off or cut yarn, but leave the sts on the needle, ready for the three-needle bind-off.
Attaching the front and back panels
Slip the stitches from the right shoulder of the back to the needle so that the right (public) side is facing up, and the needle points toward the neck.
Place the left front, WS up, on top of the back so that the needles are parallel. Use the three-needle bind-off to attach the two pieces. See the earlier section “New skill: The three-needle bind-off” for help if this is a new skill for you.
Attach the right front to the right shoulder of the back in the same way.
Making the sleeves
Make 2 sleeves that are the same as follows: With smaller needles, cast on 35 (37, 41, 41, 45, 45) sts. Work 6 rows in stockinette stitch, ending with a WS row. For the picot turning edge:
Next row (RS): K1, *k2tog, yo, repeat from * to last 2 sts, k2. This creates the picot edge of the hem.
Switch to larger needles and work 5 rows in stockinette stitch starting and ending with a purl row.
Increase row (RS): Kfb, knit to last 2 sts, kfb, k1.
Kfb stands for “knit into the front and back of the stitch”; see Chapter 11 for information.
Repeat the increase row every 6th row 13 (14, 14, 9, 9, 9) more times and then every 4th row 0 (0, 0, 6, 6, 7) times. There are 63 (67, 71, 73, 77, 79) sts.
Work even until sleeve measures 18 inches, or desired length.
Bind off.
Working the shawl collar and sides of hood
Now that you’ve completed the body of the coat, it’s time to work the lapels and sides of the hood. It’s easiest to work the collar and hood using a couple of appropriately sized circular needles, or several long ones. (I explain how to pick up and knit vertically and horizontally earlier in this chapter.)
Working with the right (public) side of your coat facing you, with your smaller needles and contrasting yarn (yarn B), start picking up stitches at the turning edge of the right front. Pick up and knit 130 stitches up to the shoulder, and then flip the coat around so that you’re working on the back — the public side of the hood. Pick up and knit 63 stitches along the right side of the hood, 33 stitches across the top of the hood, and 63 stitches down the left side of the hood. Finally, pick up and knit 130 stitches along the left front of the coat, making sure that you’re working with the right (public) side facing you. Not to alarm you, but that’s 419 stitches picked up. Don’t worry if you don’t end up with exactly that number of stitches, but be sure you have an odd number.
Work the collar and sides of the hood in seed stitch continuing with the smaller needles and yarn B as follows:
Row 1: *K1, p1, repeat from * to last st, k1.
Repeat this row until the collar is 8 inches deep (or desired depth).
Bind off.
Finishing your coat
Measure 9 (9>2, 10, 10>2, 11, 11>4) inches down from the shoulder seam on the front, and then place a marker or safety pin on the side edge at this point. Do the same on the back so that you have two markers 18 (19, 20, 21, 22, 22>2) inches apart.
Fold one sleeve in half lengthwise to find the center of the upper (bound-off) edge, and mark it with a pin. Line this up with the shoulder seam, and line up the edges of the sleeve with the markers on your coat. Sew the sleeve in place. Sew the sleeve seam and side seam. (See the appendix for directions for mattress stitch.)
Attach the other sleeve and work the seams of the remaining side in the same way.
Sew the hem facings loosely to the wrong side of the coat. Weave in all ends.
