In this section, you’ll work through creating your first iOS application with step-by-step instructions under Xcode 4. The goal is to get you started programming with Xcode and teach you how to write code and run the application on the iOS Simulator.
Creating a new project
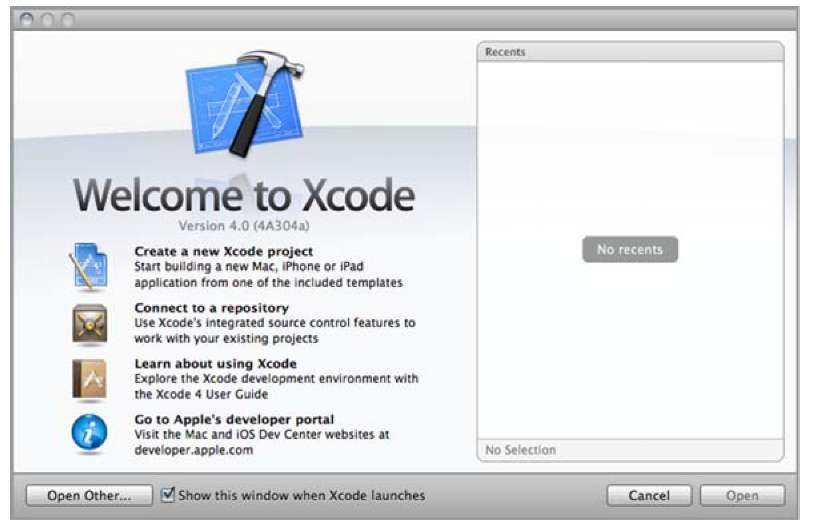
Through the default installation path, you can launch Xcode 4 from the Developer directory (typically located at Macintosh HD > Developer > Applications > Xcode). An even easier way to launch Xcode is to use Spotlight: press Command-spacebar, type xcode, and then press Enter. The first time you launch the Xcode 4 program, you’ll see the Welcome to Xcode window, as shown in figure 3.1.
Figure 3.1 The Welcome to Xcode window appears when Xcode launches.
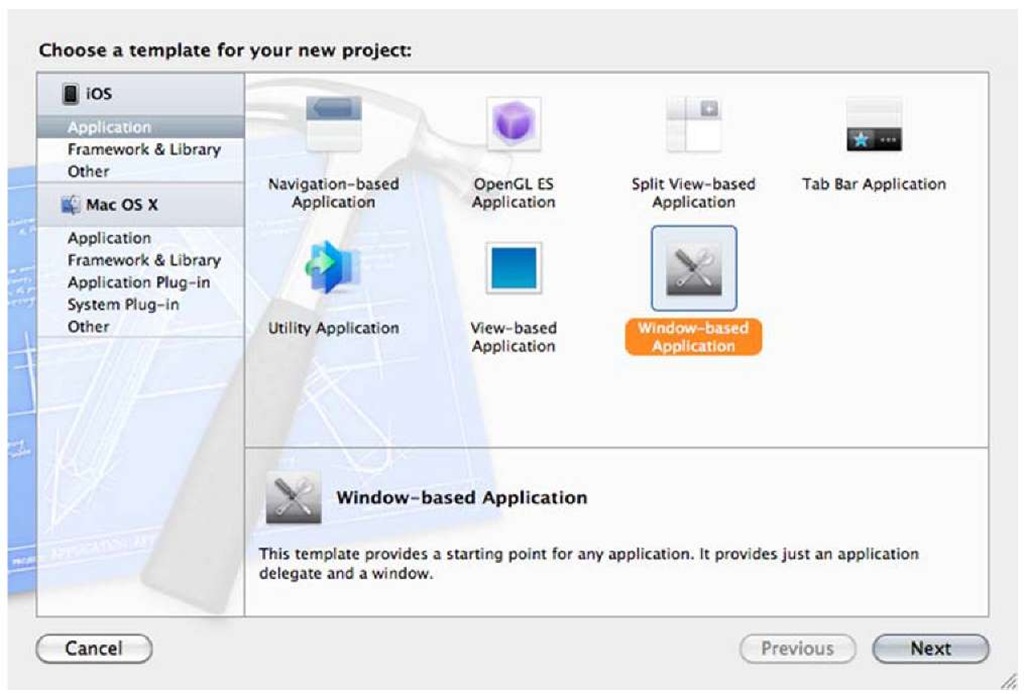
Select Create a New Xcode Project (or choose File > New > New Project), and you’re immediately prompted to choose a template for your new project, as shown in figure 3.2.
The template you choose will fill your project with default frameworks, default files, default objects, and even default code. As you’ll see, it’ll be a great help in jump-starting your own coding.
Figure 3.2 Choose a template for your new project.
Templates for new projects
When you’re creating a new project in Xcode, you always have the option to select from among several templates, as shown in figure 3.2, each of which gives you a different basis for your code. Besides a Window-Based Application, you can create a project as a View-Based Application, a Tab Bar Application, a Navigation-Based Application, a Utility Application, a Split View-Based Application, or an OpenGL ES Application.
Most of these templates will involve view controllers, which you won’t encounter for a couple of topics. We provide you with an overview for now so you can see the possibilities that Xcode offers:
■ A Window-Based Application is entirely minimalist. It provides a starting point for your application with the application delegate and window.
■ A View-Based Application has a bit more functionality. It includes a basic view controller that allows you to add custom content. You’ll use it in topic 5 (and most of the time thereafter).
■ A Tab Bar Application creates a tab bar along the bottom of the screen that allows you to switch between multiple views. The template does this by creating a tab bar controller and then defining what each of its views looks like. You’ll use it in topic 7.
■ A Navigation-Based Application sets you up with a navigation controller, a navigation bar along the top, and a table view in the middle of the page so you can easily build hierarchical applications. You’ll also use it in topic 7.
■ A Utility Application defines a flip-side controller that has two sides, the front side containing an info button that allows you to call up the backside. This is the last view controller we’ll explore in topic 7.
■ An OpenGL ES Application is another minimalistic application. The difference from the Window-Based Application is that it includes GL frameworks, sends the glView messages to get it started, and otherwise sets certain GL properties. We won’t get to GL until topic 13, and even then we’ll only touch on it lightly.
■ A Split View-Based Application is a split view controller-based application that works only on the iPad. You’ll use this template in topic 7.
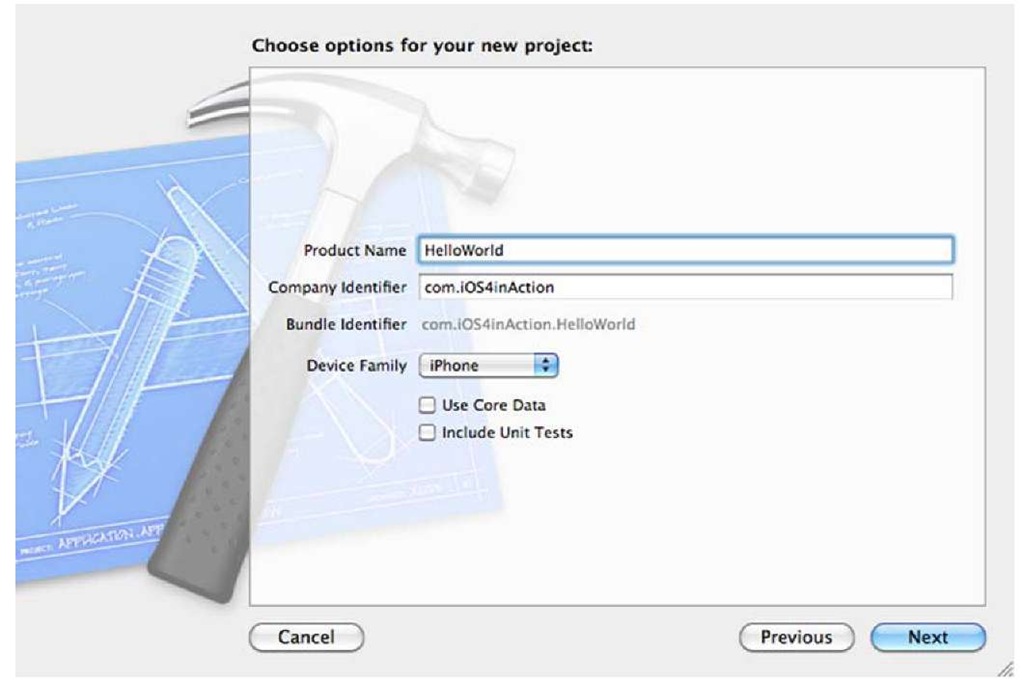
For your first program, go with the simplest template you can find: Window-Based Application. Select Next. You can specify options for your project, as shown in figure 3.3.
First, enter your project’s name under Product Name. In this example, use HelloWorld. Then fill in the company’s name. Make sure to select iPhone from the Device Family option. (Note that neither Use Core Data nor Include Unit Tests is selected, as shown in figure 3.3.)
Click Next, and choose where to save this new project. You’re ready to start coding under Xcode. Now, let’s look at the single-window interface.
Figure 3.3 Choose options for your new project.
Getting familiar with the workspace window
As you can see in figure 3.4, Xcode 4′s single workspace window contains a lot of information. The toolbar is on the top of the Xcode workspace window, and it offers a few commonly used commands for quick access. Below the toolbar, the window is divided into three main areas or sections: Navigator area on the left pane, Editor area in the center, and Utility area on the right pane. (Note that by using the default setting, the Utility area is hidden. You can show the utility view by selecting View > Utilities > Show Utilities, or clicking the Utility View button on the top-right-corner toolbar.)
The Navigator area contains a list of all the files that are being used in your project, organized by type. Whenever you need to add new frameworks, images, databases, or other files to your project, you can do so under the Navigator.
Select any .h file in the project in the Navigator area, and the contents appear in the Editor area in the center. When you select the HelloWorld application under the Navigator area (the top-level node of the tree, which also lists the iOS Build Target), the Editor area is the place to change the product information, such as the application icon, launching image, build setting, and so on.
The Utility area shows the selected file information. It’s split into two sections: on the top is the identity info, and on the bottom is the library.
Now that you have an overview of the Xcode single-window interface, let’s zoom in to the Navigator area and learn the details of the files under your HelloWorld project.
Figure 3.4 Xcode 4 in a single-window interface, which has the Navigator area on the left pane, the Editor area in the center pane, and the Utility area on the right pane


