John-Michael Kirkconnell, 2009, SCAD, 2D/3D course.
Lecture Notes
This topic explores a true hybrid character that is 2D and 3D.The contact point could have been skillfully hidden to avoid the issue of touch. We chose to show the touch/contact point because we were discussing how important touch between characters can be. However, in this topic, we will look at one character in which we want the media to be seamless. We do not want the differences in the character’s media to divert the viewer’s attention from the character’s acting.
As with everything we have encountered, there are questions that must be answered. How do we make the two media look like each other? What should we look out for? What pipeline is best to ensure registration? What method will allow for the best animation? What method will get in the way of the animator the least?
How do we Make the Two Media Look Like Each Other?
A good answer might be that we draw everything in 2D: animate the leading portion in 2D and then animate the 3D section. Then we would take the 3D render and draw over top of it in 3D. This doesn’t help our line mileage any but can certainly make for a uniform look.
Trench Note
Although this is a 3D leads example, it is an illustration of how one can animate completely in 3D and then draw over it in 2D. Here’s an old example I have in my head. Beware. If you thought I was pulling from old films before, I’m now pulling from the first thing I saw in person at Disney. Before I graduated from college, I had a chance to visit Disney Feature Animation in Florida. I was introduced to the one, let me repeat that, the one computer graphic animator. I shook his hand and was so starry-eyed. I told him the obligatory "how I really wanted to work in the industry" and "what a great thing it was that he was taking time out of his day to talk to me." He was just the nicest person, really. He worked in the "fishbowl" where the tour groups from MGM passed through on the other side of the glass ogling the artists who were working on the current production. At that point, Rob Bekuhrs was working on a 3D log crane for an animated short cartoon, Roger Rabbit’s Trail Mix Up. He played the scene on his SGI computer for me. It showed a 3D crane that came down, picked up a log, and then moved it off screen. He told me that it would be printed out and used as reference. The cleanup artists would draw overtop of it. That was my first experience with seeing production work and seeing 2D/3D in action. Here is another side note for my students. You’ll hear it said over and over again that the animation world is incredibly small. That nice guy who took time out of his crazy production schedule to entertain a starry-eyed college girl is one of the technical editors of this topic. I’ve been his biggest fan ever since that day. Thanks, Rob.
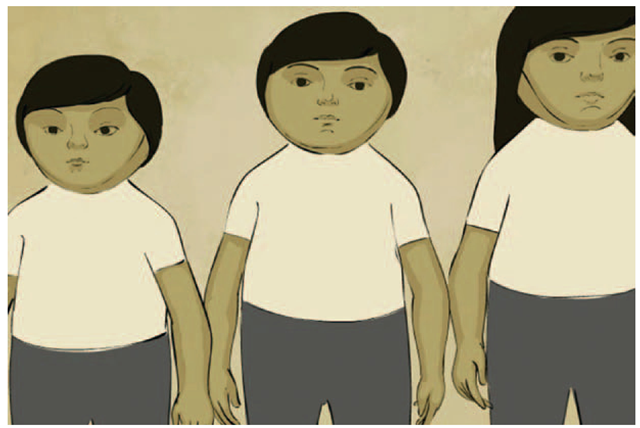
Figure 4.1 shows an example of an animation that was done in Maya then redrawn frame by frame in Photoshop. In this case, the animation was of a camera moving around the three characters. Doing the animation in 3D helped the animator to work out the perspective changes and drawing overtop in 2D gave it a nice organic feel.
FIGURE 4.1 3D animation redrawn in 2D to create an organic feel.
There are many examples of this type of line look. The Pearce Sisters by Luis Cook is an example of a hybrid animation created in 3D but drawn over in 2D (www.pearcesisters.co.uk/production .html). The resulting look is very stylized and was definitely influential to the Three Magicians shown in Figure 4.1.
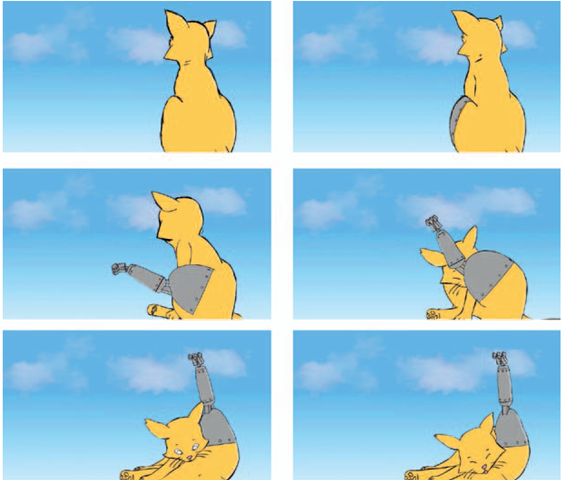
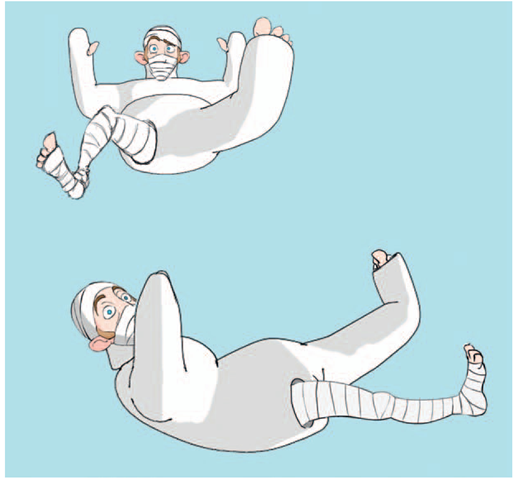
Now that toon line rendering has come so far (though it cannot completely emulate the beauty of a nice cleanup line), we can put 3D and 2D together to create hybrid characters. Later on in this topic, we will look at some industry examples of 2D/3D characters. Figure 4.2 shows a 2D/3D character from my group project class from the winter quarter of 2009. The cast itself was modeled and toon line rendered in Maya. The organic parts of the character are drawn in 2D using Photoshop.
To form a cohesive hybrid character, you will need to keep in mind the camera, lighting, shading, and movement.
Camera
The artist will want to flatten out the 3D as much as possible by using a telephoto lens (if feasible) to minimize the perspective shift of objects. This step is often overlooked as many new animators are not comfortable enough working with the camera in the 3D software. They tend to leave it at the default lens and focal distance.
Dig Deeper
If you want to learn more about cameras, read The Bare Bones Camera Course for Film and Video by Tom Schroeppel. Craig Slagel introduced me to this topic when we worked at Electronic Arts together.
FIGURE 4.2 3D body cast with 2D character.
Lighting and shading
When putting the 2D and 3D portions of the character together, we will want to minimize how rounded the 3D character looks by using flat toon shading, or, if we choose a rounded look, the 2D character portion will have to have tones on it to make it seem rounded as well.
Movement
We’ve gotten away with timing things out in 3D and basically rotoscoping the 2D on top of reference contact points. With a character led by 2D, the 3D animator will need to have access to the timing chart and x-sheet for the animation in order to see where the 3D keys should be placed and what type of spacing should be used. It is possible to proceed without x-sheets and timing charts, but doing so can cause a disjointed feel in the animation. Also keep in mind that the 2D will more than likely be on twos.
WHAT SHOULD WE LOOK OUT FOR?
When animating a 2D character that will have a 3D limb or some type of 3D appendage, make sure to draw in the placement for the limb. It will be erased at compositing time. A beginner’s mistake is to forget to sketch in where the missing limb is and thus forget to put weight on it and the like. The more information you put into your 2D animation, the more you have to follow when placing the 3D portion.
WHAT PIPELINE IS BEST TO ENSURE REGISTRATION?
When 2D leads, it doesn’t affect registration if you use 2D paper or digital 2D. There will be some time spent on scanning in the 2D paper animation, but this should not add any registration issues. Remember, we have registration issues the second we print, not when we scan. In short, 2D leading is easier on the pipeline than anything else. If there have to be any 2D animation fixes after 3D appendage animation is done, I would suggest doing it digitally. If you don’t, then you will have to go through a printing and pegging process for your 3D appendage and then you will have to rescan. Art production managers will be looking at their schedules and grimacing.
WHAT METHOD WILL GET IN THE WAY OF THE ANIMATOR THE LEAST?
When it comes to digital 2D animation, I have kept my eye out for different techniques. Recently, on a group project, we had a handful of animators working in Photoshop, Flash, and Toon Boom. We compared notes and debated on which method we liked best. I found that animators were very opinionated about the software process that they use when animating. One student and I have opposing ways of animating in Photoshop. We each tried to convince the other of the “better" way. Neither one of us has budged to the other’s method. We’ll cover different software and animation techniques. You can choose which one fits your preferred method of animation and then debate everyone else. In fact, remember to go to the website (www.hybridanimation.com) to post your findings. I have a feeling we’re just beginning these conversations.
WHAT METHOD WILL ALLOW FOR THE BEST ANIMATION?
Button pushing aside, there are other factors that are important to consider when choosing your pipeline for digital 2D animation:
1. Timing. You want the easiest method that allows you to work out your animation’s timing.
2. Playback. You need to be able to play back your animation easily, often, and at the proper frame rate.
3. Use of reference. Though when 2D leads it isn’t as important as when 3D leads, you want to be able to easily use reference images to see contact points. These can be from your 3D assets, sketches, and so on.
4. Onion skinning. It is important that the methods you use allow for pose-to-pose animation so that you can see your previous and next key while working on the pose inbetween. The method must not be cumbersome (uh oh, I’m slipping into white paper, software architecture language—“must not" “shall have").
5. Line quality. Can you draw in it? Does it slow your drawing process down? The hope is that it does not. This is the one main deciding factor in many of our group project/student project discussions. If the package you animate in doesn’t give you the final line quality you want, that is okay. You may have to add another software package to do the cleaned-up line overtop the animation.
In fact, given the specifications listed earlier of what an animator wants out of the production pipeline, it is not uncommon to have multiple software packages. For example, you might use Flash for the timing portion because of the ease of the timeline, Photoshop for the second pass at the animation and inbetweens, Toon Boom for the final cleaned-up line, and After Effects for the final composite. Now, the software I just mentioned is just an example; it is more from a student’s vantage point of the software he or she might have available. Toon Boom, however, would not normally be on a student’s computer. Students might have to stay in Photoshop for the cleaned-up line if they do not have access to non-Adobe products. Other software programs that could be used include US Animation’s Opus, Plastic Animation Paper, and CTP Pro, to name a few.
IS IT HARD TO ANIMATE A HYBRID CHARACTER?
Creating a hybrid character does add some technical challenge. You will want to have a good reason to do it. What reasons? If it supports the story by supporting your visual target and minimizes either your line mileage (how much the animator has to draw) or the complexity (perspective, lots of parts, etc.), then you have a candidate for a 2D/3D character.
The second you decide to do one character as multiple media you might find that your crew of animators cannot handle or prefer not to do both 2D and 3D. Some do, and those that do will be able to handle their shots alone. Some prefer only one medium, therefore you will have to assign two animators for one character. Did you hear an accountant just open a bottle? That does make for an expensive character. While one animator is working on the 2D portion, the other animator might have no work at his or her desk. Not an optimum situation for tight budgets.
Industry Examples
Using 2D for the character (be it traditional paper or digital) allows an artist to draw keyframes using those traditional skills that give so much personality to the character. On top of that personality, the artist is able to use 3D tools to push the character further by allowing more complex parts to be animated.
The most amazing mainstream industry examples can be found in Glen Kean’s animation of John Silver in the animated film Treasure Planet and is shown more subtly in The Triplets of Belleville, where the 2D/3D integration is invisible.
I encourage you to take a look at the bonus features on the Treasure Planet DVD. There is so much information on there that you will have to watch it many times. In fact, it is one of the best examples of a visual commentary of a DVD. You can set it up so that you watch the film and, like a built-in lecture, the film will pause at the appropriate places, play a bonus video clip on how things were made, and so on, and then resume playback of the movie. It is a classroom on a DVD.
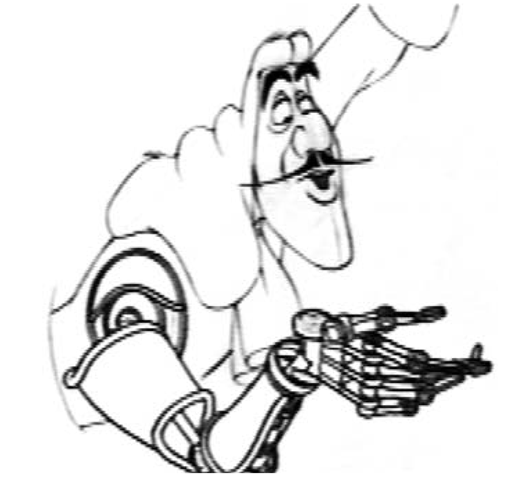
FIGURE 4.3 Pipel ine test of 3D arm with Captain Hook animation.
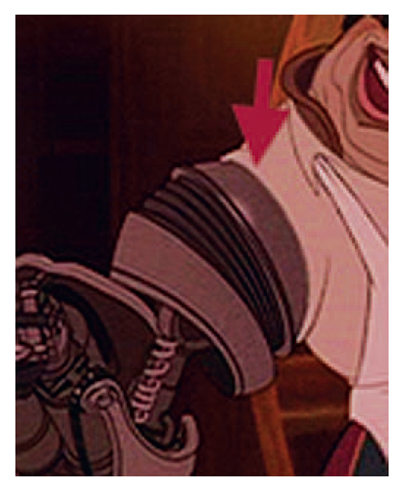
If you look at the bonus features on the DVD, you will find a pencil test of Captain Hook that has his arm replaced with a 3D arm. According to Glenn Keane in his interview, they chose that scene because it had such strong acting and vibrancy. If you watch, it should become evident that the 2D character leads. The idea of 2D leading is the same with the John Silver character. This makes sense because he is the character moving around and the arm, eyepiece, and peg leg (which are 3D) follow the 2D’s movement. The character design allows for an easy fit of the pieces together. I don’t mean to say it is easy, just that the character design does not get in the way. The arm seam, where it fits the body, is a logical seam in the drawing. If and when the 2D sleeve comes over the 3D arm, special care must be taken when compositing these together, because the 3D would be both in front of the 2D chest and behind the 2D sleeve. This would require a matte to hold out (or not show) some of the 3D arm.
FIGURE 4.4 Close up of John Silver’s arm shows a clean joining line between the two elements.
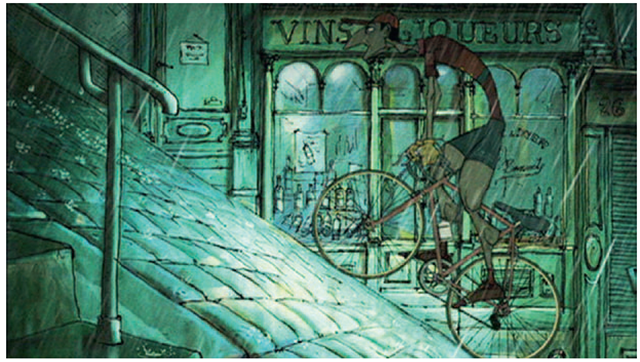
However, you might have not noticed the most invisible examples of hybrid animation. In The Triplets of Belleville, you might have missed the 2D/3D portions. You probably noticed some distinct 3D elements like the bicycle wheel, but did you see the 2D/3D character? Any time a character is riding a bicycle, the character’s contact limbs are actually 3D. The rest of the body is sometimes animated in 3D as well to use as reference. You can take a look at the bonus features on the DVD to see examples. The 3D line was dirtied up to make it less perfect in order to match the 2D line.
In Dreamworks’ Spirit Stallion of the Cimarron, you may not have noticed that the main horse is sometimes 2D, sometimes 3D. The same goes for many foreground and background characters in the film. It could be categorized as a 2D with a 3D part or a 3D with a 2D part because it is so interchanged. Buy that film and look at the extras on the DVD. From the beginning, Dreamworks had computers at the desks of the 2D artists. It was always treated just like any other tool. This showed in their films where they combined 2D and 3D seemingly effortlessly. Dreamworks eventually did transition completely to 3D for most of its films.
FIGURE 4.5 Triplets of Belleville shows a 2D/3D character with a 3D bicycle.
Students in my class, your homework is to go watch these three movies once for the story and once more frame-by-frame to see the 2D and 3D animation.
One last example that you probably are not aware of (there was no mention of it on the DVD) is the moose from Brother Bear. It might have been mentioned in the commentary. The moose were animated in 2D, and then the animators brought their 2D drawings into Maya and animated the antlers in 3D to match the 2D drawings. The drawings were printed out, pegged up, and the cleanup drawings were done traditionally on paper. I wish I had a picture of the antler rig that was made for the animators, Tony Stanley and Broose Johnson. They came to my training room one day and showed me the “make funny" button, which put Groucho Marx’s glasses and mustache on the 3D version of the moose’s head. You have to keep a sense of humor.
