Here are some of the Web sites that you can visit to access topographic maps of the United States. I cover both free and commercial sites and discuss some of their basic features. If you’re near a computer with an Internet connection, you can follow along as I step through some examples on how to display and use topographic maps on several free Web sites.
Web sites come and go, and user interfaces and site features change.
Using Maptech MapServer
Maptech (http://maptech.com) is a map and navigation software company that produces topographic, nautical, and aviation mapping products.
To showcase its map technology and sell products, Maptech hosts MapServer, the free Web service database that contains maps and the names of cities, lakes, mountains, and other features. You can visit MapServer by pointing your Web browser to http://mapserver.maptech.com.
Displaying MapServer maps
MapServer can’t read your mind to know what map you want to look at, so you first enter some search information in the upper-left corner of the MapServer Web page. For example, suppose you’re interested in looking at a map of the city of Bar Harbor, Maine. (Try the lobster ice cream if you’re ever in the neighborhood.) To display the map, follow these steps:
1. Enter Bar Harbor in the Enter City or Place Name text box.
You can also enter the ZIP code of a location (and click its Go! button) or click the Advanced Search button to find a map by either its name or its latitude and longitude coordinates.
2. Choose Maine from the Select State drop-down list box.
3. Click the Go! button.
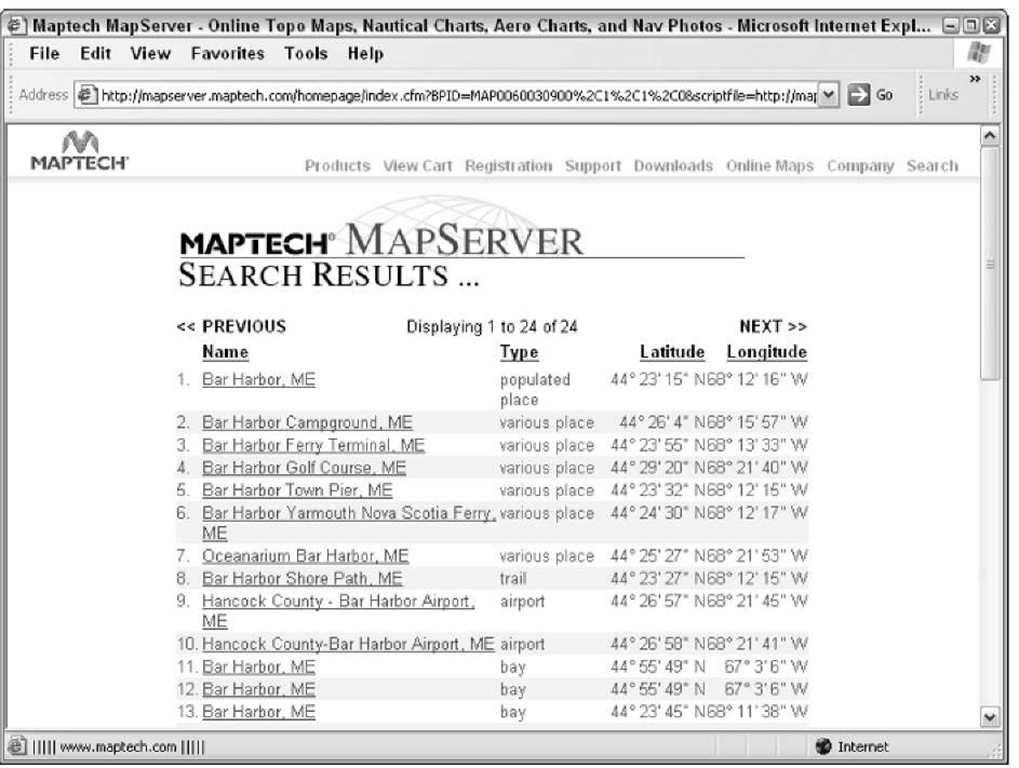
A list of places matching the place that you entered is displayed. In this case, I get 24 matches for Bar Harbor (as shown in Figure 19-1). Click the first entry for a map of the city of Bar Harbor. You know that’s the right one because it’s identified as a Populated Place (under the Type heading).
Figure 19-1:
Search for places by name, state, ZIP, or coordinates in MapSearch.
MapServer provides you with a bonus: You can also view several other types of maps. These map types appear above the map as tabs, as shown in Figure 19-2, and include
Topo Map: A United States Geological Survey (USGS) topographic map of the area
Nautical Chart: A National Oceanic and Atmospheric Administration (NOAA) nautical chart of the area (if navigable waterways are nearby)
Aeronautical Chart: A Federal Aviation Administration (FAA) aeronautical chart of the area for use by pilots
Nav Photo: An aerial photo of the area
The topographic map is displayed by default; change the display to another type of map by clicking one of the tabs. If the Nautical Chart or Nav Photo tab items are dimmed, those types of charts aren’t available for viewing.
You can print the currently displayed map by choosing Print MY MAPS from the FUN TOOLS drop-down list box (lower-left corner of the screen, under Coordinates).
Figure 19-2:
MapServer offers topographic and other map options.
Moving around in a MapServer map
After a map is displayed, you can move around in it via
Direction arrows: A series of eight red triangles surround the map. Click them to scroll the map in the direction they point.
Clicking: Clicking inside the map centers the map on the location that you click.
Viewing coordinates in a MapServer map
As you move the cursor over the map, the coordinates of the location underneath the cursor appear to the left of the map, telling you exactly where you’re located. This can be handy for finding the coordinates of a location to manually enter as a waypoint in your GPS receiver. From the menu of the Coordinates drop-down list box, you can display map coordinates in several different formats:
DMS/DM.MM/DD.DD: Latitude and longitude (degrees, minutes, seconds, or degrees and decimal minutes or decimal degrees)
UTM: Universal Transverse Mercator For the lowdown on latitude, longitude, and UTM.
MapServer displays all map coordinates using the NAD 27 map datum.
Changing a MapServer map size
You can change the size and appearance of a MapServer map three ways:
Click To Zoom: Underneath the map are a series of bars between icons of two magnifying glasses: one with a plus sign and the other with a minus sign. Click one of the bars to zoom in or out on the map. The bars closest to the plus magnifying glass zoom in, and the bars closest to the minus magnifying glass zoom out.
Scale: The Scale drop-down list box allows you to change the scale of the map. For example, a topographic map can be viewed at 1:24,000, 1:50,000, 1:100,000, or 1:250,000 scale. The larger the number to the right of the colon, the less detail there is and the more area shown. A 1:100,000 scale map is shown in Figure 19-3.
Zoom: Use the Zoom drop-down list box to change the size of the map, either showing it at 100% or reducing its size to 50% of normal. Select the size from the drop-down list box and click the Go! button. Figure 19-3 shows the same map at 50% as in Figure 19-2 at 100%.
Figure 19-3:
Map of Bar Harbor shown at 1:100,000 scale with 50% zoom.
Using MyMaps
MapServer has a unique feature — MyMaps — that lets you create and save custom maps. After you create a map, you can refer to it for future reference, e-mail it to friends, or add a link to the map on a Web site.
The MapServer Web site has a comprehensive tutorial for using MyMaps, but read along as I show you quickly how to create a custom map. Display the map you want to customize and follow these steps:
1. From the FUN TOOLS drop-down list box, choose Place an Icon.
This launches the MyMaps Wizard, which steps you through the process of building a custom map.
2. When the map in the wizard is the one you want, click NEXT.
3. Click a point on the map that you want to label with an icon.
A blue arrow pointing to that location appears.
4. Click NEXT.
5. Choose the type of symbol you want to associate with the location from the list of symbol categories; then click NEXT.
For example, if the location is for transportation, choose Transportation.
A list of icons appears for the selected symbol type. If you choose Transportation, icons of cars, planes, and other vehicles are displayed.
6. Click the icon you want to use and then click NEXT.
7. Enter a name to associate with the location; then click the Preview Name button to see the map. If you’re satisfied, click NEXT.
8. Decide whether to associate a Web site with the location:
• If you want someone to click the map location to visit a specified Web site, enter a Web site address.
• If you don’t want a Web site link, click NEXT to continue.
9. Click the SAVE TO MYMAPS button to save your map.
A new drop-down list box named MYMAPS is added to the MapServer Web page below the search boxes in the upper-right corner of the window.
A list of all the maps that you’ve created appears in the list box. Choosing a map and clicking the Go! button displays the map.
A Manage MYMAPS item in the drop-down list lets you delete a map or change its name.
MyMaps stores information about the map you’ve created as a Web browser cookie. Whenever you visit the MapServer Web site, it checks for map cookies and then displays the titles of any maps you’ve created in the MYMAPS dropdown list. Cookies apply only to the computer you used to create the maps; if you access MapServer from another computer, your MyMaps won’t appear. Maptech offers free registration on its Web site so you can log in to MapServer from any computer and have your MyMaps available.
Using GPS Visualizer
GPS Visualizer is a slick, easy-to-use Web-based mapping program, written by Adam Schneider, that allows you to upload GPS waypoints and track files to a Web site and then overlay them on topographic and other types maps.
GPS Visualizer relies on online sources that provide free topographic maps, aerial photos, satellite images, and street maps. Unlike many other sites that are limited to making maps of the United States, GPS Visualizer can create maps of Canada, Europe, and other places in the world.
GPS Visualizer has a number of powerful options for creating customized maps. In this section, I describe how to make a map using some of the Web site’s basic features. After you master the general procedure, you can experiment on your own with some of the other advanced options.
If you’d like to follow my examples, point your Web browser to www. gpsvisualizer.com. GPS Visualizer is free, but if you find it useful, the author requests a small PayPal donation as a way of saying thanks.
Before you can use GPS Visualizer to display maps, you need to install the free Adobe SVG Viewer plug-in to work with your Web browser. If you don’t already have the plug-in, you can download the viewer at www.adobe.com/ svg/viewer/install.
Downloading sample GPS Visualizer data
To demonstrate how GPS Visualizer works, I use sample GPS data available from the GPS Visualizer Web site — in this case, a GPS record of a drive down the California coast through the scenic artichoke fields. To download the data, follow these steps:
1. Click the Draw a map link on the GPS Visualizer home page.
2. Right-click and choose Save As (or Save Target As, depending on your Web browser). Click the GPX file from California link to save the sample_calif.gpx file to your hard drive.
You can input a number of different GPS data formats into GPS Visualizer, including GPX (a standardized format for inputting and outputting GPS data) and OziExplorer waypoint and track files, Geocaching.com LOC files, and tab-delimited text files.
Displaying a GPS Visualizer map
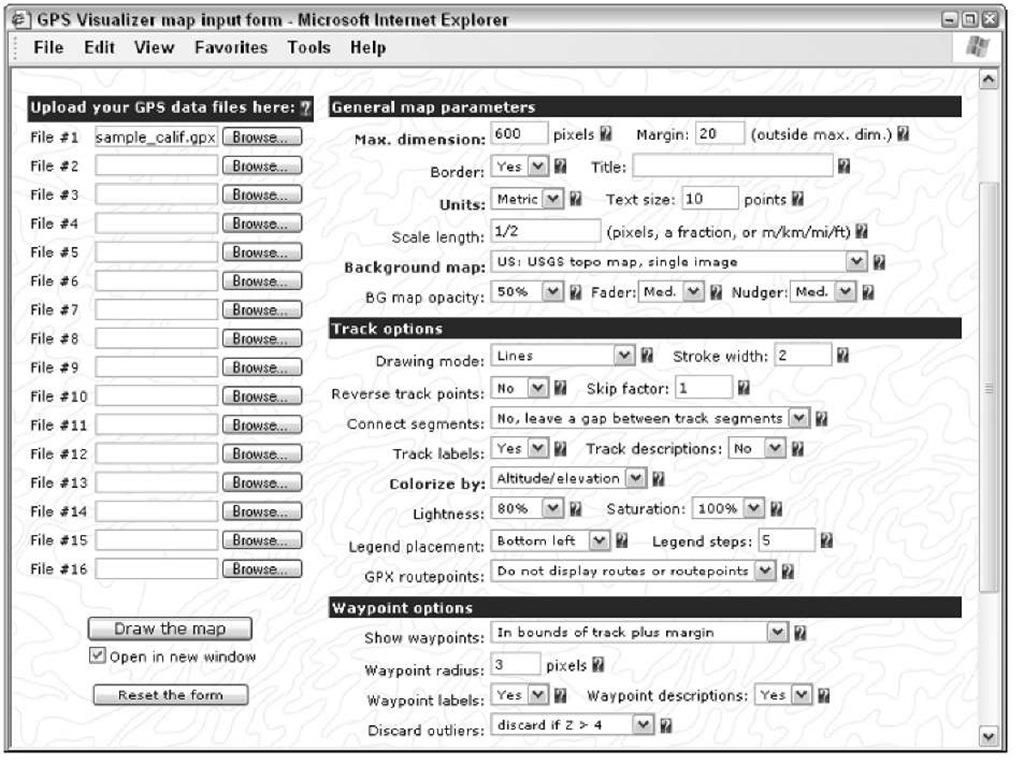
After you have some sample GPS data to use, create a map with it. The GPS Visualizer map input form page, as shown in Figure 19-4, might seem a little intimidating with all its different options. To get started making maps, you can leave most of the default settings as they are. (If you’re feeling a bit overwhelmed, click the simple version of the map form link to display just the basic input options.)
Each option has a question mark button to the right of it that you can click to display a window with more information about that option and how to use it.
Figure 19-4:
GPS Visualizer map input form page.
To display a map, you tell GPS Visualizer what GPS data you plan on using:
1. Click the Browse button next to the File #1 text box and choose the location of the sample_calif.gpx file.
See preceding step list.
2. From the Background map drop-down list box, choose US: USGS Topo Map, Single Image.
While you’re there, check out the other background map options.
3. Select the Open in New Window check box (lower left of the screen).
4. Click the Draw the Map button (lower left of the screen).
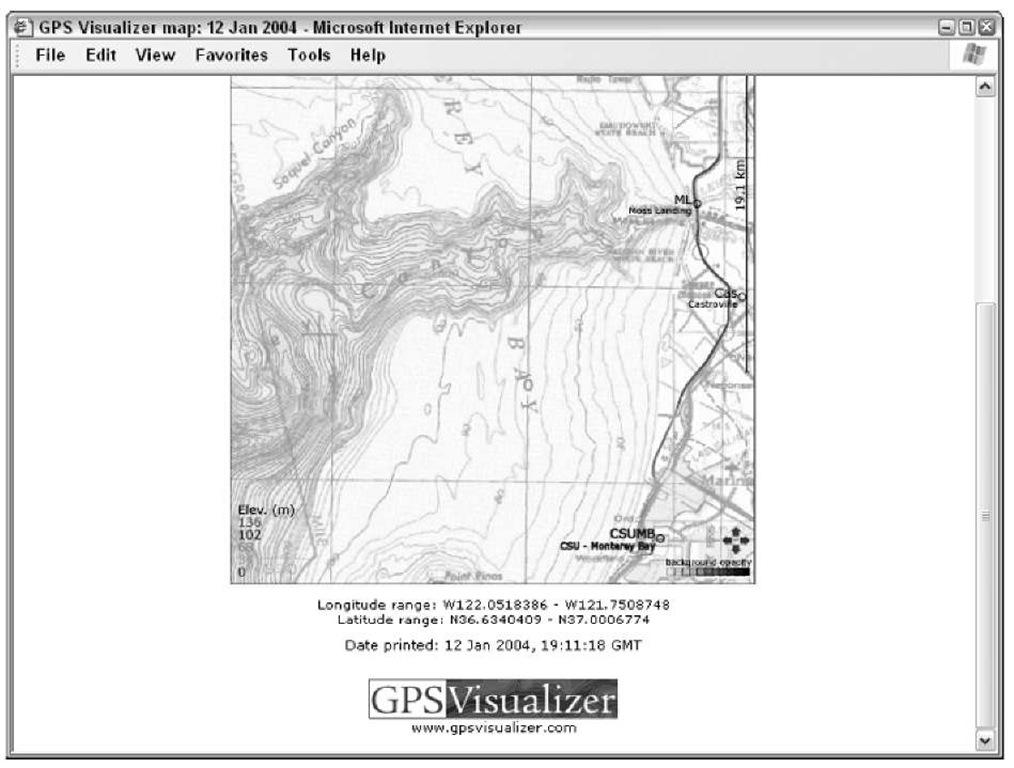
A new window shows a map with the GPS data overlaid on it (as shown in Figure 19-5). Some of the features displayed on the map include
• Waypoints: Any GPS waypoints that were included with the uploaded data are plotted on the map, identified by a circle and the waypoint name. When you move the cursor over a waypoint label, the way-point name changes color so it’s easier to see. You can also click and drag a waypoint label to move it. When you do, a line is drawn from the waypoint label to actual waypoint location. This is useful if the waypoint label obscures something you want to see on the map.
• Tracks: The GPS track data showing the travel route is drawn on the map. By default, GPS Visualizer shows the elevation for different segments of the track path in different colors; note the legend at the bottom of the map with what the different colors mean. When you create a map, you can have other data (such as speed, heading, or slope) displayed in color on the track path.
• Background opacity: At the bottom of the map is a series of small rectangles that let you fade the background map image. Click one of the rectangles to set how faded you want the background map to appear. The rectangle on the far right displays the map in full color. The rectangle on the far left fades the map completely to white (so it isn’t visible). Fade the background map to better see the colors of your track log and waypoints.
GPS Visualizer can show an elevation profile based on track data. Click the Draw a profile link at the top of the Web page to use this feature.
TerrnSeVer-USA
TerraServer-USA is a popular Web site that provides free USGS topographic maps and aerial photos of the United States. Nearly all the commands used for viewing aerial photos also apply to displaying topographic maps. Visit the Web site www.terraserver-usa.com.
Figure 19-5:
A GPS Visualizer map display with overlaid GPS data.
Commercial topographic Web map sites
Several commercial Web sites sell digital topographic maps as well as allow potential customers to view some of their maps for free (to get a hint of what their for-fee services are like). All these sites tend to have a similar business model, offering
Printed maps: You can buy printed copies of maps you view online.
Subscriptions: On some sites, you can view only certain types of free maps; to access other maps, you pay a subscription fee. Additionally, some sites offer different levels of services. For example, for an extra fee, you might get premium services, such as
• Downloading maps you can use with PC map programs
• Creating custom maps
• Uploading GPS data to use with Web-based maps
The cost of subscription services tends to be comparable or less than the prices of commercial mapping programs that you run on your PC.
When it comes to commercial topographic map Web sites, you’re paying for convenience in accessing and using the maps online as well as having a number of different types of maps available in a single place. Although some of the same services are available for free elsewhere on the Internet, commercial map Web sites are priced reasonably enough that you can try them to see whether they meet your needs.
These popular commercial map sites, along with some screenshots, give you an idea of what it’s like to use the online maps with your browser.
TopoZone
TopoZone, the first interactive Web mapping site on the Internet, provides a comprehensive collection of digital topographic maps and aerial photos for the United States. Any Internet user can freely search for and view USGS topographic maps; a screenshot of accessing a map with TopoZone is shown in Figure 19-6. For a yearly subscription fee of under $50, the TopoZone Pro service offers access to aerial photos, street maps, downloading USGS Digital Raster Graphics map, and other enhanced features. To read more about TopoZone, go to www.topozone.com.
Figure 19-6:
Use TopoZone to view a Web topographic map.
MapCard
MapCard is a commercial Web map site oriented toward outdoor recreation users; the site was named the best new product of 2003 by Backpacker Magazine. The Web site offers topographic maps, aerial photos, lake depth charts for fishing, and tools for creating custom maps; Figure 19-7 shows a screenshot of a map displayed with MapCard. Although MapCard doesn’t directly offer free online maps (a yearly subscription is under $30), the site does have a free "test drive" with which you can download maps and try out the subscription services for a single day. You can visit MapCard at www. mapcard.com.
MyTopo
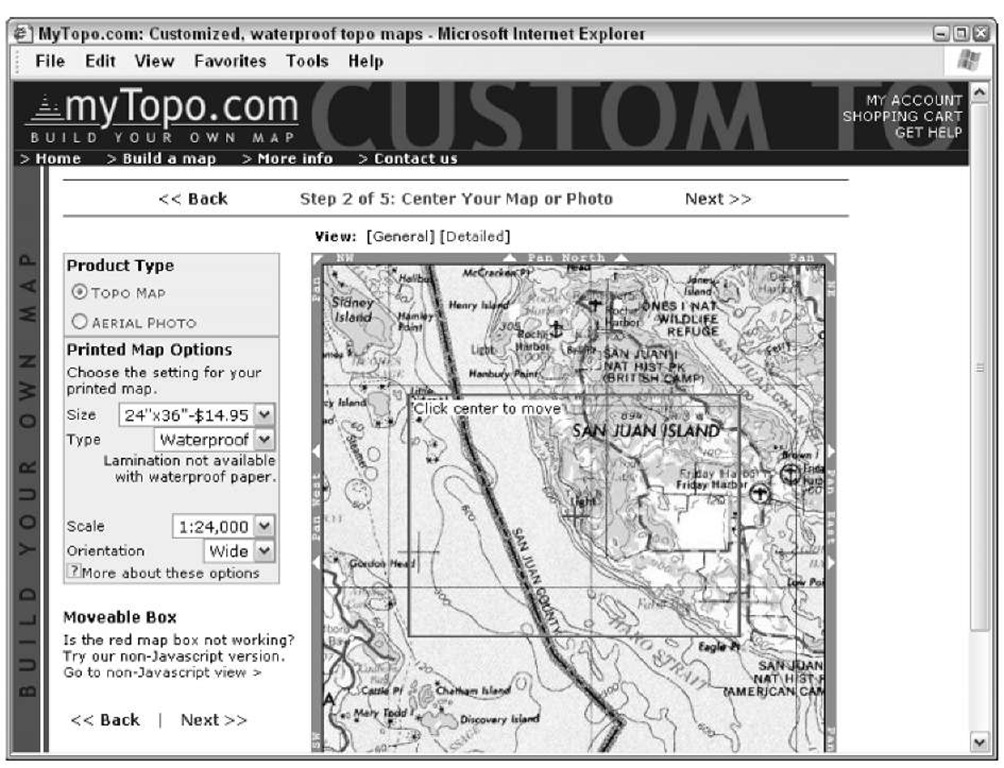
MyTopo is a commercial Web site for creating custom USGS topographic maps or aerial photos; a screenshot of using the site is shown in Figure 19-8. You select a location you want to view (either by place name or coordinates), and MyTopo displays the map or photo. You customize the map by setting its size, selecting a portion of the map to display, and naming the map. A preview copy of the map as it will be printed is displayed. You can then order a copy of the map in several different sizes on waterproof or glossy paper.
Figure 19-7:
Access an online map with MapCard
Figure 19-8:
Use MyTopo to create a topographic map.


